background image


User Manual    Rev 1.0 


25 

7. 

Getting started and OSD operation 

This chapter provides an overview of connecting the monitor to a computer, and then 
describes the OSD. 

7.1. Getting 

started 

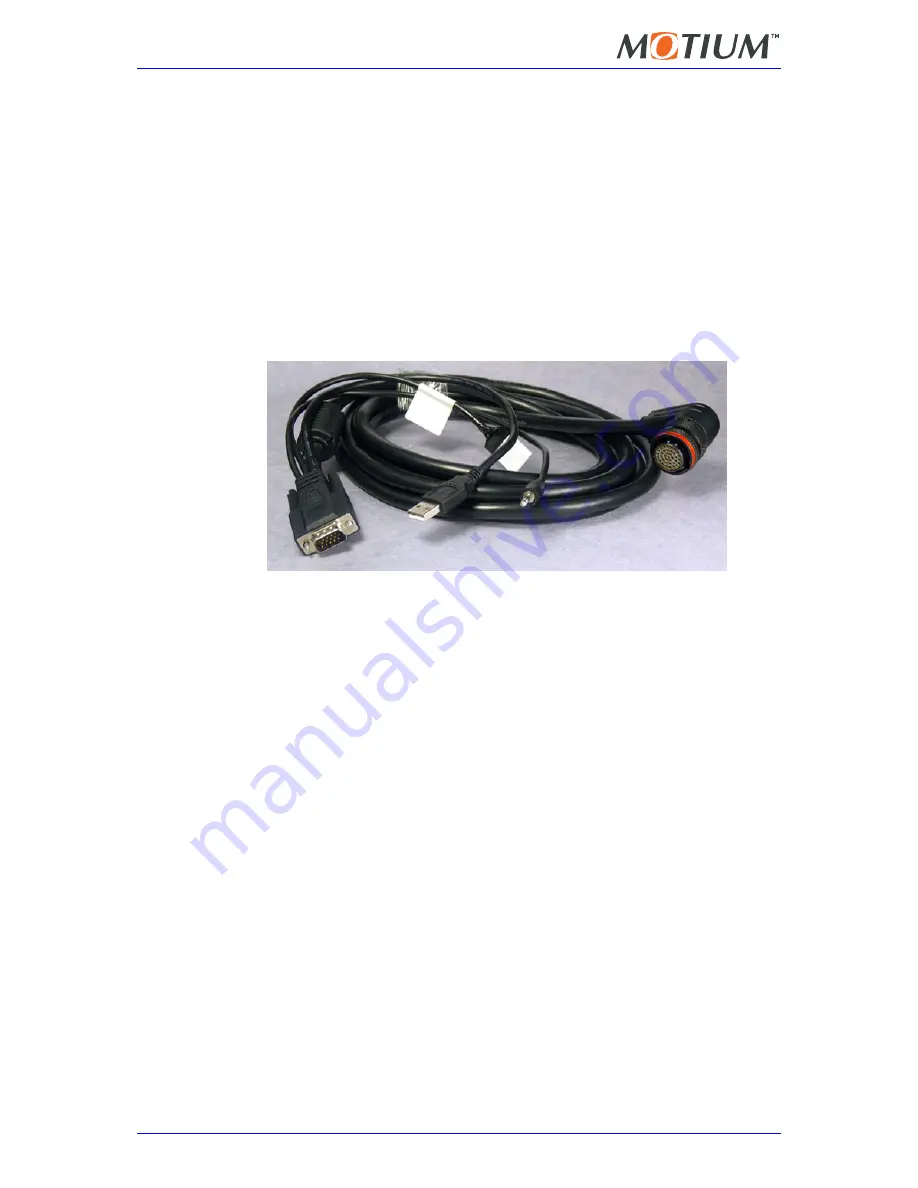
This section assumes that the Monitor Power and Signal Cable being used has standard 
PC-compatible connectors on one end (as opposed to a custom connector), as shown in 
the photograph below. 


Figure 6. 

Photograph of a typical Monitor Power and Signal Cable, with 
standard PC-compatible connectors (DB15 for video, USB for 
touch screen and 3.5mm for audio).  It also has a 4-pin 3.96mm 
Socket for DC power. 

 
The monitor can be used with any computer that has a standard VGA-compatible video 
output.  To get the monitor working: 


Plug the Monitor Power and Signal Cable into the connector on the monitor’s rear 
panel.  The connector is polarized, so can only be plugged in one way. 


Video:  Plug the DB-15 connector (on one end of the Monitor Power and Signal 
Cable) into the PC. 


Touch Screen:  Plug the USB (or RS232) connector into the PC.  If a USB 
interface is being used, the USB connector should only be plugged into the PC 
AFTER the touch screen driver has been installed – otherwise the driver may not 
install correctly. 


Audio:  Plug the 3.5mm connector into the PC’s speaker output. 


Power:  Connect DC power to the power connector. 


Turn the power supply on.  Press the monitor’s Power On/Off button, to turn the 
monitor on. 


Now turn the PC on. 


You should see the PC boot screens, etc. 


For best video performance, set the PC’s output video resolution to 1024x768 at 60Hz. 
 

Содержание MLC-1010

Страница 1: ...www motium com MLC 1010 26cm 10 4 TUFF VIEW LCD Monitor User Manual Revision 1 0 ...

Страница 2: ...ty is given in relation to any advice or information contained in this document and no responsibility for any loss or damage whatsoever arising in any way for any representation act or omission whether express or implied including responsibility to any person by reason of negligence is accepted by Motium Pty Ltd Motium or any officer agent or employee of Motium Motium reserves the right to alter t...

Страница 3: ...3 4 Rear view 14 4 Connector pin assignments 15 4 1 Connector type 15 4 2 Pin assignments 15 4 3 Cable information 18 5 Installation considerations 19 5 1 For your safety 19 5 2 Input voltage wiring 19 5 2 1 Reverse polarity protection 20 5 2 2 Transient protection 20 5 2 3 Input fuse considerations 20 5 3 Environmental Factors 20 5 3 1 Temperature 20 5 3 2 Humidity 20 5 3 3 Altitude 20 5 3 4 Outd...

Страница 4: ... 3 Brightness and Contrast 28 7 4 4 Colour 28 7 4 5 Position 29 7 4 6 Tools 29 7 4 7 Exit 30 8 Touch screen operation 31 8 1 Driver CD 31 8 2 Touch Screen driver 31 8 3 Touch screen operation 32 8 3 1 Right mouse button on the touch screen 32 8 4 Touch screen calibration 33 8 4 1 4 point calibration 33 8 4 2 9 point calibration 33 8 4 3 25 point calibration 34 8 4 4 Draw test 34 8 5 On screen keyb...

Страница 5: ...e company or other party is authorised to change modify or extend the terms of this Limited Warranty in any manner whatsoever Motium reserves the right to make changes or improvements to any product without incurring any obligation to similarly alter products previously purchased Limitation of Liability In no event shall Motium Pty Ltd be liable for any defect in hardware software loss or inadequa...

Страница 6: ...6 MLC 1010 TUFF VIEW LCD Monitor This page left blank intentionally ...

Страница 7: ...ts Use a damp cloth 3 Dropping the monitor or letting it fall could cause damage and void the warranty 4 Make sure the voltage of the power source is correct before connecting power to the monitor 5 Position the monitor s Power and Signal Cable so that people cannot step or trip on it Make sure the cable is not under strain i e has some slack when it is connected 6 All cautions and warnings on the...

Страница 8: ...8 MLC 1010 TUFF VIEW LCD Monitor This page left blank intentionally ...

Страница 9: ...water or even sprayed at a distance with high pressure water hoses All connectors are also IP65 sealed The MLC 1010 has been designed for operation in continuous vibration environments and to cope with shock A 75mm VESA mount allows industry standard in vehicle mounting hardware to be used The touch screen interface supports both USB and RS232 allowing operation with long cable runs An internal sp...

Страница 10: ...l list of ordering options refer to Motium s web site or contact your local reseller or Motium sales office Note that the Monitor Power and Signal Cable is ordered separately This is because of the large variety of options for this cable Refer to Motium s web site for the cable options 2 4 Specifications Detailed specifications are listed in Appendix A 2 5 About this manual This manual is written ...

Страница 11: ...r this cable Refer to the product page on Motium s web site to see the standard length cables available 3 1 1 Inspection Remove all items from the box If any items listed on the purchase order are missing notify your supplier immediately Inspect the product for any damage If there is damage notify your supplier immediately 3 1 2 Packaging After opening the box you might want to save the packing ma...

Страница 12: ...uch screen In front of the touch screen is a layer of replaceable protection film This protects the touch screen from damage such as scratching Refer to Chapter 6 Care and Maintenance for more information Keypad This is described in section 3 3 1 Keypad functions Speaker This is for audio from the PC Microphone This is an option It allows audio around the monitor to be recorded Speaker Keypad Micr...

Страница 13: ...ghtness setting has a direct impact on power consumption The lower the backlight brightness the lower the power consumption Refer to section 5 5 Power consumption for power consumption figures In OSD mode these buttons are used to navigate through the menus and adjust values up and down Status Indicator LED It indicates the following When green a valid video signal is being received When amber and...

Страница 14: ...polarised and protected from misalignment so the pins cannot be damaged during mating The cable end can be straight or right angle 75mm VESA Mount The monitor can be attached to a standard VESA bracket We suggest using M4 screws with a 12mm thread length maximum 14mm of thread assuming the mounting plate on the VESA bracket is 2mm thick Cable Clamp This allows the Monitor Power and Signal Cable to...

Страница 15: ...re the monitor is water and dust proof when the connector is not mated The mating part i e the female connector on the cable is Connector model number AS614 35SN 090 Crimp socket number 38943 22 Suitable for 22 to 26 AWG wire Filler plug number 600300 22 These components are available from Motium as a kit 4 2 Pin assignments The figures below show the front and rear views of the cable side connect...

Страница 16: ...of the coax If using individual wires run in a twisted pair with BLUE GND 9 VGA GND This is the ground wire in the standard DB15 VGA connector It is the return signal for the HSYNC VSYNC and DDC signals 10 HSYNC Horizontal Synchronisation signal For best performance run in a twisted pair with VGA GND 11 Audio GND Audio ground This is the ground return signal for speaker and microphone optional aud...

Страница 17: ...power return ground 29 reserved 30 reserved 31 reserved 32 V Bus USB 5V No power is taken from this signal but the voltage must be present for the monitor to detect that it is connected to a USB port 33 RS232 Tx RS232 Transmit Data output This connects to the PC s Receive Data in signal pin 2 on the PC s DB9 connector 34 RS232 Rx RS232 Received Data input This connects to the PC s Transmit Data ou...

Страница 18: ...be run in a twisted pair For very long cable runs 5 meters ideally audio should be in a shielded coaxial wire Fit a ferrite bead around the PC end of the cable to minimise EMI from the PC Use a cable with an outer shield and connect this shield to the monitor s Frame GND pin and frame ground on the PC s DB15 and DB9 or USB connectors For best performance the RGB signals should be run in coaxial wi...

Страница 19: ...e product should NOT be connected to voltages above 40 VDC Internal protection circuitry will prevent damage from transient voltages Prolonged high or transient voltages applied to the unit may cause external fuses or the internal safety fuse to blow Observe environmental ratings Unsuitable ambient conditions and improper installation mainly due to high ambient temperature and insufficient ventila...

Страница 20: ...se current rating vs ambient temperature if the monitor is going to be used at the extremes of the its temperature range 5 3 Environmental Factors 5 3 1 Temperature The monitor should not be exposed to ambient temperatures above 65C while operating at maximum brightness Doing so might overheat the liquid crystal and clear the LCD panel this will permanently damage the liquid crystal cells in the L...

Страница 21: ...artment of a vehicle consideration needs to be given to the local laws Some things to consider are Obstruction of drivers viewing area Driver and passenger safety in case the vehicle is involved in an accident This includes considering obstruction of air bags Robust mounting Even though the monitor is light the forces involved during an accident or during rapid acceleration or deceleration can be ...

Страница 22: ...g power consumption One of the best ways to minimise power consumption is to turn off the LCD panel and it s backlight when the display is not needed To do this in Windows XP it is similar in other operating systems From the Windows Start menu select Control Panel Then double click on the Display item Select the Screen Saver tab Press the Power button Set Turn off monitor to a suitable period of t...

Страница 23: ...hed when operators have sand or metal filings on their fingers or where there is a chance operators will use sharp objects such as screwdrivers The film needs to be replaced when its surface is damaged scratched and it becomes difficult to read the monitor The film is placed approximately 1mm in from each edge of the plastic case To remove the film lift one corner using something made of soft plas...

Страница 24: ...24 MLC 1010 TUFF VIEW LCD Monitor This page left blank intentionally ...

Страница 25: ...ideo output To get the monitor working Plug the Monitor Power and Signal Cable into the connector on the monitor s rear panel The connector is polarized so can only be plugged in one way Video Plug the DB 15 connector on one end of the Monitor Power and Signal Cable into the PC Touch Screen Plug the USB or RS232 connector into the PC If a USB interface is being used the USB connector should only b...

Страница 26: ... are 64 levels When one of the buttons is pressed the backlight brightness setting is displayed on the LCD Figure 7 Backlight brightness level on screen display These buttons control the actual brightness of the backlight it does not do a colour shift which is how most LCD monitors work The brightness setting has a direct impact on power consumption The lower the backlight brightness the lower the...

Страница 27: ...ss the brightness Up and Down buttons to adjust the setting up and down Once the desired level is reached press the Menu button again to exit the OSD To exit the OSD select the exit item or wait a few seconds while not pressing any buttons 7 4 2 OSD top level menus Going from left to right in the photograph below the OSD menu tabs are Input Selection This allows selection between a VGA or DVI vide...

Страница 28: ...tio of each pixel Colour Control This allows individual adjustment of the red green and blue colours Exit Figure 9 Brightness and Contrast adjustment 7 4 4 Colour The options under the Colour menu are Auto adjust colour This automatically adjusts the colour settings for the incoming picture sRGB display Loads the sRGB colour profile Colour temperature Sets the monitor s colour profile to one of th...

Страница 29: ... or right on the screen Move the image up and down on the screen Exit Figure 11 Position adjustment 7 4 6 Tools The options under the Tools menu are OSD setting Reset all settings to factory defaults Reset colour to factory defaults Reset image position on screen to factory defaults Sharpness Not used Exit Figure 12 Factory reset ...

Страница 30: ...30 MLC 1010 TUFF VIEW LCD Monitor 7 4 7 Exit This exits the on screen display Figure 13 Exit OSD ...

Страница 31: ...nto the computer If the touch screen is connected to the PC via the RS232 interface the RS232 connector can be plugged into the computer at any time 8 1 Driver CD Drivers are available from Motium s web site To minimise environmental waste Motium does not ship a Driver CD with the product Note The name of the driver file listed below is correct at the time of writing this manual The name may chang...

Страница 32: ...n looks like a digitizer tablet To the software the touch screen looks like a mouse When you press a location on the touch screen using the end of your finger or a stylus the mouse pointer jumps to that location If you press and hold in one spot and then drag your finger or the stylus this is the same as holding down the left mouse button and moving the mouse i e a region is selected Double tappin...

Страница 33: ...ity to bring up the Touchkit Configuration Window This allows access to all the Touchkit touch screen configuration functions This can also be accessed via the Windows Start Menu by Start All Programs Touchkit Configure Utility The 4 point calibration function resides under the Tools tab When the calibration utility starts it fills up the entire screen with a white background and a circle with cro...

Страница 34: ... the calibration accuracy i e the relationship between the postion touched on the touch screen and where the operating system thinks the touch occurred 8 5 On screen keyboard It is possible to run the PC without a keyboard Often some keyboard entry is still required This can be achieved by using a soft keyboard This is a keyboard which is displayed on the screen A keyboard can be plugged into a co...

Страница 35: ...atically scales the input signal Input vertical frequency 60Hz and 70Hz 60Hz is recommended Configuration On Screen Display OSD includes Brightness Contrast Ratio H position V position Clock Phase and Colour Balance User Interface Monitor controls Front panel buttons are Power On Off Backlight Brightness Up and Down OSD menu OSD menu controls On Screen Display OSD menu control buttons are Menu Sel...

Страница 36: ...uch Screen driver software Calibration Fast 4 point position Compensation Accuracy 9 point and 25 point linearity position Edge compensation Draw test Position and linearity verification Controller setting Support multiple controllers Dynamic add remove controllers Change controller interface without reboot Languages Supports 10 languages for Windows Mouse emulator Right and left button emulation ...

Страница 37: ...g 20 C to 65 C Storage 20 C to 80 C Humidity 10 to 90 RH non condensing Sealed IP65 and NEMA 4 water and dust for the entire unit Certification C tick Other certifications available on request Power Power supply Input voltage range 9V DC to 34V DC Power Consumption 11W maximum Digital input The monitor has a digital input for power on and off control This input is different to the Power On Off but...

Страница 38: ...38 MLC 1010 TUFF VIEW LCD Monitor This page left blank intentionally ...

Страница 39: ...User Manual Rev 1 0 39 B Appendix B Dimensions The following page A3 size shows a dimension drawing for the MLC 1010 monitor ...

Страница 40: ...40 MLC 1010 TUFF VIEW LCD Monitor This page left blank intentionally ...

Страница 41: ...F G H A B C D E F G H A B C D E F A B C D E F All dimensions in MM Scale Not to scale Front Side and Rear Views T UFF V IEW LCD Monitor MLC 1010 26cm 10 4 inch 224 3 263 75 75 94 5 39 50 87 41 4 18 1 TU FF VI EW ...

Отзывы: