background image

B-14          REGULAR INSPECTION

8.

CLEANING THE FANS 

<Battery position>

Electrical cabinet

Machine side cover

Hydraulic pump

<Cleaning interval>

Every 1000 hours of operation

<Procedure>

1) Turn off the power. 

2) Remove the fan cover.

3) Blow the fan with compressed air.

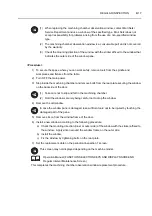
The temperature inside the cabinet must be lower than 45

°

C; measure the temperature 

periodically.

If it is higher than 45

°

C, check the ambient temperature, cooling fan, etc.  Eliminate the cause of 

the high temperature.

Содержание MSC-500

Страница 1: ...able NC Unit MSC 500 MSX 511 MSC 801 MSG 500 MSX 511III MSC 802 MSX 500 MSC 515 MSC 803 MSX 500III MSD 515 MSG 803 MSC 501 MSC 516 MSX 803 MSD 501 MSD 516 MSX 803III MSD 501II MSD 516II MSG 805 MSG 50...

Страница 2: ...these points before using the machine Mori Seiki will not be liable for any damages occurring as a direct or indirect consequence of using the machine without clarifying these points All rights reserv...

Страница 3: ...CONTENTS SIGNAL WORD DEFINITION FOREWORD A DAILY INSPECTION B REGULAR INSPECTION C OUTLINE OF SYSTEMS INDEX HOW TO ORDER THE MACHINE PARTS...

Страница 4: ...n minor or moderate injury or damages to the machine The information described following the caution symbol must be strictly observed Other symbols Indicates the items that must be taken into consider...

Страница 5: ...Operating the machine outside the machining range 3 Improper use of a workpiece holding device or peripheral 4 Using the machine with interlocks or machine protection covers removed or while the machi...

Страница 6: ...CHAPTER A DAILY INSPECTION...

Страница 7: ...ANING MACHINING CHAMBER SETUP STATION A 8 6 1 Cleaning the Front Cover of the Spindle A 8 6 2 Cleaning the Front Cover of the Tailstock with Built in Tailstock Spindle A 9 6 3 Cleaning the Slideway Pr...

Страница 8: ...y the operator and inspection by maintenance personnel at regular intervals maintain the accuracy of the machine over the long term If an abnormality is discovered during daily inspection it must be r...

Страница 9: ...r joints in the machine construction or chips Take care not to touch chips tools fixtures workpieces or the structural parts of the machine with bare hands Wear appropriate protective gear for each ki...

Страница 10: ...ose the machine door after entering the machine it may not be possible to open the door from the inside If the machine model used is equipped with a door lock prevention mechanism take the door lock p...

Страница 11: ...ers refer to the OILING CHARTS and the Oil Recommendations in the MAINTENANCE INFORMATION published separately 3 1 Storing Oil If obtaining large amounts of oil for storage observe the following point...

Страница 12: ...ENANCE INFORMATION published separately 4 2 Supplying Coolant to the Coolant Tank If the coolant level drops an insufficient amount of coolant is supplied to the cutting tool If cutting is continued u...

Страница 13: ...he chuck causing injuries and machine damage Apply grease to the master jaws at least once a day before starting the day s operation Procedure 1 Stop the spindle 2 Turn off the power 3 Supply grease f...

Страница 14: ...the spindle speed Example SL 25MC Chuck HOIMA10A6 Howa Cylinder HH4C 125 Howa The diagram above is for reference purposes only The actual gripping force will vary depending on the machine model chuck...

Страница 15: ...ning the Front Cover of the Spindle Dust and foreign matter will accumulate in the coolant holes on the front cover of the spindle allowing coolant to enter the bearings This will cause the bearings t...

Страница 16: ...pressed air is used dust and foreign matter will enter the bearings 6 3 Cleaning the Slideway Protection Covers During dry cutting or when machining cast workpieces carefully remove chips from the mac...

Страница 17: ...If chips are left to accumulate coolant will overflow and spill onto the shop floor Coolant will flow into the hydraulic oil tank via the cylinder drain inhibiting proper machine operation Procedure 1...

Страница 18: ...o prevent deterioration of the coolant due to mixing of lubricating oil 1 Because impurities are contained in the drain oil do not reuse the oil in the lubrication tank Always use fresh lubricating oi...

Страница 19: ...lure Clean the radiator at regular intervals Cleaning interval As required Necessary tools Air gun Procedure 1 Turn OFF the main power 2 Remove dust adhering to the radiator with a compressed air gun...

Страница 20: ...eyor 2 The chip conveyor cannot discharge all types of chips Carefully consider appropriate cutting conditions to generate chips which can be removed from the machining chamber WARNING 1 Do not operat...

Страница 21: ...Press the CHIP CONVEYOR BACK button The BACK button is illuminated Keep pressing the BACK button The chip conveyor moves backward to discharge chips and rags out of the machine only when the button i...

Страница 22: ...trical cabinet door with the main power ON 2 Insert the key into the keyhole below the lever on the electrical cabinet 3 Turn the key to release the electrical cabinet door lock The lever is pushed ou...

Страница 23: ...of the electrical cabinet door 3 Rotate the lever downward 4 Push the lever inward 5 Turn the key below the lever to lock the door 6 Pull out the key The customer is responsible for supervising usage...

Страница 24: ...blished separately for details on turning the power ON and OFF How to Lock the Main Power Switch Lock the main power switch using the following procedure when performing maintenance procedures conside...

Страница 25: ...the direction of arrows attach a padlock Type D 1 Place the main power switch in the OFF position 2 Put a driver into the release screw When the release screw is not prepared just pull out the lock p...

Страница 26: ...ime 1 Forced lubrication of ball screws and spindle bearings 2 Full stroke travel of all axes 3 Spindle warm up Prolonged period of time Two days or more Forced lubrication of ball screws and spindle...

Страница 27: ...CHAPTER B REGULAR INSPECTION...

Страница 28: ...alve B 11 6 4 1 Relief Valve Disassembly B 11 6 4 2 Relief Valve Cleaning B 11 6 4 3 Relief Valve Adjustment B 11 7 CLEANING THE SUCTION STRAINER IN THE HYDRAULIC OIL TANK B 12 8 CLEANING THE FANS B 1...

Страница 29: ...B 30 14 2 2 Type 1 Lithium Battery B 31 14 2 3 Type 2 B 33 14 2 4 Type 3 2CR5 Type Lithium Photo Battery B 35 14 2 5 Type 4 B 36 15 ADJUSTING THE SETTING PRESSURE B 38 15 1 Adjusting Hydraulic Unit Ma...

Страница 30: ...with the instructions of operators who are in charge of daily inspection 3 For queries or concerns related to the contents of the instruction manuals circuit diagrams and ladder diagrams contact Mori...

Страница 31: ...ey prevents the door from closing by mistake 3 Ensure that the main power is turned OFF and locked when connecting the power 4 Provide clear warning that the machine is being maintained and operations...

Страница 32: ...hock WARNING 1 Machine operators and authorized personnel working inside the plant and in the vicinity of the machine must put their clothing and hair in order so that there is no danger they will be...

Страница 33: ...njured WARNING 4 When two or more people are involved in maintenance work they must cooperate carefully communicating as fully as possible If one worker moves the machine without noticing that there i...

Страница 34: ...he air suction port is clogged the inside of the electrical cabinet will not be cooled satisfactorily Cleaning interval Every 50 hours of operation Procedure 1 Turn off the power 2 Remove the filter c...

Страница 35: ...published separately Procedure 1 Press the coolant switch off to stop coolant supply 2 Turn off the power 3 Loosen the connector and remove coolant motor pipe and wiring 4 Remove the drain plug and d...

Страница 36: ...box c Remove the tank Take care not to spill lubricant when removing the tank 3 Clean the inside of the lubricating unit tank using a neutral detergent 4 Remove the suction filter from the suction por...

Страница 37: ...ome entangled resulting in serious injury 8 Use only kerosene for cleaning the lubricating oil tank and the fill port filter Do not use volatile fluid such as gasoline or thinner No Inspection Item Co...

Страница 38: ...bricant pressure does not rise The lubricating unit may be malfunctioning When the lubricant pressure rises The piping or the distributor may be malfunctioning Refer to the following table to solve th...

Страница 39: ...B 10 REGULAR INSPECTION Line filter discharge outlet plug insertion point Manual lubrication button Suction filter Line filter piping Relief valve...

Страница 40: ...e relief valve replacement is necessary Cover the tapered threaded section with seal or sealing tape Following disassembly and cleaning of the relief valve press the manual lubrication button to bleed...

Страница 41: ...lure Clean the suction strainer at regular intervals Cleaning interval Every 1000 hours of operation Necessary tools Spanner monkey wrench Kerosene for cleaning Compressed air gun Procedure 1 Turn OFF...

Страница 42: ...form dust or foreign matter those who are wearing glasses included d Apply sealing tape to the threaded section of the suction pipe and reattach the suction strainer 7 Clean the inside of the tank wit...

Страница 43: ...Every 1000 hours of operation Procedure 1 Turn off the power 2 Remove the fan cover 3 Blow the fan with compressed air The temperature inside the cabinet must be lower than 45 C measure the temperatu...

Страница 44: ...oards or other electronic components could cause machine malfunction Clean the inside of the electrical cabinet at regular intervals Cleaning interval Every 1000 hours of operation Procedure 1 Turn of...

Страница 45: ...as made to the window even though the window may appear unaffected Once a window has been subjected to a strong impact the strength of the window will decrease remarkably 3 Due to the hardness of the...

Страница 46: ...e backside of the door 1 Take care not to slip and fall in the machining chamber 2 Hold the window securely being careful not to drop the window 4 Remove the old window In case the window pane is dama...

Страница 47: ...ttention to abnormal wear on the lip or scratches or damage due to chips If you find any abnormality on a slide seal replace it immediately Before changing the slide seals clean the inside of the mach...

Страница 48: ...Mori Seiki Service Department for assistance when replacing timing belts Replacement Interval Once every 5 years Stop machine operation immediately and contact the Mori Seiki Service Department for as...

Страница 49: ...to avoid clogging which will lower the pump flow rate Changing interval Every 1000 hours of operation Procedure 1 Turn OFF the main power 2 Remove the fill port cap 3 Place a drain pan beneath the dra...

Страница 50: ...PECTION B 21 8 Replace the fill port cap 9 Turn ON the main power 10 Confirm pump pressure and suction noise are normal If the suction noise is louder than prior to oil replacement check the oil level...

Страница 51: ...refer to the MAINTENANCE INFORMATION published separately Battery to be used Type NC Unit Memory Back up Battery Absolute Position Sensing Battery Type 1 MSC 515 Alkaline battery Manganese battery 2 p...

Страница 52: ...pe 2 MSC 803 1 Electrical cabinet side Battery unit 1 set E30027 ER6 BKO NC2157H01 Operation panel side Battery unit 1 set E03031 ER3V Battery unit 1 set E30028 ER6 B4D 01 MSG 803 Battery unit 1 set E...

Страница 53: ...ry card Mori Seiki can accept no responsibility if data in the memory such as parameters and programs is lost Battery position The batteries are installed in the electrical cabinet door or the rear co...

Страница 54: ...the danger of lost data you are recommended to save the memory data to an external I O device Mori Seiki does not have any responsibility for the loss of memory data Battery position The batteries ar...

Страница 55: ...y in less than 30 minutes The data stored in the memory will be lost if the power supply is shut off for 30 minutes or more To avoid the danger of lost data you are recommended to save the memory data...

Страница 56: ...off 4 Turn off the power 5 Open the operation panel door 6 Remove the connector attached to the battery Do not pull the battery cable 7 Hold the battery by hand and loosen screw A 8 Remove the battery...

Страница 57: ...o responsibility if data in the memory such as parameters and programs is lost Battery position The batteries are installed in the electrical cabinet door Changing interval Once a year When the batter...

Страница 58: ...in the memory such as parameters and programs is lost Battery position The batteries are installed in the electrical cabinet door Changing interval Once a year When the battery alarm message is displa...

Страница 59: ...d with the NC power supply turned OFF the absolute position data in the memory will be lost Battery position Battery box installed in the electrical cabinet door Changing interval Once a year When the...

Страница 60: ...e electrical cabinet door interlock key switch in the OFF position 4 Open the electrical cabinet door Refer to Chapter A 10 OPENING CLOSING THE ELECTRICAL CABINET DOOR 5 Turn on the power 6 Press the...

Страница 61: ...he power 13 Close the electrical cabinet door Refer to Chapter A 10 OPENING CLOSING THE ELECTRICAL CABINET DOOR 14 Place the electrical cabinet door interlock key switch in the ON position After chang...

Страница 62: ...power supply is shut off for 30 minutes or more Battery position The batteries are installed in the electrical cabinet door Changing interval Every 5 years When the battery alarm message is displayed...

Страница 63: ...B 34 REGULAR INSPECTION 6 Unplug the cable connector 7 Mount a new printed circuit board...

Страница 64: ...atteries are installed in the electrical cabinet door Changing interval Once a year When the battery alarm message is displayed on the screen Procedure 1 Turn on the power 2 Press the NC power switch...

Страница 65: ...ical cabinet door interlock key switch in the OFF position 4 Open the electrical cabinet door Refer to Chapter A 10 OPENING CLOSING THE ELECTRICAL CABINET DOOR 5 Turn on the power 6 Press the NC power...

Страница 66: ...he power 13 Close the electrical cabinet door Refer to Chapter A 10 OPENING CLOSING THE ELECTRICAL CABINET DOOR 14 Place the electrical cabinet door interlock key switch in the ON position After chang...

Страница 67: ...chuck when checking the main pressure Procedure 1 Turn on the power 2 Loosen the lock nut of the main pressure adjusting screw 3 Turn the main pressure adjusting screw while checking the pressure with...

Страница 68: ...ding on the machine model Procedure Example 1 Supply the compressed air 2 Pull down the pressure adjusting knob in the regulator 3 Turn the pressure adjusting knob to set the main air pressure For the...

Страница 69: ...rocedure Example Win Product P N31600 1 If oil is not being removed from the oil pan rotate the adjustment nut to the right to lower the height of the drain 2 If coolant is being removed with the wast...

Страница 70: ...CHAPTER C OUTLINE OF SYSTEMS...

Страница 71: ...ck C 3 4 2 Gripping Force C 4 4 3 Maximum Allowable Chuck Speed C 5 4 4 Relationship between Gripping Force and Spindle Speed C 6 4 5 Relationship between Jaw Height and Allowable Cylinder Thrust C 7...

Страница 72: ...he pump enters the distributors which distribute the correct volume of oil to each lubrication point 2 HYDRAULIC SYSTEM The hydraulic system comprises the hydraulic unit the valve units the hydraulic...

Страница 73: ...pipe Chuck Other accessories The chuck is mounted on the spindle nose and the hydraulic cylinder at the rear end of the spindle The chuck and the cylinder are connected by a pipe Schematic Cylinder C...

Страница 74: ...ed fixture is used instead of the chuck to hold a workpiece the chuck cylinder and connecting rod should be removed if they do not operate due to the mounting of the special fixture If the spindle is...

Страница 75: ...thrust must be lower than the maximum allowable thrust WARNING 6 The chuck or fixture that holds the workpiece must be secured to the spindle using the threaded holes in the spindle nose Do not mount...

Страница 76: ...ndle speed is determined under the following conditions Conditions Standard soft jaws are used The master jaw is located at the center of the jaw stroke The soft jaws are positioned so that the outer...

Страница 77: ...gh spindle speed Example Kitagawa hollow chuck The values given above are for reference only For the relationship between the gripping force and the spindle speed for the chuck actually used refer to...

Страница 78: ...ple Kitagawa hollow chuck The values given above are reference only For the relationship between the jaw height and the allowable cylinder thrust for the chuck actually used refer to the instruction m...

Страница 79: ...etween the cylinder thrust and the gripping force for the chuck actually used refer to the instruction manuals supplied by the chuck and cylinder manufacturers The determination of machining condition...

Страница 80: ...Even if the same hydraulic pressure is applied to the chuck the chuck gripping force varies according to the manufacturer and type of the chuck and cylinder Example Kitagawa hollow chuck The values gi...

Страница 81: ...operating when the power is turned on The trochoid pump in the oil cooler feeds cooling oil to the headstock to maintain the headstock temperature at room temperature 7 SPINDLE BEARING LUBRICATION SYS...

Страница 82: ...ANT TANK B 6 CLEANING THE DRAIN OIL RECEIVER FOR THE LUBRICATING OIL A 11 CLEANING THE ELECTRICAL CABINET AIR FILTER B 5 CLEANING THE FANS B 14 Cleaning the Front Cover of the Spindle A 8 Cleaning the...

Страница 83: ...NING CLOSING THE ELECTRICAL CABINET DOOR A 15 P PNEUMATIC SYSTEM C 10 PRECAUTIONS TO BE OBSERVED BY TECHNICIANS B 3 PRECAUTIONS WHEN USING CHIP CONVEYOR A 13 PREPARATION FOR MACHINE OPERATION AFTER PR...

Страница 84: ...EPLACEMENT B 19 Type 1 B 24 Type 1 Alkaline Battery Manganese Battery B 30 Type 1 Lithium Battery B 31 Type 2 B 33 Type 2 Electrical Cabinet Side B 25 Type 2 Operation Panel Side B 26 Type 3 2CR5 Type...

Страница 85: ...en available For each item see the following portions or the list 1 MACHINE MODEL The ELECTRICAL RATING plate attached to the electrical cabinet 2 SERIAL No The ELECTRICAL RATING plate attached to the...

Страница 86: ...the part name is mentioned Page P 30 4 Check the number of revisions mentioned in the last page of the parts list Number of revisions SL259308C15 5 Please inform the items checked by 1 4 to the repre...

Страница 87: ...ict your comments to those concerning this manual only Comments can also be submitted using the company website at http www moriseiki com Name of Manual MAINTENANCE MANUAL Number of Revisions MM CENL...

Страница 88: ...er they are not used usually and the units described above the expression in are used instead of the formal SI unit expression These units are also approved as SI unit system expression Quantity Metri...

Страница 89: ...Phone 39 02 4894921 Fax 39 02 48914448 MORI SEIKI ESPA A S A Head Office Technical Center Calle de la Electr nica Bloque B Nave 9 Poligono Industrial La Ferreria 08110 Montcada I Reixac Barcelona Spai...

Отзывы: