background image

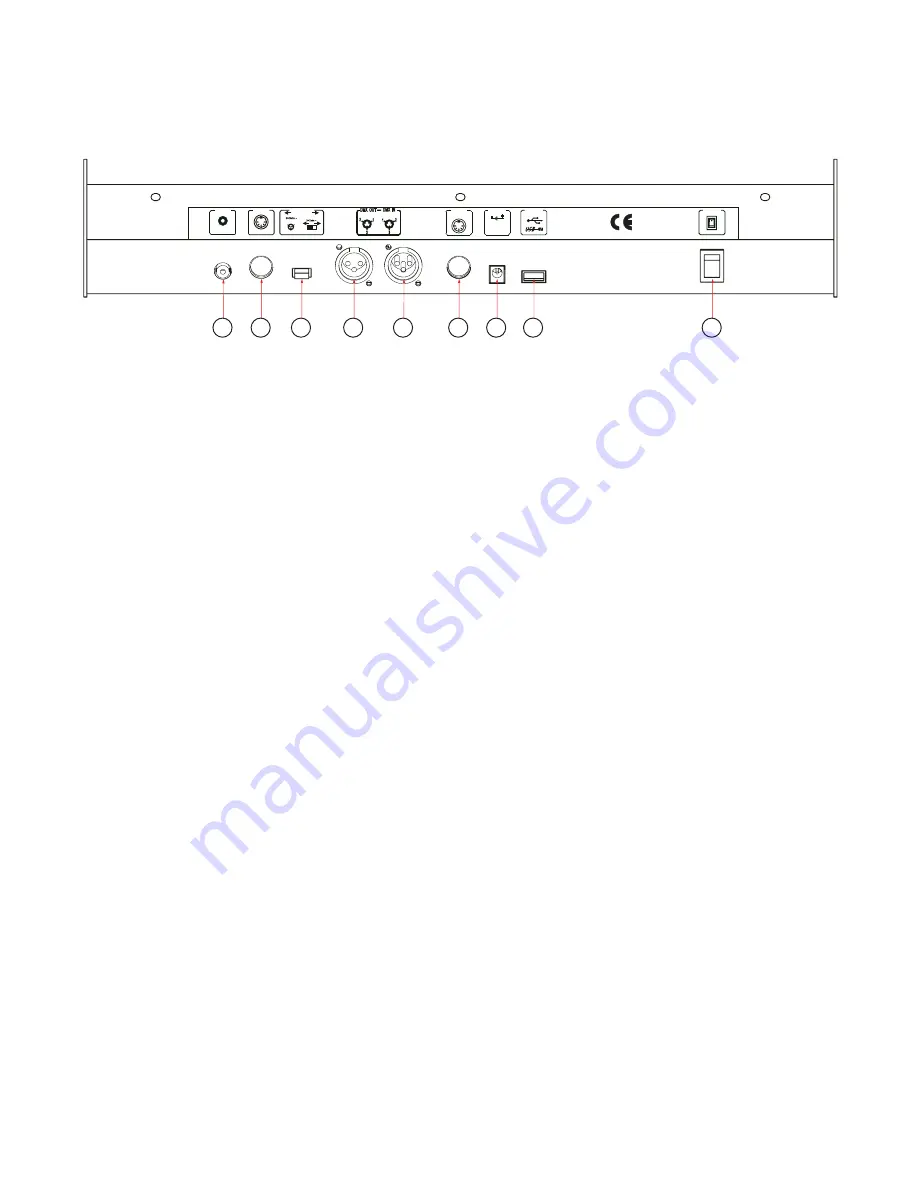
30. AUDIO INPUT JACK

Direct audio feed for use in sound-active mode

31. MIDI INPUT PORT

The MIDI input is for external triggering of Banks and Chases using a MIDI

device.

32. DMX POLARITY SWITCH

May be used to correct signal polarity.

33. DMX OUTPUT CONNECTOR

DMX control signal output to DMX devices and/or other controllers.

34. DMX INPUT CONNECTOR

Used to transfer programmed data between two controllers.

35. FOG MACHINE SOCKET

Plug a DMX fog machine into this socket.

36. DC INPUT JACK

DC power connector for use with the included AC adapter.

37. USB LAMP SOCKET

This USB power jack is intended for use with the included USB light. It is just for

power and does not have a data connection of any kind.

38. POWER SWITCH

Turns the controller on and off.

1=Ground

3=Data +

1

2

3

1

2

3

OFF

ON

POWER

DC 9V-12V

300mA min

MACHINE

DC INPUT

FOG

DMX IN

DMX OUT

DMX OUT

MIDI

LAMP

USB

0.1-1VP-P

AUDIO

DMX Polarity select

1

2

3

1=Ground

2=Data +

30

31

32

33

34

35

36

37

38

7

Содержание 612120

Страница 1: ......

Страница 2: ...following Safety Guidelines Keep these instructions handy for future reference This product is intended for indoor use only Do not expose this device to water or moisture of any kind Do not place item...

Страница 3: ...ramming ability This wheel allows the user to assign individual pan and tilt channels for each fixture 1 4 Glossary of Terms The following are common terms used in intelligent light programming Blacko...

Страница 4: ...in sync to music due to a built in microphone 2 CONTROLS AND CONNECTIONS 2 1 Top Panel 1 SCANNERS BUTTONS Allows direct selection of the connected devices fixtures 2 SCANNERS LEDS When lit indicates...

Страница 5: ...pressing this button issues the Copy command Otherwise pressing this button activates Music mode 10 LCD DISPLAY WINDOWS This status window displays pertinent operational data 11 MODE INDICATOR LEDS In...

Страница 6: ...tes 16 bit control of the wheel resulting in movement being in extremely small increments Additionally while the FINE button is active the Bank UP DOWN buttons will increase and decrease the DMX value...

Страница 7: ...ata between two controllers 35 FOG MACHINE SOCKET Plug a DMX fog machine into this socket 36 DC INPUT JACK DC power connector for use with the included AC adapter 37 USB LAMP SOCKET This USB power jac...

Страница 8: ...must be spaced 16 channels apart Please refer to your individual fixture s manual for DMX addressing instructions The table above refers to a standard dipswitch binary configurable device Fixture or...

Страница 9: ...to access wheel assignment mode 2 Press a SCANNER button to select a scanner 3 Simultaneously press the FINE and MODE buttons release them then press them again a second time to exit 3 1 5 WHEEL ASSIG...

Страница 10: ...OWN buttons to select pan tilt 4 Press the TAP DISPLAY button to switch between pages 5 Press and hold MODE button then press the SCENES buttons to select the DMX channel All LEDs will blink 6 Simulta...

Страница 11: ...ssumes that you have already recorded Scenes and Chases on the controller Otherwise skip this section and go to section 3 3 Programming 1 If the controller is not in Manual mode enable Manual mode by...

Страница 12: ...ay down 3 Select the SCANNERS you wish to include in your scene Note You can select more than one fixture 4 Compose the Scene by moving the sliders and wheel 12 Note You can access Channels 9 16 by pr...

Страница 13: ...RAM Scenes will need to be modified manually 1 Press and hold the PROGRAM button until the LED blinks Note If the Blackout LED is illuminated press the BLACKOUT button to deselect it 2 Use the BANK UP...

Страница 14: ...he SCENE to insert 5 Tap the MIDI REC button to store the Scene 6 Repeat steps 3 through 5 to add additional steps in the Chase Up to 240 steps can be recorded 7 Press and hold the PROGRAM button to s...

Страница 15: ...copied 5 Press the MIDI REC button to copy the scene All LEDs will blink to confirm 3 4 6 INSERT SCENE INTO A CHASE 1 Press and hold the PROGRAM button to enter Programming mode 2 Press the desired C...

Страница 16: ...individual scenes and program banks will be preserved 16 1 Turn the controller OFF 2 Simultaneously press and hold the BANK DOWN and the AUTO DEL buttons While holding these buttons down turn the cont...

Страница 17: ...alue 0 1 Press and hold the PROGRAM button to enter Programming mode 2 Use the BANK UP and BANK DOWN buttons to select the BANK that contains the scene to be deleted 3 Press the AUTO DEL button 4 Pres...

Страница 18: ...the BANK UP and BANK DOWN buttons to change the BANK programs 4 Alternatively you can press a single CHASE button or several CHASE buttons in sequence All selected chases will loop in the order select...

Страница 19: ...o 39 Scenes 1 8 in BANK 5 120 Chase 1 40 to 47 Scenes 1 8 in BANK 6 121 Chase 2 48 to 55 Scenes 1 8 in BANK 7 122 Chase 3 56 to 63 Scenes 1 8 in BANK 8 123 Chase 4 64 to 71 Scenes 1 8 in BANK 9 124 Ch...

Страница 20: ...ll respond exactly the same DMX fixtures are designed to receive data through a serial Daisy Chain A Daisy Chain connection is one in which the DATA OUT of one fixture connects to the DATA IN of the n...

Страница 21: ...DC 9V 12V 500mA min Maximum Ambient Temperature 113 F 45 C Data Input locking 3 pin XLR male socket Data Output locking 3 pin XLR female socket Data Pin Configuration pin 1 shield pin 2 pin 3 Protocol...

Страница 22: ...144 176 208 240 272 304 336 368 400 432 464 496 113 145 177 209 241 273 305 337 369 401 433 465 497 114 146 178 210 242 274 306 338 370 402 434 466 498 115 147 179 211 243 275 307 339 371 403 435 467...

Отзывы: