


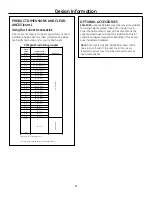


Installation Preparation
7
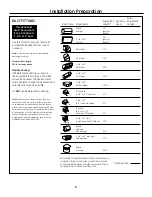
TOOLS AND MATERIALS REQUIRED
(NOT SUPPLIED)
• Tape measure
• Knife
• Spirit level
• Wire cutter/stripper
• Wire nuts
• Electric drill with 1/8" and 3/8" bits
• Phillips and flat blade screwdrivers
• Hammer
• Pliers
• Safety glasses
• Duct tape
• Tape to mount template
• Gloves to protect against sharp edges
• 120V 60Hz. 15 or 20 Amp, 2 wire with ground.
Properly grounded branch circuit.
• Strain relief for junction cover.
• 8" round metal duct, length to suit installation.
REMOVE THE PACKAGING
The hood is shipped secured to a shipping board with (4)
screws. Remove the 4 screws. Two screws are located at
the top of the hood. Two are located at the bottom of the
hood behind the grease filters.
A shipping bracket, which supports the blower, must also
be removed. It is secured with two screws. All screw im-
pressions are Phillips.
• Remove all packaging, the duct covers, and accessories.
• Lift the hood out of the carton.
• Remove and properly discard all plastic wrapping.
• Remove junction box cover.
• Install strain relief into junction box cover.
Top Of Hood
Top Shipping Screws
Junction
Box
Shipping Board
Remove Bottom Shipping
Screws and Shipping Bracket


