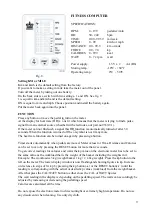
Fig. 5
7
Unscrew the two nuts holding the tension
device frame.
Put on the weight holder as in fig. 6.
Screw on and tighten firmly the two nuts again.
Fig. 6
Pedal marked R (Right) is to be assembled on
the right hand side of the cycle (the chain
wheel side). The pedal axle has a right hand
thread and must be threaded onto the crank
clockwise. Tighten firmly. See fig 5.
Pedal marked L (Left) is to be assembled on
the left hand side of the cycle. The pedal axle
has a left hand thread and must be threaded
onto the crank counter clockwise. Tighten
firmly. See fig 5.
NOTE! Check now and then that both
pedals are still firmly tightened. If not the
threading in the pedal arms will be
damaged.
Also check that the pedal arms are firmly
tightened on the crank axle. If nessecary
tighten the axle bolt. See fig. 5.
Fig. 3
Post bracket
Saddle post
locking bolt
Check that the inclination of the saddle is
comfortable and that the sadle post bracket
is firmly tightened. In order to change the
inclination of the saddle, loosen the saddle
bracket and tighten firmly again.
Adjust to desired height position of
saddle/saddle post by loosening the saddle
post locking bolt.
NOTE: Tighten firmly. See fig 3.
”L” left
”R” right
Axle bolt
Содержание Ergomedic 874 E
Страница 1: ...MANUAL Monark Ergometer 874E...
Страница 2: ......
Страница 17: ...78050 Vansbro 432 82 Varberg Tel 46 0281 594940 Fax 46 0340 80485...


