background image

46

/124

D15D Camera Manual: Mounting

© MOBOTIX AG  •  Security-Vision-Systems  •  Made in Germany

www.mobotix.com  •  [email protected]

2.2  Overview Of Network Connection

2.2.1  Power-Over-Ethernet (PoE Conforming To IEEE 802.3af)

All D15D models are supplied with power using the PoE standard. The PoE Adapter Set 
(MX-NPA-PoE-Set) may be used for smaller installations. For larger installations, we recom-
mend investing in a PoE-capable supply device available on the market. For detailed 
information on power supply options and on connecting the D15D camera, please see 
Section 2.7.1, «Notes On Cable Lengths And Power Supply» and the following sections.

Caution

The 

maximum length

 of the network cable for power supply over an Ethernet cable 

is 

100 m

.

Previous MOBOTIX network power accessories

 such as the NPA-Set, Power-Box 

and Power-Rack (MX-NPA-Set, MX-NPR-4 and MX-NPR8/20) are 

not

 suitable for 

use with the D15D.

Note

The MOBOTIX D15D can also be powered by switches or routers that support the 
PoE (Power-over-Ethernet) standard and conform to IEEE 802.3af.

Advantages of PoE power supply:

•  Centralized backup power supply available via network
•  Lower, more cost-effective power consumption
•  Camera does not require an additional network connection 

The D15D supports 

the Power-over-

Ethernet standard 

IEEE 802.3af (PoE)

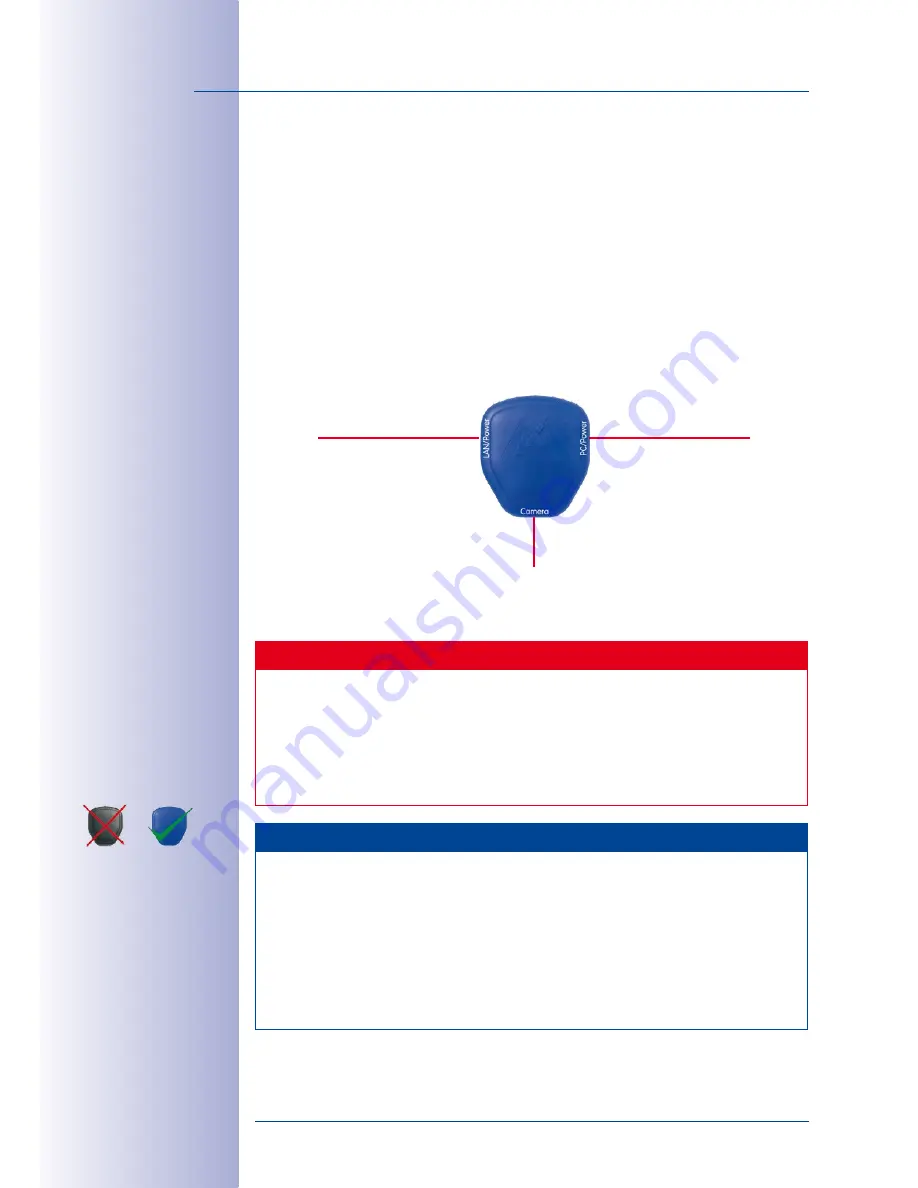
The PoE adapter replaces 

the crossover cable 

when directly connect-

ing to a computer

PoE Adapter

MX-NPA-PoE

LAN or POWER

PC or POWER

CAMERA

For the D15D, use the 

blue MX-NPA-PoE-Set


– previous MOBOTIX 

network power acces-

sories such as the 

NPA-Set, Power-Box and 

Power-Rack (MX-NPA-

Set, MX-NPR-4 and 

MX-NPR8/20) are 

not suitable for use 

with the D15D

Содержание D15D

Страница 1: ...on video systems cost efficient MOBOTIX AG D 67722 Langmeil Tel 49 6302 9816 103 Fax 49 6302 9816 190 sales mobotix com HiRes 6 Megapixels 4096 x 1536 Software zoom Skyline Format free Each image form...

Страница 2: ...om Support Manuals All rights reserved MOBOTIX MxControlCenter und MxEasy are internationally protected trademarks of MOBOTIX AG Microsoft Windows and Windows Server are registered trademarks of Micro...

Страница 3: ...4 1 3 5 Delivered Parts For The Corner And Pole Mount Accessory 35 1 4 Available Accessories 36 1 4 1 NPA PoE Set 36 1 4 2 Replacement Dome 36 1 4 3 Vandalism Set 36 1 4 4 Ethernet Patch Cable With Ba...

Страница 4: ...66 2 5 1 Overview 66 2 5 2 Mounting To The Corner Of A Building 67 2 5 3 Mounting To A Pole 68 2 5 4 Mounting The Outdoor Wall Mount 69 2 6 Adjusting The Lens 70 2 7 Network And Power Connection 71 2...

Страница 5: ...ent MOBOTIX Camera 111 3 5 7 Limitations On Warranty When Using Flash Storage Media 111 3 6 Configuration In The Browser 112 3 6 1 Overview 112 3 6 2 General Browser Settings 114 3 7 Additional Notes...

Страница 6: ...nstallation location of the IP Video Door Station the recording of video and sound data may be subject to special documentation or it may be prohibited All users of MOBOTIX products are therefore requ...

Страница 7: ...t directions totally indepen dent from one another D15D Pano Two super wide angle lenses mounted on a bracket deliver a high resolution panorama image with up to 6 megapixels that is distortion correc...

Страница 8: ...rage devices to be connected directly The camera s 4 GB internal flash memory which offers sufficient space for long term recordings can be individually extended simply by changing the MicroSD card Th...

Страница 9: ...ort for external expansions MxBus port for MOBOTIX add on modules Variable PoE class Integrated 4 GB MicroSD card expandable up to 64 GB HiRes dual image up to 6 megapixels also at night High frame ra...

Страница 10: ...and elegant dome shaped housing the MOBOTIX DualDome camera system has become an indispensable feature of the now global market of high resolution network security cameras Thanks to the flexibility o...

Страница 11: ...Four Gas Pumps Long Term Recording Without Peripheral Devices Overview And Details With A Single Camera A single D15D is all that is required to fully monitor an entire shop floor as well as provide...

Страница 12: ...sensors of the Secure models have a higher maximum resolution two 3MEGA instead of two VGA Each D15D comes with a well protected pre installed 4 GB MicroSD card as standard If required this card can...

Страница 13: ...th two different image sensors including two lenses It automatically switches to the ideal mode depending on the lighting conditions either the color sensor with daylight lens or the black and white s...

Страница 14: ...nt to be attached to the corners of buildings and to masts The Outdoor Wall Mount s design enables for example WiFi or GSM UMTS modules to be installed directly within the weatherproof housing without...

Страница 15: ...s essential for security applications and allows individuals or license plates to be identified for example In contrast the H 264 standard which was developed for feature movies and is favored by some...

Страница 16: ...ularly in outdoor area applications in contrast to video motion detection that continues to be available and that registers all image changes in defined video motion windows In the monitored area the...

Страница 17: ...cameras such as the D15D to automatically detect when an event has occurred If necessary the cameras will respond immediately with an alarm sound and will establish a direct video and sound connectio...

Страница 18: ...ate detail of panorama images with mega pixel technology Fewer recording devices because in the decentralized system ten times the standard number of cameras can be used to record high resolution HDTV...

Страница 19: ...are highly robust and work without high power climate control and extra protective housing in a temperature range from 30 to 60 C 22 to 140 F Modern Integrated into the cameras are high power process...

Страница 20: ...om is used If the D15D is mounted in the corner of a room with this lens the complete room will be visible on the image In the case of the special D15D Pano model two L25 lenses are installed in such...

Страница 21: ...6 8 51 5 36 2 24 3 11 4 Image height 59 3 37 3 27 0 18 0 8 6 Notes The specified focal lengths of the MOBOTIX lenses do not reflect the actual focal length of the lenses but the focal length Lxx mm co...

Страница 22: ...y in lux at 1 60 s 1 s 0 25 0 013 0 05 0 0025 0 25 0 013 Hardware Features Protection classes IP54 IP65 IP66 IK10 Temp internal DVR MB 32 32 64 Internal DVR MicroSD up to 64 GB 4 GB incl 4 GB incl 4 G...

Страница 23: ...5 0 013 0 05 0 0025 0 25 0 013 0 05 0 0025 Hardware Features IP54 IP65 IP66 IK10 IP54 IP65 IP66 64 64 64 64 4 GB incl 4 GB incl 4 GB incl 4 GB incl X X X X X X X X X X X X X X X X X X X X 5 5 5 5 2 3...

Страница 24: ...vent control X X X Weekly schedules holidays X X X Web functionality FTP email X X X Playback Quad und MultiView bidirec tional sound in browser X X X Logo generator animated X X X Flexible event logi...

Страница 25: ...Sec Pano D15Di Sec Night Pano D15Di Sec DNight Fix General Features X X X X X X X X X X X X X X X X X X X X 50 50 50 50 X X X X X X X X X X X X X X X X X X X X X X X X X X X X X X X X X X X X X X X X...

Страница 26: ...88 320x240 160x120 Max frame rate M JPEG live recording VGA 30 fps MEGA 10 fps 3MEGA 4 fps 6MEGA 2 fps Max frame rate MxPEG live and recording including sound VGA 30 fps MEGA 30 fps 3MEGA 20 fps 6MEGA...

Страница 27: ...Certifications EMV EN 55022 CISPR 22 EN 55024 EN 61000 6 1 2 FCC Part15B CFR 47 AS NZS 3548 Power supply Year round Power over Ethernet IEEE 802 3af variable PoE class approx 5 W Protection classes IP...

Страница 28: ...et cable installed 1 10 1 Allen wrench 3 mm 1 11 1 TX20 Torx wrench 1 12 1 Custom tool with magnet 1 13 1 MxBus connector inserted 1 14 1 MicroSD card max of 4 GB inserted Installation accessories Ite...

Страница 29: ...onents camera housing outer shell and dome 4 2 3 1 4 LEDs behind PIR cover Speaker Dome PIR sensor Lens unit I Lens unit II Sensor cable MicroSD card MxBus MxBus cabling MiniUSB Ethernet Washer Water...

Страница 30: ...ench 3 mm 2 11 1 TX20 Torx wrench 2 12 1 Custom tool with magnet 2 13 1 MxBus connector inserted 2 14 1 Lens bridge installed 2 15 1 MicroSD card max of 4 GB inserted Installation accessories Item Num...

Страница 31: ...s of three main components camera housing outer shell and dome 4 2 3 1 4 LEDs behind PIR cover Speaker XL dome PIR sensor Lens bridge Sensor cable MicroSD card MxBus MxBus cabling MiniUSB Ethernet Was...

Страница 32: ...en wrench 3 mm 2 11 1 TX20 Torx wrench 2 12 1 Custom tool with magnet 2 13 1 MxBus connector inserted 2 14 1 Lens bridge installed 2 15 1 MicroSD card max of 4 GB inserted Installation accessories Ite...

Страница 33: ...sts of three main components camera housing body shell and dome 4 2 3 1 4 LEDs behind PIR cover Speaker XL dome PIR sensor Lens bridge Sensor cable MicroSD card MxBus MxBus cabling MiniUSB Ethernet Wa...

Страница 34: ...screws M4x25 mm 3 11 4 Stainless steel washers diam 4 3 mm Make sure to check the delivered parts 8 Allen screws M4x10 mm item 3 8 4 screw anchors 10 mm item 3 3 Bottom plate item 3 2 4 washers diam 9...

Страница 35: ...Item Number Part Name 4 1 1 Corner and Pole Mount 4 2 4 Stainless steel Allen screws M8x30 mm 4 3 4 Stainless steel washers diam 9 mm 4 4 4 Stainless steel lock nuts M8 4 5 2 Stainless steel straps He...

Страница 36: ...rd with a European adapter while the INT version includes four adapters EU USA UK AUS 1 4 2 Replacement Dome Order No MX D15D OPT DCT DCS transparent tinted The standard D15D dome is available as a tr...

Страница 37: ...jets 1 4 6 Corner and Pole Mount Order No MX WH Dome ESWS The Outdoor Wall Mount can be used for applications mounted on a pole or the corner of a building This extremely robust mount is made of 3 mm...

Страница 38: ...fied posi tion exceeding or not reaching a specified speed The MX GPS Box can be connected as an add on module to all MOBOTIX cameras with an MxBus interface The MX GPS Box has the same compact exteri...

Страница 39: ...work with PoE to be set up via two wire cables which saves users from having to lay several hundred meters of Ethernet cable For example an existing two wire cable of an analog video camera can be reu...

Страница 40: ...ive image that is visible or the full sensor image full image storage This also allows you to examine parts of an image or video that had not been visible in the live image section on display at the t...

Страница 41: ...ideo search functions effective alarm handling automatic camera integra tion video storage on file servers as well as useful configuration and update wizards MxControlCenter Professional Video Managem...

Страница 42: ...instantly in the configuration of the corresponding camera The calendar functions integrated in the Alarm Planner provide an innovative tool for the scheduled settings of one or more cameras This too...

Страница 43: ...with professional security equipment In addition using mobile devices to operate the various functions such as door opening activating the voice mailbox switching the door bell off at night and switc...

Страница 44: ...or Connecting The Camera Patch Cable To The Network Cable For Example Cat 5 Position the camera over the cable outlet Connect the camera patch cable securely to the Ethernet cable for example using th...

Страница 45: ...IP65 protection class fully dustproof and resistant to water jets Ambient temperatures may vary between 30 to 60 C 22 to 140 F making it the ideal camera for the most demanding weather situations The...

Страница 46: ...e is 100 m Previous MOBOTIX network power accessories such as the NPA Set Power Box and Power Rack MX NPA Set MX NPR 4 and MX NPR8 20 are not suitable for use with the D15D Note The MOBOTIX D15D can a...

Страница 47: ...ot require any heating even during winter the average power consumption of less than five watts is comparatively low This in turn means that you can centralize the UPS protected power supply by inject...

Страница 48: ...perating network devices safely and who are familiar with the applicable regulations regarding lightning and fire prevention as well as the current tech nology for preventing damage from electrical su...

Страница 49: ...many www mobotix com sales mobotix com Lightning And Surge Protection More information on preventing lightning or surge damage is available from organizations such as the International Electrotechnica...

Страница 50: ...or the SW icon BW black white The following combinations of sensor cables L R and sensors color black and white are possible Image sensor combination L sensor cable R sensor cable Color color l l Bla...

Страница 51: ...the central lens screw Remove the center lock screw and the washer Insert the lens units into the seatings Insert the lock screw with a washer into the center of the camera and gently tighten it to h...

Страница 52: ...itches on the green circuit board ESD in order to prevent damage arising now or later and to avoid reducing the service life 6 Insert the sensor cable Insert the sensor cable through the space in the...

Страница 53: ...ee holes in the outer shell should be sealed with commercial silicon in order to prevent water from entering the outer shell Special Case D15D Pano Mounted To A Wall Without The Wall Mount The lens mo...

Страница 54: ...odules These cables can be used to connect MOBOTIX modules The wires of this cable are led along the bottom of the camera and then pushed through the sealing membranes and into the cable guides Cautio...

Страница 55: ...Boxes section 2 3 4 Connecting The MiniUSB Cable Existing additional modules like the MOBOTIX ExtIO USB can be connected via the MiniUSB connector 1 Remove the outer shell Remove the outer shell using...

Страница 56: ...no excess cable in front of the connections 7 Place the USB cable in the cable guides Carefully bend the cable guides upwards place the USB cable in the guides and snap the cable guides closed again...

Страница 57: ...for the use of existing two wire cables The white detachable MxBus connector has four connec tions each of which is blue red or 2 MxBus inputs to connect the D15D to the MxBus cable 2 MxBus outputs t...

Страница 58: ...into the three small holes of the shell one by one Lift the outer shell to loosen it from the fixtures 2 Remove cable cover Remove the two M4x25 Allen screws from the cable cover using the 3 mm Allen...

Страница 59: ...era 6 Install cable cover Push the cable cover back into its seat and fasten the two M4x25 Allen screws When mounting the cable cover take care to prop erly align the cover with the seal of the camera...

Страница 60: ...where it is most useful The PIR sensor has a range of approximately 10 m and a detection angle of approximately 15 degrees The positions that are available depend on how high the MOBOTIX D15D has been...

Страница 61: ...Wall Mount is mounted over the tested wall outlet that provides the connections network Power over Ethernet to the camera MX Patch Box or wall outlet D15D Outdoor Wall Mount MOBOTIX Ethernet patch ca...

Страница 62: ...plied screw anchors 10 mm screws 8x70 mm and washers diam 9 mm to secure the Outdoor Wall Mount 2 Attach the supplied wall sealing to the rear side of the wall mount If the Outdoor Wall Mount is mount...

Страница 63: ...camera in increments of 15 degrees All holes have been numbered from 1 to 8 in order to facilitate the mounting process Three standard positions to aim the camera are described below 1 PIR sensor of t...

Страница 64: ...n the camera on the underside of the bottom plate so that the PIR sensor points in the desired direction and the hole in the housing to the right of the PIR sensor is situated above a hole in the bott...

Страница 65: ...ion cables into the appropriate wall outlets or adapters 2 Insert the straight wall side of the bottom plate into the back of the wall mount as shown in the figure 3 Push the front of the bottom plate...

Страница 66: ...his mount is designed as an additional mounting option for the Outdoor Wall Mount The supplied stainless steel straps allow the mount to be attached to poles with diameters between 60 and 180 mm By de...

Страница 67: ...Pole Mount and then through one of the two 16 mm holes on the front of the mount In order to properly protect the cabling you should let the cabling run from the inside of the building through the Co...

Страница 68: ...eel straps allow the mount to be attached to poles with diameters between 60 and 180 mm 2 Guide the connection cables from behind through one of the large round holes of the Corner and Pole Mount In o...

Страница 69: ...le Mount to affix the Outdoor Wall Mount to the installed Corner and Pole Mount 1 Lead the cables through the appropriate hole on the back of the Outdoor Wall Mount 2 Use the M8x30 Allen screws washer...

Страница 70: ...g aid provides a visual aid when setting the image sharpness of a MOBOTIX camera lens see the The Focusing Aid Of The Camera section on the The Live View Of The MOBOTIX Camera page in the camera onlin...

Страница 71: ...the LED activity of the corresponding port at the switch or router We highly recommend using uninterruptible power supplies UPS to provide backup power If you are using IEEE 802 3af or IEEE 802 3at Po...

Страница 72: ...the Ethernet socket 3 Plug the RJ45 connector of the power supply unit into the PC Power connector of the PoE adapter The IP addresses in the diagram are shown only as an example Switch router PoE ada...

Страница 73: ...ernet port of the computer 3 Plug the RJ45 connector of the power supply unit into the LAN Power connector of the PoE Adapter The IP addresses in the diagram are shown only as an example For the D15D...

Страница 74: ...r peripheral devices to MxBus and USB inter face Caution If the total power consumption of the camera and peripheral devices exceeds the power provided by the PoE switch for the specified class the sw...

Страница 75: ...ry LEDs 2 and 4 light up for about ten seconds Starting the OS The Linux operating system unpacks its data to the RAM disk and initializes the system Boot mode factory IP address DHCP If the magnetic...

Страница 76: ...e camera s network parameters Manually using a web browser see Section 3 2 1 Automatically using MxControlCenter MxEasy see Section 3 2 3 and Section 3 2 4 or via DHCP see Section 3 2 6 3 Configure th...

Страница 77: ...r Next click on the Admin Menu button to open the camera s Quick Installation in the browser s user interface This is where you can configure the desired network parameters of the cam era Once you hav...

Страница 78: ...of a MOBOTIX camera that is not operating in the same IP address range as the computer Benefits You can connect the camera directly to the target network The camera does not need to be physically acce...

Страница 79: ...booted using DHCP see Section 3 2 6 Starting The Camera With An Automatic IP Address DHCP The IP address automatically assigned by the DHCP server will be announced via the camera speaker as soon as t...

Страница 80: ...place this IP address with the IP address of your camera You will find the IP address of your camera on a small sticker on the camera Make sure that the IP addresses used in the following examples are...

Страница 81: ...Enter displays the user interface of the MOBOTIX camera see also Section 3 2 2 First Images And The Most Important Settings In The Browser 2 Click on the Admin Menu softbutton in the user interface o...

Страница 82: ...any other graphical browser with activated JavaScript is suitable It does not matter which operating system is used After entering the camera s IP address in the address bar of the browser you will s...

Страница 83: ...and the MultiView screen displays several cameras with live or recorded images MultiView allows you to view several cameras via a proxy camera especially useful if you want to access your cameras from...

Страница 84: ...lder versions will be removed automatically and the shortcuts are created during the installation process Desktop Start Menu etc Caution MxControlCenter will automatically attempt to find all MOBOTIX...

Страница 85: ...y searches for MOBOTIX cameras in the local network when you launch the program for the first time Select Video Source Add from the menu to perform a camera search at a later time If your MOBOTIX came...

Страница 86: ...ive image is automatically displayed in the preview window when a camera is selected to help you identify the cameras For cameras marked with Different subnet or if you want to add additional video so...

Страница 87: ...rrect network settings even after they have been rebooted Click OK to close the dialog box Wait until MxControlCenter has changed the network settings and rebooted the cameras The status of the reconf...

Страница 88: ...on at that time It is also possible to open the Configure selected cameras dialog box using the shortcut menu in order to change the camera network parameters Creating A New Layout Select the camera o...

Страница 89: ...a list The camera list will be updated automatically as soon as new MOBOTIX cameras are con nected to the local network or removed from the network MxEasy also automatically monitors and displays the...

Страница 90: ...ntegrated into your existing network To do so you only have to select the affected camera in the list and then click Continue After a security prompt a new dialog box for configuring the selected came...

Страница 91: ...of MxEasy with the current live camera image by activating the option Quick Start However some required detailed configura tions may have to be made at a later time for example password protection ava...

Страница 92: ...e figure the switch is inside the camera housing 4 If you skip this step disconnect the camera from the power supply and start from the beginning 5 Release the custom tool after around 40 seconds when...

Страница 93: ...for the second time all LEDs light up continuously again hold the magnetic side of the custom tool over the spot above the microphone labeled L in the figure the switch is inside the camera housing 4...

Страница 94: ...owser using the mouse This position becomes the new image center by clicking any position on the image displayed on the monitor The image moves accordingly and the image distortion is automatically co...

Страница 95: ...ser in the Quick Control Under Browser select the option ActiveX in the field to the right The USB joystick can then be used until the browser is closed To store the setting permanently ActiveX must b...

Страница 96: ...main advantage of full image recording lies in the special functionality of the D15D in that it can always maintain availability of a maximum size full image for later investigation despite vPTZ actio...

Страница 97: ...y Vision Systems Made in Germany www mobotix com sales mobotix com Activate Deactivate Full Image Recording In The Browser To configure this feature open the Setup Menu Event Control Recording dialog...

Страница 98: ...ay be slightly distorted due to the extreme angle of the lens You can suppress this effect using software for example in the browser so that a new and appropriately corrected image can be displayed li...

Страница 99: ...orrected at a later point in time when searching recorded images This saves on processing power during recording and increases the frame rate The more you zoom in on the image the less distorted the i...

Страница 100: ...le Adjusting The Panorama Image In The Web Browser You need to follow these extra steps when installing a D15D Pano to create a good combined image from the two single images left and right image sens...

Страница 101: ...vertical center of the image are visible Zoom Move image s vertically You can move the selected sensor image up or down by clicking on the arrows pointing upwards and downwards in the range The effect...

Страница 102: ...right of the Configuration Of Panorama View Quick Control to deactivated This opens a dialog box Confirm by clicking Yes to save the current settings and then switch back to the live image of the came...

Страница 103: ...in the menu bar at the top of the screen Then click Compass in the toolbar An OnScreen Control then appears in the image This can be operated the same way as the one in the web browser Only the image...

Страница 104: ...nfigure and then open the PTZ Control controls on the left hand sidebar of MxControlCenter Click on the Activate button under configuration of the panorama view The OnScreen Control of the web browser...

Страница 105: ...d in order to create an evenly lit harmonious dual image with the D15D Pano with two individual images combined to create a panorama image This setting determines the best average exposure value for t...

Страница 106: ...MOBOTIX cameras can constantly monitor activated flash storage devices MOBOTIX has developed a technology to test the wear of the flash device by logging the number of write delete cycles patent pend...

Страница 107: ...cycle 12 hours 4 hours 14 4 hours 9 2 hours 4 4 hours Caution The MicroSD card s service life depends on production quality and frequency of use Set the type of recording event controlled or continuou...

Страница 108: ...the user name and the password of a user of the admins group and click OK to confirm The MOBOTIX camera now starts format ting the card It takes 5 to 12 minutes to format an 8 GB MicroSD card if the...

Страница 109: ...f not you must activate the recording see below Activating The Recording If the FR REC symbols are not visible in the live image after rebooting you need to activate the recording using one of the fol...

Страница 110: ...nter If the recordings stored on the MicroSD card were encrypted you need to enter the password used for the encryption before you can access the data If this is the case both MxControlCenter and MxEa...

Страница 111: ...camera Once MicroSD card recording has been activated requires a reboot the new MOBOTIX camera automatically synchronizes with the card and resumes recording No data is lost in this process Make sure...

Страница 112: ...as Windows Linux Apple etc The camera provides a HTML based user interface for this purpose The camera executes the changes you make to the camera configuration via HTTP commands using programs and sc...

Страница 113: ...implement the change when you click Close you will be asked to store the complete configuration in the camera s permanent memory or in the Admin Menu Admin Menu Store current configuration into flash...

Страница 114: ...omatic reboot if this is not desired Admin Menu Time Tasks Optimize the image settings The factory image settings of MOBOTIX cameras deliver excellent images for most application scenarios and should...

Страница 115: ...rm of action profiles The different action profiles can also be defined in the following areas Admin Menu in the Hardware Configuration profiles for signal output Transfer Profiles FTP e mail network...

Страница 116: ...ration menu the password can only be reset at the factory This service is subject to a fee 3 7 2 Permanently Deactivating The Microphone Deactivating a camera s microphone may be necessary in order to...

Страница 117: ...section the MOBOTIX camera only displays the text www mobotix com the time stamp and the MOBOTIX logo at the top of the image Once the camera arming has been acti vated the text at the bottom of the l...

Страница 118: ...Particular care should be taken when installing the camera outside to ensure proper protection against lightning as this also protects the building and the entire network infrastructure Electrical ins...

Страница 119: ...ulations You can find the MOBOTIX RoHS Declaration under www mobotix com Support Spec Sheets 3 7 13 Disposal Electrical and electronic products contain many reusable materials For this reason we would...

Страница 120: ...120 124 MOBOTIX AG Security Vision Systems Made in Germany www mobotix com sales mobotix com D15D Camera Manual Notes...

Страница 121: ...121 124 MOBOTIX AG Security Vision Systems Made in Germany www mobotix com sales mobotix com Notes...

Страница 122: ...om sales mobotix com D15D Camera Manual Declaration of Conformity O r i g i n a l D e c l a r a t i o n O f C o n f o r m i t y w w w m o b o t i x c o m Declaration of Conformity D15D DualDome Declar...

Страница 123: ...acturer Executive Board MOBOTIX AG Dr Ralf Hinkel Kaiserstrasse 67722 Langmeil Germany Registration Office Kaiserslautern Local Court Germany Registration Number HRB 3724 Tel 49 6302 9816 103 Tax Code...

Страница 124: ...on video systems cost efficient MOBOTIX AG D 67722 Langmeil Tel 49 6302 9816 103 Fax 49 6302 9816 190 sales mobotix com HiRes 6 Megapixels 4096 x 1536 Software zoom Skyline Format free Each image form...

Отзывы: