background image

TOUCH NAVIGATION 

... touch the 

ESC Button 

to start at Main Menu


TOUCH NAVIGATION 

... touch the 

ESC Button 

to start at Main Menu


touch a 

Menu Icon 

...  to open a 

Function Screen 

...  to check or change a 

Function


touch a 

Menu Icon 

...  to open a 

Function Screen 

...  to check or change a 

Function


SETTINGS 

(cont.)


Monitor Setting 

(cont.)


F

rom 

the 

Monitor Setting 

list...


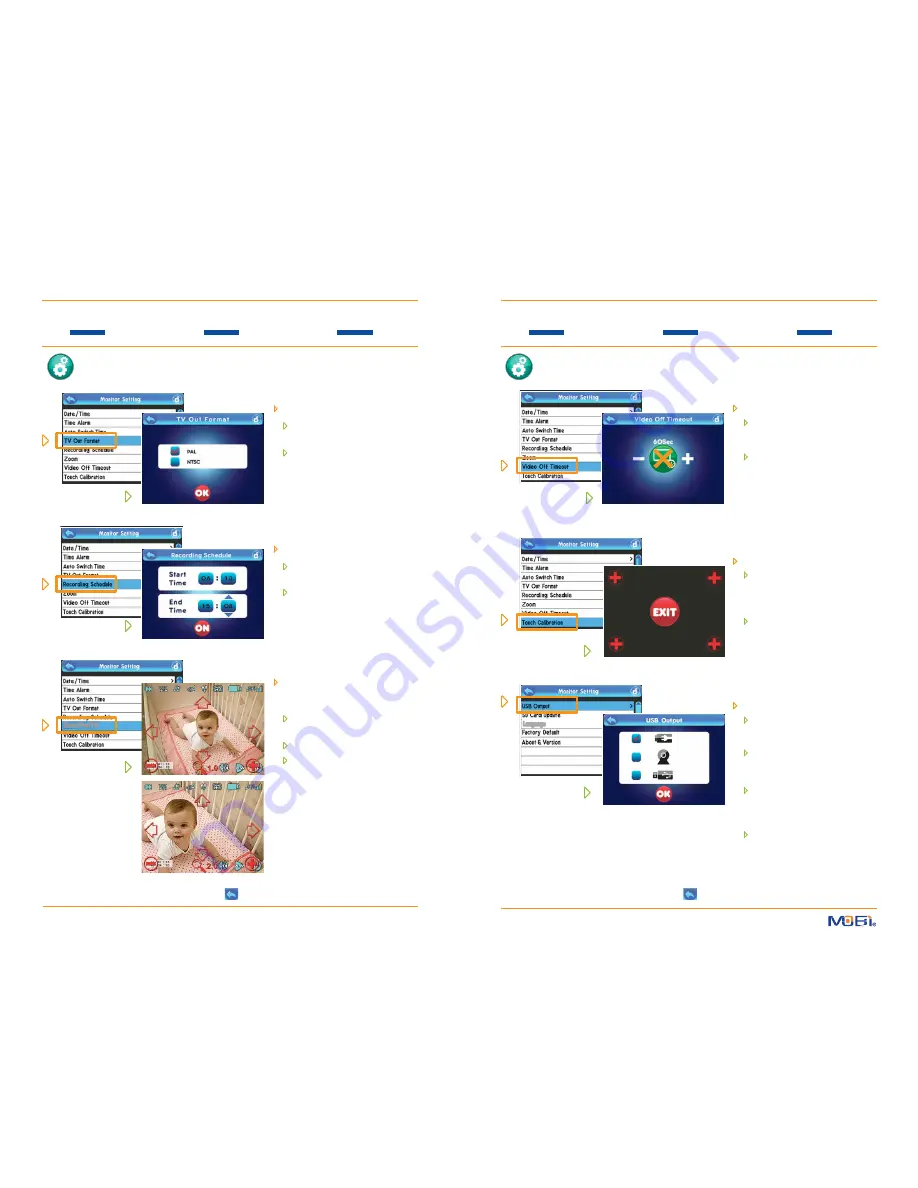
select 

TV Out Format


choose either 

PAL 

or 

NTSC 

video 

format (US standard is NTSC)


touch 

OK to set


F

rom 

the 

Monitor Setting 

list...


select 

Recording Schedule


touch 

any value 

and then touch the


up 

and 

down arrows 

to 

adjust time


to activate press 

On


(or 

OFF 

to deactivate)


SETTINGS 

(cont.)


Monitor Setting 

(cont.)


F

rom 

the 

Monitor Setting 

list...


touch 

Video Off Timeout


touch the 

timer 

icon to choose 

between 

non-active 

(X) or 

active 

(no X) 

Timeout Mode


if active, touch the 

– 

or 

icons to 

set the limit at which time the video 
will automatically 

Timeout 

(turn 

off )


F

rom 

the 

Monitor Setting 

list...


select 

Touch Calibration


touch the 

icons as they appear 

in each corner of the screen (this 
calibrates the monitor for best 
touch screen accuracy)


once all four corners are touched, 
tap 

EXIT 

to return to the Monitor 

Setting list


Zoom / Pan / Tilt


F

rom 

the 

Monitor Setting 

list...


select 

Zoom/Pan/Tilt 

and go to the 

camera scene with Zoom/Pan/Tilt 
icons overlaying the image...


to 

Zoom-In 

touch the 

icon


(maximum of 3.0 - to -1 enlargement)


to 

Zoom-Out 

touch the 

– 

icon


to 

Pan or Tilt 

touch the 

arrow 

icons 

(you can Pan or Tilt only after you 
have zoomed in)


NOTE: Press the 

ESC Button 

to return 

to the video image without Zoom/ 
Pan/Tilt icons overlaying it.


Language


See page 17 for details on using the USB Output for viewing 

video or transferring video or photo files to a PC.


F

rom 

the 

Monitor Setting 

list...


touch 

USB Output


select the 

Top 

icon for 

Charging 

the monitor via the AC Adapter 
(included)


select the 

Middle 

icon to use the 

system as a 

USB Webcam 

on a PC* 

via the USB Data Cable (included) or...


select the 

bottom 

icon for PC file 

transfer mode to or from an SD 
Card in the monitor via the 
included USB Data Cable


touch 

OK 

to 

set


HINT: To move back one screen touch 

Return 

icon 


or go to camera view by pressing the 

ESC Button

.


12


HINT: To move back one screen touch 

Return 

icon 


or go to camera view by pressing the 

ESC Button

.


13


Содержание DXR Touch

Страница 1: ...19 This device complies with part 15 of the FCC Rules Operation is subject to the following two conditions 1 This device may not cause harmful inter ference and 2 This device must accept any interfere...

Страница 2: ...ght Vision Temperature Sensor and Alarm VOX Hi Mid Lo Off controlled from receiver Adjustable Volume from receiver Adjustable TX Power High Low from receiver 4 Pre Recorded Lullaby choices 3 5 QVGA re...

Страница 3: ...feet of each other IMPORTANT Use ONLY a fingertipor other NON SHARP object to select touch screen options Using sharp objects can damage the screen and void the warranty Camera View 1 Power On the Mo...

Страница 4: ...e Stamp LULLA BYS Screen Contrast Screen Brightness select a Camera select one of four Lullabys deactivate all Lullabys adjust Lullaby Volume PLAY select play Recorded Video Recorded Photo Delete File...

Страница 5: ...s you Format Erase an SD memory card select OK or Cancel SD Info displays Total Size Used Space and Free Space on an SD card in the SD card slot PLAY Playback of Recordings select Video or Picture fol...

Страница 6: ...w C from Quad Channel screen select the Auto icon to begin alternating full screen views from each paired came ra up to 4 automatically changing from one camera view to the next SETTINGS Monitor Setti...

Страница 7: ...ibrates the monitor for best touch screen accuracy once all four corners are touched tap EXIT to return to the Monitor Setting list Zoom Pan Tilt From the Monitor Setting list select Zoom Pan Tilt and...

Страница 8: ...sion of the installed firmware SETTINGS cont Camera Settings on the Setting Screen simply touch the Camera icon on the bottom line for the one you wish to control the settings for NOTE Only Paired cam...

Страница 9: ...llation message 4 Once you have installed the device driver your MobiCam DXR Touch can be utilized as a wireless webcam 5 Once the picture from the monitor is displayed on your computer screen pressin...

Страница 10: ...vice When the AV OUT cord is connected to an external device the DXR Touch monitor screen will automatically turn off Please refer to the manual for the AV device you are connected to for pro per inpu...

Страница 11: ...e Department you may return the product to obtain warranty service Please return it to Mobi along with a dated sales receipt from the place of purchase to verify that it is within the authorized warra...

Отзывы: