Eng-8
En
g
lis
h
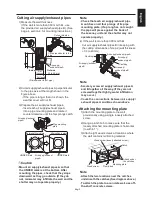
Outdoor construction
)LOOWKHZDOOKROH
Fill in any gaps between the air supply/exhaust
SLSHVDQGWKHZDOOKROHVZLWKRIIWKHVKHOI
caulking.
Note
$Q\VSDFHVOHIWXQ¿OOHGZLOODOORZUDLQZDWHU
to enter.
Air supply/exhaust pipes
Caulking
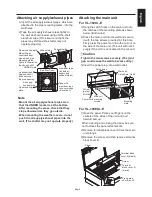
2. Installing the weather covers
,QVHUWWKHZHDWKHUFRYHUPRXQWLQJSODWHVLQWR
the air supply/exhaust pipes.
7LJKWHQWKHÀDQJHQXWV%HVXUHWKDW
WKH833(5PDUNVRQWKHZHDWKHUFRYHU
mounting plates are at the top.)
3) Attach the weather covers with the mounting
screws.
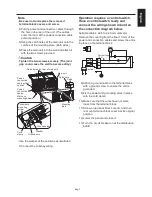
Note
The weather covers are blocked in one area
to ensure that the air supply and exhaust do
not mix. Mount the blocked parts on both
the air supply and exhaust sides so that
they are on the left, as shown above.
If the weather covers shift, check that the
air supply/exhaust pipes are cut to the
correct dimensions. (Pushing the pipes too
hard into the wall may cause the pipes to
shift or prevent the shutter from operating
properly.)
Weather cover mounting plate have two
KROHVijPPLQWKHP8VHWKHVHKROHVWR
VHFXUHWKHÀDQJHVWRWKHZDOO
Weather
cover
Flange nut
6FUHZIRUVHFXULQJ
weather cover
“Cap” area
UPP
ER
U
PP
ER
UP
PER
Air supply/exhaust
pipe
Weather cover
mounting plate
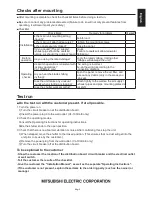
3UHYHQWLQJLQ¿OWUDWLRQRIUDLQZDWHU
&DXONDURXQGWKHHQWLUHSHULPHWHURIWKHZHDWKHU
covers.
Caulking
Weather covers


