Mitsubishi CP710E Скачать руководство пользователя страница 1

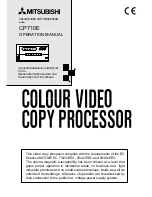
COLOUR VIDEO COPY PROCESSOR

MODEL

CP710E

OPERATION MANUAL

THIS OPERATION MANUAL IS IMPORTANT 
TO YOU.
PLEASE READ IT BEFORE USING YOUR 
COLOUR VIDEO COPY PROCESSOR.

POWER

OPEN

REMOTE

MEMORY

PRINT

MONITOR

 CP710

This video copy processor complies with the requirements of the EC
Directive 89/336/EEC, 73/23/EEC, 93/42/EEC and 93/68/EEC.
The electro-magnetic susceptibility has been chosen at a level that
gains proper operation in residential areas, on business and  light
industrial premises and on small-scale enterprises, inside as well as
outside of the buildings.  All places of operation are characterised by
their connection to the public low  voltage power supply system.

Содержание CP710E

Страница 1: ...with the requirements of the EC Directive 89 336 EEC 73 23 EEC 93 42 EEC and 93 68 EEC The electro magnetic susceptibility has been chosen at a level that gains proper operation in residential areas...

Страница 2: ...of the unit unplug the power cord from the source outlet and contact the sales dealer If used without corrective measures the unit may be damaged In the interest of safety avoid handling of liquids ne...

Страница 3: ...placed in slanted conditions or in unstable places PROTECT AGAINST DEW FORMATION In extremely cold regions if the unit is moved quickly from an extremely cold place to warmer one dew is likely to be f...

Страница 4: ...hich will assist the USER s appropriately qualified technical personnel to repair those parts of the EQUIPMENT which are classified by the manufacturer as repairable The use of ACCESSORY equipment not...

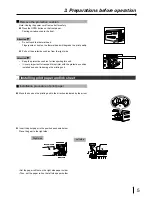
Страница 5: ...this unit Make sure you set the fixed screw to the bottom of the unit when transporting the printer Fixed screw S VIDEO REMOTE AC LINE VIDEO 1 2 Stored position 1 1 1 1 1 Removing the fixed screw on t...

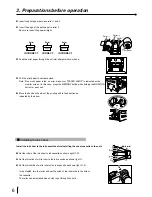
Страница 6: ...very important to transport this printer with the protective cushion installed so as not to damage the printing unit 2 2 2 2 2 Installing print paper and ink sheet Installation procedure of print pape...

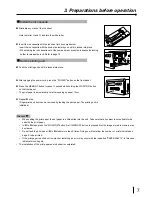
Страница 7: ...e printing unit to the direction as indicated by the arrow Roller Roller Roller Paper Paper Paper INCORRECT CORRECT INCORRECT 1 Roller 2 Roller 3 Roller Print paper 1 Installing the ink sheet Install...

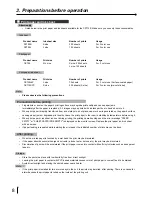
Страница 8: ...he print paper is automatically cut after sending by about 10cm 4 Repeat 3 step Fingerprints and dust can be removed by feeding the print paper The printing unit is initialized 3 Preparations before o...

Страница 9: ...quality Leave the print paper in the room to stabilize its temperature before using it When print paper or ink sheet runs out during printing the printing operation stops and the error message PAPER...

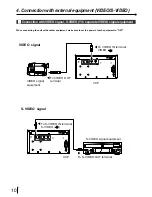
Страница 10: ...to connect with a S video signal equipment 1 1 1 1 1 Connection with Monitors Connect this unit with a monitor to check the images to be printed and the images stored in memory The following example s...

Страница 11: ...ting the unit with another equipment make sure to set the power of each equipment to OFF S VIDEO REMOTE AC LINE VIDEO 1 2 PUSH To VIDEO IN terminal VIDEO To VIDEO OUT terminal VCP VIDEO signal equipme...

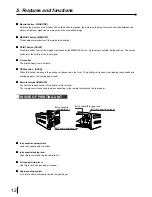
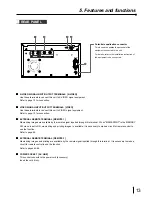
Страница 12: ...button to turn on and off the power When power is turned on the indicator lights up Do not turn off the POWER during transferring data This may cause damage 2 2 2 2 2 Alarm indicator ALARM When this u...

Страница 13: ...EN When this button is pressed the printing unit advances to the front The printing unit is used when loading ink cassette and printing paper or overcoming paper jams B B B B B Remote terminal REMOTE...

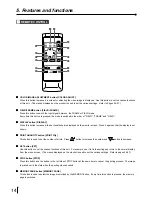
Страница 14: ...er to page 10 for connection 3 3 3 3 3 EXTERNAL REMOTE TERMINAL REMOTE 1 Memorizing images are available by the remote signal inputted through this terminal When MEM PRINT in the MEMORY SW menu is set...

Страница 15: ...PRINT QUANTITY button PRINT Q ty This button is used to set the number of prints Press button to increase the number and button to decrease 5 5 5 5 5 SET button SET Use this button to set the various...

Страница 16: ...g a function and moving to the next menu The menus displayed on the monitor is used to set the various settings Refer to pages 26 27 B B B B B MENU button MENU Press this button to display the main me...

Страница 17: ...cture image can be printed on one sheet S size printing L size printing 1 1 1 1 1 Printing Pages 17 23 Explains storing an image in the memory and printing 2 2 2 2 2 Continuous printing Page 24 Explai...

Страница 18: ...e of quickly moving objects When the FIELD mode is selected the print image will be lower in resolution The selected mode is displayed on the monitor screen of this unit PRINT Q ty PROG MENU CLEAR STO...

Страница 19: ...time you print unless the input signal is changed 1 Press the MENU button MENU MAIN MENU is displayed 2 Press the DOWN or UP shift button to select 2 SIGNAL SET 3 Press the RIGHT shift button 2 SIGNAL...

Страница 20: ...U is displayed 7 Press the SET SET button SAVE 1 2 3 is selected This menu is used to store the setting in any one of 3 programs 1 2 or 3 8 Press the RIGHT or LEFT shift button to select the program n...

Страница 21: ...you print unless the size of the ink sheet is changed 1 Press the MENU button MAIN MENU is displayed 2 Press the UP or DOWN shift button to select 4 PRINT PUSH 3 Press the RIGHT shift button Print Men...

Страница 22: ...s displayed 7 Press the SET SET button SAVE 1 2 3 is selected This menu is used to store the setting in any one of 3 programs 1 2 or 3 8 Press the RIGHT or LEFT shift button to select the program numb...

Страница 23: ...ach time the MEMORY PAGE button on the remote control is pressed the mode can be switched between FIELD A and B The character without mark shows the page under selected When pressing the MONITOR butto...

Страница 24: ...not be printed correctly when a VCR plays back in special effects playback mode such as speed search during printing The special effects playback should not be made during printing To memorize and pr...

Страница 25: ...e continuous printing is completed the set value returns to 1 Cancelling continuous printing When cancelling continuous printing A Cancelling after printing of an image is completed Press the PRINT Q...

Страница 26: ...PRINT Selecting paper size comment printing method Adjusting image outline Adjusting print image density mirror print left right inverted 5 COMMENT Making a comment 6 SYSTEM Setting print area and pr...

Страница 27: ...ns Changing a value selecting mode switching ON or OFF is switched by pressing Operation COLOR ADJUST MAIN menu COLOR ADJUST POWER ON SET SET SET SET SAVE 2 SIGNAL SET INPUT VIDEO S VIDEO FIELD NML RE...

Страница 28: ...SETTING INIT MENU MAIN MEM SW INITIALIZE OFF GO REMAINING OFF 0 CHANGE OK SET SET SET SET MEMORY SW menu SAVE SET Selecting a letter Deleting a letter Inserting a space Selecting input position Switch...

Страница 29: ...MORY SW menu Make sure to turn the POWER OFF before the above operation Displaying the sub menu Select the sub menu for each function setting to display from MEMORY SW MENU or MAIN MENU 1 Press the UP...

Страница 30: ...t and the Main menu display or Memory SW menu is shown 5 Press the SET SET button In the Main menu SAVE 1 2 3 is selected Store the setting of function on the sub menu 1 6 to program 1 2 and 3 Refer t...

Страница 31: ...und SAVE Storing the above setting in 3 kinds of memories SAVE This menu is shown in the lowest position on the MAIN MENU Function Storing the setting value on the menu 1 6 Store the setting of functi...

Страница 32: ...ance Blue Function Adjust the blue subcontrast including white of printing image The each function and setting area is as follows display adjusting 64 adjusting area 63 BRT Brightness Darker Brighter...

Страница 33: ...nction Adjust the contrast of printing image COLOR Function Adjust the color of printing image The each function and setting area is as follows Item Adjustment 32 Adjusting area 31 BRT Brightness Dark...

Страница 34: ...distortion on the top may occur when the VCR image is input in pause field by field playback or FF playback mode In this case AFC function is set to OFF ON AFC available OFF AFC invalid AGC Function...

Страница 35: ...nts are available OFF Multi image prints are not available Set the number of images 2 4 16 image in a print Set the number of images in a print and the size with MULTI MODE IMAGES and SEPARATE menus R...

Страница 36: ...k sheet and selecting S the image can be printed on S size Also the number of prints is as follows When S size ink sheet is set S size printing is made even if L is selected in print mode GRAD Gradati...

Страница 37: ...nted When selecting DATA the following information is printed ADJ 10 11 12 13 14 15 15 17 18 BRT CONT COLOR TINT W B RED W B BLUE ANALOG BRT ANALOG CONT ANALOG COLOR When selecting ON in 3 ADDITIONAL...

Страница 38: ...ted depending on printing size When WIDE SET EXTRA is selected in 3 PRINT SETTING in MEMORY SW MENU USER ADJ User Adjustment Function This menu is used to display USER SIZE ADJ menu Press the RIGHT sh...

Страница 39: ...isplayed in TOP BOTTOM LEFT and RIGHT The value is the basis of change When MODE PHOTO is selected in 3 ADDITIONAL SIZE is not displayed and setting can not be changed TOP BOTTOM LEFT RIGHT Function S...

Страница 40: ...ng or changing a letter or changing select CANCEL Press the MENU MENU button to switch the menu screen A B C 5 COMMENT POSITION 2 SELECT 20123456789 CHANGE OK CANCEL Comment making display Use these b...

Страница 41: ...NGE OK CANCEL 5 COMMENT POSITION 42 SELECT 20123456789 CHANGE OK CANCEL 3 Press the RIGHT shift button 4 Repeat the above steps 1 2 and 3 Changing character type Page 41 Deleting a letter or inserting...

Страница 42: ...ion to be edited The selected letter or space will be deleted A space will be inserted to the previous position of the selected position or letter 2 Press the MENU MENU button The comment editing disp...

Страница 43: ...MENU display is shown 4 Press the SET SET button SAVE 1 2 3 is selected 5 Press the SET SET button The made comment is stored in the memory Set the COMMENT in MAIN MENU NOTE When printing in FIELD mo...

Страница 44: ...REMOTE SET Setting the BUSY signal level and definition of the external terminal 1 2 3 PRINT SET Print direction printing speed cutting position vertical position extra size print 4 SYSTEM SET Initial...

Страница 45: ...g printed MEM STOP Memory and Stop Function When setting to ON the next image is not overlaid in the memory after the last image is stored in the memory ON The image is not overlaid in the memory OFF...

Страница 46: ...inting or Memorization is impossible Mechanical error or Print paper or ink sheet error PRINTING MECHA ERR MEMORY STOP MECHA ERR MEDIA ERR MEMORY STOP MECHA ERR MEMORY STOP PRINTING MECHA ERR MEDIA ER...

Страница 47: ...ction Selecting the print direction NML The margin is made on the lower position REV The margin is made on the upper position REV NML This function is available on S size paper except 2 image print PH...

Страница 48: ...tialized MEM SW The memorized settings in MEMORY SW MENU are initialized Select MAIN or MEM SW to initialize the settings When INITIALIZE is set to GO initializing is carried out INITIALIZE Initializi...

Страница 49: ...e can be inserted between the images when two or more images are printed on a sheet 2 image 4 image 16 image S size paper L size paper S size paper L size paper S size paper L size paper 4 Strobe prin...

Страница 50: ...images are stored in FRAME 4 image print consists of the memorized 4 images Images can not be stored in FIELD The mode display on the monitor screen will be 1 2 3 4 SAME The same 16 images are printed...

Страница 51: ...A shows the direction of images OPERATION Setting the multi print menu Setting the multi print function 1 Press the MENU button Then Press the DOWN or UP shift button to select 3 ADDITIONAL PUSH 2 Pre...

Страница 52: ...eted When 2 is selected 2 images can be stored in memory When 4 is selected 4 images can be stored in memory When 16 is selected 16 images can be stored in memory Displaying the image from input signa...

Страница 53: ...ge is stored in FIELD A B and FIELD A B 2 multi image consists of images of FIELD A B and FIELD A B The image is stored in the memory page with mark FRAME Image can not be stored in memory The mode di...

Страница 54: ...e printed The image is stored in the selected position Printing the images 1 Press the MONITOR button to display the memorized image MEMORY is displayed on the monitor When MODE is set to SAME at FIEL...

Страница 55: ...is displayed on the menu screen IMAGES 2 4 16 is displayed on the lower line 4 Press the DOWN or UP shift button to select MODE SAME DIFF PHOTO Then press the RIGHT shift button to select PHOTO IMAGES...

Страница 56: ...utton to select the program number 1 2 or 3 to store the setting The setting will be overlaid When keeping the stored program do not select the program No in which the setting is stored 5 Press the SE...

Страница 57: ...e PRINT button The set PHOTO image is printed Printing on pre cut sticker Pre cut sticker is a pre cut sheet for sticking on a business card etc 16 images can be printed on a S size sheet 16 multi ima...

Страница 58: ...Refer to page 65 When the remote terminal 2 is not used HIGH level is set Set CONNECT in 2 REMOTE SETTING in MEMORY SW MENU to PRE CUT Refer to page 45 If NORMAL is selected the image is printed accor...

Страница 59: ...5 menus Refer to 1 MULTI PRINT and 2 PHOTO PRINT for the multi image type Setting the SEPARATE function 1 Press the DOWN shift button to select SEPARATE OFF ON 2 Press the RIGHT shift button to selec...

Страница 60: ...size are memorized in one page the margin is determined according to the largest width of the image in the page 4 4 4 4 4 STROBE PRINTS OPERATION Selecting FIELD or FRAME Setting STROBE function 1 Pre...

Страница 61: ...16 images in STROBE mode This setting is used to memorize multi image in order in one memory page 1 Set the mode to MULTI Select ON in MULTI in 3 ADDITIONAL 2 Set the number of images and print size...

Страница 62: ...of image memory is automatically set To store the images in strobe memory again while MEM STOP is set to ON at multi image and strobe memory setting press the CLEAR button or press the MEMORY button...

Страница 63: ...ulti image This is the function to store the set number of multi images in memory page FRAME FIELD A or FIELD B in order at set interval and print repeatedly 1 Set multi image mode Set MULTI OFF ON to...

Страница 64: ...will be overlaid When keeping the stored program do not select the program No in which the setting is stored 5 Press the SET SET button The source image image from the input signal or memorized image...

Страница 65: ...ignal becomes LOW from HIGH the image is stored in memory When the signal has been LOW for 60msec or more the image is stored in memory 3 BUSY PC When REMOTE BUSY is set to HIGH HIGH The VCP cannot ac...

Страница 66: ...USY 2 4 BUSY 1 PC HIGH The VCP cannot accept MEMORY PRINT and PHOTO signals LOW The VCP can accept MEMORY PRINT and PHOTO signals When BUSY LEVEL in REMOTE SETTING is set to LOW the setting of HIGH an...

Страница 67: ...ecrease 0D 0E SET button 0F STOP button 12 PROG Program button 13 PRINT button 15 FIELD FRAME button 16 COLOR ADJUST button 17 MEMORY button 18 DISPLAY button 1C MEMORY PAGE button 1D MONITOR button I...

Страница 68: ...up Paper jamming occurs Other defects Countermeasures Insert the printing unit until it is locked in the unit Set the print paper correctly Refer to pages 5 6 Install the ink cassette Refer to page 7...

Страница 69: ...ote 3 This is an operation for initialization Make sure to press the MONITOR button first If the MEMORY button is pressed first a new image will be stored in memory erasing any previously stored image...

Страница 70: ...page 33 Is the image stored in memory displayed on the monitor screen Press the MONITOR button to display the source image LIVE Are the images being printed Store image in memory after completing prin...

Страница 71: ...ea set correctly in the USER SIZE ADJ Check the setting of the print area Refer to page 38 Is the color of the image stored in the memory adjusted Adjust the color of the image stored in the memory wi...

Страница 72: ...ote Never use other than cleaning cloth for video head It may cause damage to the thermal head When the symptom of the poor print quality is not corrected even if the head is cleaned replacing the the...

Страница 73: ...3 color use Product name PK700S PK700L Ink sheet size S size L size No of prints 200 125 Usage For 3 color use For 3 color use Ink sheet print paper Product name CK700L4P CK710SPC Ink sheet size L si...

Страница 74: ...l paper S size 110 x 107 mm Printing area Wide mode 100 x 73 mm Middle mode 94 x 71 mm Narrow mode 91 x 68 mm Supply method Automatic Input terminal Composite video 1 BNC type connectors S VIDEO 1 S V...

Страница 75: ...ale Colleoni Palazzo Perseo Ingresso 2 Via Paracelso 12 20041 Agrate Brianza Milano Italy Phone 039 60531 FAX 039 6057694 Benelux Branch Nijverheidsweg 23 A 3641 RP Postbus 222 3640 AE Mijdrecht Phone...

Отзывы: