background image

-

 49 

-

 '17 • SCM-T-225

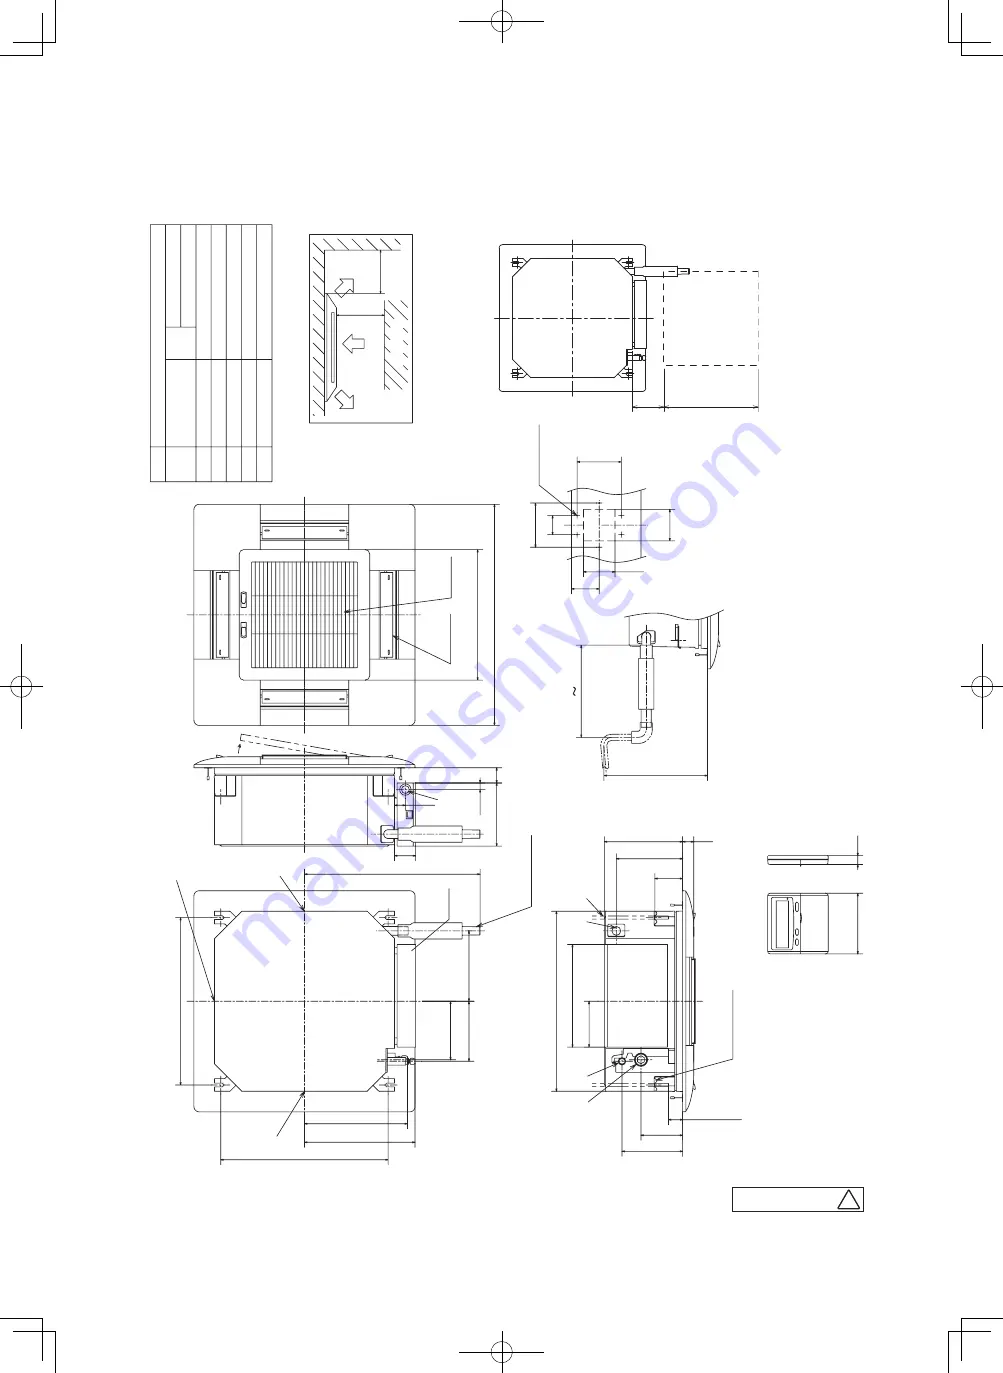
D

G

F

C

B

Hole for wiring

Suspension bolts

Drain piping

Liquid piping

M10 or M8

VP20 

I.D.20,O.D.26

  Note 

2

φ

6.35

1

4"

)(

Flar

e

Gas piping

Model

A

Symbol

25,35

φ

9.52

3

8"

)(

Flar

e

50,60

φ

12.7

1

2"

)(

Flar

e

Content

Knock out

φ

25

Unit:mm

2

) 

Pr

epar

e the connecting socket

VP20

on site. 


Notes  


1

) 

The model name label is attached on the contr

ol box lid.


3

) 

This unit is designed for 2x2 grid ceiling.


pr

ovide an inspection por

t on the contr

ol box side.


If it is installed on a ceiling other than 2x2 grid ceiling,

Obstacle

Wir

ed r

emote contr

ol

Space for installation and service

Option

Make a space of 4000 or mor

e between

the units when installing mor

e than one.

Ducting for air outlet

6-

φ

4

Holes for

Hole

tapping scr

ews

Hanger plate for suspension bolt

Drain hose piece

Accessor

y

Contr

ol

box

Installed on site

Decorative panel

Air supply

Air r

etur

n

grille

G

G

G

G

D

A

C

B

F

1000 

or mor

e

1000 or mor

e

19

120

600 

or less


Max. Drain lift

60

140

100

100

88

140

145

325

570

45  

or more

132

192

35

88

210

248

185

190

223

326

350

530 

Suspension bolts pitch

530 

Suspension bolts pitch

556

67

200

48

413

700

21

35

295     325

Control box

Inspection hole

Service space

150

150 or more

(4)   4 way ceiling cassette type (FDTC)

Models FDTC25VF, 35VF, 50VF, 60VF

C

PJA003Z338

Содержание SRK60ZSX-S

Страница 1: ...R UNIT Wall mounted type SRK20ZSX S 25ZSX S 35ZSX S 50ZSX S 60ZSX S SRK20ZS S 25ZS S 35ZS S 50ZS S Floor standing type SRF25ZMX S 35ZMX S 50ZMX S SRF25ZMA S 35ZMA S 50ZMA S 4 way ceiling cassette type FDTC25VF 35VF 50VF 60VF Ceiling concealed type SRR25ZM S 35ZM S 50ZM S 60ZM S Ceiling suspended type FDEN50VF FDE50VG Duct connected Low Middle static pressure type FDUM50VF ...

Страница 2: ...ic pressure type FDUM 52 5 Ceiling suspended type FDEN FDE 61 6 Duct connected Low Middle static pressure type FDUM 63 2 Floor standing type SRF 46 2 2 Exterior dimensions 44 44 1 2 Exterior dimensions 9 1 3 Electrical wiring 10 1 4 Noise level 11 1 5 Application data 14 3 Ceiling concealed type SRR 47 4 4 way ceiling cassette type FDTC 49 1 Wall mounted type SRK 2 Floor standing type SRF 58 56 3 ...

Страница 3: ...te type FDTC 3 PIPING SYSTEM 121 4 RANGE OF USAGE LIMITATIONS 122 7 1 SRK SRF and SRR series 138 7 OUTLINE OF OPERATION CONTROL BY MICROCOMPUTER 138 7 1 1 SRK ZSX series 138 7 1 2 SRK ZS series 148 7 1 3 SRF SRR series 158 7 2 FDTC FDEN FDE and FDUM series 170 175 7 2 3 Operation control function by the indoor control 7 2 2 Operation control function by the wired remote control 172 7 2 1 Remote co...

Страница 4: ...ction of cooling heating external input function 190 25 Fan control at heating startup 190 27 Return air temperature compensation 26 Room temperature detection temperature compensation during heating 190 185 21 External input output control CnT or CnTA 181 11 Compressor inching prevention control 22 Operation permission prohibition 187 23 Temporary stop input 189 190 190 190 190 191 28 High power ...

Страница 5: ...nditioner does not run at all 204 5 Self diagnosis table 205 6 Service mode Trouble mode access function 206 214 7 Inspection procedures corresponding to detail of trouble 8 Phenomenon observed after shortcircuit wire breakage on sensor 219 1 Cooling overload protective control 195 10 Compressor overheat protection 199 6 Heating low outdoor temperature protective control 198 8 Crankcase heater 198...

Страница 6: ... 240 2 Troubleshooting 1 List of troubles 239 6 Outdoor unit inspection points 238 1 FDTC series RCN TC 24W E2 314 2 FDEN FDE series RCN E E2 322 330 3 FDUM series RCN KIT4 E2 11 Inspection procedure for blown fuse on the indoor and outdoor PCB 221 12 Outdoor unit inspection points 222 221 10 How to make sure of wireless remote control 8 2 1 Diagnosing of microcomputer circuit 224 8 2 FDTC FDEN FD...

Страница 7: ...mounted type SRK ZS S Duct connected Low Middle static pressure type FDUM 4 way ceiling cassette type FDTC Ceiling suspended type FDEN Ceiling suspended type FDE Example Indoor unit SRK 20 Z Series code Inverter type Product capacity Model name SRK SRF SRR FDTC FDEN FDE FDUM SX S Wall mounted type Floor standing type Ceiling concealed type 4 way ceiling cassette type Ceiling suspended type Duct co...

Страница 8: ...ts Compressor overheat protection Overcurrent protection Frost protection Serial signal error protection Outdoor fan motor error protection Heating overload protection High pressure control Cooling overload protection Installation data Refrigerant piping size O D mm Liquid line φ6 35 1 4 x 4 Gas line φ9 52 3 8 x 4 Connecting method Flare connection Insulation for piping Necessary Both sides indepe...

Страница 9: ...erheat protection Overcurrent protection Frost protection Serial signal error protection Outdoor fan motor error protection Heating overload protection High pressure control Cooling overload protection Installation data Refrigerant piping size O D mm Liquid line φ6 35 1 4 x 4 Gas line φ9 52 3 8 x 4 Connecting method Flare connection Insulation for piping Necessary Both sides independent Refrigeran...

Страница 10: ...rpendicularly to the dominant wind direction 4 Leave 1 2m or more space above the unit 5 A wall in front of the blower outlet must not exceed the unit s height 6 The model name label is attached on the rear panel D Terminal block C E Symbol Content A Service valve connection gas side φ9 52 3 8 Flare B Service valve connection liquid side φ6 35 1 4 Flare C Pipe cable draw out hole D Drain discharge...

Страница 11: ...SUB PWB 1 MAIN t t t T2 T1 L YE YE TH1 TH2 TH3 2 t TH4 T12 T11 L BL BL 2 N 2 N 2 N CN20S CNHEAT 20S HEATER WH RD 2 2 coil CM To indoor unit Power cable Signal wire Earth wire 1 3 T 1A L 250V F3 FUSE 4 4 4 4 3 SCM71ZM S1 Model name 2 5mm x 3 12 1 5mm x 4 20 0 2 2 2 N Power cable indoor outdoor connecting wires Switchgear or circuit breaker capacity should be chosen according to national or regional...

Страница 12: ... T1 H1 Mode Rated capacity value Model SCM80ZM S1 30 0 40 0 50 0 60 0 70 0 80 0 90 0 63 125 250 500 1000 2000 4000 8000 Mid octave band frequency Hz Sound power level dB 30 0 40 0 50 0 60 0 70 0 80 0 90 0 63 125 250 500 1000 2000 4000 8000 Mid octave band frequency Hz Sound power level dB Cooling Heating Cooling Heating 1 4 Noise level 1 Sound power level Model SCM71ZM S1 ...

Страница 13: ... value 10 20 30 40 50 60 70 10 20 30 40 50 60 70 N50 N30 N40 N60 N70 N20 63 125 250 500 1000 2000 4000 8000 Mid octave band frequency Hz Sound pressure level dB Standard 2 10 5 Pa Model SCM80ZM S1 10 20 30 40 50 60 70 10 20 30 40 50 60 70 63 125 250 500 1000 2000 4000 8000 Sound pressure level dB Standard 2 10 5 Pa N50 N30 N40 N60 N70 N20 Mid octave band frequency Hz 2 Sound pressure level a Rated...

Страница 14: ...e Silent 10 20 30 40 50 60 70 10 20 30 40 50 60 70 63 125 250 500 1000 2000 4000 8000 Sound pressure level dB Standard 2 10 5 Pa Mid octave band frequency Hz N50 N30 N40 N60 N70 N20 Model SCM80ZM S1 10 20 30 40 50 60 70 10 20 30 40 50 60 70 63 125 250 500 1000 2000 4000 8000 Sound pressure level dB Standard 2 10 5 Pa Mid octave band frequency Hz N50 N30 N40 N60 N70 N20 b Silent mode Model SCM71ZM ...

Страница 15: ...untings can cause anomalous heat production or Do not process splice or modify the power cable or share the socket with other power plugs Improper power cable or power plug can cause or electric shock due to poor connection insuf insulation or over current Do not perform any change in protective device or its setup condition yourself Changing protective device can cause electric shock or burst Be ...

Страница 16: ...ulation the following measures are required 1 Location of strong wind Place the unit with its outlet side facing the wall Place the unit such that the direction of air from the outlet gets perpendicular to the wind direc tion Over 500mm Wind direction Wind direction 2 Location of snow accumulation Install the unit on the base so that the bottom is higher than snow cover surface Install the unit un...

Страница 17: ...inter does not swing back 5 Remove valve caps from liquid service valve and gas operation valve 6 Turn the liquid service valve s rod 90 degree counterclockwise with a hexagonal wrench key to open valve Close it after 5 seconds and check for gas leakage Using soapy water check for gas leakage from indoor unit s and outdoor unit s and valve rods Wipe off all the water after completing the check 7 D...

Страница 18: ...E Make sure to match the piping and wiring from each unit to the outdoor unit Be careful because if connections are wrong normal operation cannot be achieved and may damage the compressor 1 Heating and condensation prevention 1 Dress the connecting pipes both liquid and gas pipes with insulation to prevent it from heating and dew condensation Use the heat insulating material which can withstand 12...

Страница 19: ...ntrol Room temperature control Microcomputer thermostat Operation display RUN Green TIMER Yellow ECO Blue Safety equipments Frost protection Serial signal error protection Indoor fan motor error protection Installation data Refrigerant piping size O D mm Liquid line φ6 35 1 4 Gas line φ9 52 3 8 Connecting method Flare connection Attached length of piping m Liquid line 0 55 Gas line 0 48 Insulation...

Страница 20: ... thermostat Operation display RUN Green TIMER Yellow ECO Blue Safety equipments Frost protection Serial signal error protection Indoor fan motor error protection Installation data Refrigerant piping size O D mm Liquid line φ6 35 1 4 Gas line φ9 52 3 8 Connecting method Flare connection Attached length of piping m Liquid line 0 55 Gas line 0 48 Insulation for piping Necessary Both sides independent...

Страница 21: ... thermostat Operation display RUN Green TIMER Yellow ECO Blue Safety equipments Frost protection Serial signal error protection Indoor fan motor error protection Installation data Refrigerant piping size O D mm Liquid line φ6 35 1 4 Gas line φ9 52 3 8 Connecting method Flare connection Attached length of piping m Liquid line 0 55 Gas line 0 48 Insulation for piping Necessary Both sides independent...

Страница 22: ... thermostat Operation display RUN Green TIMER Yellow ECO Blue Safety equipments Frost protection Serial signal error protection Indoor fan motor error protection Installation data Refrigerant piping size O D mm Liquid line φ6 35 1 4 Gas line φ12 7 1 2 Connecting method Flare connection Attached length of piping m Liquid line 0 55 Gas line 0 48 Insulation for piping Necessary Both sides independent...

Страница 23: ... thermostat Operation display RUN Green TIMER Yellow ECO Blue Safety equipments Frost protection Serial signal error protection Indoor fan motor error protection Installation data Refrigerant piping size O D mm Liquid line φ6 35 1 4 Gas line φ12 7 1 2 Connecting method Flare connection Attached length of piping m Liquid line 0 55 Gas line 0 48 Insulation for piping Necessary Both sides independent...

Страница 24: ...splay RUN Green TIMER Yellow Safety equipments Frost protection Serial signal error protection Indoor fan motor error protection Installation data Refrigerant piping size O D mm Liquid line φ6 35 1 4 Gas line φ9 52 3 8 Connecting method Flare connection Attached length of piping m Liquid line 0 54 Gas line 0 47 Insulation for piping Necessary Both sides independent Drain hose Hose connectable VP16...

Страница 25: ...hermostat Operation display RUN Green TIMER Yellow Safety equipments Frost protection Serial signal error protection Indoor fan motor error protection Installation data Refrigerant piping size O D mm Liquid line φ6 35 1 4 Gas line φ9 52 3 8 Connecting method Flare connection Attached length of piping m Liquid line 0 54 Gas line 0 47 Insulation for piping Necessary Both sides independent Drain hose...

Страница 26: ...eration display RUN Green TIMER Yellow Safety equipments Frost protection Serial signal error protection Indoor fan motor error protection Installation data Refrigerant piping size O D mm Liquid line φ6 35 1 4 Gas line φ9 52 3 8 Connecting method Flare connection Attached length of piping m Liquid line 0 54 Gas line 0 47 Insulation for piping Necessary Both sides independent Drain hose Hose connec...

Страница 27: ...hermostat Operation display RUN Green TIMER Yellow Safety equipments Frost protection Serial signal error protection Indoor fan motor error protection Installation data Refrigerant piping size O D mm Liquid line φ6 35 1 4 Gas line φ12 7 1 2 Connecting method Flare connection Attached length of piping m Liquid line 0 54 Gas line 0 47 Insulation for piping Necessary Both sides independent Drain hose...

Страница 28: ...ER Yellow HI POWER Green Air outlet selection Green ECONO Green Safety equipments Frost protection Serial signal error protection Indoor fan motor error protection Installation data Refrigerant piping size O D mm Liquid line φ6 35 1 4 Gas line φ9 52 3 8 Connecting method Flare connection Attached length of piping m Insulation for piping Necessary Both sides independent Drain hose Hose connectable ...

Страница 29: ...n Green ECONO Green Safety equipments Frost protection Serial signal error protection Indoor fan motor error protection Installation data Refrigerant piping size O D mm Liquid line φ6 35 1 4 Gas line φ9 52 3 8 Connecting method Flare connection Attached length of piping m Insulation for piping Necessary Both sides independent Drain hose Hose connectable VP16 Drain pump max lift height mm Interconn...

Страница 30: ... RUN Green TIMER Yellow HI POWER Green Air outlet selection Green ECONO Green Safety equipments Frost protection Serial signal error protection Indoor fan motor error protection Installation data Refrigerant piping size O D mm Liquid line φ6 35 1 4 Gas line φ12 7 1 2 Connecting method Flare connection Attached length of piping m Insulation for piping Necessary Both sides independent Drain hose Hos...

Страница 31: ...RUN Green TIMER Yellow HI POWER Green Air outlet selection Green ECONO Green Safety equipments Frost protection Serial signal error protection Indoor fan motor error protection Installation data Refrigerant piping size O D mm Liquid line φ6 35 1 4 Gas line φ9 52 3 8 Connecting method Flare connection Attached length of piping m Insulation for piping Necessary Both sides independent Drain hose Hose...

Страница 32: ... Green ECONO Green Safety equipments Frost protection Serial signal error protection Indoor fan motor error protection Installation data Refrigerant piping size O D mm Liquid line φ6 35 1 4 Gas line φ9 52 3 8 Connecting method Flare connection Attached length of piping m Insulation for piping Necessary Both sides independent Drain hose Hose connectable VP16 Drain pump max lift height mm Interconne...

Страница 33: ... RUN Green TIMER Yellow HI POWER Green Air outlet selection Green ECONO Green Safety equipments Frost protection Serial signal error protection Indoor fan motor error protection Installation data Refrigerant piping size O D mm Liquid line φ6 35 1 4 Gas line φ12 7 1 2 Connecting method Flare connection Attached length of piping m Insulation for piping Necessary Both sides independent Drain hose Hos...

Страница 34: ...MER Yellow HI POWER Green ECONO Green Safety equipments Drain error protection Frost protection Serial signal error protection Indoor fan motor error protection Installation data Refrigerant piping size O D mm Liquid line φ6 35 1 4 Gas line φ9 52 3 8 Connecting method Flare connection Insulation for piping Necessary Both sides independent Drain hose Hose connectable VP25 Drain pump max lift height...

Страница 35: ...n TIMER Yellow HI POWER Green ECONO Green Safety equipments Drain error protection Frost protection Serial signal error protection Indoor fan motor error protection Installation data Refrigerant piping size O D mm Liquid line φ6 35 1 4 Gas line φ9 52 3 8 Connecting method Flare connection Insulation for piping Necessary Both sides independent Drain hose Hose connectable VP25 Drain pump max lift he...

Страница 36: ...n TIMER Yellow HI POWER Green ECONO Green Safety equipments Drain error protection Frost protection Serial signal error protection Indoor fan motor error protection Installation data Refrigerant piping size O D mm Liquid line φ6 35 1 4 Gas line φ12 7 1 2 Connecting method Flare connection Insulation for piping Necessary Both sides independent Drain hose Hose connectable VP25 Drain pump max lift he...

Страница 37: ...en TIMER Yellow HI POWER Green ECONO Green Safety equipments Drain error protection Frost protection Serial signal error protection Indoor fan motor error protection Installation data Refrigerant piping size O D mm Liquid line φ6 35 1 4 Gas line φ12 7 1 2 Connecting method Flare connection Insulation for piping Necessary Both sides independent Drain hose Hose connectable VP25 Drain pump max lift h...

Страница 38: ... Noise heat Polyurethane form Remote control Wired RC EX3 RC E5 RCH E3 option Wireless RCN TC 24W E2 option Room temperature control Thermostat by electronics Safety equipment Overload protection for fan motor Frost protection thermostat Installation data Refrigerant piping size mm Liquid line φ6 35 1 4 Gas line φ9 52 3 8 Connecting method Flare piping Drain pump Built in Drain pump Drain Hose con...

Страница 39: ...Wired RC EX3 RC E5 RCH E3 option Wireless RCN TC 24W E2 option Room temperature control Thermostat by electronics Safety equipment Overload protection for fan motor Frost protection thermostat Installation data Refrigerant piping size mm Liquid line φ6 35 1 4 Gas line φ9 52 3 8 Connecting method Flare piping Drain pump Built in Drain pump Drain Hose connectable with VP20 Insulation for piping Nece...

Страница 40: ...ethane form Remote control Wired RC EX3 RC E5 RCH E3 option Wireless RCN TC 24W E2 option Room temperature control Thermostat by electronics Safety equipment Overload protection for fan motor Frost protection thermostat Installation data Refrigerant piping size mm Liquid line φ6 35 1 4 Gas line φ12 7 1 2 Connecting method Flare piping Drain pump Built in Drain pump Drain Hose connectable with VP20...

Страница 41: ...l Wired RC EX3 RC E5 RCH E3 option Wireless RCN TC 24W E2 option Room temperature control Thermostat by electronics Safety equipment Overload protection for fan motor Frost protection thermostat Installation data Refrigerant piping size mm Liquid line φ6 35 1 4 Gas line φ12 7 1 2 Connecting method Flare piping Drain pump Built in Drain pump Drain Hose connectable with VP20 Insulation for piping Ne...

Страница 42: ...oom temperature control Thermostat by electronics Safety equipment Internal thermostat for fan motor Frost protection thermostat Installation data Refrigerant piping size mm Liquid line φ6 35 1 4 Gas line φ12 7 1 2 Connecting method Flare piping Drain pump Drain Hose connectable with VP20 Insulation for piping Necessary both Liquid Gas lines IP number IPX0 Standard accessories Mounting kit Drain h...

Страница 43: ...ed RC EX3 RC E5 RCH E3 option wireless RCN E E2 option Room temperature control Thermostat by electronics Safety equipment Internal thermostat for fan motor Frost protection thermostat Installation data Refrigerant piping size mm Liquid line φ6 35 1 4 Gas line φ12 7 1 2 Connecting method Flare piping Drain pump Drain Hose connectable with VP20 Insulation for piping Necessary both Liquid Gas lines ...

Страница 44: ...an motor Frost protection thermostat Installation data Refrigerant piping size mm Liquid line I Uφ6 35 1 4 Gas line φ12 7 1 2 Connecting method Flare piping Drain pump Built in Drain pump Drain Hose connectable with VP25 Insulation for piping Necessary both Liquid Gas lines IP number IPX0 Standard accessories Mounting kit Drain hose Notes 1 The data are measured at the following conditions The pip...

Страница 45: ...control the interface kit SC BIKN2 E is required 120 19 60 24 167 120 19 920 305 60 45 55 60 35 55 59 5 12 5 45 59 5 12 5 61 220 3 100 100 118 5 118 5 683 145 630 145 176 568 176 460 460 10 3 277 3 17 4 56 4 47 48 6 76 6 47 65 70 SRK 50 60 486 548 533 65 120 88 6 Service space SRK 20 25 35 480 Service space Service space Service space Outlet for downward piping Refer to the top view Unit Installat...

Страница 46: ... front Unit mm Notes 1 The model name label is attached on the right side of the unit 2 To connect the wired remote control the interface kit SC BIKN2 E is required 120 19 60 24 167 45 45 870 290 Outlet for downward piping Refer to the top view 230 3 60 13 530 450 185 190 43 170 585 13 Service space Unit Service space Service space Installation board 142 5 142 5 100 50 9 47 268 47 80 100 Terminal ...

Страница 47: ...rvice when viewing from the front Option Wired remote control Wireless remote control G Screw point fasten the indoor unit φ5 860 238 15 60 60 100 60 55 157 2 76 3 85 3 22 7 185 25 5 30 5 198 804 65 65 45 585 30 5 103 5 585 45 83 5 620 156 5 5 2 726 Notes 1 The model name label is attached on the rightside of the unit 2 It takes the interface kit SC BIKN2 E to connect the wired remote control 3 In...

Страница 48: ...ng D Hole for wiring E Suspension bolts M10 Symbol Content φ6 35 1 4 Flare φ9 52 3 8 Flare Drain piping C2 Gravity drainage VP25 I D 25 O D 32 Used with attached connector VP25 I D 25 O D 32 Used with attached connector φ25 x 2 Unit mm Wired remote control Option Wireless remote control Remote control signal receiver Remote control signal receiver Cord length 1 8m Notes 1 The model name label is a...

Страница 49: ...φ6 35 1 4 Flare φ12 7 1 2 Flare Drain piping C2 Gravity drainage VP25 I D 25 O D 32 Used with attached connector VP25 I D 25 O D 32 Used with attached connector φ25 x 2 Control box Connector Accessory Installed on site Remote control signal receiver Cord length 1 8m 120 19 60 24 167 29 5 7 5 28 68 7 85 101 30 950 990 Suspension bolts pitch 457 22 21 500 380 168 105 200 30 326 413 55 860 65 58 165 ...

Страница 50: ...ed remote control Space for installation and service Option Make a space of 4000 or more between the units when installing more than one Ducting for air outlet 6 φ 4 Holes for Hole tapping screws Hanger plate for suspension bolt Drain hose piece Accessory Control box Installed on site Decorative panel Air supply Air return grille G G G G D A C B F 1000 or more 1000 or more 19 120 600 or less Max D...

Страница 51: ...Piping can be connected from 3 different direction Remove the cutout using side cutter or similar tool Obstacle Space for installation and service or more Air return grille Receiving part Air supply Drain hose piece 㧔Accesory 0 3m㧕 㧔Installed on site㧕 PE cover Plate cover or more or more or more Drain piping 㧔for left back㧕 G 㧔Knock out㧕 㧔for left㧕 drain piping Hole for 68 410 690 5 135 145 27 40 ...

Страница 52: ... 51 17 SCM T 225 C 2 C 1 C 2 C 1 C 2 C 1 A B G E F D B A PFA004Z025 Model FDE50VG ...

Страница 53: ... φ150 Knock out φ125 Knock out C2 Drain piping Gravity drainage φ6 35 1 4 Flare H Inspection hole 450X450 φ170 φ124 φ170 tapping screws Holes for Space for installation and service or more or more or more or more Case 1 From side of unit Select either of two cases to keep space for installation and services or more or more Case 2 From bottom of unit 4 φ4 Suspension bolts pitch Air supply duct Cont...

Страница 54: ... 53 17 SCM T 225 Models FDTC FDEN FDE FDUM Option parts 7 Remote control a Wireless remote control Models SRK SRF SRR Typical example 3 Remote control Unit mm 60 24 167 60 24 167 ...

Страница 55: ...Adapted to RoHS directive Exterior appearance Munsell color Pearl White N8 5 near equivalent white allen cores cores cores cores b Wired remote control Option parts Interface kit SC BIKN2 E is required to use the wired remote control Models SRK SRF and SRR only Model RC EX3 ...

Страница 56: ...cores 2 0mm2 2 cores Under 300m Under 400m Under 600m Upper part Lower part Lower case Sheath Upper cace Board Wiring Upper Lower X Y Sheath Upper cace Board Wiring Upper Lower Y X Tighten the screws after cutting off the thin part of screw mounting part Embedded mounting Exterior appearance Munsell color Pearl White N8 5 near equivalent The peeling off length of sheath The peeling off length of s...

Страница 57: ...CABLE SIGNAL WIRE M 5 5 5 M 5 M 5 LEFT MOTOR LOUVER RIGHT MOTOR LOUVER RIGHT LOWER MOTOR FLAP UPPER MOTOR FLAP LEFT MOTOR INLET RIGHT MOTOR INLET SW LIMIT PANEL INLET MOTOR FAN STACK DIODE 1 3 EXCHANGER HEAT EXCHANGER HEAT Power source 1 Phase 220 240V 50Hz 220V 60Hz TO OUTDOOR UNIT CNJ 3 SENSOR ROOM TEMP SENSOR 1 HEAT EXCHANGER SENSOR 2 HEAT EXCHANGER SENSOR HUMIDITY SENSOR MOTION 3 1 CNZ CNX CNY...

Страница 58: ...5A PRINTED CNF CNE CNX CNG 4 CNU 1 3 6 5 35 50 CNY M M M 5 5 U 2 8 2 t o CNS CNM M 5 TO OUTDOOR S N J L G 1 CIRCUIT BOARD INTERFACE KIT RD BK WH Y BL WIRELESS DISPLAY BACK UP SW UNIT BK WH RD Y G HEAT EXCHANGER 2 N 3 Y G HD ONLY t o 2 t o R AMP 2 HEAT EXCHANGER 5 FM i SM i LM 1 LM 2 F Va Th 1 Th 2 Th 3 T DS LM 1 2 SM i Louver motor Th 1 Th 2 3 Yellow Y Humidity sensor HD Power source 1 Phase AC220...

Страница 59: ... Y Y G BK t Th2 1 Th2 2 Th3 DM 1 DM 2 SM 1 SM 2 FM i DS t t TO OUTDOOR UNIT HEAT EXCHANGER 1 2 N 3 POWER CABLE SIGNAL WIRE 1 2 N 3 Power source 1 Phase AC220 240V 50Hz T AIR SELECTION SW Color marks Meaning of marks Blue Black BK Red BL RD White WH Yellow Green Y G Yellow Y Color Mark Heat exchanger sensor Humidity sensor Fan motor Room temp sensor Flap motor Th1 Th2 1 2 Th3 Diode stack DS Fuse F ...

Страница 60: ... L 250V F 2 F 3 15A L 250V Y BK RD CNS t t t 5 1 8 2 RD TB CNY Color marks Meaning of marks Blue Black BK Red BL RD White WH Yellow Y Color Mark Heat exchanger sensor Fan motor Room temp sensor Th1 Th2 1 2 Diode stack DS Fuse F 1 2 Connector CNE FM i Terminal block TB Description Item Drain motor DM CNG CNS CNU CNW CNY DS Va Th1 Th2 1 Th2 2 FM i Yellow Green Y G Float switch FS Varistor Va INTERFA...

Страница 61: ...ting line between BL 1 Y GN Y GN Y GN 6 7 8 9 BK BK BK BK 10 BK 11 BK 12 BK 13 BK 14 BK 15 BK 16 BK 17 BK BK 18 BK 19 BK 20 BK 1 2 3 4 5 BK BK BK BK BK BK BK BK BK BK BK BK BK BK BK BK BK BK BK BK BK 1 2 3 4 5 1 2 3 4 5 1 2 3 4 5 i FS LM1 4 DM FM Float switch Drain motor Fan motor Louver motor Indication lamp Red Inspection Indication lamp LED 3 F200 203 Fuse LED 2 Connector CNB Z Green Normal ope...

Страница 62: ...P SW4 CNB2 WH CNB 1 2 3 4 CNN Y 5 6 1 2 BK CNH Th R1 Th A Th R2 t t Th R3 t t i i i i BK BK BK BK WH RD Receiver PCB Receiver PCB 7 segment display Switches for setting SW1 LED2 Back up switch㸦Operation㸭Stop㸧 SW4 Indication lamp 㸦Green Normal operation㸧 LED3 Indication lamp 㸦Yellow Timer㸭Inspection㸧 LED4 BK BK BK BK XR5㸦Remote operation input 㸦Operation㸧 㸦Heating㸧 㸦Compressor ON㸧 㸦Inspection㸧 volt...

Страница 63: ... 5 6 t 1 2 CNH BK Thi A t t t Thi R1 Thi R2 Thi R3 BK BK BK BK BK BK CNTA BL 1 2 YE GN 3 BL WH 1 3 CNW3 WH F2 3 15A SW2 SW6 SW5 SW7 LED 2 LED 3 CNZ FOR HA WH 12 BK BK Connecting line between indoor unit and outdoor unit 2 1 3 Power source line Signal line XR5 Remote operation volt free contact YE GN CNI BL WH 1 4 5 6 7 CNF1 WH RD 1 2 Fan motor Indication lamp Red Inspection Connector CNB Z LED 2 M...

Страница 64: ...1 2 RD t Control PCB Power PCB RD YE t YE BK t BK 1 2 3 4 5 6 BK t BK 1 2 XR1 XR2 XR3 XR4 XR5 Remote operation Remote operation input volt free contact Prepare on site 1 2 3 4 5 6 12 SW2 SW6 SW5 SW7 LED E2 LED E3 X Y 1 3 X Y t TB2 WH BK WH 8 9 10 11 12 8 9 10 11 12 CNW2 WH CNW1 WH CNB WH CNN YE CNH BK CNT BL 1 2 WH RD YE GN 3 5 CNW0 WH 1 TB1 Power circuit Operation Heating Compressor ON Inspection...

Страница 65: ...noise level in position as mentioned below Distance from front side 1m Mike position 0 8m 1m Unit Mike position Center Low points Noise Level Cooling 39 dB A Heating 40 dB A Cooling Heating Model SRK25ZSX S 10 20 30 40 50 60 70 63 125 250 500 1000 2000 4000 8000 Mid octave band frequency Hz Sound pressure level dB Standard 2 10 5 Pa 10 20 30 40 50 60 70 N50 N30 N40 N60 N70 N20 Condition ISO5151 T1...

Страница 66: ...ave band frequency Hz Sound pressure level dB Standard 2 10 5 Pa 10 20 30 40 50 60 70 N50 N40 N60 N70 N20 N30 Noise Level Cooling 43 dB A Heating 41 dB A Cooling Heating Model SRK35ZSX S Condition ISO5151 T1 H1 10 20 30 40 50 60 70 63 125 250 500 1000 2000 4000 8000 Mid octave band frequency Hz Sound pressure level dB Standard 2 10 5 Pa 10 20 30 40 50 60 70 N50 N30 N40 N60 N70 N20 Mike position at...

Страница 67: ...osition 0 8m 1m Unit Mike position Center Low points Model SRK20ZS S Mike position at highest noise level in position as mentioned below Distance from front side 1m Mike position 0 8m 1m Unit Mike position Center low points 09 SRK DB 087D Noise Level Cooling 34 dB A Heating 36 dB A Outdoor Unit Model SRC20ZS S Noise Level Cooling 45 dB A Heating 45 dB A Condition ISO5151 T1 H1 Mid octave band freq...

Страница 68: ...Sound pressure level dB N30 Model SRK25ZS S Mike position at highest noise level in position as mentioned below Distance from front side 1m Mike position 0 8m 1m Unit Mike position Center low points 09 SRK DB 087D Noise Level Cooling 40 dB A Heating 41 dB A Model SRK35ZJ S Outdoor Unit Model SRC35ZS S Noise Level Cooling 50 dB A Heating 48 dB A 63 10 20 30 40 50 60 70 125 250 500 1000 2000 4000 80...

Страница 69: ...00 4000 8000 10 20 30 40 50 60 70 N50 N30 N40 N60 N70 10 20 30 40 50 60 70 63 125 250 500 10 20 30 40 50 60 70 N50 N40 N60 N70 N20 N30 N20 Mid octave band frequency Hz Mid octave band frequency Hz Standard 2 10 5 P a Sound pressure level dB Standard 2 10 5 P a Sound pressure level dB Model SRK50ZS S Mike position at highest noise level in position as mentioned below Distance from front side 1m Mik...

Страница 70: ... 41 dB A Cooling Heating Condition ISO T1 JIS C 9612 10 20 30 40 50 60 70 10 20 30 40 50 60 70 Sound pressure level dB Standard 2 10 5 Pa 63 125 250 500 1000 2000 4000 8000 Mid octave band frequency Hz N50 N30 N40 N60 N70 N20 Noise Level Cooling 40 dB A Heating 40 dB A 2 Floor standing type SRF Unit Mike position Front points 1m 1m Mike position Models SRF25ZMX S Models SRF25ZMA S Unit Mike positi...

Страница 71: ... dB A Cooling Heating Condition ISO T1 JIS C 9612 10 20 30 40 50 60 70 10 20 30 40 50 60 70 Sound pressure level dB Standard 2 10 5 Pa 63 125 250 500 1000 2000 4000 8000 Mid octave band frequency Hz N50 N30 N40 N60 N20 N70 Models SRF50ZMX S Models SRF50ZMA S Model SRR25ZM S Sound pressure level Unit Mike position Front points 1m 1m Mike position 1m Unit Supply duct Return duct 2m 1m 1m Air 1 5m 1m...

Страница 72: ...1000 2000 4000 8000 Mid octave band frequency Hz N50 N30 N40 N60 N70 N20 10 20 30 40 50 60 70 10 20 30 40 50 60 70 Sound pressure level dB Standard 2 10 5 Pa 63 125 250 500 1000 2000 4000 8000 Mid octave band frequency Hz N50 N30 N40 N60 N70 N20 Noise Level Cooling 39 dB A Heating 40 dB A Cooling Heating Cooling Heating Condition ISO5151 T1 JIS C 9612 Sound pressure level Sound pressure level 1m U...

Страница 73: ...d octave band frequency Hz N50 N30 N40 N60 N70 N20 Noise Level Cooling 33 dB A Heating 34 dB A Cooling Heating Condition ISO5151 T1 JIS C 9612 Model SRR35ZM S Sound pressure level Sound pressure level 1m Unit Supply duct Return duct 2m 1m 1m Air 1 5m 1m Unit Supply duct Return duct External staic pressure 10Pa External staic pressure 10Pa 2m Air 1 5m Unit Air Mike position Mike position Mike posit...

Страница 74: ...8000 Mid octave band frequency Hz N50 N30 N40 N60 N70 N20 Noise Level Cooling 41 dB A Heating 43 dB A Cooling Heating Condition ISO5151 T1 JIS C 9612 Sound pressure level 1m Unit Supply duct Return duct 2m 1m 1m Air 1 5m 1m Unit Supply duct Return duct External staic pressure 10Pa External staic pressure 10Pa 2m Air 1 5m Unit Air Mike position Mike position Model SRR50ZM S Sound pressure level 1m ...

Страница 75: ... 8000 Mid octave band frequency Hz N50 N30 N40 N60 N70 N20 Noise Level Cooling 41 dB A Heating 46 dB A Cooling Heating Condition ISO5151 T1 JIS C 9612 Sound pressure level Sound pressure level 1m Unit Supply duct Return duct 2m 1m 1m Air 1 5m 1m Unit Supply duct Return duct External staic pressure 10Pa External staic pressure 10Pa 2m Air 1 5m Unit Air Mike position Mike position Mike position 1m U...

Страница 76: ...d octave band frequency Hz N50 N30 N40 N60 N70 N20 Noise Level Cooling 37 dB A Heating 39 dB A Cooling Heating Condition ISO5151 T1 JIS C 9612 Model SRR60ZM S Sound pressure level Sound pressure level 1m Unit Supply duct Return duct 2m 1m 1m Air 1 5m 1m Unit Supply duct Return duct External staic pressure 10Pa External staic pressure 10Pa 2m Air 1 5m Unit Air Mike position Mike position Mike posit...

Страница 77: ...Cooling Heating Condition ISO T1 JIS C 9612 10 20 30 40 50 60 70 10 20 30 40 50 60 70 Sound pressure level dB Standard 2 10 5 Pa 63 125 250 500 1000 2000 4000 8000 Mid octave band frequency Hz N50 N30 N40 N60 N70 N20 4 4 way ceiling cassette type FDTC Sound pressure level Model FDTC25VF 1 5m Mike position Center below unit Mike position 1m Unit Supply duct Return duct 2m 1m 1m Air 1 5m 1m Unit Sup...

Страница 78: ...ndard 2 10 5 Pa Condition ISO T1 JIS C 9612 Noise Level Cooling 47 dB A Heating 47 dB A Cooling Heating N50 N30 N40 N60 N70 N20 10 20 30 40 50 60 70 63 125 250 500 1000 2000 4000 8000 10 20 30 40 50 60 70 Mid octave band frequency Hz Sound pressure level dB Standard 2 10 5 Pa Condition ISO T1 JIS B 8616 Model FDTC35VF Model FDTC50VF 1 5m Mike position Center below unit Mike position 1 5m Mike posi...

Страница 79: ...ition ISO T1 JIS B 8616 Noise Level Cooling 46 dB A Heating 46 dB A Cooling Heating N50 N30 N40 N60 N70 N20 10 20 30 40 50 60 70 63 125 250 500 1000 2000 4000 8000 10 20 30 40 50 60 70 Mid octave band frequency Hz Sound pressure level dB Standard 2 10 5 Pa Condition ISO T1 JIS B 8616 5 Ceiling suspended type FDEN FDE Model FDTC60VF Model FDEN50VF 1 5m Mike position Center below unit Mike position ...

Страница 80: ... 125 250 500 1000 2000 4000 8000 20 10 30 40 50 60 20 10 30 40 50 60 N30 N40 N20 N50 N60 Souud Pressure Level dB Standard 2 10 5 Pa 1 4 NOISE LEVEL Mid Octave Band Frequency Hz Models FDE60VG 71VG Noise level 47 dB A at P HIGH 41 dB A at HIGH 37 dB A at MEDIUM 32 dB A at LOW 63 125 250 500 1000 2000 4000 8000 20 10 30 40 50 60 20 10 30 40 50 60 N30 N40 N20 N50 N60 Souud Pressure Level dB Standard ...

Страница 81: ...ure Pa 13 15 40 50 60 30 20 10 0 5 7 9 11 Air flow m3 min External static pressure Pa 13 15 40 50 60 30 20 10 0 5 7 9 11 Air flow m3 min External static pressure Pa 13 15 40 30 20 10 0 4 6 8 Air flow m3 min External static pressure Pa 10 30 20 10 0 4 6 ULo Lo Me Hi ULo Lo Me Hi ULo Lo Me Hi ULo Lo Me Hi ULo Lo Me Hi ULo Lo Me Hi ULo Lo Me Hi ULo Lo Me Hi 8 10 Model SRR25ZM S Cooling Heating Model ...

Страница 82: ...i m i t o f E S P Setting 10Pa P Hi P Hi P Hi 0 10 20 30 40 50 60 70 80 90 100 110 11 12 13 14 15 Air flow m3 min External static pressure Pa 100Pa Max 90Pa 80Pa 70Pa 60Pa 50Pa 40Pa 30Pa 20Pa 10Pa Min Characteristic FAN 2 Characteristic FAN 1 Model FDUM50VF Range of approvable air flow rate 0 10 20 30 40 50 60 70 80 90 100 110 6 8 10 12 14 16 Air flow m3 min External static pressure Pa P Hi P Hi P...

Страница 83: ...s not switched off there is a risk of electric shock unit failure or personal injury Be sure to tighten the cables securely in terminal block and relieve the ca bles properly to prevent overloading the terminal blocks Loose connections or cable mountings can cause anomalous heat production or fire Do not process splice or modify the power cable or share the socket with other power plugs Improper p...

Страница 84: ... 683 145 630 145 568 176 460 460 48 6 47 47 10 3 277 3 17 4 120 65 70 65 100 100 176 88 6 76 6 56 4 Installation board Service Space Unit 480 Gas pipe Unit mm 533 Drain hose 548 Liquid pipe Service Space Service Space 4 DRILLING HOLE AND FIXTURE OF SLEEVE When drilling the wall that contains a metal lath wire lath or metal plate be sure to use sealing plate sleeve and inclination plate Locally pro...

Страница 85: ...nnecting pipe 1 Cut the connecting pipe to the required length with pipe cutter 2 Hold the pipe downward and remove the burrs Make sure that no foreign material enters the pipe 3 Cover the connecting pipe ends with the tape 2 Piping work 2 1 Flaring pipe 1 Take out flare nuts from the service valves of indoor unit and engage them onto connecting pipes 2 Flare the pipes according to table and figur...

Страница 86: ...or control box with the clamp and screw supplied with the kit 4 Hook to fix the interface kit to the 2 latches on side panel L For more details refer to the user s manual of Interface kit SC BIKN2 E Screw CNS terminal Indoor PCB Control cover Right side Fixing point of the clamp Front panel Bottom panel Screw Front panel Screw Side panel R Latches Side panel R Side panel L Screw Side panel L Latch...

Страница 87: ...ribed pipes flare nuts and tools for R410A U sing existing parts for R22 or R407C can cause refrigerant circuit burst resulting in unit failure and personal injury B e sure to connect both liquid and gas connecting pipes properly before operating the compressor Do not open the liquid and gas service valves before completing piping work and evacuation I f the compressor is operated when connecting ...

Страница 88: ... generate or accumulate D rain water can not be discharged properly T V set or radio receiver is placed within 1m H eight above sea level is more than 1000m It can cause performance degradation corrosion and damage of components unit malfunction and fire D ispose of all packing materials properly P acking materials contain nails and wood which can cause personal injury Keep the polybag away from c...

Страница 89: ...ignal surely during operating the wireless remote control A place where it is not affected by the TV and radio etc Do not place where it is exposed to direct sunlight or near heat devices such as a stove Wireless remote control Remote control holder Wood screws 5 cm mi nim um fro m the wa ll 10 cm min imu m fro m the wa ll Installation board 10 cm minimum from the ceiling a Sleeve 180 cm minimum f...

Страница 90: ... Preparing cable 1 Selecting cable Select the connecting cable in accordance with the specifications mentioned below 4 core 1 5mm 2 conformed with 60245 IEC57 CENELEC H05RN F 1 Earth wire is included Yellow Green 2 Arrange each wire length as shown below Make sure that each wire is stripped 10mm from the end Connecting cable Wire end 40mm or more Earth wire 30mm or more 10mm 3 A ttach round crimp ...

Страница 91: ...le Avoid the following drain piping Higher than specified Wavy The drain hose tip is in water The gap to the ground is 5 cm or less The drain hose tip is in the gutter Odor from the gutter Pour water to the drain pan located under the heat exchanger and ensure that the water is discharged outdoor When extended drain hose is present inside the room insulate it securely with heat insulator available...

Страница 92: ...ndensation prevention 1 D ress the connecting pipes both liquid and gas pipes with insulation to prevent it from heating and dew condensation U se the heat insulating material which can withstand 120 C or higher temperature Make sure that insu lation is wrapped tightly around the pipes and no gap is left between them 2 Wrap the refrigerant pipings of indoor unit with indoor unit heat insulation us...

Страница 93: ...h the front panel and fix 4 upper latches 2 Secure the front panel with the 2 screws 3 Install the bottom panel the air inlet panel and the air filters Front panel Bottom panel Screw in the cap Screw Latch 12 INSTALLING WIRELESS REMOTE CONTROL 13 TERMINAL CONNECTION FOR AN INTERFACE Mount the batteries 1 Slide and take out the cover of backside 2 Mount the batteries R03 AAA Micro 2 pieces in the b...

Страница 94: ... button continuously for at least 5 seconds Then operation will start For the detail of pump down refer to the instal lation manual of outdoor unit Unit ON OFF button 16 INSTALLATION CHECK AND TEST RUN After finishing the installation work check the following points again before turning on the power Conduct a test run and ensure that the unit operates properly At the same time explain to the custo...

Страница 95: ...s installation Locations where strong air blows against the air outlet of outdoor unit Locations where something located above the unit could fall It can cause remarkable decrease in performance corrosion and damage of components malfunction and fire Do not install the indoor unit in the locations listed below Be sure to install the indoor unit according to the installation manual for each model b...

Страница 96: ...N OF INDOOR UNIT Indoor unit Installing the support of piping Install at location that meets the following conditions after getting approval from the customer Wireless remote control In case of piping in the right rear direction When drilling the wall that contains a metal lath wire lath or metal plate be sure to use pipe hole sleeve sold separately Taping of the exterior Top Thicknese of the wall...

Страница 97: ...gf Cover the exterior portion with outer tape and shape the piping so it will match the contours of the route that the piping to take Also fix the wiring and pipings to the wall with clamps ELECTRICAL WIRING WORK Preparation of indoor unit Terminal block Sensor Fixing screw Clamp Wiring holder Remove the fixing screw of clamp Connect the connecting wire securely to the terminal block 1 Connect the...

Страница 98: ...to the outdoor unit when the pipes are removed from the unit Uncover the wireless remote control and mount the batteries R03 AAA Micro 2 pieces in the body regularly Fit the poles with the indication marks without fail CONCERNING TERMINAL CONNECTION FOR AN INTERFACE Remove the front panel and lid of control There is a terminal respectively marked with CNS for the indoor control board In connecting...

Страница 99: ...gh rise apartment etc Be sure to perform air tightness test by pressurizing with nitrogen gas after completed refrigerant piping work If the density of refrigerant exceeds the limit in the event of refrigerant leakage in the small room lack of oxygen can occur which can cause serious accidents Do not install the unit in the locations listed below Locations where carbon fiber metal powder or any po...

Страница 100: ...do not cause the unit or the ceiling to vibrate A place where there will be enough space for servicing Where space mentioned below can be secured Where wiring and the piping work will be easy to conduct The place where receiving part is not exposed to the direct rays of the sun or the strong rays of the street lighting A place where it can be easily drained A place separated at least 1m away from ...

Страница 101: ...in pipe after installation Insulating material to be removed Joint Rubber stopper to be removed Standard hard polyvinyl chloride pipe Connecting port of bottom drain pipes Outside diameter 25mm Connecting port of top drain pipe DRAIN PIPE 3 Make sure to make descending slope of greater than 1 100 and do not make up down bend and or trap in the midway Pay attention not to give stress on the pipe on...

Страница 102: ...over and mount the batteries R03 AAA Micro 2 pieces in the body regularly Fit the poles with the indication marks without fail Do not use new and old batteries together Disconnect When two air conditioners are installed in the same room use this setting when the two air conditioners are not operated with one wireless remote control Set the wireless remote control and indoor unit INSTALLING TWO AIR...

Страница 103: ...t Earth leakage breaker must be installed If the earth leakage breaker is not installed it can cause electric shocks Use the circuit breaker of correct capacity Circuit breaker should be the one that disconnect all poles under over current Using the incorrect one could cause the system failure and fire Do not use any materials other than a fuse of correct capacity where a fuse should be used Conne...

Страница 104: ...r 700mm apply earthquake resistant brace to the bolt In case the unit is hanged directly from the slab and is installed on the ceiling plane which has enough strength When suspension bolt length is over 1000mm apply the earthquake resistant brace to the bolt l Prepare four 4 sets of suspension bolt nut and spring washer M10 or M8 on site Ceiling opening Suspension bolts pitch Pipe position Install...

Страница 105: ...the pipe as close place to the unit as possible when connecting the drain pipe Do not set up air vent Supporting metal No bump No trap Not touching the water Trapped air will generate noises Air vent Insulation material 1 5m 2m Descending slope greater than 1 100 When sharing a drain pipe for more than one unit lay the main pipe 100mm below the drain outlet of the unit In addition select VP30 or b...

Страница 106: ...door unit PCB is turned ON the Connector CNB is disconnected and then the power supply 220 240VAC on the terminal block and or Ⓛ and Ⓝ is turned ON Make sure to turn OFF SW7 1 and reconnect the Connector CNB after the test Wiring out position and wiring connection Electrical installation work must be performed according to the installation manual by an electrical installation service provider qual...

Страница 107: ... 106 17 SCM T 225 source PJA012D783 ...

Страница 108: ...5 5 7 5 7 Note This function is not able to be set with wireless remote controls or simple remote control RCH H3 5 7 5 7 For setting the swing range of other louvers return to 1 and proceed same procedure respectively ...

Страница 109: ...on work If the power is supplied during servicing or inspection work it could cause electric shock and injury by the operating fan Do not run the unit when the panel or protection guard are taken off Touching the rotating equipment hot surface or high voltage section could cause an injury to be caught in the machine to get burned or electric shock Shut off the power before electrical wiring work I...

Страница 110: ...l not be accidentally activated by the air conditioner Areas where the supply air does not short circuit Areas where it is not influenced by draft air Areas not exposed to direct sunlight Areas where dew point is lower than around 23 C and relative humidity is lower than 80 This indoor unit is tested under the condition of JIS Japan Industrial Stan dard high humidity condition and confirmed there ...

Страница 111: ...at high humidity condition reinforce insulation of refrigerant pipes Surface of insulation may cause dew condition or water dropping if insulations are not reinfoced Work procedure Bracket Pipe Remove Cut Drain socket Heat insulation material Drain hose accessory VP20 prepare on site Clamp accessory To be a descending angle No bumps No traps Not to be in water Drain hose Lowest point Hose clamp It...

Страница 112: ...Drain hose accessory VP20 prepare on site Clamp accessory scending No bumps No traps Not to be in water Drain hose Lowest point Hose clamp It can be attached from both inside and outside the unit 10mm eneath the drain hose amp ive must not be used e VP20 for drain pipe e mid way while assum 0 supplied as accessories ider precautions against drain pipe eft or to the right side in order to drain pro...

Страница 113: ... the machine to get burned or electric shock Shut off the power before electrical wiring work It could cause electric shock unit failure and improper running Perform earth wiring surely Do not connect the earth wiring to the gas pipe water pipe lightning rod and telephone earth wiring Improper earth could cause unit failure electric shock and fire due to a short circuit Earth leakage breaker must ...

Страница 114: ...s no obstruction of airflow on both air return grille and air supply port Areas where fire alarm will not be accidentally activated by the air conditioner Areas where the supply air does not short circuit Areas where it is not influenced by draft air Areas not exposed to direct sunlight Areas where dew point is lower than around 23 C and relative humidity is lower than 80 This indoor unit is teste...

Страница 115: ...o not to make the up down bending and trap in the mid way while assum ing that the drain pipes is downhill more than 1 100 Never set up air vent 5 Insulate the drain pipe Insulate the drain hose clamp with the heat insulation supplied as accessories When the unit is installed in a humid place consider precautions against dew condensation such as heat insulation for the drain pipe The drain pipes m...

Страница 116: ... the louver is fixed at that position auto swing does not funtion ATTENTION If you press RESET button during settings the display will return to previous display If you press button during settings the mode will be ended and return to original display and the settings that have not been completed will become invalid EXAMPLE Example displayed for two seconds PFA012D628 at insulation material Drain ...

Страница 117: ... or accumulated or volatile flammable substances are handled It could cause the corrosion of heat exchanger breakage of plastic parts etc And inflammable gas could cause fire Secure a space for installation inspection and maintenance specified in the manual Insufficient space can result in accident such as personal injury due to falling from the installation place Do not use the indoor unit at the...

Страница 118: ... to unit falling Space for installation and service Make installation altitude over 2 5m Indoor Unit Select either of two cases to keep space for installation and services Notes a There must not be obstacle to draw out fan motor marked area b Install refrigerant pipe drain pipe and wiring so as not to cross marked area If suspension bolt becomes longer do reinforcement of earthquake resistant For ...

Страница 119: ...d to t Caution Refrigerating machine is because even if the force on the threads an by the stress corrosion Refrigerating machine Be sure to use new pipes for the refrigerant pipes Use the flare nut attached to the product or a nut compatible with JIS B 8607 Class 2 Regarding whether existing pipes can be reused or not and the washing method refer to the instruction manual of the outdoor unit cata...

Страница 120: ...ng machine oil may be applied to the internal surface of flare only Descending slope greater than 1 100 As wide as possible about100mm Supporting metal Descending slope greater than 1 100 Please confirm that the pipe doesn t bend Air vent No bump No trap Not touching the water Trapped air will generate noises VP30 or bigger 1m 2m PJG012D008C D ut attached to the product r to the instruction manual...

Страница 121: ...securely and handled with care not to drop when it is necessary toreplace Notes 2 For the maintenance space refer to page 117 i Remove the control box and the side panel and remove the screws marked in the circles 2 places in the figure ii Take out the fan unit in the arrow direction Control box Side panel Screw ...

Страница 122: ...harge Suction Sensor Tho D Receiver Sensor Tho S Service valve Liquid Electronic expansion valve Compressor Oil separator 4way valve Sensor Heat exchanger Tho A Sensor Tho R Capillary tube Capillary tube Accumulator Accumulator Cooling cycle Heating cycle Th2 2 Humidity sensor 2 1 1 1 1 Th3 2 Humidity sensor SRK20 25 35 50 60ZSX S SRK35 50ZS S and SRF series only 1 Gas line Model 20 25 35 ȭ 9 52 M...

Страница 123: ...stic conduit is used with no more than three cables contained in a conduit and a voltage drop is 2 For an installation falling outside of these conditions please follow the internal cabling regulations Adapt it to the regulation in effect in each country Difference in height between indoor units C Within 3 of rated voltage Within 15 of rated voltage Within 10 of rated voltage 3 min or more 8 min o...

Страница 124: ... 8 5 8 2 7 8 35 35 3 40 3 40 3 0 6 8 7 6 550 1860 2680 8 5 8 2 7 8 35 50 2 80 4 00 3 0 6 8 7 7 550 1860 2750 8 5 8 2 7 8 35 60 2 51 4 29 3 0 6 8 7 7 550 1860 2750 8 5 8 2 7 8 50 50 3 40 3 40 3 0 6 8 7 7 550 1860 2750 8 5 8 2 7 8 50 60 3 09 3 71 3 0 6 8 7 7 550 1860 2750 8 5 8 2 7 8 60 60 3 40 3 40 3 0 6 8 7 7 550 1860 2750 8 5 8 2 7 8 3 units 20 20 20 2 00 2 00 2 00 3 7 6 0 8 2 670 1300 2750 6 0 5...

Страница 125: ... 25 25 1 78 1 78 1 78 1 78 4 4 7 1 8 8 890 1580 2750 7 3 6 9 6 6 25 25 25 35 1 61 1 61 1 61 2 26 4 4 7 1 8 8 890 1580 2750 7 3 6 9 6 6 25 25 25 50 1 42 1 42 1 42 2 84 4 4 7 1 8 8 890 1580 2750 7 3 6 9 6 6 25 25 35 35 1 48 1 48 2 07 2 07 4 4 7 1 8 8 890 1580 2750 7 3 6 9 6 6 Heating Indoor unit combination Heating capacity kW Power consumption W Standard current A Indoor unit capacity kW Total capa...

Страница 126: ...3 2 8 4 9 1 660 2060 3350 9 5 9 0 8 7 25 50 50 1 68 3 36 3 36 3 2 8 4 9 1 660 2060 3350 9 5 9 0 8 7 35 35 35 2 80 2 80 2 80 3 2 8 4 9 1 660 2060 3350 9 5 9 0 8 7 35 35 50 2 45 2 45 3 50 3 2 8 4 9 1 660 2060 3350 9 5 9 0 8 7 4 units 20 20 20 20 2 10 2 10 2 10 2 10 3 6 8 4 9 4 800 1960 3350 9 0 8 6 8 2 20 20 20 25 1 98 1 98 1 98 2 47 3 6 8 4 9 4 800 1960 3350 9 0 8 6 8 2 20 20 20 35 1 79 1 79 1 79 3...

Страница 127: ... 8 7 3 550 2150 2750 9 9 9 4 9 0 3 units 20 20 20 2 00 2 00 2 00 3 7 6 0 7 8 670 1450 2750 6 7 6 4 6 1 20 20 25 2 00 2 00 2 50 3 7 6 5 7 8 670 1630 2750 7 5 7 2 6 9 20 20 35 1 84 1 84 3 22 3 7 6 9 7 8 670 1910 2750 8 8 8 4 8 0 20 20 50 1 53 1 53 3 83 3 7 6 9 7 8 670 1910 2750 8 8 8 4 8 0 20 20 60 1 38 1 38 4 14 3 7 6 9 7 8 670 1910 2750 8 8 8 4 8 0 20 25 25 1 94 2 43 2 43 3 7 6 8 7 8 670 1820 2750...

Страница 128: ...25 25 1 78 1 78 1 78 1 78 4 4 7 1 8 3 890 1790 2750 8 2 7 9 7 5 25 25 25 35 1 61 1 61 1 61 2 26 4 4 7 1 8 3 890 1790 2750 8 2 7 9 7 5 25 25 25 50 1 42 1 42 1 42 2 84 4 4 7 1 8 3 890 1790 2750 8 2 7 9 7 5 25 25 35 35 1 48 1 48 2 07 2 07 4 4 7 1 8 3 890 1790 2750 8 2 7 9 7 5 Heating Indoor unit combination Heating capacity kW Power consumption W Standard current A Indoor unit capacity kW Total capac...

Страница 129: ...660 2100 3350 9 6 9 2 8 8 25 50 50 1 68 3 36 3 36 3 2 8 4 8 9 660 2100 3350 9 6 9 2 8 8 35 35 35 2 80 2 80 2 80 3 2 8 4 8 9 660 2100 3350 9 6 9 2 8 8 35 35 50 2 45 2 45 3 50 3 2 8 4 8 9 660 2100 3350 9 6 9 2 8 8 4 units 20 20 20 20 2 10 2 10 2 10 2 10 3 6 8 4 9 1 800 2010 3350 9 2 8 8 8 5 20 20 20 25 1 98 1 98 1 98 2 47 3 6 8 4 9 1 800 2010 3350 9 2 8 8 8 5 20 20 20 35 1 79 1 79 1 79 3 13 3 6 8 5 ...

Страница 130: ... 00 2 50 3 7 6 5 8 5 670 1450 2830 6 7 6 4 6 1 20 20 35 1 89 1 89 3 31 3 7 7 1 8 5 670 1730 2830 7 9 7 6 7 3 20 20 50 1 73 1 73 4 33 3 7 7 8 8 5 670 2030 2830 9 3 8 9 8 5 20 20 60 1 56 1 56 4 68 3 7 7 8 8 5 670 2030 2830 9 3 8 9 8 5 20 25 25 1 94 2 43 2 43 3 7 6 8 8 5 670 1610 2830 7 4 7 1 6 8 20 25 35 1 88 2 34 3 28 3 7 7 5 8 5 670 1870 2830 8 6 8 2 7 9 20 25 50 1 64 2 05 4 11 3 7 7 8 8 5 670 203...

Страница 131: ...0 20 35 50 1 28 1 28 2 24 3 20 4 4 8 0 9 2 890 1950 2830 9 9 8 6 9 0 20 20 35 60 1 19 1 19 2 07 3 56 4 4 8 0 9 2 890 1950 2830 9 9 8 6 9 0 20 25 25 25 1 66 2 08 2 08 2 08 4 4 7 9 9 2 890 1940 2830 8 9 8 5 8 2 20 25 25 35 1 50 1 88 1 88 2 63 4 4 7 9 9 2 890 1940 2830 8 9 8 5 8 2 20 25 25 50 1 33 1 67 1 67 3 33 4 4 8 0 9 2 890 1950 2830 9 9 8 6 9 0 20 25 25 60 1 23 1 54 1 54 3 69 4 4 8 0 9 2 890 195...

Страница 132: ...60 1930 3430 8 9 8 5 8 1 20 20 35 2 27 2 27 3 97 3 2 8 5 9 3 660 2090 3430 9 6 9 2 8 8 20 20 50 2 00 2 00 5 00 3 2 9 0 9 3 660 2250 3430 10 3 9 9 9 5 20 20 60 1 80 1 80 5 40 3 2 9 0 9 3 660 2250 3430 10 3 9 9 9 5 20 25 25 2 34 2 93 2 93 3 2 8 2 9 3 660 1990 3430 9 1 8 7 8 4 20 25 35 2 20 2 75 3 85 3 2 8 8 9 3 660 2180 3430 10 0 9 6 9 2 20 25 50 1 89 2 37 4 74 3 2 9 0 9 3 660 2250 3430 10 3 9 9 9 5...

Страница 133: ...49 1 49 2 60 3 72 3 6 9 3 9 8 800 2260 3430 10 4 10 0 9 5 20 20 35 60 1 38 1 38 2 41 4 13 3 6 9 3 9 8 800 2260 3430 10 4 10 0 9 5 20 25 25 25 1 94 2 42 2 42 2 42 3 6 9 2 9 8 800 2240 3430 10 3 9 8 9 4 20 25 25 35 1 75 2 19 2 19 3 07 3 6 9 2 9 8 800 2240 3430 10 3 9 8 9 4 20 25 25 50 1 55 1 94 1 94 3 88 3 6 9 3 9 8 800 2260 3430 10 4 10 0 9 5 20 25 25 60 1 43 1 79 1 79 4 29 3 6 9 3 9 8 800 2260 343...

Страница 134: ... 5 8 1 670 1630 2830 7 5 7 2 6 9 20 20 35 1 89 1 89 3 31 3 7 7 1 8 1 670 1950 2830 9 0 8 6 8 2 20 20 50 1 73 1 73 4 33 3 7 7 8 8 1 670 2320 2830 10 7 10 2 9 8 20 20 60 1 56 1 56 4 68 3 7 7 8 8 1 670 2320 2830 10 7 10 2 9 8 20 25 25 1 94 2 43 2 43 3 7 6 8 8 1 670 1820 2830 8 4 8 0 7 7 20 25 35 1 88 2 34 3 28 3 7 7 5 8 1 670 2130 2830 9 8 9 4 9 0 20 25 50 1 64 2 05 4 11 3 7 7 8 8 1 670 2320 2830 10 ...

Страница 135: ... 35 50 1 28 1 28 2 24 3 20 4 4 8 0 8 7 890 2220 2830 10 1 9 7 9 3 20 20 35 60 1 19 1 19 2 07 3 56 4 4 8 0 8 7 890 2220 2830 10 1 9 7 9 3 20 25 25 25 1 66 2 08 2 08 2 08 4 4 7 9 8 7 890 2200 2830 10 0 9 6 9 2 20 25 25 35 1 50 1 88 1 88 2 63 4 4 7 9 8 7 890 2200 2830 10 0 9 6 9 2 20 25 25 50 1 33 1 67 1 67 3 33 4 4 8 0 8 7 890 2220 2830 10 1 9 7 9 3 20 25 25 60 1 23 1 54 1 54 3 69 4 4 8 0 8 7 890 22...

Страница 136: ...30 9 0 8 7 8 3 20 20 35 2 27 2 27 3 97 3 2 8 5 9 1 660 2130 3430 9 8 9 4 9 0 20 20 50 2 00 2 00 5 00 3 2 9 0 9 1 660 2300 3430 10 6 10 1 9 7 20 20 60 1 80 1 80 5 40 3 2 9 0 9 1 660 2300 3430 10 6 10 1 9 7 20 25 25 2 34 2 93 2 93 3 2 8 2 9 1 660 2030 3430 9 3 8 9 8 5 20 25 35 2 20 2 75 3 85 3 2 8 8 9 1 660 2220 3430 10 2 9 7 9 3 20 25 50 1 89 2 37 4 74 3 2 9 0 9 1 660 2300 3430 10 6 10 1 9 7 20 25 ...

Страница 137: ... 49 1 49 2 60 3 72 3 6 9 3 9 5 800 2310 3430 10 7 10 2 9 8 20 20 35 60 1 38 1 38 2 41 4 13 3 6 9 3 9 5 800 2310 3430 10 7 10 2 9 8 20 25 25 25 1 94 2 42 2 42 2 42 3 6 9 2 9 5 800 2290 3430 10 5 10 1 9 6 20 25 25 35 1 75 2 19 2 19 3 07 3 6 9 2 9 5 800 2290 3430 10 5 10 1 9 6 20 25 25 50 1 55 1 94 1 94 3 88 3 6 9 3 9 5 800 2310 3430 10 7 10 2 9 8 20 25 25 60 1 43 1 79 1 79 4 29 3 6 9 3 9 5 800 2310 ...

Страница 138: ...een the indoor and outdoor units 3 Correction relative to frosting on outdoor heat exchanger during heating In additions to the foregoing corrections 1 2 the heating capacity needs to be adjusted also with respect to the frosting on the outdoor heat exchanger Air inlet temperature of outdoor unit in WB Adjustment coefficient 10 0 95 15 0 95 9 0 94 7 0 93 5 0 91 3 0 88 1 0 86 1 0 87 3 0 92 5 or mor...

Страница 139: ... button This button sets the room temperature AIR FLOW UP DOWN button This button changes the air flow up down direction TIME SET UP switch This switch is used for setting the time SLEEP button This button selects SLEEP operation MENU switch This switch selects the brightness adjustment AUTO OFF operation SELF CLEAN operation and PRESET operation ON TIMER button This button selects ON TIMER operat...

Страница 140: ... remote control Set the wireless remote control and indoor unit a ࠉSetting the wireless remote control i Pull out the cover and take out batteries ii Disconnect the switching line next to the battery with wire cutters iii Insert batteries Close the cover b ࠉSetting indoor unit i Turn off the power source and turn it on after 1 minute ii Point the wireless remote control that was set according to t...

Страница 141: ...ion for 15 minutes continuously The wireless remote control displays HIGH POWER mark and the FAN SPEED display disappears a During the HIGH POWER operation the room temperature is not controlled When it causes an excessive cooling and heating press the HI ECO button again to cancel the HIGH POWER operation b HIGH POWER operation is not available during the DRY and the ON timer to OFF timer operati...

Страница 142: ...e HI ECO button is pressed again When the operation mode is changed from DRY to FAN When the NIGHT SETBACK button is pressed 3 Not operable while the air conditioner is OFF 09 SRK DB 087D 9 Air flow direction adjustment a Flap b Louver c Swing COOL DRY FAN Wireless remote control display HEAT Approx 15 Approx 30 Approx 40 Approx 25 Approx 45 Approx 55 Swing Flap stopped Approx 30 Approx 50 Approx ...

Страница 143: ...ter Right approx 50 Right approx 20 Right approx 30 Right approx 45 Right approx 50 Louver stopped Swing Spot Wide In HEAT operation In COOL DRY FAN operation Approx 30 Approx 55 Approx 25 Approx 55 Every time when you press the AIR FLOW L R Left approx 50 Left approx 50 Left approx 20 Left approx 20 Left approx 45 Center Approx 20 b Louver c Swing i ii d Memory flap Flap or louver stopped COOL DR...

Страница 144: ...ting temp 5 C Setting temp Room temp 5 C Setting temp Room temp 5 C HIGH POWER AUTO HI MED LO HIGH POWER AUTO Flap Louver Cooling Up down swing Heating Wide Fixed Center Fixed Flap Louver Cooling Heating Left right swing Horizontal blowing Fixed Slant forwardl blowing Fixed Flap Louver Cooling Heating Wide Fixed Flap Louver Cooling Heating Horizontal blowing Fixed Slant forwardl blowing Fixed Oper...

Страница 145: ...c OFF timer operation 14 Air flow range setting a Setting i If the air conditioner is running press the ON OFF button to stop ii Press the AIR FLOW U D UP DOWN button and the AIR FLOW L R LEFT RIGHT button together for 5 seconds or more iii Setting the air flow range iv Press the ON OFF button Air flow range Air flow range Air flow range Left end installation Center installation Right end installa...

Страница 146: ... the brightness of unit display Note 1 When the unit displays self diagnosis or service mode brightness level is always LV2 Brightness level Run light Timer light LV2 50 0 LV1 LV0 100 50 0 100 17 Outline of dehumidifying DRY operation The purpose is Dehumidification and not to control the humidity to the target condition Indoor outdoor unit control the operation condition to reduce the humidity an...

Страница 147: ...en both the indoor and the outdoor air temperatures are in the range A cooling or heating is switched depending on the difference between the setting temperature and the indoor air temperature When the operation mode has been judged following the change of setting temperature with the remote control the hourly j udgment of operation mode is cancelled 12 54rps 12 70rps 12 110rps 12 110rps 12 90rps ...

Страница 148: ...1 C or more or 47ºC or more with the compressor running the lower limit speed of compressor is brought up d Cooling high pressure control i Purpose Prevents anomalous high pressure operation during cooling ii Detector Outdoor heat exchanger sensor TH1 iii Detail of operation P1 P2 P3 Outdoor heat exchanger temperature C 8rps 1 8rps 1 0rps After lapse of 30 sec or over 3 After lapse of 30 sec or ov...

Страница 149: ...ENU switch This switch selects the CLEAN operation display brightness adjustment and PRESET operation ON TIMER button This button selects ON TIMER operation TIMER button This button is used for setting the current time and timer function ACL switch This switch resets the program to default state PROGRAM button This button sets WEEKLY TIMER HI ECO button This button changes the HIGH POWER ECONOMY o...

Страница 150: ...ioners are not operated with one wireless remote control Set the wireless remote control and indoor unit a ࠉSetting the wireless remote control i Pull out the cover and take out batteries ii Disconnect the switching line next to the battery with wire cutters iii Insert batteries Close the cover b ࠉSetting an indoor unit i Turn off the power source and turn it on after 1 minute ii Point the wireles...

Страница 151: ... for 15 minutes continuously The wireless remote control displays HIGH POWER mark and the FAN SPEED display disappears a During the HIGH POWER operation the room temperature is not controlled When it causes an excessive cooling and heating press the HI POWER ECONOMY button again to cancel the HIGH POWER operation b HIGH POWER operation is not available during the DRY and the ON timer to OFF timer ...

Страница 152: ... a soft operation with the power suppressed in order to avoid an excessive cooling or heating The unit operate 1 5 higher than the setting temperature during cooling or 2 5 lower than that during heating The wireless remote control displays ECONOMY mark and the FAN SPEED display disappears a It will go into ECONOMY operation at the next time the air conditioner runs in the following cases When the...

Страница 153: ...B 087D 10 3D auto operation a i ii Cooling Air flow selection Operation mode AUTO HI MED LO Heating Room temp Setting temp 5 C Room temp Setting temp 5 C Setting temp Room temp 5 C Setting temp Room temp 5 C HIGH POWER AUTO HI MED LO HIGH POWER AUTO Flap Louver Cooling Up down swing Heating Wide Fixed Center Fixed Flap Louver Cooling Heating Left right swing Horizontal blowing Fixed Slant forwardl...

Страница 154: ... is set the unit operates by dropping the outdoor fan speed and the compressor speed 13 Night setback operation When the night setback operation is set the heating operation starts with the setting temperature at 10 Outdoor fan speed Upper limit Compressor speed Upper limit Cooling Heating Cooling Heating SCM71 SCM80 4th speed 40 rps 5th speed 55 rps 4th speed 45 rps 5th speed 60 rps b Flap Louver...

Страница 155: ...This function can be used when it is necessary to adjust the brightness of unit display Note 1 When the unit displays self diagnosis or service mode brightness level is always LV2 Brightness level Run light Timer light LV2 50 0 LV1 LV0 100 50 0 100 b Sleep timer operation c OFF timer operation 14 Air flow range setting a Setting i If the air conditioning unit is running press the ON OFF button to ...

Страница 156: ...diately c When the unit is started again within one hour after the stop of automatic operation or when the automatic operation is selected during heating cooling or dehumidifying operation the unit is operated in the previous operation mode d Setting temperature can be adjusted within the following range There is the relationship as shown below between the signals of the wireless remote control an...

Страница 157: ...ing the flaps change to the horizontal position b When the horizontal wind direction is set at other than the horizontal swing the louver changes to the vertical position iii Reset condition Humidity is less than 63 Humidity 68 73 Range A Range B 09 SRK DB 087D b Frost prevention control i Operating conditions ii Detail of anti frost operation iii Reset conditions Indoor heat exchanger temperature...

Страница 158: ... 157 17 SCM T 225 l Outdoor unit failure c Indoor fan motor protection item i ii is satisfied Once the unit is stopped by this function it is not min 1 i ii air conditioning air conditioner ...

Страница 159: ...ng operation Blinks when airflow stops due to the HOT KEEP and CLEAN operation ON OFF 1 5 sec 0 5 sec HOT KEEP 3 sec 1 sec ON OFF CLEAN operation ON OFF 0 5 sec 0 5 sec Operation mode invalid OPERATION MODE select button ON OFF luminous button TEMPERATURE button AIR FLOW UP DOWN button TIME SET UP switch SLEEP button CLEAN switch ON TIMER button TIMER button ACL switch PROGRAM button Operation sec...

Страница 160: ...door temperature setting Fan speed Flap Louver Timer switch COOL About 24ºC Auto Auto Continuous DRY About 25ºC HEAT About 26ºC Unit display section RUN HOT KEEP light green Illuminates during operation Blinks when air flow stops due to the HOT ECONO light orange Illuminates during ECONOMY operation TIMER light yellow Illuminates during TIMER operation HI POWER light green Illuminates during HIGH ...

Страница 161: ... air conditioners are installed in the room use setting when the two air conditioners are not operated with one wireless remote control Set the wireless remote control and indoor unit a ࠉSetting the wireless remote control i Pull out the cover and take out batteries ii Disconnect the switching line next to the battery with wire cutters iii Insert batteries Close the cover b ࠉSetting an indoor unit...

Страница 162: ...i Check that the reception buzzer sound pip is emitted from the indoor unit At completion of the setting the indoor unit emits a buzzer sound pip If no reception tone is emitted start the setting from the beginning again Disconnect 4 ࠉInstalling two air conditioners in the same room Reception pip SRF seris 5 Selection of the annual cooling function a The annual cooling function can be enabled or d...

Страница 163: ...has been 15 minutes since HIGH POWER operation has started e Not operable while the air conditioner is OFF f After HIGH POWER operation the sound of refrigerant flowing may be heard մ When the SILENT botton is pressed յ When the NIGHT SETBACK botton is pressed 7 Economy operation Pressing the HI POWER ECONO button initiate a soft operation with the power suppressed in order to avoid an excessive c...

Страница 164: ...ration In COOL DRY FAN operation Approx 45 Approx 75 Approx 5 Approx 60 a AIR SELECTION button can switch between the combination of upper and lower air outlets and upper air outlet Not operable while the air conditioner is OFF i Each time the AIR SELECTION button is pressed The combination of the upper and lower air outlets and the upper air outlet can be switched ii When the upper air outlet is ...

Страница 165: ...t will change to both outlets That state will be maintained until the switch is turned off 2 Automatic adjustment of lower air outlet direction prevents stirring up of warm air and keeps optimum comfort at floor level b Sleep timer operation Pressing the SLEEP button causes the temperature to be controlled with respect to the set temperature a Comfortable timer setting ON timer c OFF timer operati...

Страница 166: ...taneously wity the compres sor ON The DM continues to operate for 5 minutes after the operation stop anomalous stop thermostat stop or when it was switched from the COOL and DRY operations to the fan or HEAT operation Notes 1 Inciuding the stop from the cooling dehumidity ing fan and heating and the anomalous stop 2 Inciuding the FAN operation according to the mismatch of operation modes i Control...

Страница 167: ... by the temperature difference ii The indoor unit check the current area by every 5 minutes and operate by the next checking c Other When the outdoor air temperature and room temperature is low for cooling operation indoor unit can not operate in cool ing and dehumidifying In this case the units operate in heating to rise the room temperature and after that start dehumid ifying operation Indoor un...

Страница 168: ...the jumper wire J3 is released Permission Prohibition mode When CnT input is set to ON the operation mode is changed to permission and if input is set to OFF the operation is prohibited When the jumper wire J1 is short circuited The signal a above starts the air conditioner Shipping status When the jumper wire J1 is released When the CnT input is set to ON the air condition er starts operation Aft...

Страница 169: ...de Item Protective control Reset Compressor operation Indoor fan Forced outage Operation instruction Depends on operation mode 8 2 5 i ii Reset Protective control CnT Input Unit CASE A Unit CASE B OFF OFF ON ON ON ON OFF OFF OFF ON ON ON OFF OFF OFF Note 1 The ON with the mark indi cates an ON operation using the wired remote control etc ON i Level input If the factory settings Jumper wire J1 EXTE...

Страница 170: ... 169 17 SCM T 225 13 Outdoor unit failure 20 Indoor fan motor protection compressor command SRF 150 300 Model SCM40 45 50 60 71 80 only min 1 ...

Страница 171: ...rror occurs Operation lamp luminance can be changed LCD With backlight A tap on the LCD lights the backlight The backlight turns off automatically if there is no operation for certain period of time Lighting period of the backlight lighting can be changed If the backlight is ON setting when the screen is tapped while the backlight is turned off the backlight only is turned on Operations with switc...

Страница 172: ...ustment mode Cover AIR CON No button Display the indoor unit number connected to this remote control CHECK button This button is used at servicing TEST button This button is used during test operation Weekly timer display Displays the settings of the weekly timer Operation setting display area Displays setting temperature airflow volume operation mode and oparation message Operation check indicato...

Страница 173: ...ontrol as follows TOP screen Menu Service setting Service Maintenance Service password The selected screen is displayed The selected screen is displayed Service Maintenance 2 Special settings CPU reset Microcomputers of indoor unit and outdoor unit connected are reset State of restoration after power failure 3 Power failure compensation function Electric power source failure Enable the Auto restar...

Страница 174: ... function items are saved in the memory of indoor unit g Weekly timer peak cut timer or silent mode timer settings h Remote control function setting Please check the I U Set clock first on the initializing screen set the timer Other thanA C is connected 4 Alert displays If the following a to c appear check and repair as follows Communication check screen This appears if communications cannot be es...

Страница 175: ...state of stop is memorized Although the timer mode is cancelled at the recovery from power failure the setting of weekly timer is changed to the holiday setting for all weekdays b Operation mode c Air flow volume mode d Room temperature setting e Louver auto swing stop However the stop position 4 position is cancelled so that it returns to Position 1 f Remote control function items which have been...

Страница 176: ...ion Heating operation Room temperature detected with Thi A deg 59 56 Heating operation stopped cooling Heating OK Indoor heat exchanger temperature C b The following automatic controls are performed other than a above i Cooling or heating operation mode is judged according to the conditions of the Judgment based on Setting temperature Cooling select temperature and Indoor return air temperature an...

Страница 177: ...ying Fan Operation Functional item Thermostat ON Thermostat ON Thermostat OFF Thermostat OFF Hot start Defrost Compressor 4 way valve Outdoor unit fan Indoor unit fan Drain pump 3 2 2 Thermostat ON Thermostat OFF 2 2 Note 1 Operation Stop Turned ON OFF by the control other than the room temperature control 2 ON during the drain motor delay control 3 Drain pump ON setting may be selected with the i...

Страница 178: ...eekly timer Set the ON or OFF timer for a week Up to 8 patterns can be set for a day The day off setting is provided for holidays and non business days Note 1 It is necessary to set the clock to use the weekly timer vii Combination of patterns which can be set for the timer operations Note 1 Allowed Not Sleep time Sleep time Set OFF timer by hour Weekly timer Set ON timer by hour Set OFF timer by ...

Страница 179: ...Thi R1 or R2 whichever higher detects 35 C or higher the fan operates with the set air flow volume c If the fan control at heating thermostat OFF is set at the Set air flow volume from the remote control the fan operates with the set air flow volume regardless of the thermostat ON OFF 2 Once the fan motor is changed from OFF to ON during the thermostat ON the indoor fan motor is not turned OFF eve...

Страница 180: ...ss the LOUVER button to operate the swing louver when the air conditioner is operating SWING is displayed for 3 seconds and then the swing louver moves up and down continuously 2 To fix the swing louver at a position press one time the LOUVER button while the swing louver is moving so that four stop positions are displayed one after another per second When a desired stop position is displayed pres...

Страница 181: ...an if the heat exchanger thermistors both Thi R1 and R2 detect 25 C or lower 2 Indoor fan OFF is fixed for 5 minutes After the 5 minutes the indoor fan is operated at Lo or ULo for 2 minutes In the meantime the louver is controlled at level 3 After operating at Lo or ULo for 2 minutes the indoor fan moves to the state of 1 above 4 If the thermostat is turned ON it moves to the hot start control 5 ...

Страница 182: ...an OFF is selected the fan on the indoor unit of which the thermostat has been turned OFF is turned OFF The same occurs also when the remote control sensor is effective 10 Filter sign As the operation time Total ON time of ON OFF switch accumulates to 180 hours 1 FILTER CLEANING is displayed on the remote control This is displayed when the unit is in trouble and under the centralized control regar...

Страница 183: ...rning the drain detection switch OFF releases the forced drain pump ON condition Normal state 1 2 Normal state Drain detection switch ON Stop 1 Indoor unit operation mode Control A Control B Compressor ON Compressor OFF Cooling Dry Heating Fan 2 Notes 1 Including the stop from the cooling dehumidifying fan and heating and the anomalous stop 2 Including the Fan operation according to the mismatch o...

Страница 184: ...en the indoor return air detection temperature detected with Thi A is 23 C or higher and the indoor heat exchanger temperature detected with Thi R detects the compressor frequency drop start temperature A C 1 C of indoor unit fan speed is increased by 20 min 1 2 If the phenomenon of 1 above is detected again after the acceleration of indoor unit fan indoor unit fan speed is increased further by 20...

Страница 185: ...emote control the indoor units which are connected are displayed 2 In case of RC E5 remote control Pressing AIR CON No button on the remote control displays the indoor unit address If button is pressed at the next it is displayed orderly starting from the unit of youngest No iv In case of anomaly 1 If any anomaly occurs on a unit in a group a protective function operates that unit stops with the a...

Страница 186: ...ulse CnT Operation stop level CnT CnT CnT CnTA CnT CnT CnTA CnT CnTA Operation stop pulse CnT CnT CnT CnTA CnT CnT CnTA CnT CnTA Operationpermission prohibitionlevel CnT CnTA CnT CnTA CnT CnTA CnT CnT CnTA CnT CnTA Operation permission prohibition pulse CnT CnT CnT CnTA CnT CnT CnTA CnT CnTA Cooling heating selection level CnT CnTA CnT CnTA CnT CnTA CnT CnTA CnT CnT Cooling heating selection pulse...

Страница 187: ...OFF OFF ON ON ON ON Remote control OFF Remote control ON Remote control OFF Remote control ON OFF OFF ON ON OFF OFF ON OFF OFF OFF OFF ON ON OFF OFF CnT 6 or CnTA input Unit A Unit B CnT 6 or CnTA input Unit A Unit B c Remote operation i In case of multiple units Max 16 indoor units group are connected to one wired remote control When the indoor function setting of wired remote control for Externa...

Страница 188: ...OFF ON OFF Operation Stop Operation permission 1 Operation prohibition Unit stops 1 Only the LEVEL INPUT is acceptable for external input however when the indoor function setting of Level input Factory default or Pulse input is selected by the function for External input of the wired remote control operation status will be changed as follows In case of Level input setting In case of Pulse input se...

Страница 189: ...e Actual operation Remote control CnT Operation stop pulse CnTA Operation permission prohibition level Operation permission prohibition zone Actual operation Remote control Remote control ON Remote control OFF Remote control ON Remote control ON Remote control OFF Remote control ON ON ON ON ON ON ON ON OFF OFF OFF OFF OFF OFF OFF ON ON OFF ON ON ON ON ON OFF OFF OFF OFF OFF OFF Operation Operation...

Страница 190: ...s are inverted Cooling Heating or Heating Cooling d If the cooling heating selection signal is given by the external input the operation mode is transmitted to the remote control Selection of cooling heating external input function External input selection External input selection Cooling heating selection External input method Level External terminal input CnT or CnTA Cooling heating Cooling heat...

Страница 191: ...C 27 Return air temperature compensation This is the function to compensate the deviation between the detection temperature by the return air temperature thermistor and the measured temperature after installing the unit a It is adjustable in the unit of 0 5 C with the wired remote control indoor unit function RETURN AIR TEMP 1 0 C 1 5 C 2 0 C 1 0 C 1 5 C 2 0 C b Compensated temperature is transmit...

Страница 192: ...ossible the air flow rate is increased when the set temperature of thermostat differs largely from the return air temperature According to temperature difference between set temperature and return air temperature indoor fan tap are controlled automalically Auto 1 Changes the indoor fan tap within the range of Hi Me Lo Auto 2 Changes the indoor fan tap within the range of PHi Hi Me Lo 36 IU overloa...

Страница 193: ...onents Operation Command speed Indoor unit fan Compressor Outdoor unit fan Electronic expansion valve Multi operation rpm calculated based on the rpm required for each indoor unit ON According to command speed According to outdoor unit speed According to decision speed 0 All indoor units Hot keep OFF According to stop mode Hot keep Hot keep Hot keep 0 Thermostat off units ON According to heating s...

Страница 194: ...0 15 10 5 0 Outdoor air temperature Outdoor heat exchanger temperature Defrost operation start Defrost operation start temperature b i ii iii Tho R Tho R Tho R 2 2 20 º 1 conditions satisfied v i ii iii v 8 Max 12 minutes and 50 seconds Defrost operation Heating operation Depends on an operation condition the time can be longer than 7 minutes 2 7 minutes Hot keep operation 20 20 15 10 5 0 5 10 15 ...

Страница 195: ...ponents Operation Command speed Indoor unit fan Compressor Outdoor unit fan Electronic expansion valve ON According to command speed According to outdoor unit speed According to decision speed 0 All indoor units OFF According to stop mode According to mode switching OFF 0 Thermostat off units ON All closed Thermostat off units According to outdoor unit speed According to mode switching All closed ...

Страница 196: ...etail of operation c Reset conditions 2 Cooling high pressure control i Purpose ii Detector iii Detail of operation 53 58 60 Outdoor heat exchanger temperature C 8rps 1 8rps 1 0rps After lapse of 30 sec or over 3 After lapse of 30 sec or over 3 After lapse of 30 sec or over 3 lower limit speed 30 rps Example Fuzzy Tho R 60 8 20 60 30 40 30 40 thermo OFF the speed is reduced to 0 rps a Models SCM71...

Страница 197: ...ower continues for 20 seconds while compressor command speed is other than 0 rps b Detail of operation i The lower limit of compressor command speed is set to B or D rps and even if the speed becomes lower than B or D rps the speed is kept to B or D rps However when the thermo becomes OFF the speed is reduced to 0 rps ii The upper limit of compressor command speed is set to A or C rps the speed is...

Страница 198: ...ontrol c Reset conditions 8 6 4 6 Lower limit 40 rps Lower limit 35 rps Normal operation Outdoor air temperature C 6 Tho A Tho A Tho A Tho A i ii 13 A or C B or D B or D B or D 11 4 11 13 16 17 OFF Upper limit C Lower limit D Upper limit A Lower limit B Outdoor air temperature C Item Model SCM71 80 90 A 30 B 75 C 40 D Unit rps when the thermo becomes OFF the speed is i ii iii 197 17 SCM T 225 ...

Страница 199: ...When the compressor command speed has satisfied the following conditions iii When the indoor air temperature of running indoor unit Th1 and the indoor heat exchanger temperature Th2 have satisfied the following condition even on one unit b Contents of control i Stop the compressor and delay the start and then restarts ii Compressor stops by the abnormal stop when the compressor stop has occurred 3...

Страница 200: ...umper wire J1 or J2 on the outdoor PCB Control starts when it exceeds the control value 1 Switching with jumper wire Jumper wire J2 Short circuit At shipping from factory Short circuit Jumper wire J1 Short circuit At shipping from factory Current safe Current safe Open Current safe Current safe ii 11 Current safe i Purpose ii Detail of operation Cooling Heating Lower limit speed Item Model 115 SCM...

Страница 201: ...0 rps b Once the unit is stopped by this function it is not restarted Notes 1 Tho D X After compressor operation the discharge pipe temperature sensor after X minutes 2 Tho A X After compressor operation the outdoor air temperature sensor after X minutes Values of A B Model A B 20 rps 60 rps SCM80ZM S1 20 rps 60 rps SCM71ZM S1 12 Current cut a Purpose b Detail of operation 13 Outdoor unit failure ...

Страница 202: ...speed 3rd speed Models SCM71 80 b If the outdoor unit s fan speed drops the outdoor fan is run for 1 minute at that speed 16 Serial signal transmission error protection a Purpose b Detail of operation 17 Rotor lock 18 Outdoor fan motor protection 19 Outdoor fan control at low outdoor temperature Cooling 1 a Operating conditions 2 Detail of operation 3 Reset conditions Outdoor air temperature 10 C ...

Страница 203: ...e outdoor air temperature Tho A has dropped lower than 40 C i Start condition When the outdoor heat exchanger temperature Tho R has risen higher than 13 C for 30 seconds continuously while the compressor is operating ii Contents of control The outdoor unit fan is stepped down by 3 speed Lower limit is 2nd speed iii Reset condition When the compressor is turned off or the outdoor heat exchanger tem...

Страница 204: ...ocedure If the air conditioner does not run at all Important YES YES YES NO NO NO NO YES AC source source satisfied 1 Cautions 2 Items to check before troubleshooting 3 Troubleshooting procedure If the air conditioner does not run at all Important YES YES YES NO NO NO NO YES AC source source satisfied 203 17 SCM T 225 ...

Страница 205: ... 4 Troubleshooting procedure If the air conditioner runs NO NO NO NO YES YES YES YES 205 206 212 206 212 204 17 SCM T 225 ...

Страница 206: ...air conditioner stops Defective compressor Open phase on compressor Defective outdoor PCB Service valve is closed Refrigerant is insuf Outdoor sub PCB communication error Outdoor sub PCB fauly Poor connection of wire between outdoor sub PCB main PCB Defective limit switch Defective suction panel set Defective indoor control PCB Communication error for 15 minutes Detected more than 15 seconds 4 tim...

Страница 207: ...orded for up to 5 previous occurrences Data which are older than the 5th previous occurrence are erased In addition data on the temperature of each sensor room temperature indoor heat exchanger outdoor heat exchanger outdoor air temperature discharge pipe remote control information operation switching fan speed switching are recorded when trouble occurs so more detailed information can be checked ...

Страница 208: ...1ºC 22ºC 23ºC 24ºC 25ºC 1 time previous previous time 2 times previous 3 times previous 4 times previous 5 times previous Only for indoor heat exchanger sensor 2 Indicates the number of occasions previous to the present the error display data are from Temperature setting 26ºC 27ºC 28ºC 29ºC 30ºC 1 time previous previous time 2 times previous 3 times previous 4 times previous 5 times previous i mod...

Страница 209: ...de 2 times previous when the air conditioner was stopped by protective stop control Displays the reason for the stop stop code 3 times previous when the air conditioner was stopped by protective stop control Displays the reason for the stop stop code 4 times previous when the air conditioner was stopped by protective stop control Displays the reason for the stop stop code 5 times previous when the...

Страница 210: ...code or Error code Error content Cause Occurrence conditions Error display Auto recovery OFF 3 time flash 5 time flash 6 time flash 8 time flash 4 time flash 2 times 2 times 3 times 3 times 3 times When high pressure control operates during heating operation and the compressor stops If the float switch OPEN is defected for 3 seconds continuously or if float switch connector or wire is disconnected...

Страница 211: ...1 s digit Display pattern when in service mode Fan speed mode when there is an abnormal stop 2 time flash 3 time flash 4 time flash AUTO HI MED LO 5 time flash ULO 6 time flash 7 time flash operation mode and fan speed mode becomes as follows HI POWER ECONO Mode Operation mode Fan speed mode 0 5 sec 1 5 sec RUN light 10 s digit TIMER light 1 s digit 11 second interval 0 5 sec OFF ON OFF ON mode CO...

Страница 212: ...5 15 5 5 15 25 35 45 55 65 75 85 95 56 46 36 26 16 6 6 16 26 36 46 56 66 76 86 96 57 47 37 27 17 7 7 17 27 37 47 57 67 77 87 97 58 48 38 28 18 8 8 18 28 38 48 58 68 78 88 98 59 49 39 29 19 9 9 19 29 39 49 59 69 79 89 99 No does not sound Sensor name Room temperature sensor Indoor heat exchanger sensor Outdoor air temperature sensor Outdoor heat exchanger sensor 64ºC 64ºC 64ºC 64ºC Sensor value dis...

Страница 213: ... 8 28 48 68 88 108 128 148 50 30 10 10 30 50 70 90 110 130 150 52 32 12 12 32 52 72 92 112 132 54 34 14 14 34 54 74 94 114 134 56 36 16 16 36 56 76 96 116 136 58 38 18 18 38 58 78 98 118 138 No does not sound Sensor value displayed when the error code is normal 64ºC 0 5 sec 0 1 sec 1 5 sec 11 second interval 0 5 sec OFF ON OFF ON OFF ON temperature information data Buzzer sound If the temperature ...

Страница 214: ... 09 SRK DB 087D Service data record form 207 Operation mode Fan speed mode Wireless r Wireless r Wireless r Wireless r Wireless r wireless Wireless r 213 17 SCM T 225 ...

Страница 215: ...e and power transistor sensor temperature characteristics Indoor fan motor error Broken sensor wire connector poor connection 0 0 20 40 60 80 100 120 135 20 40 60 80 100 120 140 160 180 Temperature C Resistance k Defective fan motor connector poor connection defective indoor PCB 220 for the fan motor and indoor PCB check proc Power source reset Is it normalized Malfunction by temporary noise Repla...

Страница 216: ... main main Limit switch anomaly SRK20 25 35 50 60ZSX only Defective limit switch defective indoor control PCB Defective air inlet panel set Is the air inlet panel set correctly Are limit switch OK Defective indoor control PCB Correction re set Defective limit switch Note 1 Check if the limit switch functions properly or not by seeing whether the lamp continues to blink or can be reset by pressing ...

Страница 217: ...eat of compressor Gas shortage defective discharge pipe sensor Error of signal transmission Wiring error including power cable defective indoor outdoor PCB 214 main indoor indoor outdoor sub 216 17 SCM T 225 ...

Страница 218: ...t Is it normalized Malfunction by temporary noise Replace fan motor If the error persists after replacing the fan motor replace the outdoor main PCB the fan motor and outdoor outdoor main PCB Replace outdoor fan motor sub main main main outdoor main See page 223 for the fan motor and outdoor main PCB check pro After making sure the fan motor and outdoor main PCB are nor V AC AC AC AC AC AC Check c...

Страница 219: ...iver Is the drain piping clogged or at the wrong gradient Drain motor is defective Inspect wiring Drain abnormality SRR only Drain piping defective pump defect float switch indoor PCB Service valve gas side closed operation Service valve gas side closed Defective outdoor PCB Are the service valve gas side opened Open the valve NO YES NO YES Is the checked result of power transistor module OK Defec...

Страница 220: ...d oscillating between DC 0 and 20V Inspect power source for outdoor unit Replace fuse Replace indoor PCB Is the fuse burnt out 3 15 A YES YES YES NO NO NO b Indoor unit fan motor check procedure 1 Indoor PCB output check DC15V Indoor PCB DC 308 336V DC several V 4 6 V CNU GND Sensor Operation mode Phenomenon Shortcircuit Disconnected wire Heat exchanger sensor Cooling Heating Ourdoor air temperatu...

Страница 221: ...O b Indoor unit fan motor check procedure i Indoor PCB output check ii Fan motor resistance check FMi DC15V Indoor PCB DC 280V DC several V 4 6 V CNU GND Blue Yellow White Black Red Sensor Operation mode Phenomenon Shortcircuit Disconnected wire Heat exchanger sensor Cooling Heating Ourdoor air temperature sensor Cooling Heating Discharge pipe sensor All modes Measuring point Resistance when norma...

Страница 222: ...peration Faulty part other than fan motor YES Fan motor is faulty YES YES YES NO NO NO Replace the faulty part and the fuse Test run then the unit for checking Is there any damage on the internal circuit of fan motor Check the resistance value to judge See pages 220 to 223 Is the fuse blown on the indoor and outdoor PCB Is there any faulty part fan motor etc See pages 219 to 223 Replace the fuse o...

Страница 223: ...if the voltage oscillates between DC 0 and approx 20V UNIT A UNIT B UNIT C UNIT D Power source 1 Phase AC220 240V 50Hz 220V 60Hz Inspection of electronic expansion valve See page 223 Color marks Mark Color BK BR Black BL Blue BR Brown Brown RD Y G Red Yellow Green WH White OR Orange YE Yellow EEV A BK WH WH S 1 CNMAIN SIN RIN BK WH SO RO 250V 20A FUSE G2 Y G RD C 1 CN20V 5 2 G1 Y G CNEEV1 CNEEV2 T...

Страница 224: ... fan motor is fauly DC several 0 6V DC several V 0 6V DC280V DC15V Outdoor main PCB GND DC280V Red Blue 20 MΩ or higher Brown Blue 20 kΩ or higher CNFAN Red Blue Brown Orange White FM0 a Inspection of electronic expansion valve 6 White Yellow Orange Blue Red 5 4 3 2 1 Inspection of electronic expansion valve as a separate unit Measuring point Resistance when normal b Outdoor unit fan motor check p...

Страница 225: ...cement repair of tempera ture thermistor 256 Indoor control PCB Defective indoor control PCB Defective temperature thermistor input circuit Replacement of PCB 1 time flash Keeps flashing Stays OFF Indoor return air temperature thermistor Defective indoor return air temperature thermistor defective element broken wire short circuit Poor contact of temperature thermistor connector Replacement repair...

Страница 226: ...eplacement repair of temperature sensor 270 Outdoor main PCB Defective outdoor main PCB Defective temperature sensor input circuit Replacement of PCB Stays OFF Keeps flashing 1 time flash Outdoor main PCB compressor Current cut Anomalous compressor over current Replacement of PCB 271 272 Installation operation status Service valve closing operation Repair Stay OFF Keeps flashing 4 time flash Outdo...

Страница 227: ...with one remote control Whenever excessively connected indoor units is detected after power ON Return air temperature thermistor anomaly 50 C or lower is detected for 5 seconds continuously within 60 minutes after initial detection of this anomalous temperature Indoor heat exchanger temperature thermistor anomaly 50 C or lower is detected for 5 seconds continuously within 60 minutes after initial ...

Страница 228: ...emote control and fuse Note 1 With regard to parts of high voltage circuits and refrigeration cycle judge it according to ordinary inspection methods b Instruction of how to replace indoor control PCB Read the SAFETY PRECAUTIONS carefully first of all and then strictly follow it during the replacement in order to protect yourself The precautionary items mentioned below are distinguished into two l...

Страница 229: ... Control PCB Parts mounting are different by the kind of PCB Part number SW2 Blue Address setting SW7 Function setting CNT Blue External switch CNJ White Louver motor CNN Yellow Thermistor Heat exchanger CNI Blue Float SW CNH Black Thermistor Return air CNW3 Red Power PCB CNB White Remote control CNG Blue CNZ White HA CNE White RAM checker CNW4 Blue Power PCB SW6 Capacity setting item switch Addre...

Страница 230: ...he PCB Wiring connector color should match with the color of connector of the PCB Note 2 vi Let the wiring red and blue pass beneath the yellow green wiring and bind together with band vii Screw back the terminal of wiring yellow green from PCB T1 T2 T3 that was removed in i In that case do not place the crimping part of the wiring under the PCB Note 1 It might not be applicable on some models Not...

Страница 231: ... color c Do not pass CPU surrounding about wirings 4 Control PCB Parts mounting are different by the kind of PCB 㻼㼍㼞㼠㻌㼚㼡㼙㼎㼑㼞 㻿㼃㻞㻌㻔㻮㼘㼡㼑㻕 㻭㼐㼐㼞㼑㼟㼟㻌㼟㼑㼠㼠㼕㼚㼓 㻿㼃㻣 㻯㻺㻹㻟䠄㼃㼔㼕㼠㼑䠅 㻲㼍㼚㻌㼙㼛㼠㼛㼞 㻯㻺㼃㻝䠄㼃㼔㼕㼠㼑䠅 㻼㼞㼕㼙㼍㼞㼥㻌㼠㼞㼍㼚㼟㼒㼛㼞㼙㼑㼞 㻯㻺㻶㻞㻔㻮㼘㼡㼑䠅 㻸㼛㼡㼢㼑㼞㻌㼙㼛㼠㼛㼞 㻯㻺㻶㻔㼃㼔㼕㼠㼑㻕 㻸㼛㼢㼑㼞㻌㼙㼛㼠㼛㼞 㻼㼡㼘㼟㼑 㻯㻺㻿㻔㻮㼘㼡㼑䠅 㻸㼛㼡㼢㼑㼞㻌㻿㼃 㻯㻺㻴㻔㻮㼘㼍㼏㼗䠅 㼀㼔㼑㼞㼙㼕㼟㼠㼛㼞 㻔㻾㼑㼠㼡㼞㼚㻌㼍㼕㼞㻕 㻯㻺㻮㻔㼃㼔㼕㼠㼑䠅 㻾㼑㼙㼛㼠㼑 㼏㼛㼚㼠㼞㼛㼘 㻯㻺㼃㻞㻔㻮㼘㼍㼏㼗䠅 㻿㼑㼏㼛㼚㼐㼍㼞㼥 㼠㼞㼍㼚㼟㼒㼛㼞㼙㼑㼞 㻯㻺㻺㻔㼅㼑㼘㼘㼛㼣䠅 㼀㼔㼑㼞㼙㼕㼟㼠㼛㼞...

Страница 232: ...nd connect it d Control PCB Parts mounting are different by the kind of PCB item switch Address SW2 Master Slave1 Slave2 Slave3 SW5 1 SW5 2 Content of control Plural indoor units control by 1 remote control Master Slave setting Test run SW7 1 Normal Operation check drain motor test run SW6 ON 1 2 3 4 SW6 1 2 3 4 50VG OFF OFF OFF ON OFF OFF ON OFF OFF ON ON ON ON ON Part number SW5 Master Slave set...

Страница 233: ...ings connected to the connector are removed iii Fix the board such that it will not pinch any of the wires iv Reconnect the wirings to the PCB Wiring connector color should match with the color of connector of the PCB v Screw back the terminal of wiring that was removed in i b Power PCB Parts mounting are different by the kind of PCB Part number CNM1 White Fan motor CNW1 White Control PCB CNW3 Whi...

Страница 234: ...the PCB Match the wiring connector to the connector color on the PCB and connect it d Control PCB Parts mounting are different by the kind of PCB item switch Address SW2 OFF ON Content of control Plural indoor units control by 1 remote control Test run SW7 1 Normal Operation check drain motor test run SW6 ON 1 2 3 4 SW6 1 2 3 4 50VF ON OFF ON OFF Part number SW2 Blue Address setting CNI Blue Float...

Страница 235: ...d to the connector are removed iii Fix the board such that it will not pinch any of the wires iv Reconnect the wirings to the PCB Wiring connector color should match with the color of connector of the PCB v Screw back the terminal of wiring that was removed in i b Power PCB Parts mounting are different by the kind of PCB Part number CNM1 White Fan motor CNW1 White Control PCB CNW3 White Terminal b...

Страница 236: ...ep OFF Test run Drain motor Normal Test run Valid Invalid Normal See table 2 Model selection As per model See table 1 Remarks Address No setting at plural indoor units control by 1 R C 0 F Switches Description Default setting Master Slave setting Master Slave Table 1 Indoor unit model selection with SW6 1 SW6 4 35V 50V 60V SW6 4 SW6 1 SW6 2 SW6 3 Table 2 Indoor unit Master Slave setting with SW5 1...

Страница 237: ...ction State No of The Compressor Outdoor Unit Fan Speed 63H1 On Off Defrost Control On Off Total Running Hours of The Compressor Pulse of The Outdoor Unit Expansion Valve EEVC Pulse of The Outdoor Unit Expansion Valve EEVH 13 Supply Air Temperature ە Details of Compressor protection status No 33 No Contents of display 0 Normal 1 Discharge pipe temperature protection control 2 Discharge pipe temper...

Страница 238: ...on control 2 Discharge pipe temperature anomaly 3 Current safe control of inverter primary current 4 High pressure protection control 5 High pressure anomaly 6 Low pressure protection control 7 Low pressure anomaly 8 Anti frost prevention control 9 Current cut 10 Power transistor protection control 11 Power transistor anomaly Overheat 12 Compression ratio control 13 Spare 14 Dewing prevention cont...

Страница 239: ...dgment i Power ON and start check operation on cooling or heating mode ii Check ON OFF status of 6 LED s on the checker iii Judge the PCB by ON OFF status of 6 LED s on the checker iv Stop check operation within about 2minutes after starting check operation ON OFF status of LED If all of LED are ON OFF according to following pattern If all of LED stay OFF or some of LED are ON OFF Outdoor main PCB...

Страница 240: ...hermistor anomaly 257 E8 Heating overload operation 258 E9 Drain trouble FDTC and FDUM only 259 E10 Excessive number of connected indoor units more than 17 units by controlling with one remote control 260 E11 Address setting error of indoor units 261 E16 Indoor fan motor anomaly FDTC FDE and FDUM only 262 E19 Indoor unit operation check drain motor check setting error 263 E20 Indoor fan motor rota...

Страница 241: ...spective parts NO YES YES NO YES YES YES NO NO Is the compressor operating NO YES NO Note 1 Outdoor 35 C Indoor 27 C 1 WAIT It is normal This unit is designed to start in the soft start mode by detecting the under dome temperature of compressor when it restart after power reset It is necessary to replace to higher capacity one or to install additional unit Compressor refrigerant oil protection con...

Страница 242: ...phenomenon NO YES YES NO YES YES YES NO NO Is the compressor operating NO YES NO Note 1 Outdoor 7 C Indoor 20 C 1 WAIT It is normal This unit is designed to start in the soft start mode by detecting the under dome temperature of compressor when it restart after power reset It is necessary to replace to higher capacity one or to install additional unit Compressor refrigerant oil protection control ...

Страница 243: ... MΩ because of refrigerant migrated in the compressor When the earth breaker is activated at lower insulation resistance check the following points 6 hours after power ON check if the insulation resistance recovers to normal When power ON crankease heater heat up compressor and evaporate the refrigerant migrated in the compressor Check if the earth leakage breaker is conformed to higher harmonic r...

Страница 244: ...transmitting to wall and etc by fixing pipes on the wall or wrapping rubber cushion around the pipe which goes through the hole in the wall or applying other appropriate means Strength of ceiling wall floor etc may be insufficient Review the installing position or reinforce it Check for leaning of installed unit or anomalous mounting of fan louver or motor and specify the contacting point and corr...

Страница 245: ...ccur particularly during cooling or defrost operation in the heating mode It is normal The noise vibration occurs when the refrigerant starts or stops flowing It is normal When the defrosting starts or stops during heating the refrigerant flow is reversed due to switching 4 way valve This causes a large change in pressure which produces a blowing sound It may accompany also the hissing sounds as m...

Страница 246: ...cessary to recover refrigerant vacuum dry and recharge refrigerant Since there could be many causes of noise vibration the above do not cover all In such case check the conditions when where how the noise vibration occurs according to following check point Indoor outdoor unit Cooling heating fan mode Startup stop during operation Operating condition Indoor outdoor temperatures pressure Time it occ...

Страница 247: ...side LM louver motor Is the louver operable with the remote control YES NO Does the louver operate at the power on YES NO YES NO Operate after waiting for more than 1 minute Repair wiring Defective indoor control PCB Replace Replace LM Normal Adjust LM lever and then check again 2 Error detection method 3 Condition of error displayed 4 Presumable cause Defective LM LM wire breakage Faulty indoor c...

Страница 248: ...transformer secondary side YES YES NO 1 FDTC FDE FDUM Series FDEN Series Note 1 for GND NO NO IsDC5Vdetected between of CNW2 FDE FDUM CNW1 NO YES YES Is JX1 open Is JX1 open YES Defective outdoor control PCB Noise filter Misconnection or breakage of connecting wires Defective indoor control or power PCB Replace Replace FM LM etc Replace fuse Defective indoor power PCB Replace Open JX1 Defective in...

Страница 249: ...S NO Is DC 24V or higher between Brown Brown of transformer secondary side IsDC180V between of CNW2 FDE FDUM CNW1 FDEN Series FDTC FDE FDUM Series YES NO NO YES NO Correct Replace wires Replace remote control Defective indoor power PCB Replace Defective indoor control PCB Replace Replace transformer Defective indoor unit PCB Replace 2 Error detection method 3 Condition of error displayed 4 Presuma...

Страница 250: ...t Power source reset NO YES YES NO NO NO NO NO YES YES YES Set one remote control for Master and the other for Slave Set SW1 on remote control PCB at Master Set address again SW2 on indoor control PCB Separate remote control wires from high voltage wires Defective indoor control PCB Replace Defective remote control Change 2 Error detection method Communication between indoor unit and remote contro...

Страница 251: ...ed Same as above 4 Presumable cause Improper setting Surrounding environment Defective remote control communication circuit Faulty indoor control or power PCB Faulty outdoor sub PCB Note If any error is detected 30 minutes after displaying WAIT on the remote control the display changes to INSPECT I U NO NO NO NO NO Are more than 3 units of remote control connected Does remote control display Slave...

Страница 252: ...S WAIT YES YES YES YES To next page Normal Defective outdoor sub PCB Replace Defective indoor control PCB Replace Replace indoor control PCB Correct connection wires between indoor and outdoor units Defective outdoor sub PCB Replace Defective connection wire broken wire Noise Defective indoor control PCB Replace 2 Error detection method 3 Condition of error displayed 4 Presumable cause Blown fuse ...

Страница 253: ...he power source fuse Diagnosis Countermeasure Replace the outdoor sub PCB YES YES NO YES Replace the outdoor main PCB Replace the reactor Isn t there a short circuit between phases of outdoor sub PCB Aren t there cracks or burning on the power ransistor module or diode stack Isn t reactor the anomalous NO NO From previous page Replace fuse 2 Error detection method 3 Condition of error displayed 4 ...

Страница 254: ...tween wires at the remote control side after disconnecting the remote control Are wires connected properly between the indoor and the outdoor units Is approx DC20V detected between on the outdoor unit terminal block NO Is approx DC20V detected between on the indoor unit terminal block YES NO 1 Note 1 FDEN only YES YES YES YES NO NO Replace fuse Defective transformer Short circuit on remote control...

Страница 255: ...se Check peripheral environment Defective remote control or defective indoor control PCB Replace Move to E5 Communication error during operation check 2 Error detection method When normal communication between the remote control and the indoor unit is interrupted for more than 2 minutes Detectable only with the remote control 3 Condition of error displayed Same as above 4 Presumable cause Defectiv...

Страница 256: ...source reset Note 2 Check for faulty connection or breakage of signal wires between indoor outdoor units YES NO YES NO Repair signal wires Repair signal wires Defective outdoor sub PCB Defective network communication circuit Replace Unit is normal Malfunction by temporary noise etc 2 Error detection method When normal communication between indoor and outdoor unit is interrupted for more than 2 min...

Страница 257: ...Defective indoor control PCB Replace Defective indoor unit heat exchanger temperature thermistor input circuit 2 Error detection method Anomalously low temperature or high temperature resistance is detected on the indoor heat exchanger thermistor Thi R1 R2 or R3 3 Condition of error displayed When the temperature thermistor detects 50 C or lower for 5 seconds continuously the compressor stops Afte...

Страница 258: ...re thermistor Replace Defective indoor control PCB Replace Defective return air temperature thermistor input circuit 2 Error detection method Anomalously low temperature or high temperature resistance is detected by indoor return air temperature thermistor Thi A 3 Condition of error displayed When the temperature thermistor detects 50 C or lower for 5 seconds continuously the compressor stops Afte...

Страница 259: ...play E6 YES NO YES NO Error stop Reset Indoor heat exchanger temperature C 56 63 For the characteristics of indoor heat exchanger temperature refer to E6 Wash Defective indoor heat exchanger temperature thermistor connector Correct Defective indoor heat exchanger temperature thermistor Check refrigerant system Adjust 2 Error detection method Indoor heat exchanger temperature thermistor Thi R1 R2 R...

Страница 260: ...ogged Is the drain pipe slop OK NO YES NO NO Check float switch Defective indoor control PCB Replace Defective indoor control PCB Replace Check optional equipment Correct setting to Humidifier drain motor interlock Defective indoor power PCB Replace FDUM Indoor control PCB Check wiring of drain motor Correct Check drain motor 2 Error detection method Float switch is activated 3 Condition of error ...

Страница 261: ...e model 5 Troubleshooting All models Diagnosis Countermeasure Aren t more than 17 indoor units connected to one remote control NO YES Defective remote control Replace Reduce to 16 or less units 2 Error detection method When it detects more than 17 of indoor units connected to one remote contorl 3 Condition of error displayed Same as above 4 Presumable cause Excessive number of indoor units connect...

Страница 262: ...cases of RC E5 Return address No to IU using or button 2 Error detection method IU address has been set using the Master IU address set function of remote control 3 Condition of error displayed Same as above 4 Presumable cause Same as above Note Is Master IU address set function of remote control used E11 occurs YES IU IU IU R C In case the wiring is below and Master IU address set is used E11 is ...

Страница 263: ...ace faulty fan motor and power PCB Replace fan motor If the error persists after replacing the fan motor replace the indoor control PCB Malfunction by temporary noise 2 Error detection method Detected by rotation speed of indoor fan motor 3 Condition of error displayed When actual rotation speed of indoor fan motor drops to lower than 200min 1 for 30 seconds continuously the compressor and the ind...

Страница 264: ...Defective indoor control PCB Defective SW7 Replace Turn SW7 1 on the indoor control PCB OFF and reset the power 2 Error detection method After indoor operation check when the communication between indoor and outdoor unit is established and SW7 1 is still kept ON 3 Condition of error displayed Same as above 4 Presumable cause Mistake in SW7 1 setting Due to forgetting to turn OFF SW7 1 after indoor...

Страница 265: ...urce reset Remove foreign material Replace the fan motor Check power voltage Replace faulty fan motor and power PCB Replace fan motor If the error persists after replacing the fan motor replace the indoor control PCB Malfunction by temporary noise 2 Error detection method Detected by rotation speed of indoor fan motor 3 Condition of error displayed When the actual fan rotation speed does not reach...

Страница 266: ...ter 3 minutes delay the compressor starts again automatically but if this error occurs again within 60 minutes after the initial detection 4 Presumable cause Faulty connection of remote control temperature thermistor Defective remote control temperature thermistor Defective remote control PCB Note After 10 seconds has passed since remote control thermistor was switched from valid to invalid E28 wi...

Страница 267: ...ere any fouling or clogging on heater exchanger Control operation check Defective outdoor main PCB Replace Excessive refrigerant amount Recharge refrigerant by weighing proper amount on a scale 2 Error detection method Anomalous stop Reset 53 60 Outdoor heat exchanger temperature C 3 Condition of error displayed When anomalous outdoor heat exchanger temperature occurs 5 times within 60 minutes or ...

Страница 268: ...nt refrigerant amount Recharge refrigerant by weighing proper amount on a scale Control operation check Defective outdoor main control PCB Replace Check unit side Isn t filter clogged Are adequate indoor outdoor unit installation spaces Isn t there any short circuit of air Isn t there any fouling clogging on indoor heat exchanger 2 Error detection method For the error detection method refer to the...

Страница 269: ...ure sensor Replace Defective outdoor main control PCB Replace Defective outdoor heat exchanger temperature sensor input circuit 2 Error detection method Detection of anomalously low temperature resistance on the outdoor heat exchanger temperature sensor 3 Condition of error displayed When the temperature sensor detects 55 C or lower for 20 seconds continuously within 2 minutes to 2 minutes 20 seco...

Страница 270: ...ce Defective outdoor main control PCB Replace Defective outdoor air temperature sensor input circuit 2 Error detection method Detection of anomalously low temperature resistance on outdoor air temperature sensor 3 Condition of error displayed When the temperature sensor detects 55 C or lower for 5 seconds continuously within 2 minutes to 2 minutes 20 seconds after the compressor ON the compressor ...

Страница 271: ... discharge pipe temperature sensor Replace Defective outdoor main control PCB Replace Defective temperature sensor input circuit 2 Error detection method Detection of anomalously low temperature resistance on the discharge pipe temperature sensor 3 Condition of error displayed When the temperature sensor detects 25 C or lower for 5 seconds continuously within 10 minutes to 10 minutes 20 seconds af...

Страница 272: ...ource Open the valves Check refrigerant amount and refregerant circuit In case of transitional increase of high pressure and or test run several times restarting may recover it because liquid refrigerant migrated in the compresser is discharged from the compressor Replace compressor 2 Error detection method In order to prevent from overcurrent of inverter if the current exceeds the specifications ...

Страница 273: ...fully opened Is the filter clogged At heating does the indoor fan motor run Are the service valves fully opened Is the filter clogged Is there any liquid flooding Is the superheat within normal range Is the suction pipe temperature thermistor normal Is there any anoumalous sound on the compressor YES From previous page YES Defective outdoor main PCB Replace Defective outdoor main PCB Replace 2 Err...

Страница 274: ...onnector Check why power is not supplied to outdoor sub PCB Connect communication wire securely Defective outdoor sub PCB Replace Malfunction by temporary noise 2 Error detection method Detected communication error of more than 15 seconds 4 times in 15 minutes 3 Condition of error displayed When communication is not established between the outdoor sub PCB and the outdoor main PCB 4 Presumable caus...

Страница 275: ...for foreign matter like dust fouling etc YES Is voltage within the specified range NO Restore normal condition Restore normal condition Remove foreign matter like dust fouling etc Defective outdoor sub PCB Replace 2 Error detection method Error is displayed if the converter voltage exceeds DC340V 3 times within 20 minutes Remote control may be set after 3 minutes delay 3 Condition of error display...

Страница 276: ...or detection method Detected by rotation speed of outdoor fan motor 3 Condition of error displayed When actual rotation speed of outdoor fan motor drops to 75min 1 or lower for 30 minutes continuously the compressor and the outdoor fan motor stop After 3 minutes delay it starts again automatically but if this anomaly occurs 3 times within 60 minutes after the initial detection 4 Presumable cause D...

Страница 277: ...Countermeasure 2 Error detection method 3 Condition of error displayed 4 Presumable cause Note If the power transistor primary current exceeds the setting value for 3 seconds the compressor stops Power transistor primary current Faulty outdoor main PCB Dust on outdoor main PCB Blown F4 fuse Check soldered surfaces on the outdoor main PCB for foreign matter like dust fouling etc Isn t F4 fuse 250V ...

Страница 278: ...r Replace Defective outdoor sub PCB Replace Defective suction pipe temperature sensor input circuit 2 Error detection method Detection of anomalously low temperature resistance on suction pipe temperature sensor 3 Condition of error displayed When the temperature sensor detects 55 C or lower for 5 seconds continuously within 2 minutes to 2 minutes 20 seconds after the compressor ON the compressor ...

Страница 279: ...0 40 20 50 Temperature thermistor resistance kΩ Temperature C 5kΩ at 25 C Broken wire Short circuit Open fully Correct indoor heat exchanger return air temperature thermistor connector connections Defective indoor heat exchanger return air temperature thermistor Replace Charge refrigerant Defective indoor control PCB Replace Defective indoor heat exchanger return air temperature thermistor input c...

Страница 280: ...der Same as above Excessive refrigerant amount Indoor outdoor unit installation spaces Faulty compressor Defective outdor air temp sensor Defective outdoor main PCB Diagnosis Countermeasure 2 Error detection method 3 Condition of error displayed 4 Presumable cause Note Is outdoor ventilation condition good Inspect outdor air temperature sensor Is the refrigerant amount nomal Adjust the refrigerant...

Страница 281: ...e Check refrigerant amount and refrigerant circuit Repalce compressor Defective outdoor main PCB Replace Defective outdoor main PCB Replace Repalce compressor 2 Error detection method If it fails to change over to the rotor detection operation of compressor motor 3 Condition of error displayed If compressor fails to startup for 42 times 4 Presumable cause Faulty outdoor fan motor Faulty outdoor ma...

Страница 282: ... resistance Replace compressor if necessary Defective outdoor main PCB Replace 2 Error detection method Compressor rotor position 3 Condition of error displayed If it fails again to detect the rotor position after shifting to the compressor rotor position detection operation the compressor stops 4 Presumable cause Defective outdoor main PCB Anomalous power source voltage Improper refrigerant amoun...

Страница 283: ... Forced operation of drain pump Forced operation of drain pump is sent to the indoor unit 20 Setting of compressor frequency Fixing compressor frequency 21 Quiet mode On timer in order to start quiet mode RAC unit does not have this function 22 Auto address change from remote control Auto address can be changed from remote control RAC unit does not have this function 23 Indoor unit s address set o...

Страница 284: ...s received RAC unit does not have this function Display of check Display of checking in case of signal of error code address from remote control RAC unit does not have this function Display of auto cleaning operation Displays it when it is received auto cleaning singnal from indoor unit RAC unit does not have this function Display of room temperature Display room temperature Display of demand cont...

Страница 285: ...rvice panel 3 After removal of service panel loosen a screw 4 And then loosen 4 screws and remove the front panel together with the fan guard 5 Loosen a nut and remove the fan propeller 6 Disconnect the connector of CNFAN Screw Screws For front panel Screws For front panel Screws For top panel Screws For top panel Screws For service panel Nut 17 SCM T 225 ...

Страница 286: ...move the service panel and top panel 2 Loosen screws and remove the cover and the terminal cover 3 Loosen screws and disconnect all power cables locally installed Caution Be sure to do above work after turning the power OFF by breaker Nuts Clanps Side panel Cover Terminal cover Screws ï ï After removed terminal coverï ï TB1 for power 17 SCM T 225 ...

Страница 287: ...side panel 5 Untie the string and remove rear and front insulation cover 6 Disconnect the connector of crankcase heater Rear cover Front cover Side panel Side view Rear view Screws Screws Screws Disconnect the connector of crankcase heater 17 SCM T 225 ...

Страница 288: ...ide jacket of compressor 8 Remove the crankcase heater It is available to remove the crankcase heater after removing the compressor 9 Loosen 3 nuts of compressor fixing bolts Top cover Side jacket Crankcase heater Rear view Front view Nuts 17 SCM T 225 ...

Страница 289: ... discharger pipes to remove the compressor When brazing do not forget to disconnect suction pipe temperature sensor Tho S and discharge pipe temperature sensor Tho D from sockets Without disconnecting sensors sensors may have damage by the heat during brazing Nut Terminal cover U Red cable V White cable W Black cable Discharge pipe Suction pipe Discharge pipe temperature sensor Tho D Suction pipe ...

Страница 290: ...rews Screws Main PCB PCB1 on the upper layer 1 Loosen the screws and remove the top panel and service panel 2 Unlatch the cover and remove the cover of control box 3 Disconnect the connector of CNFAN Note Be sure to do following work after elapsing 3 minutes from power OFF Disconnect the connector of CNFAN 4 Loosen 6 screws and lift up the main PCB 17 SCM T 225 ...

Страница 291: ... W Black cable Disconnect the fasten connectors of reactotr which is located just above the 4 way valve Disconnect the connector of fan motor CNFAN Disconnect the connector of CNSUB Going to Sub PCB Disconnect the connector of CNTH For Tho A Outdoor air temp Tho R Heat exchanger temp Tho D Discharge pipe temp Tho S Suction pipe temp 6 Disconnect all connectors on the Sub PCB side Disconnect the fa...

Страница 292: ... 291 Main PCB PCB1 on the upper layer Layout of Main PCB Main PCB Part side Pattern side CNFAN CN20S CNHEAT CNTH Fuse CNSUB R Black S White C 2 Red S 2 White U Red V White W Black 17 SCM T 225 ...

Страница 293: ...A EEVB Disconnect the connector of CNEEV2 for EEVC EEVD Disconnect the connector of CNMAIN Going to Main PCB Disconnect the connector of CN20V Going to Main PCB Disconnect the connectors of CNA CNB CNC and CND 2 Loosen screws and disconnect the grounding cables 3 Disconnect the fasten connector of the black cable Note Be sure to do above work after elapsing 3 minutes from power OFF 4 Loosen a scre...

Страница 294: ...ayer 6 Loosen 4 screws and remove Sub PCB Layout of Sub PCB Black cable White cable to N terminal Pattern side CN20V CNEEV2 CNMAIN CNEEV1 RO BK SO WH C 1 RD S 1 WH Screws Screws CNA CNB CNC CND Part side Grounding cables 17 SCM T 225 ...

Страница 295: ...nector be sure to check the color marked on the top of coil and the color of the connector 2 When replace to a new coil be sure to insert the socket attached to the coil to the pipe correctly EEVD EEVC EEVB EEVA Marking color GREEN GREEN EEVD BLUE BLUE EEVC RED RED EEVB WHITE WHITE EEVA Socket 17 SCM T 225 ...

Страница 296: ... 295 4 way valve coil 1 Disconnect the connector 2 Loosen a screw and remove the coil Connector Red Screw Coil 17 SCM T 225 ...

Страница 297: ... 296 11 CHECKING PROCEDURE Models SCM71ZM S1 80ZM S1 Fan motor Compressor CNFAN1 on PCB1 WH OR BR BL RD NO Output DC280V DC15V DC0 6V DC0 5V Resistance 1 154Ω U Red V White W Black 17 SCM T 225 ...

Страница 298: ... 297 EEVB EEVC EEVA EEVD MARKING GREEN BLUE RED WHITE EEV A EEV D 46Ω WH 46Ω 46Ω 46Ω M YE OR BL RD Input DC12V 17 SCM T 225 ...

Страница 299: ...o R Black 4 6 Tho A Black Tho D Black Black 5 0 5 0 Tho S 5 0 Name Color Resistance kΩ Suction pipe temp sensor Tho S Outdoor air temp sensor Tho A Heat exchanger sensor Tho R Discharge pipe temp sensor Tho D 17 SCM T 225 ...

Страница 300: ... SUB PCB DC20V CNSUB 1 2 CN20V of SUB PCB DC20V CNTH Sensor Tho R Tho A Tho D Tho S CN20S 20S For solenoid coil of 4 way valve CNHEAT Crankacase heater For crankcase heater U Compressor V Compressor U Compressor AC300V AC220 240V AC220 240V CNMAIN of SUB PCB CNFAN CN20S CNHEAT Fuse CNSUB R Black S White C 2 Red S 2 White U Red V White W Black CNTH 17 SCM T 225 ...

Страница 301: ...0V Earth CNB Black White Indoor unit B AC220 240V Power source CNB Brown Indoor unit B AC0V Earth CNC Black White Indoor unit C AC220 240V Power source CNC Blue Indoor unit C AC0V Earth CND Black White Indoor unit D AC220 240V Power source CND Yellow Indoor unit D AC0V Earth CNEEV1 EEV A WH and EEV B RD CNMAIN 1 4 DC13V CNMAIN 5 4 DC5V CNEEV2 EEV C BL and EEV D GN CNSUB of Main PCB Black cable Whi...

Страница 302: ...ical work Otherwise it could result in electric shocks break down or malfunction Do not modify the unit It could cause electric shocks fire or break down Be sure to turn OFF the power circuit breaker before repairing inspecting the unit Repairing inspecting the unit with the power circuit breaker turned ON could cause electric shocks or injury Please read this manual carefully before starting inst...

Страница 303: ...s fire or break down Use the specified cables for wiring and connect them securely with care to protect electronic parts from external forces Improper connections or fixing could cause heat generation fire etc Seal the inlet hole for remote control cable with putty If dew water insect etc enters through the hole it could cause electric shocks fire or break down If dew or water enters the unit it m...

Страница 304: ... on the remote control Where the remote control gets wet 3 Accurate room temperature may not be detected using the temperature sensor of the remote control Where the average room temperature cannot be detected Place near the equipment to generate heat Place affected by outside air in opening closing the door Place exposed to direct sunlight or wind from air conditioner Where the difference between...

Страница 305: ...e When the cable length is longer than 100 m the max size for wires used in the R C case is 0 5 mm2 Connect them to wires of larger size near the outside of R C When wires are connected take measures to prevent water etc from entering inside 200 m 0 5 mm2 x 2 cores 300m 0 75 mm2 x 2 cores 400m 1 25 mm2 x 2 cores 600m 2 0 mm2 x 2 cores Secure the installation space shown in the figure For the insta...

Страница 306: ...om front 37 23 23 固定穴 18 3 83 5 120 19 120 37 23 23 19 120 Fixing holes 83 5 120 18 3 PCB side Viewed from rear 8 50 200 壁 電線管 ロ ッ クナッ ト スイ ッ チ ボ ッ クス パテで シール する こ と リ モコ ン配線 下ケース配線穴 ブッ シング センサー USB 端子 Wall Conduit Sensor USB port Terminal block Locknut Bushing Switch box Seal with putty R C cable When wires are passed through the bottom case fix the bottom case at 2 places on the switch box Switc...

Страница 307: ...not to pinch the sheath Tighten by hand 0 7 N m or less the wire connection If the wire is connected using an electric driver it may cause failure or deformation In case of exposing wiring When the wiring is taken out from the upper center or upper left of R C Cut out the thin wall sections on the cases for the size of wire Fix the bottom R C case on a flat surface with two wood screws In case of ...

Страница 308: ...p control Left right flap control Ventilation setting Auto restart Auto temp setting Auto fan speed IU settings Service Maintenance IU address Next service date Operation data Error display Error history Display erase anomaly data Reset periodical check Saving IU settings Special settings Erase IU address CPU reset Restore of default setting Touch panel calibration Indoor unit capacity display Ind...

Страница 309: ...er or knife and grind burrs with a file etc Install the lower case to the flat wall with attached two wooden screws Connect the remote control cord to the terminal block Connect the terminal of remote control with the terminal of indoor unit X Y X and Y are no polarity Wiring route is as shown in the right diag depending on the pulling out direction The wiring inside the remote control cas The she...

Страница 310: ...nter upper part with a nipper or knife ooden screws Connect the remote control cord to the terminal block Connect the terminal of remote control X Y with the terminal of indoor unit X Y X and Y are no polarity Wiring route is as shown in the right diagram depending on the pulling out direction The wiring inside the remote control case should be within 0 3mm2 recommended to 0 5mm2 The sheath should...

Страница 311: ...utton once and change to the TEMP RANGE indication 3 Press SET button and enter the temperature range setting mode 4 Select UPPER LIMIT or LOWER LIMIT by using button 5 Press SET button to fix 6 When UPPER LIMIT is selected valid during heating Press SET button to fix Indication example UPPER 26 C Displayed for two seconds After the fixed upper limit value displayed for two seconds the indication ...

Страница 312: ...nction 04 accordingly You can select the louver stop position in the four The louver can stop at any position In normal working indication indoor unit temperature is indicated instead of airflow Only the master remote control can be indicated Heating preparation indication should not be indicated Temperature indication is by degree C Temperature indication is by degree F ON OFF button finished Sta...

Страница 313: ...e in return air temperature of indoor unit To be reset producing 1 0 C increase in return air temperature of indoor unit To be reset producing 1 0 C increase in return air temperature of indoor unit To be reset producing 1 5 C increase in return air temperature of indoor unit To be reset producing 2 0 C increase in return air temperature of indoor unit When heating thermostat is OFF fan speed is l...

Страница 314: ... fan perform intermittent operation for five minutes twenty minutes OFF ed or heating thermostat is OFF the fan perform intermittent operation for five minutes five minutes OFF sing type indoor unit and is automatically defined ngle split series on the indoor fan tap is raised xchanger temperature to start frost prevention control How to check the current setting When you select from No and funcio...

Страница 315: ...own or malfunction Do not modify the unit It could cause electric shocks Be sure to turn OFF the power circuit breaker before repairing inspecting the unit Repairing inspecting the unit with the power circuit breaker turned ON could cause electric shocks or injury Do not install the unit in appropriate environment or where in generate If the unit is used at places where air contains dense oil mist...

Страница 316: ...in the control box with other wiring as shown below Connect the wiring to the terminal block X Y provided in the control box No polarity Fix the wiring with the clamp as shown below 1 2 012D791 SW1 Prevents interference during plural setting ON Normal OFF Remote SW2 Receiver master slave setting ON Master OFF Slave SW3 Buzzer ON Valid OFF Invalid SW4 Auto restart ON Valid OFF Invalid ter Slave ing...

Страница 317: ...tric shocks Preparation before installation continued Note Make sure Up to two receiver or wired remote control can be installed in one indoor unit group When two receiver or wired remote control are used it is necessary to change SW on the PCB to set it as slave How to install the receiver How to The receiver can be installed by replacing with a corner panel on the applicable decorative panel Att...

Страница 318: ...the panel according to the panel installation manual Put the wiring in the control box with other wiring as shown below Connect the wiring to the terminal block X Y provided in the control box No polarity Fix the wiring with the clamp as shown below Reattach the control box lid with 1 screw removed 1 3 4 2 Terminal block X Y in the indoor unit control box Terminal block X Y Wiring Clamp Control bo...

Страница 319: ...own the MODE button or insert batteries while holding down the MODE button Note Once the batteries are removed the setting is reset to the factory default When the batteries are removed repeat the steps described above Indoor function settings 1 How to set indoor functions Press the ON OFF button to stop the unit Press the desired one of the buttons shown item 2 while holding down the FUNCTION SET...

Страница 320: ...gn display 1000 hours 04 Filter sign display Operation stop after 1000 hours have elapsed U P Up Down 00 Anti draft setting Disable 01 Anti draft setting Enable SILENT 00 Infrared sensor setting Motion sensor setting Disable 01 Infrared sensor setting Motion sensor setting Enable HI POWER 00 Infrared sensor control Motion sensor control Disable 01 Infrared sensor control Motion sensor control Powe...

Страница 321: ...e receiver 300lux when no lighting is installed within 1m of the receiver in an ordinary office 2 Correlation receiver and in a plain vie The drawing correlation b the signal an at the receiv control is op under the co height of 2 4 3 Installation Minimum di condition of When no li Backup sw A backup switc surface When operatio possible due t can use it as an switch manuall 1 If pressed the air co...

Страница 322: ...con Transmit a cooling operation command with the wireless remote control unit while the backup switch on the receiver is depressed If the backup switch on the receiver is pressed during a test run it will end the test run If you cannot operate the unit properly during a test run please check wiring by consulting with inspection guides How to read the two digit display On the receiver of a wireles...

Страница 323: ...k and fied electrical installer and use exclusive circuit fire fire or break down flammable gas could flow in accumulate or leak fire as a result of significant deterioration of its performance or corrosion fire or break down fire or break down flat To change setting 1 Remove four screws located on the back of the receiver and detach the board 2 Change the setting by the switch on PCB WARNING Safe...

Страница 324: ...e to falling may result because of working at high place 012D630 SW1 Prevents interference during plural setting ON Normal OFF Customized SW2 Receiver master slave setting ON Master OFF Slave SW3 Buzzer ON Valid OFF Invalid SW4 Auto restart ON Valid OFF Invalid ter Slave ng when ng plural e controls Do not install the wireless kit at the following places in order to avoid malfunction It could caus...

Страница 325: ...place where it gets wet such as laundry room It could cause electric shocks Do not operate the unit with wet hands It could cause electric shocks Preparation before installation continued Up to two receiver or wired remote control can be installed in one indoor unit group When two receiver or wired remote control are used it is necessary to change SW on the PCB to set it as slave How to 1 3 Co The...

Страница 326: ... working at high place OFF Invalid ter Slave ng when ng plural e controls Remove the cover Insert a and wrench slightly Connect the wiring Connect wiring of the receiver to the wiring in the back ATTENTION Do not remove the clamp fixed the wiring Installation of the receiver Check direction of the receiver and CAUTION Connect the connectors before installing the receiver In case of connecting afte...

Страница 327: ...t batteries while holding down the MODE button Note Once the batteries are removed the setting is reset to the factory default When the batteries are removed repeat the steps described above Indoor function settings 1 How to set indoor functions Press the ON OFF button to stop the unit Press the desired one of the buttons shown item 2 while holding down the FUNCTION SETTING switch Use the selectio...

Страница 328: ...ter sign display Operation stop after 1000 hours have elapsed U P Up Down 00 Anti draft setting Disable 01 Anti draft setting Enable SILENT 00 Infrared sensor setting Motion sensor setting Disable 01 Infrared sensor setting Motion sensor setting Enable HI POWER 00 Infrared sensor control Motion sensor control Disable 01 Infrared sensor control Motion sensor control Power control only 02 Infrared s...

Страница 329: ...ontrol Up to two receivers can be installed in one indoor unit group Wireless re Backup sw A backup switc section of the p When operatio unit is not poss unit a unit failu means You sh 1 If pressed will cause in the auto only in th Wind spe Louver h 2 If pressed Cooling tes After safety Transmit a c on the rece If the backu If you canno inspection g How to read A two digit ind 1 An indica 2 An ind...

Страница 330: ...egment indicator is provided on the receiver section 1 An indication will be displayed for one hour after power on 2 An indication appears for 3 5 seconds when a Stop command is sent from the wireless remote control unit while the air conditioner is not running 3 An indication appearing in 1 or 2 above will go off as soon as the unit starts operation 4 When there are no error records to indicate a...

Страница 331: ...o a ceiling or a wall Select a method according to the installation position Installation position A Direct installation onto the ceiling with wood screws Take out th Fit the upp Use this m 1 B Installat PJZ012D112 Master Slave setting when using plural remote controls Do It c 1 2 3 4 5 6 7 Switch To change setting 1 Remove one screws located on the under of the receiver and detach the board 2 Cha...

Страница 332: ...ll the receiver continued Take out the connector to the backside from the hole of the lower case putting through the wiring at Fit the upper case and the lower case and tighten the screws Use this method when installaing onto a gypsum board 7 to 18mm etc 1 2 B Installation with enclosed bracket 012D112 SW1 Prevents interference during plural setting ON Normal OFF Customized SW2 Receiver master sla...

Страница 333: ... connect the wiring to the power source of the terminal block If it is connected printed board will be damaged 1 3 Drill the receiver installation holes with the dimensions shown right at the ceiling position where wires can be connected A Direct installation onto the ceiling with wood screws 88mm H 101mm W B Installation with enclosed bracket 108mm H 108mm W 1 Drilling of the ceiling ceiling open...

Страница 334: ... the above drawing Insert the end of the installation fitting into the back of the ceiling from the opening and tighten the screws to fix the bracket onto the ceiling Pass the wiring from the rear side through the hole on the lower case Fit the lower case onto the bracket and fix the lower case to the bracket using the two installation holes shown above The other four holes are not used Follow step t...

Страница 335: ... on the indoor unit PCB from 000 to 127 so as not to duplicate Terminal block Receiver continued Receiv 5 Wood screw Cutting Holder for remote control Ensure the correct polarity when inserting Button Numb FAN SPEED MODE FILTER U P SILENT HI POWER Band enclosed Hole Lower case Cord clamp Wiring Fix with band Hole Upper case Lower case A p p r o x 1 0 0 m m o r m o r e C Exposed installation Use th...

Страница 336: ...ting Standard ON TIMER 00 Cooling fan residual period running Disable 01 Fun speed setting Setting 1 01 Cooling fan residual period running 0 5 hours 02 Fun speed setting Setting 2 02 Cooling fan residual period running 2 hours MODE 00 Room heating temperature adjustment Disable 03 Cooling fan residual period running 6 hours 01 Room heating temperature adjustment 1 C OFF TIMER 00 Heating fan resid...

Страница 337: ...alled on ceiling 1 Standard reachable area of the signa Condition Illuminance at the receiver 300lux when no lighting is installed within 1m of the receiver in an ordinary office l Receiver Ceiling surface Ceiling surface Floor Floor Orientation of receiver Receivable area of the signal Receivable area of the signal Orientation of receiver 2 Correlation between illuminance at the receiver and reach...

Страница 338: ...operation command with the wireless remote control unit while the backup switch on the receiver is depressed If the backup switch on the receiver is pressed during a test run it will end the test run If you cannot operate the unit properly during a test run please check wiring by consulting with inspection guides How to read the 6 digit display A 6 digit indicator 7 segment indicator is provided o...

Страница 339: ... button Button to start stop the air conditioner FAN SPEED button Button to set the fan speed AIR CON No button Indicates the No of air conditioner which is connected MODE button Use to select the mode TEMP button Use to raise the setting temperature TEMP button Use to lower the setting temperature Operation mode display Indoor unit No display VRF series outdoor unit No display Central control dis...

Страница 340: ...uration 2 Maximum prolongation of remote control wiring is 600m If the prolongation is over 100m change to the size below But the wiring in the remote control case should be 0 3mm2 recommended to 0 5mm2 Change the wire size outside of the case according to wire connecting Waterproof treatment is necessary at the wire connecting section Be careful about contact failure Thin part The remote control ...

Страница 341: ...mote control is mounted to a flat wall with two accessory wood screws Connect the remote control cord to the terminal block Connect the terminals X and Y of the remote control and the terminals X and Y of the indoor unit No polarity of X and Y The wiring route is as shown in the right The wiring in the remote control case should be 0 3 mm2 recommended to 0 5 mm2 at maximum Further peel off the she...

Страница 342: ...remote control cord to the wall surface with a trol cord cores wires or cables on site configuration s 600 m ize below be 0 3mm2 recommended to 0 5mm2 ng to wire connecting Waterproof treatment is eful about contact failure cores cores cores cores Set the switch SW1 1 of the slave remote control is Slave ON The factory default is set as Master OFF Note The remote control thermistor enabled setting...

Страница 343: ...ontrol thermistor enabled offset temperature at 3 0 C 05 Ventilation setting 01 No ventilator connection 02 Ventilator links air conditioner In case of Single split series by connecting ventilation device to CNT of the indoor printed circuit board in case of VRF series by connecting it to CND of the indoor printed circuit board the operation of ventilation device is linked with the operation of in...

Страница 344: ...nds Function number 07 lighting for 3 to 20 seconds Setting number 01 lighting for 3 to 20 seconds Then the screen goes back to the function number blinking indication if the setting is sequentially conducted continue with the same procedures If the setting is finished proceed to Stop air conditioner and simultaneously press AIR CON No and MODE buttons at the same time for over three seconds The f...

Страница 345: ...ction Safety precautions Before use please read these Safety precautions thoroughly before installation All the cautionary items mentioned below are important safety related items to be taken into consideration so be sure to observe them at all times Incorrect installation could lead to serious consequences such as death major injury or envirommental destruction Symbols used in these precautions A...

Страница 346: ...on cable length approximately 1 3m from the indoor unit Be sure not to extend the connection cable on site If the connection cable is extended malfunction may occur Fix the interface on the wall pillar or the like Cut out the punch outs for the connection cables running into the casing with cutter Recess the electrical box procured locally and connection cables in the wall Mount the lower casing o...

Страница 347: ...rohibition mode switch OFF the DIP switch SW2 3 on the interface PCB Connection of Superlink E board Functions of CnT connector Switch ON the DIP switch SW2 2 Factory setting ON on the interface PCB Wiring connection between the interface and the Superlink E board Clamp the connection cables with cable clamps Regarding the connection of Superlink E board refer to the installation manual of Superli...

Страница 348: ...te control with reference to the attached installation manual of wired remote control B 0 3mm2 x 2 cores cable should be used for the wiring of wired remote control C Maximum length of wiring is 600m If the length of wiring exceeds 100m change the size of cable as mentioned below 100m 200m 0 5mm2 x 2 cores 300m or less 0 75mm2 x 2 cores 400m or less 1 25mm2 x 2 cores 600m or less 2 0mm2 x 2 cores ...

Страница 349: ... 348 17 SCM T 225 l l l l l l er l l K K 12 5 Superlink E board SC ADNA E ...

Страница 350: ... 349 17 SCM T 225 l l l l l l l l ...

Страница 351: ...lace the unit as shown below ii Remove the bottom plate and duct flange plate of rear from the unit Keep the removed tapping screws to reuse later The number of tapping screws to be removed BOTTOM TOP iii Install rear panel by using removed tapping screws in process 2 Install fan guard by using tapping screws in parts set The number of tapping screws to be tightened RJZ012A040 BOTTOMAIR INLET KIT ...

Страница 352: ... surface etc Run the sensor cable in a place where the power cable or electrical noise will not cause any abnormal operation 3 Installation procedure a Insert the tip of slotted screwdriver to the gap between the cover and base of the sensor box and twist it to disassemble b Fix the base to the wall with screws c Connect the cable to the terminal block in the base Non polarity d Attach the cover t...

Страница 353: ...Connect the cable from remote sensor box and the cut wiring procedure f of CnG connector Non polarity Be sure to connect the wirings by solder separately Then wirings should prevent a short circuit separately by insulating tapes etc In case of faulty wiring connection it can cause electrical shock and fire j Put CnG connector back on the indoor unit PCB k Attach the control lid of the indoor unit ...

Страница 354: ...urn of the unit Turn off the power source during servicing or inspection work If the power is supplied during servicing or inspection work it could cause electric shock and injury by the operating fan Shut off the power before electrical wiring work It could cause electric shock unit failure and improper running Do not install and use the unit where corrosive gas such as sulfurous acid gas etc or ...

Страница 355: ...tions of intake outdoor air do not meet process the outdoor air before intaking 2 Intake outdoor air volume Intake outdoor air volume is 2 6 m3 min at the maximum when two sets of duct joints are used Up to two sets of duct joint can be installed on OA spacer In case one set of duct joint is installed 1 3 m3 min max In case two sets of duct joint is installed 2 6 m3 min max 3 Selection of booster ...

Страница 356: ...he figure For the height position of hanging the indoor unit refer to Section 5 Fix the brackets 3 and 4 2 pieces each with bolts Install OA spacer i Install it in the way that the recess of OA spacer will fit on the bracket 1 fixed temporarily at the step ii Tighten the bolt of bracket 1 iii Fix the bracket 2 with bolt Tighten up 1 2 When installing OA spacer after hanging the indoor unit 2 Apply...

Страница 357: ...e put on distant place Confirm there is no backlash between the hanger plate for suspension bolt and the lower nut and washer Use the level gauge only when OA spacer has been installed before hanging 1 1 only Unit Correct Unit Wrong Nut upper Flat washer Spring washer Ceiling surface Nut lower Touch the nut lower and washer without any play Play is left between the fixture and the nut lower and wa...

Страница 358: ...sed by assembling on the spacer TC OAS E Confirm the following parts are included 1 Before installation Fix the product on the spacer TC OAS E as shown below For the installation method refer to the installation manual of the spacer 2 Regarding the use of this product Duct joint Screw Spacer Lid PJZ012D073 12 8 Duct joint FDTC only ...

Страница 359: ... model 7pcs model 5pcs 1pc 1pc Installation Points and Operating Instructions for the Filter Kit CAUTION PJZ012D076 This manual contains installation points and operating instructions for the filter kit manufactured by MHI Carry out the work following the instructions below This manual also contains information on the usage after installation so keep this manual properly with USER S MANUAL provide...

Страница 360: ...pper side 2 Install the rail on both inner sides of the duct with the screw 3 Install the air filter on the rails Installation procesure 4 Install the bracket on the rail with the screw PJZ012D076 When the unit is installed bottom side of the unit is located at the lower side Insulation Rail Screw Air filter Bracket Screw Insulation Duct Sticking standard position for insulation Insu Duct lation 3...

Страница 361: ...acity for heating Warmer season at indoor Declared coefficient of performance Warmer season at indoor temperature 20 and outdoor temperature Tj temperature 20 and outdoor temperature Tj Tj 2 Pdh kW Tj 2 COPd Tj 7 Pdh kW Tj 7 COPd Tj 12 Pdh kW Tj 12 COPd Tj bivalent temperature Pdh kW Tj bivalent temperature COPd Tj operating limit Pdh kW Tj operating limit COPd Declared capacity for heating Colder...

Страница 362: ...imit COPd 2 40 Declared capacity for heating Warmer season at indoor Declared coefficient of performance Warmer season at indoor temperature 20 and outdoor temperature Tj temperature 20 and outdoor temperature Tj Tj 2 Pdh kW Tj 2 COPd Tj 7 Pdh kW Tj 7 COPd Tj 12 Pdh kW Tj 12 COPd Tj bivalent temperature Pdh kW Tj bivalent temperature COPd Tj operating limit Pdh kW Tj operating limit COPd Declared ...

Страница 363: ...COPd 2 40 Declared capacity for heating Warmer season at indoor Declared coefficient of performance Warmer season at indoor temperature 20 and outdoor temperature Tj temperature 20 and outdoor temperature Tj Tj 2 Pdh kW Tj 2 COPd Tj 7 Pdh kW Tj 7 COPd Tj 12 Pdh kW Tj 12 COPd Tj bivalent temperature Pdh kW Tj bivalent temperature COPd Tj operating limit Pdh kW Tj operating limit COPd Declared capac...

Страница 364: ...OPd 2 30 Declared capacity for heating Warmer season at indoor Declared coefficient of performance Warmer season at indoor temperature 20 and outdoor temperature Tj temperature 20 and outdoor temperature Tj Tj 2 Pdh kW Tj 2 COPd Tj 7 Pdh kW Tj 7 COPd Tj 12 Pdh kW Tj 12 COPd Tj bivalent temperature Pdh kW Tj bivalent temperature COPd Tj operating limit Pdh kW Tj operating limit COPd Declared capaci...

Страница 365: ...mit COPd 2 30 Declared capacity for heating Warmer season at indoor Declared coefficient of performance Warmer season at indoor temperature 20 and outdoor temperature Tj temperature 20 and outdoor temperature Tj Tj 2 Pdh kW Tj 2 COPd Tj 7 Pdh kW Tj 7 COPd Tj 12 Pdh kW Tj 12 COPd Tj bivalent temperature Pdh kW Tj bivalent temperature COPd Tj operating limit Pdh kW Tj operating limit COPd Declared c...

Страница 366: ...COPd 2 30 Declared capacity for heating Warmer season at indoor Declared coefficient of performance Warmer season at indoor temperature 20 and outdoor temperature Tj temperature 20 and outdoor temperature Tj Tj 2 Pdh kW Tj 2 COPd Tj 7 Pdh kW Tj 7 COPd Tj 12 Pdh kW Tj 12 COPd Tj bivalent temperature Pdh kW Tj bivalent temperature COPd Tj operating limit Pdh kW Tj operating limit COPd Declared capac...

Страница 367: ...OPd 1 99 Declared capacity for heating Warmer season at indoor Declared coefficient of performance Warmer season at indoor temperature 20 and outdoor temperature Tj temperature 20 and outdoor temperature Tj Tj 2 Pdh kW Tj 2 COPd Tj 7 Pdh kW Tj 7 COPd Tj 12 Pdh kW Tj 12 COPd Tj bivalent temperature Pdh kW Tj bivalent temperature COPd Tj operating limit Pdh kW Tj operating limit COPd Declared capaci...

Страница 368: ...imit COPd 1 99 Declared capacity for heating Warmer season at indoor Declared coefficient of performance Warmer season at indoor temperature 20 and outdoor temperature Tj temperature 20 and outdoor temperature Tj Tj 2 Pdh kW Tj 2 COPd Tj 7 Pdh kW Tj 7 COPd Tj 12 Pdh kW Tj 12 COPd Tj bivalent temperature Pdh kW Tj bivalent temperature COPd Tj operating limit Pdh kW Tj operating limit COPd Declared ...

Страница 369: ...imit COPd 1 99 Declared capacity for heating Warmer season at indoor Declared coefficient of performance Warmer season at indoor temperature 20 and outdoor temperature Tj temperature 20 and outdoor temperature Tj Tj 2 Pdh kW Tj 2 COPd Tj 7 Pdh kW Tj 7 COPd Tj 12 Pdh kW Tj 12 COPd Tj bivalent temperature Pdh kW Tj bivalent temperature COPd Tj operating limit Pdh kW Tj operating limit COPd Declared ...

Страница 370: ...mit COPd 2 40 Declared capacity for heating Warmer season at indoor Declared coefficient of performance Warmer season at indoor temperature 20 and outdoor temperature Tj temperature 20 and outdoor temperature Tj Tj 2 Pdh kW Tj 2 COPd Tj 7 Pdh kW Tj 7 COPd Tj 12 Pdh kW Tj 12 COPd Tj bivalent temperature Pdh kW Tj bivalent temperature COPd Tj operating limit Pdh kW Tj operating limit COPd Declared c...

Страница 371: ...ing limit COPd 2 40 Declared capacity for heating Warmer season at indoor Declared coefficient of performance Warmer season at indoor temperature 20 and outdoor temperature Tj temperature 20 and outdoor temperature Tj Tj 2 Pdh kW Tj 2 COPd Tj 7 Pdh kW Tj 7 COPd Tj 12 Pdh kW Tj 12 COPd Tj bivalent temperature Pdh kW Tj bivalent temperature COPd Tj operating limit Pdh kW Tj operating limit COPd Decl...

Страница 372: ... Declared capacity for heating Warmer season at indoor Declared coefficient of performance Warmer season at indoor temperature 20 and outdoor temperature Tj temperature 20 and outdoor temperature Tj Tj 2 Pdh kW Tj 2 COPd Tj 7 Pdh kW Tj 7 COPd Tj 12 Pdh kW Tj 12 COPd Tj bivalent temperature Pdh kW Tj bivalent temperature COPd Tj operating limit Pdh kW Tj operating limit COPd Declared capacity for h...

Страница 373: ...mit COPd 2 30 Declared capacity for heating Warmer season at indoor Declared coefficient of performance Warmer season at indoor temperature 20 and outdoor temperature Tj temperature 20 and outdoor temperature Tj Tj 2 Pdh kW Tj 2 COPd Tj 7 Pdh kW Tj 7 COPd Tj 12 Pdh kW Tj 12 COPd Tj bivalent temperature Pdh kW Tj bivalent temperature COPd Tj operating limit Pdh kW Tj operating limit COPd Declared c...

Страница 374: ...ng limit COPd 2 30 Declared capacity for heating Warmer season at indoor Declared coefficient of performance Warmer season at indoor temperature 20 and outdoor temperature Tj temperature 20 and outdoor temperature Tj Tj 2 Pdh kW Tj 2 COPd Tj 7 Pdh kW Tj 7 COPd Tj 12 Pdh kW Tj 12 COPd Tj bivalent temperature Pdh kW Tj bivalent temperature COPd Tj operating limit Pdh kW Tj operating limit COPd Decla...

Страница 375: ... COPd 2 30 Declared capacity for heating Warmer season at indoor Declared coefficient of performance Warmer season at indoor temperature 20 and outdoor temperature Tj temperature 20 and outdoor temperature Tj Tj 2 Pdh kW Tj 2 COPd Tj 7 Pdh kW Tj 7 COPd Tj 12 Pdh kW Tj 12 COPd Tj bivalent temperature Pdh kW Tj bivalent temperature COPd Tj operating limit Pdh kW Tj operating limit COPd Declared capa...

Страница 376: ...it COPd 2 14 Declared capacity for heating Warmer season at indoor Declared coefficient of performance Warmer season at indoor temperature 20 and outdoor temperature Tj temperature 20 and outdoor temperature Tj Tj 2 Pdh kW Tj 2 COPd Tj 7 Pdh kW Tj 7 COPd Tj 12 Pdh kW Tj 12 COPd Tj bivalent temperature Pdh kW Tj bivalent temperature COPd Tj operating limit Pdh kW Tj operating limit COPd Declared ca...

Страница 377: ...g limit COPd 2 14 Declared capacity for heating Warmer season at indoor Declared coefficient of performance Warmer season at indoor temperature 20 and outdoor temperature Tj temperature 20 and outdoor temperature Tj Tj 2 Pdh kW Tj 2 COPd Tj 7 Pdh kW Tj 7 COPd Tj 12 Pdh kW Tj 12 COPd Tj bivalent temperature Pdh kW Tj bivalent temperature COPd Tj operating limit Pdh kW Tj operating limit COPd Declar...

Страница 378: ...imit COPd 2 14 Declared capacity for heating Warmer season at indoor Declared coefficient of performance Warmer season at indoor temperature 20 and outdoor temperature Tj temperature 20 and outdoor temperature Tj Tj 2 Pdh kW Tj 2 COPd Tj 7 Pdh kW Tj 7 COPd Tj 12 Pdh kW Tj 12 COPd Tj bivalent temperature Pdh kW Tj bivalent temperature COPd Tj operating limit Pdh kW Tj operating limit COPd Declared ...

Страница 379: ...AVY INDUSTRIES THERMAL SYSTEMS LTD Because of our policy of continuous improvement we reserve the right to make changes in all specifications without notice C MITSUBISHI HEAVY INDUSTRIES THERMAL SYSTEMS LTD 16 5 Konan 2 chome Minato ku Tokyo 108 8215 Japan http www mhi mth co jp en ...

Отзывы: