30
VS-60HS12U Set-up Manual
Color
b
ala
nc
e a
dju
stm
en
t
3.4.3
CSC adjustment
SYSTEM SETTING > MAINTENANCE > CSC
The CSC can be adjusted automatically and manually.
The automatic adjustment applies the optimum CSC
values to monitors calculated from the color data
retained in the monitors. If necessary, the setting can
be fine tuned manually.
A monitor has 2 memory tables, CSC1 and CSC2.
Adjusted values can be saved in either one.
Automatic CSC adjustment
1
Set NORMAL in LED POWER (page 34) on all monitors
to be adjusted. Also make sure its gain value(s) is
(are) 100 as default.
2
Select 1 or 2 in CSC > TABLE SELECTION menu.
Adjusted values will be applied to the selected
memory table.
3
Selecting AUTO TUNING > START? > YES on the
MASTER monitor starts the automatic adjustment.
The optimum CSC values will be calculated to be
applied to the selected memory table.
The
automatic adjustment
refers to the
brightness/color data saved in the monitors which was
measured at factory shipment. It may not match
precisely in the following cases, so manual adjustment
may be needed:
•
When temperature condition is different between
the monitors in operation.
•
With different types of screens from Mitsubishi
specified
Manual CSC adjustment
Colors can be adjusted manually by eyes.
1
Set NORMAL in LED POWER (page 34) on all monitors
to be adjusted. Also make sure its gain value(s) is
(are) 100 as default
2
Display the adjustment white in the internal test
patterns (page 8, 55).
3
Select 1 or 2 in CSC > TABLE SELECTION menu.
Adjusted values will be applied to the selected
memory table.
•
[MENU1] button switches the adjustment menu to
the simple one (page 9).
4
Display a single color with [R], [G] and [B] buttons.
•
Regardless of remote ID setting (page 8), one of
those buttons mutes (switches off) a color on all
the monitors. When muted / un-muted monitors
are mixed in a display wall, these buttons may just
alternate the effect. To un-mute a color on all
monitors in the same time, press and hold the
button of the color.
5
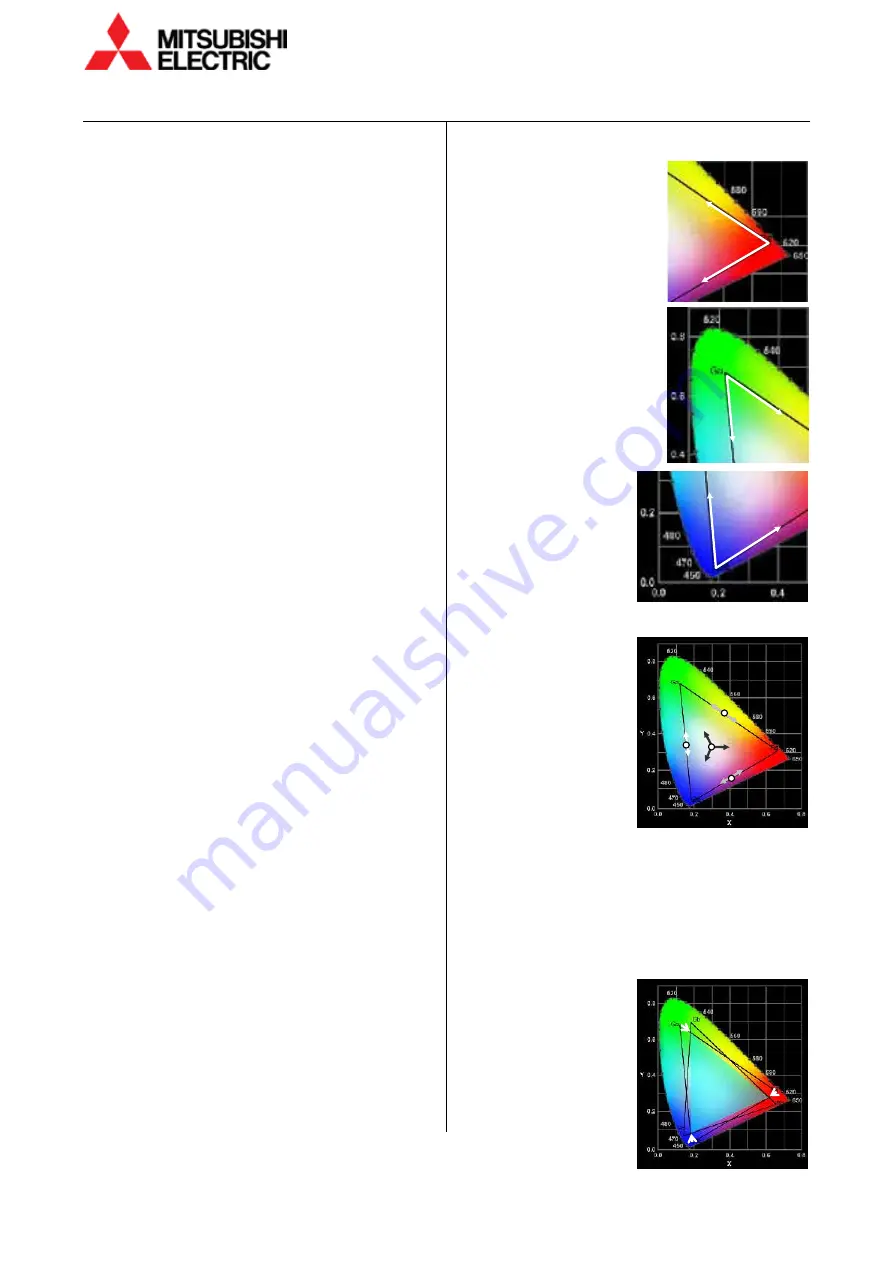
Adjustment for three primary colors:
5-1 Display the single red
color on entire display wall
and align the luminance
level with the darkest one
by R–R. Then align the tint
on the single red by R–G
and R–B.
5-2 Display the single green
color to align it in the same
way by G–G, G–R and G–B.
5-3 Display the single
blue color to align it in
the same way by B–B,
B–R and B–G.
6
Adjustment for mid-colors and white:
6-1 Display the yellow
color (red + green) and
align it by R-GAIN and
G-GAIN.
•
R-GAIN, G-GAIN and
B-GAIN don’t have
value indications.
They control the
related CSC values
with the same ratio
to change the
luminance
with
maintaining their tints.
6-2 Display the cyan color (green + blue) and align it
by G-GAIN and B-GAIN.
6-3 Display the magenta color (blue + red) and align
it by B-GAIN and R-GAIN.
6-4 Display the white color (red + green + blue) and
align it by R-GAIN, G-GAIN and B-GAIN.
7
Repeat the step 5 and 6
until the luminance
and tint of all the colors
get uniformed.
G-R
G-B
R-B
R-G
B-G
B-R
Magenta
Yellow
Cyan
White
Содержание VS-60HS12U
Страница 1: ...DLPTM Display Wall Cube VS 60HS12U Set up Manual REV 1 0 Dec 22 2014 ...
Страница 57: ...REV 1 0 57 Menu trees Installation Installation White Balance Detail Misc 1 ...
Страница 63: ...REV 1 0 63 Revision history M E M O ...
Страница 64: ......


