background image

ENGLISH

13

••••••••••••••••••••••••••••••••••••••••••••••••••••••••••••••••••••••••••••••••••••••••••••••••••••••••••••••••••••••••••••••••••••• Connections

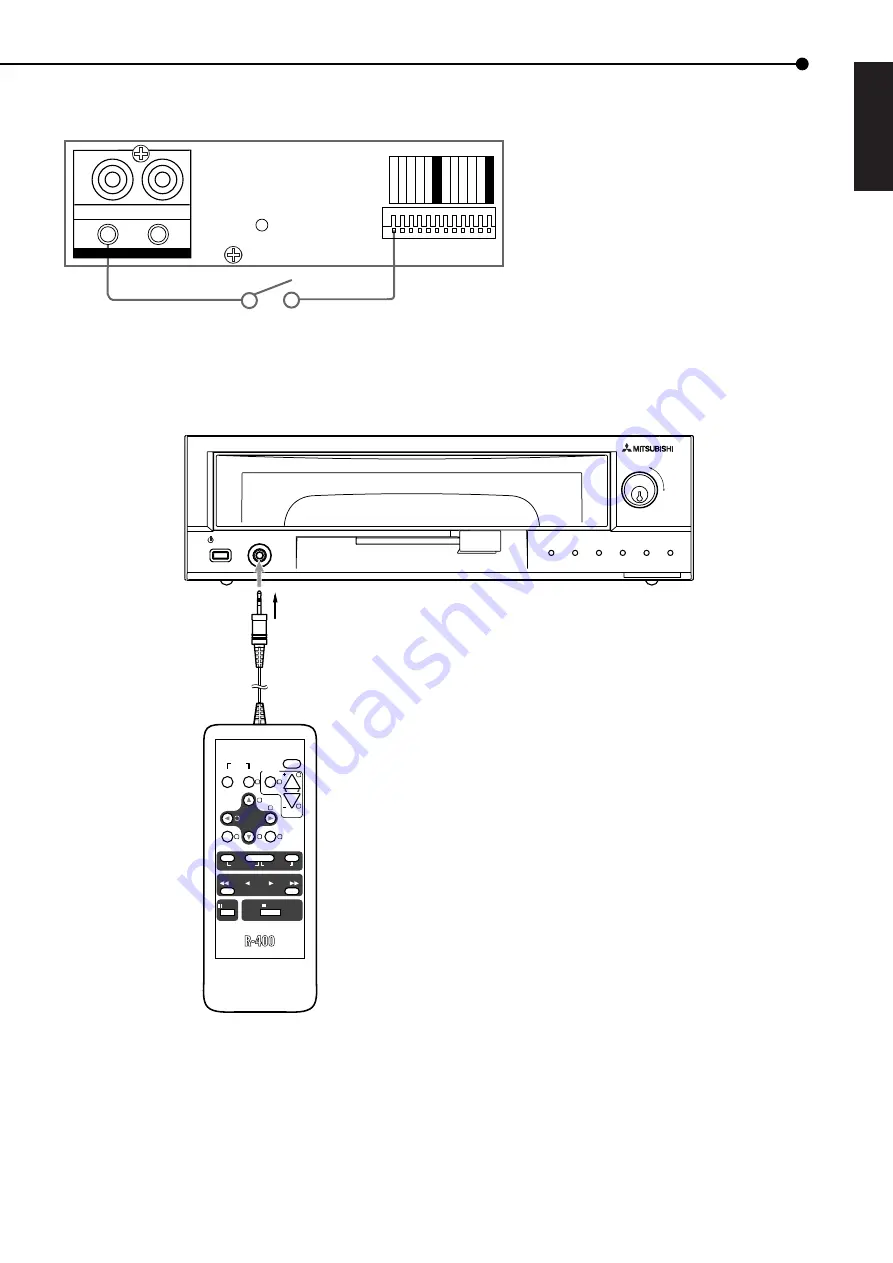
Alarm recording connection

Example: The diagram below shows an example of connection for alarm signals corresponding to camera number 1.

ALARM SWITCH

RESET

EMERGENCY

MODE OUT 1

MODE OUT 2

MODE OUT 3

MODE OUT 4

ALARM 1

ALARM 2

ALARM 3

ALARM 4

MODE OUT 5

GND

GND

IN

OUT

GND

AUDIO

Connecting the wired remote control R-400 (supplied)

ACCESS

REC

ALARM

INTERRUPT WARNING

LINK

LOCK

RX/TX

DIGITAL RECORDER DX-NT400

POWER

REMOTE

REMOTE CONTROL UNIT

PLAY

REV.P

REC/STOP

TIMER ON/OFF

PAUSE

STOP

CLEAR

ENTER

SET UP

MENU

SEARCH

SPLIT/

SINGLE

ZOOM

ALARM

INTERRUPT

LOCK

WARNING

RESET

JOG

2

1

4

8

9

7

0

6

5

3

To REMOTE jack

2 m

Содержание DX-NT400E

Страница 1: ...1 ENGLISH OTHERS DIGITAL RECORDER INSTALLATION AND OPERATION MANUAL MODEL DX NT400E THIS INSTRUCTION MANUAL IS IMPORTANT TO YOU PLEASE READ IT BEFORE USING YOUR DIGITAL RECORDER ...

Страница 2: ...ecording and alarm recording can be registered Furthermore individual settings can be made for pre alarm recording and motion detection function as well Timer holiday specification Holidays throughout the year can be set in advance Versatile functions to support surveillance Removable HDD tray Owning to the removable structure attaching or removing the HDD is possible The removable HDD tray suppor...

Страница 3: ...e regularly as a precaution against possible breakdowns and accidents HEAVY OBJECTS SHOULD NEVER BE PLACED ON THE UNIT E G TV MAINS LEAD CONNECTION The mains lead on this unit is fitted with a non rewireable mains plug incorporating a 5A fuse If you need to replace the fuse use a 5A fuse approved by BSI or ASTA to BS 1362 ensuring you refit the fuse cover If the mains plug is not suitable for the ...

Страница 4: ...ING 34 CAMERA DISPLAY 34 CAMERA TITLE MEMO SETTING 34 35 DUPLEX MODE DISPLAY 35 MPX DISPLAY SETTINGS 36 37 Multiplexer function related button operations 36 SPLIT SINGLE and buttons 36 ZOOM and JOG buttons 36 SPLIT4 SCREEN SETTING 37 SEQUENCE SETTING 37 INTERLACE 37 MOTION DETECTION SETTINGS 38 40 SELECTION CAMERA NUMBER 38 DETECTION MASK SETTING 38 SENSITIVITY 39 MOTION THRESHOLD 39 TEST MODE 39 ...

Страница 5: ...t Audio recording 77 With Audio recording 77 Pre alarm recording time table 77 78 Without Audio recording recording duration LONG 77 Without Audio recording recording duration MEDIUM 78 Without Audio recording recording duration SHORT 78 With Audio recording recording duration LONG 78 With Audio recording recording duration MEDIUM 78 With Audio recording recording duration SHORT 78 Troubleshooting...

Страница 6: ... See LANGUAGE SELECTION on page 28 Set the present time and screen display See TIME DATE DISPLAY SETTINGS on pages 34 and 35 Set the present time See TIME DATE ADJUST on page 24 Set the display mode See DISPLAY MODE on page 34 Setting the HDD hard disk drive mode Set the repeat recording See HDD REPEAT REC MAIN HDD REPEAT REC SUB on page 47 Set the audio recording See AUDIO RECORDING on page 48 an...

Страница 7: ...larm recording See PRE ALARM REC on page 43 and Pre alarm recording time table on pages 77 and 78 Set the timer program mode See TIMER PROGRAM SETTINGS on pages 44 to 46 Set the holiday See HOLIDAY SETTING on page 46 Set the timer program See Structure of the TIMER PROGRAM screen on pages 44 and 45 Selecting the day Selecting the start time Selecting the end time Selecting the recording mode Selec...

Страница 8: ... as boot up the button flashes and other operations are not accepted 4 REMOTE jack Input connector for supplied wired remote control 5 Lever Used when attaching or removing the HDD tray 6 ACCESS indicator Illuminates while accessing the HDD 7 REC indicator Illuminates while recording 8 ALARM INTERRUPT indicator When pressingALARM INTERRUPT button the unit does not accept alarm signals or motion de...

Страница 9: ...trolled by the other device through this connector 11 ETHERNET connector Use the cable applies to 10BASE T to connect this terminal The duplex mode is half duplex Auto negotiation is not supported 1 MAIN switch This is the main power switch When using this unit set this switch to ON Otherwise the power cannot be turned on or off using the POWER button on the front panel 2 VIDEO OUT connector Outpu...

Страница 10: ...even when both buttons are pressed 6 REV P REVERSE PLAY button When pressing this button during stop mode the reverse playback speed changes in the 4 grades normal 25 fields second reverse playback 30 MB units 300 MB units normal 7 PAUSE button When pressing this button during playback the still frame playback picture is displayed When pressing this button again the unit resumes playback 8 SPLIT S...

Страница 11: ...er recording standby mode When pressing both buttons again timer recording standby mode is can celled 13 PLAY button When pressing this button during stop mode the playback speed changes in the 4 grades normal 25 fields second 30 MB units 300 MB units normal 14 STOP button Press to stop playback ...

Страница 12: ...to 4 cameras Processing the connecting line Connection on the ALARM IN terminals and the I O terminals Compatible power lines ø0 32 ø0 65 mm AWG 28 22 Cut the designated area from the electric wire s outer covering vinyl portion 5 7 mm To GND terminal To ALARM IN terminal corresponds to the CAMERA SENSOR 1 CAUTION Connecting a coaxial transmission camera incorrectly may damage the input terminal B...

Страница 13: ...OUT 3 MODE OUT 4 ALARM 1 ALARM 2 ALARM 3 ALARM 4 MODE OUT 5 GND GND IN OUT GND AUDIO Connecting the wired remote control R 400 supplied ACCESS REC ALARM INTERRUPT WARNING LINK LOCK RX TX DIGITAL RECORDER DX NT400 POWER REMOTE REMOTE CONTROL UNIT PLAY REV P REC STOP TIMER ON OFF PAUSE STOP CLEAR ENTER SET UP MENU SEARCH SPLIT SINGLE ZOOM ALARM INTERRUPT LOCK WARNING RESET JOG 2 1 4 8 9 7 0 6 5 3 To...

Страница 14: ...place the MASTER HDD or the SLAVE HDD with another one in most cases the recorded image cannot be played back When the protection sheet is stuck on the attaching part of the HDD tray on the front of the unit remove it before using The following HDDs have been tested and compatibility is ensured This information is as of June 2003 Supply of these HDDs may be stopped or they may be changed without n...

Страница 15: ...r of the HDD tray 4 While moving the lever to the right pull out the HDD tray slightly to unlock the HDD tray 5 Hold the HDD tray with both hands and pull it out Be sure to use both hands when pulling out the HDD tray in order to prevent the trouble of the HDD or injury due to the fall or the shock Attaching the HDD tray to the unit 1 Insert the HDD tray into the unit until it stops 2 Move the lev...

Страница 16: ...ends D Push the POWER LEAD and the ATA LEAD between the middle connector and the outer connector into the space between the PCB and the HDD A D B C Attaching the HDD to the HDD tray When attaching one HDD 1 Remove the top cover from the HDD tray Remove the 2 screws and lift the top cover 2 Remove the HDD holder on the right side of the HDD tray Remove the 4 screws attached to the HDD holder to rem...

Страница 17: ...r to the instruction book of HDD for setting the jumper The leads should not be caught in the HDD holder or the HDD 4 Connect the outer connector of the ATA LEAD to the additional HDD Make sure that theATA LEAD between the HDDs is clamped C 5 Connect the POWER LEAD to the additional HDD Make sure that the POWER LEAD between the HDDs is clamped D 6 Check the wiring A The lead between the PCB and th...

Страница 18: ... sectors in the HDD The recorded contents will not be affected by this test The reading and writing test executed in all the sectors in the HDD All the recorded contents will be erased The HDD will be formatted to record or playback the data stably Tests the compatibility beween the HDD and the recorder In addition to the compatiblity test criticizes the partial sector defects in reading the data ...

Страница 19: ... ERASED ESTIMATED TIME MORE THAN 10H ENTER EXECUTE CLEAR BACK 5 Press the ENTER button to execute the test The test is executed and the status screen appears When you attach the 2 HDDs test for the HDD of drive A is executed first and then test for the HDD of drive B is executed When testing the 2 HDDs the percentage displayed on the screen indicates the total value of the 2 HDDs When the problem ...

Страница 20: ...TH 01 YEAR 2003 TIME 00 00 00 APPLY EXECUTE JOG SELECT ENTER EXECUTE 5 Set the desired setting in this screen See DAY LIGHT SAVING page 23 TIME DATE ADJUST page 24 for the details To start the clock running press the JOG buttons to move the cursor to APPLY and then press the ENTER button 6 Press the JOG buttons to move the cursor to EXECUTE and then press the ENTER button PERFORM AUTO SET UP is di...

Страница 21: ...ate the recognition time of attached HDD When setting timer recording in the TIMER PROGRAM SETTINGS screen and setting the BOOT UP DELAY with 30 seconds or more the recording start time delays for the amount of time exceeds 30 seconds in the set up time of BOOT UP DELAY 1 Turn on the MAIN switch on the rear panel and wait until the ACCESS indicator turns off Make sure that the POWER button on the ...

Страница 22: ...g the JOG ENTER and CLEAR buttons is described in the example below Example Setting DISPLAY MODE to 3 default 1 1 Set the MAIN switch on the rear panel to ON Press the POWER button on the front panel after the ACCESS indicator turns off SETTING UP appears on the screen and the unit boots up POWER button operation is not accepted while the ACCESS indicator is flashing Press the POWER button after t...

Страница 23: ... time period to move the clock an hour To activate this function set the desired time period in DAYLIGHT SETTING and then set DAYLIGHT SAVING to AUTO In the DAYLIGHT SETTING start end time of the DAYLIGHT SAVING function can be checked and changed 1 Press the SET UP button to display the SETTINGS screen 2 Check that the cursor is positioned at TIME DATE DISPLAY SETTINGS and then press the ENTER bu...

Страница 24: ...10 YEAR 2003 TIME 18 00 00 The time is indicated using the 24 hour system 9 Press the JOG button to move the highlighted display to MINUTE and press the ENTER button And then repeat step 8 10 Repeat step 9 for SECOND 11 Press the ENTER button The setting item is determined and flashing stops TIME DATE ADJUST DAYLIGHT SAVING OFF DAY 28 MONTH 10 YEAR 2003 TIME 18 30 00 12 Press the CLEAR button or t...

Страница 25: ...en 2 Press the JOG buttons to move the cursor to RECORD SETTINGS and then press the ENTER button The RECORD SETTINGS screen appears RECORD SETTINGS ALARM SETTING RECORD SETTING ALARM REC DURATION 5S 3 Press the JOG buttons to move the cursor to RECORD SETTING and then press the ENTER button The RECORD SETTING screen appears 4 1 2 3 CAUTION For ESTD REC see Continuous recording time table on page 7...

Страница 26: ...recorded video is played back first Otherwise playback resumes from the stopped position of the previous playback When HDD REPEAT PLAY in the HDD SETTINGS screen is set to OFF playback stops when reaching the physical end of the HDD or the end of the recorded section When HDD REPEAT PLAY is set to ON recorded video is played back repeatedly see HDD REPEAT PLAY on page 47 To change the playback dev...

Страница 27: ... HDD SETTING in the INITIALIZATION is set to PARTITION 10 2 Press the JOG buttons to display the desired playback device and then press the ENTER button 11 1 To change the search type Press the JOG buttons to select SEARCH TYPE and then press the ENTER button The background of the setting item turns red and flashes Setting default TIME DATE TIME DATE INDEX ALARM INDEX ALARM SKIP ALARM LIST 11 2 Pr...

Страница 28: ...ges As ENGLISH is selected for the ini tial setting follow the procedure below if you want to select a language other than ENGLISH LANGUAGE SELECTION LANGUAGE ENGLISH JOG SELECT ENTER EXECUTE Setting default ENGLISH ENGLISH FRANCAIS DEUTSCH ESPAÑOL PyCCK N N ITALIANO 1 Press the SET UP button SETTINGS INITIAL SET UP INFORMATION Select LANGUAGE in the LANGUAGE SELECTION screen Display the desired s...

Страница 29: ...NFORMATION MEMO TIME DATE DISPLAY SETTINGS TIME DATE ADJUST DISPLAY MODE 1 CLOCK LOCATION SETTING CAMERA DISPLAY NUMBER CAMERA TITLE MEMO SETTING DUPLEX MODE DISPLAY BOTTOM MODE 1 01 01 2003 00 00 00 TIME DATE ADJUST DAYLIGHT SAVING OFF DAY 01 MONTH 01 YEAR 2003 TIME 00 00 00 DAYLIGHT SETTING DAY OF WEEK MONTH TIME IN SUN LAST MAR 01 00 OUT SUN LAST OCT 02 00 JOG SELECT ENTER EXECUTE 01 01 2003 00...

Страница 30: ...SETTING A ALARM RECORD CAMERA TRIGGER 1 EXT 2 EXT 3 EXT 4 EXT EMR ALARM TYPE ALARM CH CLEAR BACK TIMER PROGRAM SETTINGS SELECTED PATTERN P1 SET HOLIDAY SETTING REC MODE A REC MODE B REC MODE C REC MODE D ALARM REC DURATION 5S TIMER PROGRAM P1 DW START END MODE MD 1 2 3 4 5 6 7 8 SPL SAT SUN HOLIDAY SETTING DAY MONTH SETTINGS TIME DATE DISPLAY SETTINGS MPX DISPLAY SETTINGS MOTION DETECTION SETTINGS...

Страница 31: ...TON TO APPLY NEW SETTING RS 232C SETTINGS TRANSMISSION MODE 9600 DATA BIT LENGTH 8BIT PARITY BIT NONE STOP BIT LENGTH 1BIT DELIMITER CR SERVICE PORT SETTING WEB 00080 USER ACCESS 53705 SUPER USER 53706 LIVE USER1 53707 LIVE USER2 53708 LIVE USER3 53709 LIVE USER4 53710 ALARM NOTIFICATION SETTING NO IP ADDRESS TARGET OWN 1 000 000 000 000 55111 01111 2 000 000 000 000 55111 01112 3 000 000 000 000 ...

Страница 32: ...INFORMATION A HDD 120GB B HDD 120GB MAIN START 01 01 2003 00 00 00 END 01 01 2003 00 00 00 SUB START 01 01 2003 00 00 00 END 01 01 2003 00 00 00 SUB HDD DATA CLEAR PUSH WARNING RESET KEY FOR 3 SECOND TO CLEAR INITIALIZATION HDD SETTING PARTITION PARTITION SIZE 10 BOOT UP DELAY 30S POWER OFF INITIALIZATION ALL DATA WILL BE ERASED WHEN PROCEED INITIALIZATION SETTINGS TIME DATE DISPLAY SETTINGS MPX D...

Страница 33: ... START END PUSH SEARCH KEY FOR SEARCH SELECTION SEARCH SELECTION SEARCH TYPE ALARM LIST SELECTION CAMERA NUMBER ALL DATE TIME PLAYBACK DEVICE MAIN MAIN START END SEARCH SELECTION SEARCH TYPE INDEX PLAYBACK DEVICE MAIN MAIN START END SEARCH SELECTION SEARCH TYPE ALARM SKIP SELECTION CAMERA NUMBER ALL PLAYBACK DEVICE MAIN MAIN START END SEARCH SELECTION SEARCH TYPE ALARM INDEX SELECTION CAMERA NUMBE...

Страница 34: ...of the date and present time 1 Press the SET UP button SETTINGS Select CLOCK LOCATION SETTING in the TIME DATE DISPLAY SETTINGS screen and then press the ENTER button The CLOCK LOCATION SETTING screen appears 01 01 2003 00 00 00 2 Use the JOG buttons to move the date and time display to the desired position and then press the ENTER button The setting is determined 3 Press the CLEAR button or the S...

Страница 35: ...hile one of the characters in the string is highlighted press the JOG and buttons to highlight the character to be changed 2 Follow the steps 3 and 4 7 When completed with input press the CLEAR button The display returns to the CAMERA TITLE MEMO SETTING screen 8 Repeat steps 2 to 7 for camera number 4 and MEMO 4 1 2 3 CAMERA TITLE MEMO SETTING ENTRANCE COUNTER MEMO BANK CLEAR BACK ENTER CHARACTERS...

Страница 36: ...lit screen display setting can be set using SPLIT4 SCREEN SETTING in the MPX DISPLAY SETTINGS screen The update speed of the camera video becomes slower as the number of connected camera increases For smoother video playback remove un necessary cameras by setting PPS or A PPS in the RECORD SETTING screen to ZOOM and JOG buttons When the ZOOM button is pressed during single screen display magnifica...

Страница 37: ...E SETTING in the MPX DISPLAY SETTINGS screen and press the ENTER button The SEQUENCE SETTING screen appears 4 1 2 3 SEQUENCE SETTING SEQUENCE NUMBER TIME 1 2S 2 2S 3 2S 4 2S CLEAR BACK Setting of NUMBER default 1 1 2 3 4 Displays nothing Setting of TIME default 2S 1S 2S 30S 2 Select the desired display order 1 to 4 and press the ENTER button twice The camera number is highlighted when the ENTER bu...

Страница 38: ...ELECTION CAMERA NUMBER DETECTION MASK SETTING SENSITIVITY HIGH LOW MOTION THRESHOLD 5 TEST MODE MD LOCK OUT TIME OFF Setting default 1 1 2 3 4 When selecting the MOTION DETECTION SETTINGS screen during single screen display of any specified camera number that camera number is displayed as the initial setting of SELECTION CAMERA NUMBER 1 Press the SET UP button SETTINGS Select SELECTION CAMERA NUMB...

Страница 39: ... function operates when detecting the change that exceeds the number of dots set as the minimum 1 MOTION DETECTION SETTINGS SELECTION CAMERA NUMBER DETECTION MASK SETTING SENSITIVITY HIGH LOW MOTION THRESHOLD 5 TEST MODE MD LOCK OUT TIME OFF Setting default 5 1 2 3 4 5 191 192 Set MOTION THRESHOLD to the number less than the number set as the active dots in the detec tion area The motion detection...

Страница 40: ...may not be detected when many motions are detected or many alarm signals are input simultaneously MD LOCK OUT TIME This item is used to restrict motion detection function in order to control the recording to prevent the continuous recording of the same image Once the unit detects motion and starts alarm recording the unit ignores the input of mortion detection for the time period set in the MD LOC...

Страница 41: ...TING in the RECORD SETTINGS screen and then press the ENTER button The ALARM SETTING screen appears 2 When setting the camera number and trigger for the alarm recording Press the JOG buttons to select the number for setting the camera number and then press the ENTER button The leftmost setting item of RECORD CAMERA is highlighted The camera numbers are lined in order of the number from 1 to 4 3 Pr...

Страница 42: ...NG NO PPS GRADE A PPS A GRADE 3 125P STD 3 125P STD 3 125P STD 3 125P STD 3 125P STD 3 125P STD 3 125P STD 3 125P STD ALARM TYPE ALARM CH PRE ALARM REC OFF CLEAR BACK ESTD REC D H M Setting of PPS and A PPS default 3 125P 6 25P 3 125P 2 083P 1 563P 1 25P 1 042P 0 781P 0 625P 0 25P 0 125P 0 063P 0 031P Does not perform recording with camera set to this item Setting of GRADE and A GRADE default STD ...

Страница 43: ...le setting the PRE ALARM REC to SHORT MEDIUM or LONG set PRE ALARM REC to OFF first 1 Press the SET UP button SETTINGS Select RECORD SETTING in the RECORD SETTINGS screen and then press the ENTER button The RECORD SETTING screen appears 2 Press the JOG buttons to move the cursor to PRE ALARM REC and then press the ENTER button The background of the setting item turns red and flashes 3 Display the ...

Страница 44: ...tion function to on or off 8 Displays the selected timer program number P1 P3 9 SPL special day of the week setting Sets the start and end day of the week When selecting SPL in DW the period from the start day of the week to end day of the week set here is active Example Setting the timer program to program number 1 in TIMER PROGRAM P2 in REC MODE A on Wednesday to Saturday from 12 30 to 13 00 and...

Страница 45: ...2 DW START END MODE MD 1 SPL 12 30 13 00 A ON 2 3 4 5 6 7 8 SPL WED SAT 20 Press the CLEAR button or the SET UP button Press the CLEAR button to return the cursor on the left side of SPL Press the SET UP button to clear the TIMER PROGRAM screen and return to the normal screen If there is an unset item in the program display the setting screen can not be exited even when pressing the CLEAR button I...

Страница 46: ...LARM REC is set to SHORT MEDIUM or LONG In this case normal recording is performed at the interval which is set in PPS 3 To continue with REC MODE B to REC MODE D repeat steps 1 and 2 The storage area in MAIN HDD set in PARTI TION is displayed with the percentage and the recordable time of that storage area is displayed in ESTD REC for PARTITION see page 70 ALARM REC DURATION The recording time pe...

Страница 47: ... HDD to execute alteration check and then start playback Warning is also displayed for the portion where the recorded data is damaged for some reason HDD SETTINGS HDD REPEAT REC MAIN HDD REPEAT REC SUB This item is used to set the operation when HDD space becomes full during recording HDD SETTINGS HDD REPEAT REC MAIN ON HDD REPEAT REC SUB OFF HDD REPEAT PLAY OFF IM CHECK PLAY OFF SEQUENTIAL PLAY O...

Страница 48: ... the highest camera number selected for recording is played back for the longest time AUDIO RECORDING This item is used to simultaneously record audio along with the video When recording audio the continuous recording time becomes shorter than when recording only video INITIAL SET UP INFORMATION HDD SETTINGS AUDIO RECORDING OFF REAR TERMINAL SETTINGS COMMUNICATION PORT SETTINGS INFORMATION SERVICE...

Страница 49: ...sired terminal from MODE OUT 1 to MODE OUT 5 display the desired setting and then determine such setting 3 To set other terminals repeat step 2 4 Press the CLEAR button or the SET UP button KEY SOUND This item is used to make button sounds when using the operational buttons REAR TERMINAL SETTINGS MODE OUT 1 OFF MODE OUT 2 OFF MODE OUT 3 OFF MODE OUT 4 OFF MODE OUT 5 OFF KEY SOUND ON BUZZER OFF REM...

Страница 50: ...ENTER button twice The setting item of selecting HDD is highlighted when the ENTER button is pressed once When the button is pressed again the background turns red and flashes 2 Press the JOG buttons to display the desired HDD and then press the ENTER button The setting item is determined and flashing stops 3 Press the JOG button to highlight the REMAIN HDD capacity and then press the ENTER button...

Страница 51: ...Y SOUND ON BUZZER OFF REMAIN HDD MAIN 10 CALL OUT SETTINGS EMERGENCY REC DURATION 10M For the details concerning EMERGENCY RECORDING settings see page 61 Setting default 10M 1M 2M 5M 10M 20M 30M 60M 1 Press the SET UP button SETTINGS INITIAL SET UP INFORMATION Select EMERGENCY REC DURATION in the REAR TERMINAL SETTINGS screen Display the desired setting and determine such setting 2 Press the CLEAR...

Страница 52: ...ed 3 Press the JOG buttons to highlight the number to be changed and then press the ENTER button The background of the selected number turns red and flashes 4 Press the JOG buttons to display the desired number and then press the ENTER button The setting item is determined and flashing stops To display the cursor press the CLEAR button 5 Repeat steps 2 to 4 to change the other numbers The setting ...

Страница 53: ...o select the desired setting number and then press the ENTER button The first figure of the port number is highlighted 3 Press the JOG buttons to highlight the figure of IP ADDRESS TARGET PORT and OWN PORT to be changed and then press the ENTER button The background of the selected number turns red and flashes 4 Press the JOG buttons to display the desired number and then press the ENTER button Th...

Страница 54: ...pressed and the unit is put on interruption ALM ON Alarm interrupt is cancelled manually by pressing ALARM INTERRUPT button Alarm interrupt is cancelled automatically after 5 minutes from the start of interruption 1 Press the SET UP button SETTINGS INITIAL SET UP INFORMATION Select WARNING LOG LIST in the INFORMATION SERVICE screen Press the ENTER button The WARNING LOG LIST screen appears The WAR...

Страница 55: ...o OFF or when a menu is displayed SIMPLE LOCK and PASSWORD LOCK do not function SIMPLE LOCK When SIMPLE LOCK is turned on buttons other than the SPLIT SINGLE and ZOOM buttons and the MAIN switch become inoperable and the unit is locked in the current mode To activate simple lock 1 Press and hold the LOCK button for more than 3 seconds while both the MAIN switch is set to ON The lock turns on LOCK ...

Страница 56: ...nly 2 7 Press the CLEAR button 3 1 When registering the PASSWORD for HDD DATACLEAR level 4 Press the JOG buttons to move the cursor to HDD DATA CLEAR and then press the ENTER button The PASSWORD SETTING level 4 screen appears PASSWORD SETTING FIRST SECOND 4 3 2 Repeat steps 2 2 to 2 4 to set level 4 4 Press the CLEAR button or SET UP button To activate the PASSWORD LOCK 1 Press and hold the LOCK b...

Страница 57: ...SSWORD SETTING levels 1 to 3 screen Press the JOG buttons to move the cursor to the level to be changed and then press and hold the WARNING RESET button for more than 3 seconds The PASSWORD in FIRST and SECOND are cleared and appears PASSWORD SETTING FIRST SECOND 1 2 3 2 2 Input the new PASSWORD referring to To register the PASSWORD 3 1 To change the PASSWORD of level 4 Display the PASSWORD screen...

Страница 58: ...OFF HDD REPEAT PLAY OFF IM CHECK PLAY OFF SEQUENTIAL PLAY OFF 4 TIMER PROGRAM SETTINGS screen setting see pages 44 to 46 SELECTED PATTERN P1 TIMER PROGRAM SETTINGS SELECTED PATTERN P1 SET HOLIDAY SETTING REC MODE A REC MODE B REC MODE C REC MODE D ALARM REC DURATION 5S 5 RECORD SETTING A screen setting see page 46 All the cameras 1 to 4 PPS GRADE Set the desired interval and picture quality for ea...

Страница 59: ...OGRAM P2 DW START END MODE MD 1 SPL 08 00 15 00 A OFF 2 SPL 15 00 20 00 B OFF 3 SAT 08 00 17 00 B OFF 4 SUN 08 00 17 00 B OFF 5 HOL 08 00 17 00 B OFF 6 7 8 SPL MON FRI When completed with all the settings above and after clearing the menu screen press both the TIMER ON OFF buttons The unit switches to the timer programming mode Operation example 3 Setting a combination of normal recording pre alar...

Страница 60: ... 125P HIGH ALARM TYPE ALARM CH PRE ALARM REC MEDIUM CLEAR BACK ESTD REC D H M 7 ALARM SETTING D screen setting see page 46 Camera numbers 1 and 3 only TRIGGER MD EXT ALARM SETTING D ALARM RECORD CAMERA TRIGGER 1 MD EXT 2 EXT 3 MD EXT 4 EXT EMR ALARM TYPE ALARM CH CLEAR BACK 4 1 2 3 4 1 2 3 8 RECORD SETTING D screen setting see page 46 Camera numbers 1 and 3 only PPS GRADE A PPS A GRADE Set the des...

Страница 61: ...deo contents or the timing of the alarm signal input EMERGENCY RECORDING When the EMERGENCY terminal is grounded while the MAIN switch on the rear panel and the POWER button on the front panel are both turned ON and during timer re cording emergency recording starts automatically overrid ing all the other settings Emergency recording does not perform while the MAIN switch or POWER button is turned...

Страница 62: ...mal 25 fields second 30 MB units 300 MB units normal Speed search stops when press the STOP button Audio cannot be played back during speed search Once the playback speed is changed audio is not played back even when returning the playback speed to normal To playback audio stop playback and then playback the video again Monitor display settings and playback operation Single screen display Playback...

Страница 63: ...a numbers 1 through 4 and displays search results in SPLIT4 screen display 1 to 4 When the search type which can select the camera number is set the unit searches the specified conditions of the selected camera and displays the search result in the single screen display 1 Press the SEARCH button twice to display the SEARCH SELECTION screen 2 Display the desired setting in SELECTION CAMERA NUMBER a...

Страница 64: ...s SELECTION CAMERA NUMBER setting does not appear when INDEX is selected 2 When the desired search screen is not displayed on the screen Change the SEARCH TYPE setting to INDEX or ALARM INDEX And then press the CLEAR button to display INDEX SEARCH screen or ALARM INDEX SEARCH screen When searching index signals which are written during normal recording display the INDEX SEARCH screen When searchin...

Страница 65: ... setting and then press the CLEAR button to display the ALARM SKIP SEARCH screen 3 Select EXECUTE FORWARD or EXECUTE REVERSE and determine such setting EXECUTE FORWARD Searches in the forward direction EXECUTE REVERSE Searches in the reverse direction To cancel searching press the SEARCH button twice The search result of the alarm skip search is displayed in the SPLIT4 screen display regardless of...

Страница 66: ...r still frame playback press the STOP button ALARM LIST SEARCH This unit stores the start times of alarm recording and emer gency recording in the alarm list when such recording is started It is possible to perform the index search for the desired time or the closest time from the alarm recording or emergency recording start times listed in the alarm list Up to 10 000 alarm recording emergency rec...

Страница 67: ...CH and ALARM INDEX SEARCH SPLIT4 screen display is displayed when SELECTION CAMERA NUMBER is set to ALL Single screen display in still frame playback is displayed when selecting the individual camera number For INDEX SEARCH SPLIT4 screen display is displayed 3 Playback the search result Press the PLAY REV P or the PAUSE button 4 To stop playback or still frame playback press the STOP button During...

Страница 68: ... warning indicator is not appear on the screen If WARNING is set in BUZZER setting the BUZZER sounds and the unit registers this error in the WARNING LOG LIST and output a CALLOUT signal When COVERT CAMERA SETTING is set to OFF for a camera set for recording recording is performed without displaying the video on the screen When COVERT CAMERA SETTING is set to OFF the playback video of the correspo...

Страница 69: ...The MIRROR warning is displayed every time the unit is booted up until the faulty HDD is replaced When the faulty HDD is replaced with the operable HDD the following screen appears To copy the contents of the HDD select RECONSTRUCTION and press the ENTER button HDD RECONSTRUCTION A HDD 120GB B HDD 120GB POWER OFF RECONSTRUCTION DATA WILL BE SYNCHRONIZED IT MAY TAKE SEVERAL HOURS The following scre...

Страница 70: ...HDD SETTING and then press the ENTER button The background of the setting item turns red and flashes 3 Press the JOG buttons to display PARTITION and then press the ENTER button The setting item is determined and flashing stops The PARTITION SIZE setting appears in the INITIALIZATION screen INITIALIZATION HDD SETTING PARTITION PARTITION SIZE 10 BOOT UP DELAY 30S POWER OFF INITIALIZATION ALL DATA W...

Страница 71: ...ion Professional The product requirement described above can not guarantee operations in all environments Lack of compatibility between Web functions and the PC peripheral driver may in rare instances re sult in abnormal operation If this happens upgrade to the newest version of Internet Explorer and try again Connections When making a direct connection between this unit and a personal computer he...

Страница 72: ...nto a new password select change and left click or press ENTER To stop the change select clear and left click or press ENTER Welcome This is screen for selecting live monitor for live images or playback for pre recorded image for display User mainte nance for setting user authorization can be configured along with log out for ending a job or change log in user for marking a change to the logged in...

Страница 73: ...far on Hi may present obstacles to PC operation as determined by the performance of the PC you are using Please set it to the appropriate rate to the image retrieval speed of your machine Depending on the network capacity and the load conditions the transfer rate may not rise Only a user who has the authorization for Change Password can store screen layouts in the Recorder side using Save Layout I...

Страница 74: ... playback menu The func tion cannot operate during image data playback so to make a search of any type first stop the playback Time Search Select the date and time and click Search Alarm Search Click Alarm List and the Alarm List Search MAIN screen will appear in the sub screen Select the Alarm No de sired and then click Search Click Refresh to re acquire the Alarm List and click Close to hide the...

Страница 75: ...ete in Review Change user attribute The Remove confirmation screen appears 3 2 If you want to delete it left click remove If you don t want to delete it left click cancel 3 3 If you have selected remove The User Removed screen appears so left click Back to Registration The screen returns to the Registration screen 3 4 If you have selected cancel The screen returns to the Registration screen 4 1 To...

Страница 76: ...ay take effect Change log in user This screen is for changing the logged in user 1 Select Change log in user and left click The Authentication menu appears 2 1 To change the logged in user In the Log in or log in as a different user settings execute step 2 1 and 2 2 in AUTHENTICATION and change the logged in user The logged in user is changed and the Welcome screen appears 2 2 If the log in is mad...

Страница 77: ...uous recording time with without audio recording is half of the time described on the table above Continuous recordable time and the estimated time displayed on the menu screen is the continuous record able time when operating this unit and is not the warranty period of the product Furthermore it is not the period that guarantees the operation of used parts The time displayed in the menu screen ma...

Страница 78: ...5P 2 5s 3 3s 5 5s 7 6s 15s 5s 6 7s 10s 14s 30s 7 5s 9 7s 15s 21s 42s 10s 12s 20s 27s 53s 12s 16s 25s 33s 1min 14s 18s 29s 38s 1min10s 19s 24s 37s 49s 1min20s 22s 30s 45s 58s 1min30s 51s 1min 1min20s 1min40s 2min30s 1min20s 1min30s 2min 2min20s 3min 4min20s 5min40s 9min20s 13min 29min 8min40s 11min 18min 26min 58min With Audio recording recording duration MEDIUM PPS GRADE SUPER HIGH STD BASIC LONG ...

Страница 79: ...ectly Is the camera s focus adjusted correctly Check that the HDD is connected or attached correctly and the HDD tray is attached correctly When the message displays even after the above items are checked the connector of the HDD tray may be defective Consult your dealer Are the HDD REPEAT REC MAIN set to OFF or STANDBY and HDD REPEAT REC SUB set to OFF The unit begins recording only after the spe...

Страница 80: ... is to be executed in the RECORD SETTING screen set to Is MOTION THRESHOLD in the MOTION DETECTION SETTINGS screen set to the value larger than that of DETECTION MASK SETTING Is the RS 232C set correctly Are the unit and computer connected correctly Is there a defect in the connecting cable Is the proper connecting cable used The screens of camera number with no video signal input will be blue eve...

Страница 81: ...ystem error has occurred Error has occurred during writing of data to HDD One HDD could not be detected during mirroring Unable to recognize HDD HDD or HDD tray is connected or attached incorrectly Issued when in a high temperature environment within the tolerance level The fan stops Reboots by watchdog operation Press and hold the WARNING RESET button Press and hold the WARNING RESET button Stop ...

Страница 82: ... recording is performed in numbered sections called sectors Relation of recording operation to the number of cameras and recording interval settings The recording pattern of this unit is as illustrated in the diagram below Image data input from all the connected cameras is recorded sequentially at a rate of number of cameras x recording interval 25P recording interval during normal recording C4 2 ...

Страница 83: ...stop time for one week x 3 set Memory Backup Lasts for more than 1 month CONNECTORS ALARM IN 1 4 Input Terminal for starting alarm recording EMERGENCY Input Terminal for starting emergency recording GND Terminal for ground MODE OUT 1 5 Output Terminal for indication of the operational state of the unit RS 232C RS 232C D SUB 9 pin connector for connection with personal computer ETHERNET Connector R...

Страница 84: ...nie 93 68 EWG Die Anforderungen an die Störfestigkeit gemäß EN 55024 und an die Störaussendung gemäß EN 55022 beim Betrieb im Wohnbereich in Geschäfts und Gewerbebereichen sowie in Kleinbetrieben sowohl innerhalb als auch außerhalb der Gebäude werden eingehalten Alle Einsatzorte sind dadurch gekennzeichnet daß sie direkt an die öffentliche Niederspannungs Stromversorgung angeschlossen sind Dieses ...

Страница 85: ...s l appareil ne fonctionne pas convenablement en raison des conditions externes ou du signal d entrée vidéo ou d autres facteurs Cet enregistreur longue durée satisfait aux exigences des directives communautaires n 89 336 CEE Directive Compatibilité Electromagnétique et n 73 23 CEE Directive Basse Tension modifiées par la directive n 93 68 CEE Les exigences sur la susceptibilité conformément à la ...

Страница 86: ... de las grabaciones importantes como una medida de protección contra posibles averías y accidentes Este unidad está fabricada de acuerdo con las Directivas del Consejo de la Unión Europea 89 336 CEE EMC Directive y la Directiva del Consejo 73 23 CEE relativa a Directiva de Baja Tensión de acuerdo con las modificaciones establecidas por la Directiva 93 68 CEE Asímismo también se observan las normat...

Страница 87: ...Ci possono essere casi in cui la funzione MOTION DETECTION RILEVAMENTO MOVIMENTO incorporata nell unità non funzioni correttamente a causa di condizioni esterne o segnale d ingresso video o altri fattori Questa Unità è conforme alla direttiva della CE 89 336 EEC Direttiva EMC e della direttiva EC 73 23 EEC Direttiva sui bassi voltaggi così come emendata dalla Direttiva 93 68 EEC I requisiti per la...

Страница 88: ...le terreinen en kleinbedrijf zowel binnen als buiten de gebouwen Alle gebruikslocaties worden gekarakteriseerd door hun aansluiting op het publieke laagspanningsnet DIT toestel is gefabriceerd in overeenstemming met EN 60950 De gebruiker zal niet worden gevrijwaard tegen problemen bijv niet opnemen of afspelen die in het gebruik kunnen optreden met DIT product of een aangesloten toestel U wordt aa...

Страница 89: ...tegrada de MOTION DETECTION DETECÇÃO DE MOVIMENTO não funcione corretamente devido a condições externas ou sinais de entrada de vídeo entre outros fatores Este aparelho cumpre os requisitos da Diretriz EC 89 336 EEC Diretriz EMC e 73 23 EEC Diretriz sobre Baixa Voltagem corrigida pela Diretriz 93 68 EEC Foram observados os requisitos de susceptibilidade de acordo com EN 55024 e os de interferência...

Страница 90: ... denna apparat skall vara det allmanna lagspanningsnatet tillgangligt Apparaten ar konstruerad enligt EN 60950 Användaren får inte ersättning för problem t ex misslyckad inspelning eller uppspelning som uppstår under drift med själva enheten eller en ansluten enhet Därför rekommenderar vi att användaren regelbundet gör säkerhetskopior av viktiga inspelningar till skydd mot eventuella haverier och ...

Страница 91: ...твии со стандартами Европейского комитета по стандартизации EN 55022 соблюдаются при эксплуатации в жилых районах деловых районах в небольших помещениях промышленного назначения и в малых промышленных предприятиях как внутри так и вне помещений Все места характеризуются их связью с системами электропитания низкого напряжения бытового типа Этот аппарат изготовлен в соответствии со стандартами Европ...

Страница 92: ...ffice 25 Boulevard des Bouvets 92741 Nanterre Cedex Telephone 33 1 41 02 83 23 Fax 33 1 49 01 07 23 ITALY Mitsubishi Electric Europe B V Italian Branch Office Centro Direzionale Colleoni Palazzo Perseo Ingresso 2 Via Paracelso 12 20041 Agrate Brianza Italy Telehone 39 0 39 60531 Fax 39 0 39 6053214 The Netherlands Mitsubishi Electric Benelux A Division of Mitsubishi Electric Europe B V Niiverheids...

Отзывы: