background image

EN-39

Advanced display utilities

USB Display

You can project the computer images inputted via a 
USB connection.
You don’t have to install any drivers on your computer 
to use this function.

Important:

• 

Supported OS’s are Windows XP, Windows Vista  
and Windows 7.

• 

Only 1-to-1 screen projection is supported.

•  Moving images cannot be displayed.

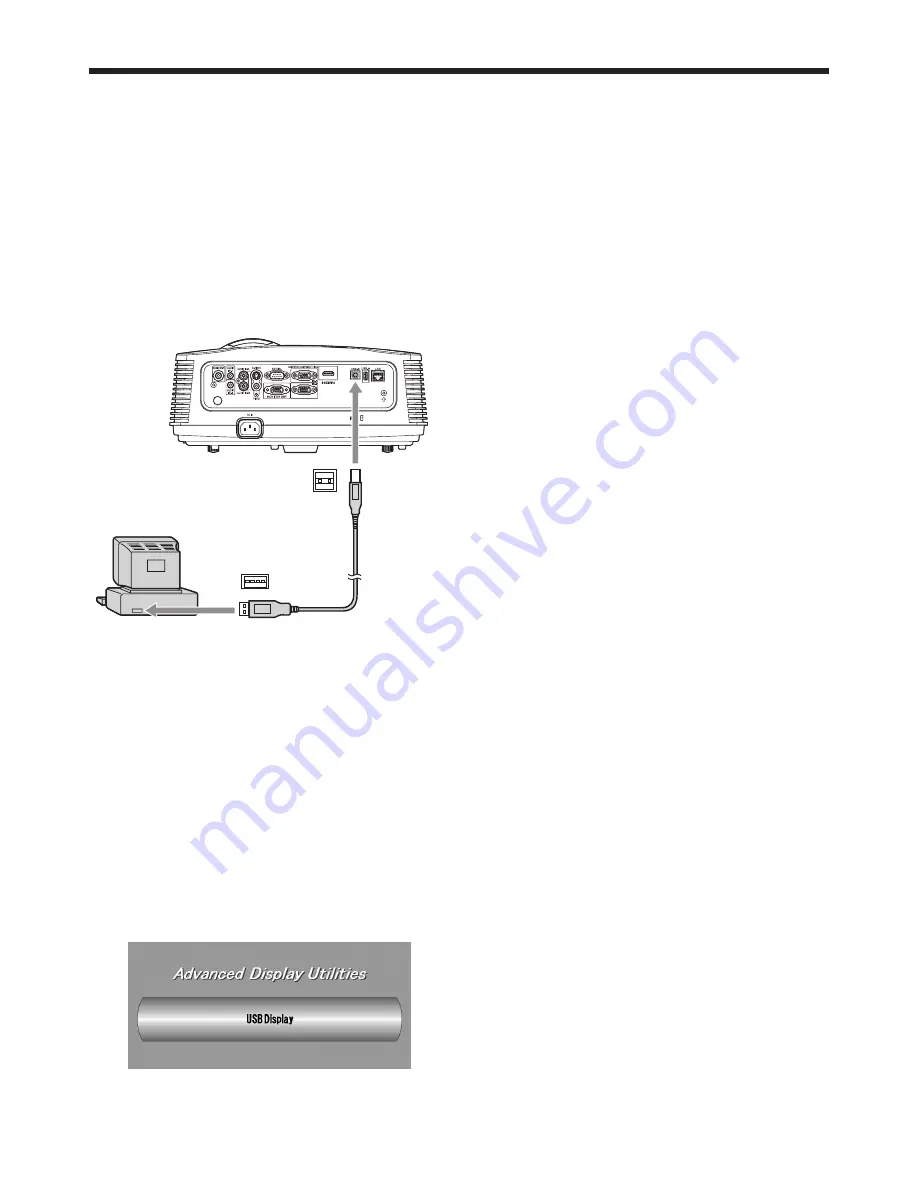
Connection

Connect the projector and the computer using a 
commercially available USB cable.

Computer

To USB-B 

terminal

USB 4-pin 

(type B)

To USB port

USB cable 

(option)

USB 4-pin 

(type A)

Important:

• 

The USB-B terminal on this projector is compatible 

with USB 2.0.

•  Do not use a 

USB hub between the projector and 

the computer.

Operation

1.  Select a USB Display input by pressing the 

USB DISP. button on the remote control or the 
COMPUTER button on the projector.

•  Each time you press 

the COMPUTER 

button, the input source is switched between 
Computer1, Computer2, HDMI, LAN Display, 
USB Display and PC Less Presentation.

•  When the 

USB Display input is selected, the 

splash screen for USB Display appears on the 
screen.


2.  When the computer is connected to the projector,  

the computer image is automatically displayed on 
the screen.

3.  When ending the USB Display projection, unplug 

the USB cable from the projector.

•  It is not necessary to “Safely Remove Hardware” 

on the computer or to press the UNPLUG 
button on the remote control.

Important:

• 

When the image is projected, the computer 

resolution will be changed to WXGA/XGA according 

to the projector model and will be automatically 

recovered after unplugging the USB cable.

Содержание DLP WD720U

Страница 1: ...This User Manual is important to you Please read it before using your projector DLP PROJECTOR MODEL XD700U WD720U User Manual XD700U WD720U ...

Страница 2: ... in the literature accompanying the appliance WARNING TO PREVENT FIRE OR SHOCK HAZARD DO NOT EXPOSE THIS APPLIANCE TO RAIN OR MOISTURE CAUTION TO PREVENT ELECTRIC SHOCK DO NOT USE THIS POLARIZED PLUG WITH AN EXTENSION CORD RECEPTACLE OR OTHER OUTLET UNLESS THE BLADES CAN BE FULLY INSERTED TO PREVENT BLADE EXPOSURE NOTE SINCE THIS PROJECTOR IS PLUGGABLE EQUIPMENT THE SOCKET OUTLET SHALL BE INSTALLE...

Страница 3: ...ademarks of Texas Instruments HDMI the HDMI logo and High Definition Multimedia Interface are trademarks or registered trademarks of HDMI Licensing LLC Microsoft Windows Windows 2000 Windows XP Windows Vista Windows 7 and Internet Explorer are registered trademarks trademarks or trade names of Microsoft Corporation in the U S and or other countries The trademark of PJLink is trademark applied for ...

Страница 4: ...s Never push objects of any kind through openings of this projector as they may touch dangerous voltage points or short out parts that could result in a fire or electric shock Never spill liquid of any kind on the projector 14 Servicing Do not attempt to service this projector by yourself Refer all servicing to qualified service personnel 15 Damage requiring service Unplug this projector from the ...

Страница 5: ...rojector Flammable substances may ignite causing fire or breakdown because the temperature inside the projector rises very high while the lamp is illuminating Do not use the projector with condensation on it It can lead to breakdown or other failure Place of installation For safety s sake do not use the projector at any place subjected to high temperature and high humidity Please maintain an opera...

Страница 6: ...on 3 STATUS indicator 4 POWER indicator 5 COMPUTER button 6 button 7 VIDEO button 8 KEYSTONE ENTER button 9 MENU button 10 POWER button ON STANDBY The status is changed between ON and STANDBY 1 3 2 4 5 6 7 10 11 12 13 14 8 9 1 AUDIO OUT terminal mini jack 2 AUDIO IN 1 terminal mini jack 3 AUDIO IN 3 terminals L R 4 S VIDEO terminal 5 SERIAL RS 232C terminal D SUB 9 pin 6 COMPUTER COMPONENT VIDEO I...

Страница 7: ...P button 12 STANDBY button 13 ASPECT button 14 EFFICIENT MODE button 15 3D button 16 AUTO POSITION button 17 buttons 18 FREEZE button 19 VIDEO S VIDEO buttons 20 COMPUTER 1 2 buttons 21 HDMI button ON ASPECT EFFICIENT MODE MAGNIFY KEYSTONE VOL UP 3D DOWN STANDBY MENU FREEZE AUTO POSITION AV MUTE ENTER 1 2 COMPUTER VIDEO VIEWER UNPLUG S VIDEO USB DISP LAN DISP DVI HDMI 1 2 3 4 5 6 7 10 11 8 9 19 20...

Страница 8: ...not used for a long time Do not combine a new battery with an old one If the solution of batteries comes in contact with your skin or clothes rinse with water If the solution comes in contact with your eyes rinse them with water and then consult your doctor Do not carry or store the batteries together with metallic ballpoint pens necklaces coins or hairpins Otherwise they may short out causing exp...

Страница 9: ...4 10 120 305 96 244 72 183 11 27 138 3 5 206 5 2 8 20 5 13 150 381 120 305 90 229 14 34 173 4 4 258 6 5 10 25 6 16 200 508 160 406 120 305 18 46 231 5 9 344 8 7 13 34 8 21 250 635 200 508 150 381 23 57 289 7 3 17 42 10 26 300 762 240 610 180 457 27 69 348 8 8 20 51 12 31 For WD720U Screen size 16 10 Hd Projection distance L Lens shift height Diagonal size Width SW Height SH Shortest Wide Longest T...

Страница 10: ...5 177 4 5 266 6 8 10 26 9 22 200 508 160 406 120 305 189 479 160 406 100 254 10 25 29 74 236 6 0 356 9 0 14 34 12 30 250 635 200 508 150 381 236 599 200 508 125 318 13 32 36 92 296 7 5 17 43 15 37 300 762 240 610 180 457 283 719 240 610 150 381 15 38 44 111 355 9 0 20 52 18 45 When the aspect ratio of the image is 16 9 Screen size 4 3 Size of the projected image 16 9 Black space B Hd Projection di...

Страница 11: ...least 55 kgf When using a metal wire secure one end to a screw hole marked with an arrow on the rear terminal panel and the other end to the mount kit Don t use screw holes without arrow marks In this case make sure that the screw is inserted in the projector at least 5 mm The length of the screw should be 20 mm or shorter Also make sure that no electrical current is flowing in the mount kit due t...

Страница 12: ...ut R To video output To S Video output Important Match the colors of the video and audio plugs on the Audio cable with those of the terminals Speaker output is mono Projector DVD player or HDTV decoder Some DVD players have an output connector for 3 line fitting Y CB CR When connecting such DVD player with this projector use the COMPUTER COMPONENT VIDEO IN terminal B R G Audio cable option DVD pla...

Страница 13: ...nectors When you connect this projector and a Digital device such as a DVD player via the HDMI terminal black color may appear dark and deep depending on the type of the connected device This depends on the black level setting of the connected device There are two kinds of methods to digitally transfer image data in which different black level settings are employed respectively Therefore the speci...

Страница 14: ...image may not be projected correctly Some computers require additional connectors or analog RGB output adapters to be connected with this projector Contact your dealer for further information This projector uses stereo mini jack for its audio input Check the type of the audio output terminal of the connected computer and prepare a proper cable for connection Some computers don t have the audio out...

Страница 15: ...may cause electric shock When you move the projector turn off the power unplug the power cord from the wall outlet and then remove the connected cords Otherwise the power cord may be damaged resulting in fire or electric shock If dust or metallic substance is on or around the pins of the power plug unplug the power cord and clean it using a dry cloth If you continue to use the projector without cl...

Страница 16: ...lt position See page 9 The automatic keystone adjustment may not be carried out correctly because of the ambient temperature and the installation conditions of the projector and the screen In such cases correct the keystone manually When the projector is projecting images where acceleration is present such as in a vehicle and aircraft the automatic keystone adjustment may not function correctly In...

Страница 17: ...s warming up when the POWER button is pressed During the warm up process images may appear dark and no commands are accepted By blinking red the STATUS indicator indicates that the lamp should be replaced soon Replace the lamp when the STATUS indicator blinks red See page 53 and 57 Images may not be projected with good quality in an extremely hot or cold environment This is not a product malfuncti...

Страница 18: ... just by unplugging the power cord without pressing the POWER button Don t shut down the projector while the STATUS indicator is blinking after the lamp lights up because the lamp s life may be shortened Don t turn the projector back on right after shutting it down because the lamp s life may be shortened Wait about 10 minutes before turning the projector back on Before shutting down the projector...

Страница 19: ... can enjoy 3D content with this projector In order to watch 3D content you need to have the following items Field sequential 3D video contents DLP Link active 3D glasses Field sequential The system which displays alternately the image for the left eye and the right eye R L R R L R L L R L R L R L R L R L R R L R L L R L R L R L R L R L R R L R L L R L R L R L R L R L R L L L R R R L R L 3D image F...

Страница 20: ...every 30 60 minutes Prolonged use may cause eyesight fatigue When you feel uncomfortable stop viewing 3D images and playing 3D games until you are restored If necessary consult a doctor Also stop driving a car until you are restored for about 2 hours The period to restore varies with the individual As a guide 3D glasses should not be used by children younger than 5 6 years old As it is difficult t...

Страница 21: ... 1 1 1 Audio Audio Input Volume 0 21 1 2 2 2 1 2 IP Address DHCP Default Gateway DHCP Function Off On xx xx xx xx xx xx MAC Address End IP Address Start IP Address IP Config Setup Subnet Mask 2 2 2 Cyan Magenta 10 Off On xxxx Normal Aspect Ratio Full 8 Color Temp Auto Normal Enhanced Input Level Color Management Standard Low Lamp Mode Blue Yellow 16 9 On OK OK Projector Name xxxxxxxx SET Network C...

Страница 22: ...the or button to select an item to adjust Off Installation Adjust MENU Exit Select Efficient Mode Image Reverse Auto Power On Auto Keystone Test Pattern Language Reset All English Off Off Menu Position Upper Left OK Cross Hatch OK 5 Set the selected item by pressing the or button Off Installation Adjust MENU Exit Select Efficient Mode Image Reverse Auto Power On Auto Keystone Test Pattern Language...

Страница 23: ...s the contrast of projected images See page 31 Color Temp 4 options Adjusts the color temperature See page 31 Color Management Red Green Blue Cyan Yellow Magenta You can change to any desired color by adjusting each of Gain Saturation and Hue of six different colors See page 32 Aspect Ratio Normal Automatically sets the aspect ratio in relative to the input signal Use this setting for most cases 1...

Страница 24: ...mputer1 Computer2 or HDMI is selected as the input source Sharpness 5 Adjusts the sharpness of projected images See page 31 Tint 10 Adjusts the color tint of projected images See page 31 You can select this setting only when NTSC is selected as the input signal You cannot adjust Tint when the TV50 PAL SECAM signal is inputted When Computer1 Computer2 or HDMI is selected Tint does not work Menu ope...

Страница 25: ...in the upper area of the screen User OK The Signal User menu is displayed for the following adjustments Clamp Position 1 255 Use this setting to correct solid white or solid black that appears in projected images Clamp Width 1 63 Use this setting to correct solid black that appears in projected images LPF On Off Select this setting to enable or disable LPF Shutter U 0 20 Use this setting to adjust...

Страница 26: ...put source is Video S Video and selects HDMI when the input source is HDMI Audio 1 Audio 2 Audio 3 Selects audio input Mix Selects mix signal of Audio 1 and Audio 2 You can change the balance of Audio 1 Audio 2 using Mix Volume 0 21 Adjusts the volume of the audio from the speaker In Audio Input HDMI audio is selected when the input source is HDMI input The audio of Audio 1 Audio 2 Audio 3 and Mix...

Страница 27: ...ng when you want to view images from behind the screen with the projector set at the ceiling Mirror Invert Select this setting when you want to view images from the front with the projector set at the ceiling Auto Power On Off On When this mode is set to On the lamp is automatically lit when the power cord is plugged in the wall outlet Select On when you set the projector at the ceiling When the l...

Страница 28: ...tup cancel function for the U S Image Capture OK Use to capture the screen for the splash screen See page 47 Splash Screen Original Displays the original image for the splash screen when the projector is powered on User Displays the image captured for the splash screen when the projector is powered on Off Displays no splash screen when the projector is powered on Back Color Blue Black Displays blu...

Страница 29: ... IP Config automatically by DHCP server IP Address xxx xxx xxx xxx Displays IP Address Subnet Mask xxx xxx xxx xxx Displays Subnet Mask Default Gateway xxx xxx xxx xxx Displays Default Gateway MAC Address xx xx xx xx xx xx Displays MAC Address DHCP Function On Off Use this setting when the projector behaves as a DHCP server Start IP Address xxx xxx xxx xxx Displays Start IP Address However Start I...

Страница 30: ...time than the actual time See page 52 for the interval of lamp replacement Input Indicates the name of the terminal to which the currently projected video signal is being inputted Resolution Indicates the resolution of the currently projected video signal H Frequency Indicates the horizontal frequency of the currently projected video signal V Frequency Indicates the vertical frequency of the curre...

Страница 31: ...st in the Picture menu Image adjustment To adjust the brightness Contrast and Brightness You can make adjustments for the brightness of the projected image using the menu See page 22 for menu setting 1 Display the Picture menu 2 Select Contrast or Brightness by pressing the or button 3 Adjust the selected item by pressing the or button To cancel the menu 4 Press the MENU button Contrast Select to ...

Страница 32: ... low such as movies and music video clips BrilliantColor Use this setting to make colors with medium brightness such as yellow and the skin tone appear natural Press the button to decrease the value to lessen the effect Press the button to increase the value to heighten the effect BrilliantColor has no effect at value 0 6 Select a value by pressing the or button For more enhanced color reproductio...

Страница 33: ...r using the menu Perform the following procedures when the following conditions occur When wide strips appear Adjust Tracking in the Signal menu When the projected image flickers When the projected image is blurred Adjust Fine sync in the Signal menu When the projected image is displaced horizontally Adjust H Position in the Signal menu Every time the button is pressed the image moves to the right...

Страница 34: ...complete the setting without storing The display returns to the Network Config menu after selecting OK or CANCEL It may take some time to reflect the setting Enabling or disabling the network certification You can select whether or not to certify the network communication using the network password See page 22 for menu setting 1 Display the Network Config menu 2 Press the or button to select Netwo...

Страница 35: ...flect the settings IP Config settings See page 22 for menu setting 1 Display the Network Config menu 2 Press the or button to select IP Config IP Config OK 3 Press the ENTER button The IP Config menu appears MENU IP Config Adjust Exit Select DHCP IP Address Subnet Mask Default Gateway MAC Address DHCP Function Start IP Address End IP Address IP Config Setup On OK xx xx xx xx xx xx Off 169 255 169 ...

Страница 36: ...o set these settings set DHCP Function to On and perform the IP settings as follows Start IP Address setting 1 Display the IP Config menu 2 Press the or button to select Start IP Address Start IP Address 169 254 0 221 3 Press the ENTER button The first octet is selected Start IP Address 169 254 0 221 4 Press the or button to select the numeric value 5 Press the or button to select the octet The se...

Страница 37: ...fter selecting CANCEL Network settings continued Channel setting 1 Display the Wireless Setting menu 2 Press the or button to select Channel Channel Auto 3 Press the or button to select Auto or 1 to 11 To cancel the setting press the MENU button Encryption setting 1 Display the Wireless Setting menu 2 Press the or button to select Encryption Encryption Off 3 Press the or button to select SET 4 Pre...

Страница 38: ...It may take some time to initialize the settings Restart of network function See page 22 for menu setting 1 Display the Network Config menu 2 Press the or button to select Network Restart Network Restart OK 3 Press the ENTER button Network Restart dialog appears 4 If the ENTER button is pressed again the network function will be restarted It may take some time to restart the function How to use ne...

Страница 39: ...Select a USB Display input by pressing the USB DISP button on the remote control or the COMPUTER button on the projector Each time you press the COMPUTER button the input source is switched between Computer1 Computer2 HDMI LAN Display USB Display and PC Less Presentation When the USB Display input is selected the splash screen for USB Display appears on the screen 2 When the computer is connected ...

Страница 40: ...The Setup window is displayed Click Next Installation is started 3 When the installation has been completed LAN Display System is automatically executed When deleting LAN Display System Uninstallation Important When uninstalling LAN Display System it should be ended in advance If the application continues operating uninstallation cannot be performed normally 1 Select Start All Programs LAN Display...

Страница 41: ...er logs in to the projector and the computer image is projected Operating the LAN Display System 3 Click the buttons on the main user interface to operate the projection Exit button Play button Split 1 button Split 3 button Split 2 button Split 4 button Menu button Freeze button Stop button Play button Projects the image in full screen Split 1 4 buttons Click either of the buttons to project the i...

Страница 42: ...be operated with the device To USB A terminal One of the USB devices can be connected Installing the virtual display driver To project a virtual extended screen install the Virtual display driver as follows 1 Double click Virtual display driver exe contained in the folder LAN Display System and start up the installer of the Virtual display driver 2 The Setup window is displayed Click Next and oper...

Страница 43: ...nverter Lite About PtG Converter Lite PtG Converter Lite is a software which converts PPT files created by Microsoft Office PowerPoint into PtG files that can be projected by PC Less Presentation Pause page marks and animations contained in the PPT files are also converted Features Converting up to 20 pages of PPT Converting into 800 600 16bpp PtG System requirement CPU Intel Pentium M 1 5G or abo...

Страница 44: ...on has been completed click OK Important All the animation effects available on a computer display can be converted However the followings are not supported Animation effects with the timer setting or the repeat setting Animation effects taking 60 seconds or more in a single movement Pages having more than 3 second downtime setting VBA object embedded files OLE object embedded files Connection Con...

Страница 45: ...o and press the ENTER button The file selection screen appears 6 Press the or button to select a file or folder you want to display and press the ENTER button If you select a folder the underlying file names are displayed Then select a file An image on page 1 is displayed on the screen 7 Change the page by pressing the or button button to previous page button to next page button to next pause 8 Pr...

Страница 46: ...trol to select Presentation to Go or Photo Viewer and press the ENTER button The file selection screen appears 6 Press the or button to select a file or folder you want to display and press the ENTER button If you select a folder the underlying file names are displayed Then select a file When a PtG file is selected the file is displayed with the slideshow When a JPEG file is selected all the files...

Страница 47: ...o is muted or no signal is inputted Important You can capture the computer images from the Computer1 Computer2 HDMI LAN Display USB Display and PC Less Presentation input sources Procedure See page 22 for menu setting 1 Select the input source Computer1 Computer2 or HDMI 2 Display your desired image 3 Display the Option menu 4 Select Image Capture by pressing the or button Image Capture OK 5 Press...

Страница 48: ...ering a new password appears Password Adjust Confirm Select Password New Password Off When the password has already been set the screen for entering the old password appears instead In such a case enter the old password using the same operation as in next step and press the ENTER button Then the screen for entering a new password appears 6 Enter a 4 digit password using the and buttons 1 2 3 4 To ...

Страница 49: ... You can supervise and control the projector s operation using a personal computer via a LAN network Major functions ProjectorView Global Batch projector controlling supervising application software Batch operation of stand alone projector multiple projectors Scheduling function to turn ON OFF for each day of the week Checking each condition of the projector and detecting a theft Setting of the pr...

Страница 50: ... S Video 31 HDMI 41 PC Less Presentation 42 USB Display 51 LAN Display INPT Inquiry about input switching AVMT Mute control 30 Video and audio mute disable 31 Video and audio mute enable AVMT Inquiry about the mute state ERST Inquiry about the error state 1st byte Fan error 0 or 2 2nd byte Lamp error 0 to 2 3rd byte Temperature error 0 or 2 4th byte Cover open error 0 or 2 5th byte Always 0 6th by...

Страница 51: ...agments from scattering Be sure to use the lamp dedicated to this projector VLT XD700LP for XD700U WD720U Use of other lamps may cause a failure of the projector A When the projector is placed on the table Make sure that the projector is securely held in place 1 Remove the cover a of the screw fixing the lamp cover with a fingernail If it is difficult to remove it with a fingernail use a finetippe...

Страница 52: ... not reset the lamp operation time unless you replace the lamp Caution The lamp is fragile If it is broken be careful not to cut yourself with glass fragments Contact your dealer for a new lamp Interval of lamp replacement The recommended interval of lamp replacement is about 5000 hours 1 2 of consecutive use Such interval differs depending on the operating environment and may be shorter than 5000...

Страница 53: ...ntact your dealer No image appears on the screen Cancel the AV mute by pressing the AV MUTE button Check that the lens cap is removed It may take about 1 minute for the lamp to light up The lamp fails to light up on rare occasions In such a case wait for a few minutes and then try again If the projector was turned off before the lamp was cooled down sufficiently last time the fan may start rotatin...

Страница 54: ...A in the Option menu When the input signal is other than a WXGA video signal select Off in WXGA in the Option menu Projected images are distorted Adjust the projector and the screen so that they are perpendicular to each other See page 16 Projected images are dark Adjust Brightness and Contrast in the Picture menu See page 31 Replace the lamp See page 51 Projected images are blurred Adjust the foc...

Страница 55: ...6 Projected images are flickering After the POWER button or ON button on the remote has been pressed or the Lamp Mode setting has changed images may be flickering until the lamp lights stably This is an expected behavior When selecting the input signal Auto Position and Image the projected image may be flickering temporarily This is not a product malfunction Projector images are twitching Projecto...

Страница 56: ...ff the lamp and unplug the power cord from the wall outlet before you perform any maintenance on the projector Ask your dealer for annual cleaning of the inside of the projector If you continue to use the projector with dust inside it may result in fire or malfunction Cleaning of the projector and the vents Use a soft cloth to clean the projector and the vents When the vents become dirty wipe them...

Страница 57: ...e clogged with dust or dirt The room temperature is high Clean the vents Relocate the projector to a cooler place Steady red Blinking green The protection circuit is working or the lamp is in an abnormal condition Wait until the STATUS indicator goes out then press the POWER button If the above solution is not effective replace the lamp Steady green Blinking green red The lamp operation time excee...

Страница 58: ...compatibility NTSC NTSC 4 43 PAL including PAL M N SECAM PAL 60 Component Video DVD HDTV 480i 576i 480p 576p 1080i 720p 1080p Speaker 10 W mono x 1 S video input Luminance signal 1 0 Vp p 75 Ω negative sync Chroma signal 0 286 Vp p 75 Ω burst signal Video input 1 0 Vp p 75 Ω negative sync Audio input 350 mVrms 10 kΩ or more Analog RGB input RGB 0 7 Vp p 75 Ω negative sync YPBPR YCBCR Y 1 0 Vp p ne...

Страница 59: ...1 7 TMDS Data 0 8 TMDS Data 0 Shield 9 TMDS Data 0 10 TMDS Clock 11 TMDS Clock Shield 12 TMDS Clock 13 CEC 14 15 SCL 16 SDA 17 DDC Ground 18 5 V Power 19 Hot Plug Detect Dimension drawings unit mm 270 345 134 What s included in the box AC power cord for the U S J2552 0063 03 for Europe J2552 0247 00 for the U K J2552 0065 02 for Australia J2552 0053 00 for South Korea J2552 0247 00 Computer cable ...

Страница 60: ...85 94 85 00 1024 x 768 1066 x 800 SXGA60 1280 x 1024 63 98 60 02 960 x 768 1000 x 800 3 SXGA75 1280 x 1024 79 98 75 02 960 x 768 1000 x 800 SXGA85 1280 x 1024 91 15 85 02 960 x 768 1000 x 800 SUN66a 1152 x 900 61 85 66 00 984 x 768 1024 x 800 SUN76a 1152 x 900 71 81 76 64 984 x 768 1024 x 800 SUN66 1280 x 1024 71 68 66 68 960 x 768 1000 x 800 SUN76 1280 x 1024 81 13 76 11 960 x 768 1000 x 800 SGI7...

Страница 61: ...1 Zusho Baba Nagaokakyo City Kyoto Japan Ver 1 0 ...

Отзывы: