EN-44
Conversion of a PPT file to PtG file using
the PtG Converter-Lite
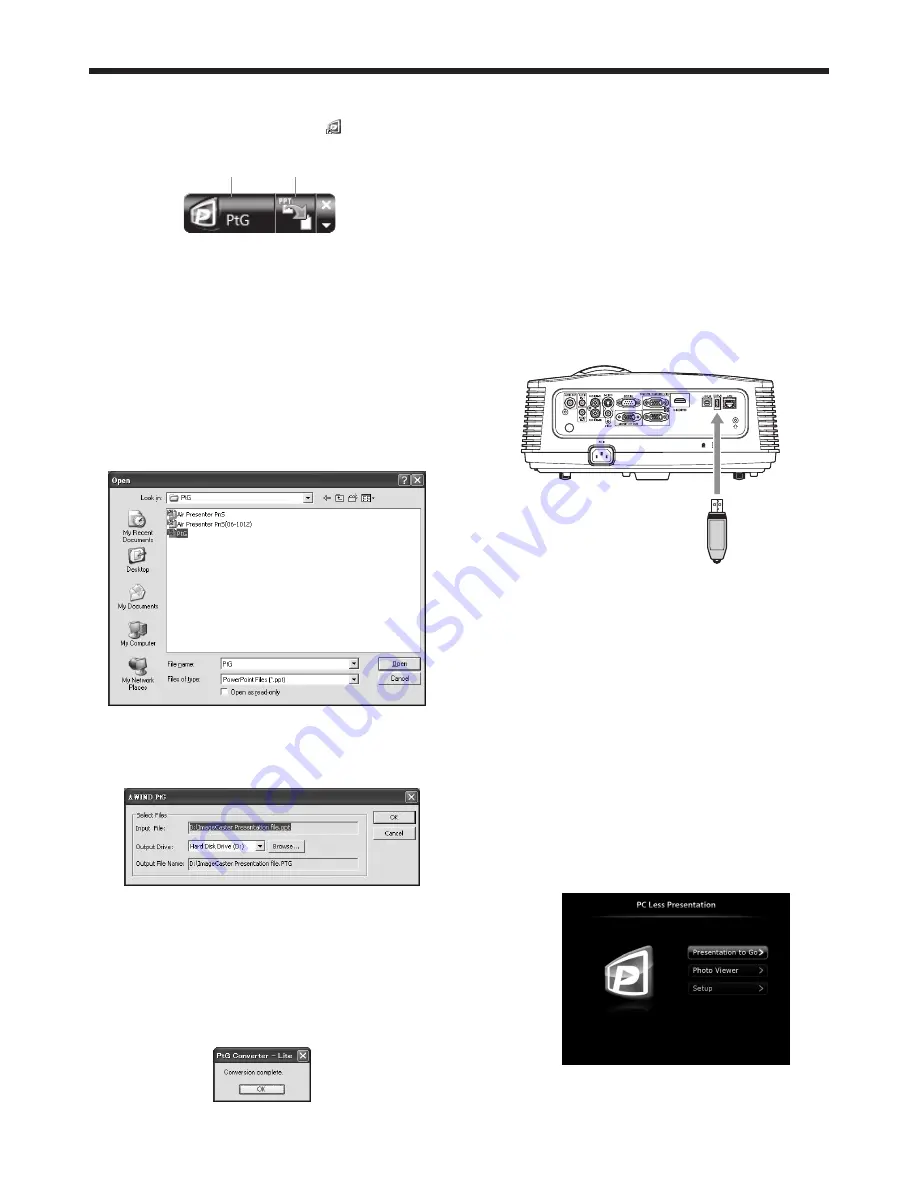
1. Click the PtG Converter-Lite icon “ ” to execute
the program.
PPT conversion button
Menu bar
•
Menu bar
Right-click to open the menu.
•
Max Circle Animation:
Selects the max time of animation.
•
About:
Displays the software version information.
•
Exit:
Exits the PtG Converter-Lite.
•
PPT conversion button:
Starts the conversion from the PPT file to the
PtG file.
2. Click the PPT conversion button.
•
The file selection screen appears.
3. Select the PPT file you want to convert, and click
[Open].
• The screen for specifying the file destination and
name appears.
4. Set the file destination and the name.
•
The converted file is stored in the same folder as
original file by default.
•
The name of the converted file is the same as
original file’s by default.
5. Click [OK] to start conversion.
6. When the conversion has been completed, click
[OK].
Important:
• All the animation effects available on a computer
display can be converted. However, the followings
are not supported.
• Animation effects with the timer setting or the
repeat setting
• Animation effects taking 60 seconds or more in
a single movement
• Pages having more than 3 second downtime
setting
• VBA object embedded files
• OLE object embedded files
Connection
Connect a USB device to the USB-A terminal on the
projector.
To USB-A
terminal
USB device
(option)
Important:
• The USB-A terminal on this projector is compatible
with USB 2.0.
•
Do not use a USB hub for the connection.
Performing the PC Less Presentation
Selecting a PC Less Presentation input
1. Press the VIEWER button on the remote control or
the COMPUTER button on the projector.
• Each time you press
the COMPUTER
button, the input source is switched between
Computer1, Computer2, HDMI, LAN Display,
USB Display and PC Less Presentation.
• When the
PC Less Presentation input is
selected, the PC Less Presentation screen
appears.
Advanced display utilities (continued)


