10
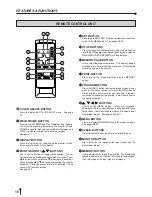
REMOTE CONTROL UNIT
5
5
5
5
5
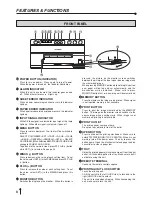
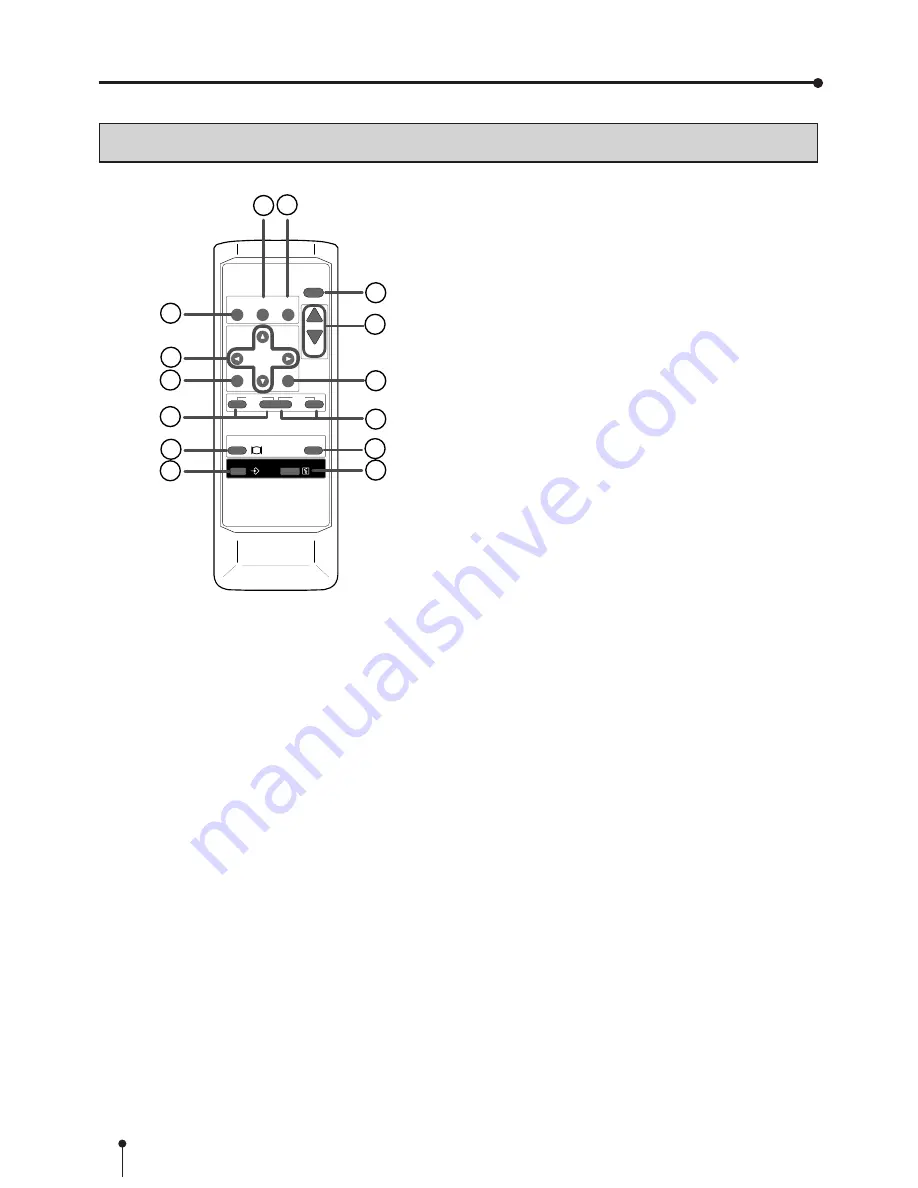
SET BUTTON
Press to go to SAVE PRG. Repress to memorize the values
and exit the MENU mode. See pages 28-29.
6
6
6
6
6
STOP BUTTONS
Press to cancel the printing process and start mechanical
initializing. When pressing these buttons during displaying
MAIN MENU, SERVICE MENU will be displayed.
7
7
7
7
7
MEMORY PAGE BUTTON
Use to select the image memorized . The memory page is
switched every time this button is pressed. The selected
memory page mark illuminates.
8
8
8
8
8
PRINT BUTTON
Press to print the image memorized by the MEMORY
button.
9
9
9
9
9
PROGRAM BUTTON
Press the PROG. button to select between 3 types of user
presets. Functions previously set with the MENU can be
stored into one of 3 memories and recalled. Programs
cannot be changed during printing. It may take longer to
change the program.
A
A
A
A
A
{
{
{
{
{
,
}
}
}
}
}
,
[
[
[
[
[
,
]
]
]
]
]
BUTTONS
Use to set the MENU display. Values are increased/
decreased and the cursor position is changed with these
four buttons. These buttons are also used to select one of
memorized images. See page 30 and 37.
B
B
B
B
B
MENU BUTTON
Press to display MAIN MENU used for various settings.
See pages 28-29.
C
C
C
C
C
CLEAR BUTTONS
Press to eliminate all or a part of memorized images.
D
D
D
D
D
MONITOR BUTTON
Press to switch the image of the input signal and the
memorized image.
E
E
E
E
E
MEMORY BUTTON
Use to memorize the image to be printed. The memorized
image is displayed on the monitor screen for one second,
then the image of the input signal is displayed.
1
1
1
1
1
COLOR ADJUST BUTTON
Press to display the COLOR ADJUST menu. See page
32.
2
2
2
2
2
FIELD/FRAME BUTTON
Press to switch FRAME and FIELD mode of input signals.
The selected mode is displayed on the monitor screen.
FRAME is good for high quality printing of still images, and
FIELD is good for printing fast movement images.
See page 17.
3
3
3
3
3
DISPLAY BUTTON
Press to display the set condition on the monitor screen.
Press again to switch off the display.
4
4
4
4
4
PRINT QUANTITY
{
{
{
{
{
,
}
}
}
}
}
BUTTONS
Use to set the number of copies to be printed. The set
number of copies is displayed on the monitor screen. Press
{
to increase the number and
}
to decrease the number.
When pressing
{
or
}
button during printing, the counter
becomes “1” and continuous printing is cancelled. It also
cancels the reserved printing.
See page 22.
PROG.
MENU
CLEAR
MONITOR
MEMORY
MEMORY
PAGE
STOP
SET
COLOR FIELD
ADJUST /FRAME
DISPLAY
PRINT
Q’ ty
-
+
1 2
9
10
11
12
13
14
3
4
6
5
7
8
FEATURES & FUNCTIONS

