background image

ii

NOTICE

The information contained in this document is believed to be accurate in all respects but is not warranted 
by Mitel Networks™ Corporation (MITEL

®

). The information is subject to change without notice and should 

not be construed in any way as a commitment by Mitel or any of its affiliates or subsidiaries. Mitel and its 
affiliates and subsidiaries assume no responsibility for any errors or omissions in this document. Revisions 
of this document or new editions of it may be issued to incorporate such changes.

No part of this document can be reproduced or transmitted in any form or by any means - electronic or 
mechanical - for any purpose without written permission from Mitel Networks Corporation.

Trademarks

Mitel is a trademark of Mitel Networks Corporation.

Other product names mentioned in this document may be trademarks of their respective companies and 
are hereby acknowledged.

Mitel 5606 Wireless Handset

User Guide

February 2010

®,™ Trademark of Mitel Networks Corporation

© Copyright 2010, Mitel Networks Corporation

All rights reserved

Содержание 3300 IP Communications Platform

Страница 1: ...IP DECT System Global 5606 Wireless Handset User Guide MITEL 3300 IP Communications Platform ...

Страница 2: ...ent Revisions of this document or new editions of it may be issued to incorporate such changes No part of this document can be reproduced or transmitted in any form or by any means electronic or mechanical for any purpose without written permission from Mitel Networks Corporation Trademarks Mitel is a trademark of Mitel Networks Corporation Other product names mentioned in this document may be tra...

Страница 3: ... Keys and Buttons 6 Navigation Key 6 ON Button 6 OFF Button 6 Soft keys 6 Hot keys 6 Volume Button 7 Mute Button 7 Alpha Numeric Keys 7 Customizing Your Phone 8 Volume Mute Controls 8 Adjust the Volume During a Call 8 Mute the Microphone During a Call 8 Turn off Alert Signal at Incoming Call 8 Turn Audible Signals On Off 8 Turn Loudspeaking Function On Off 8 Lock Unlock the Keypad 8 Making and Ans...

Страница 4: ...ive a Text Message 15 Delete a received message 15 Close message 15 Read a Stored Text Message 15 Delete a Stored Text Message 16 Receive a Message with Request for Answer 16 SMS Short Message Service 16 Send an SMS 16 Send an SMS to a predefined Destination Address 16 Display and Scroll between SMS Messages 17 Voice Mail 17 To access the Voice Inbox 17 Navigate the Menu 18 Enter Exit the Menu Mod...

Страница 5: ...28 Deactivate Activate Man down alarm 28 Edit a Soft key 28 Edit a Hot key 29 Select Language 29 Change Text Size 30 Lock the Handset Manually 30 Change the Lock Code 30 Clock Settings 30 Turn On Off Automatic Keypad Lock 31 Enable Disable Quick Answer 31 Set New Messages to be Displayed Upside down 31 Set Owner ID 32 General Handset Information 32 Select IP DECT Base Station 32 Alarm Operation 56...

Страница 6: ... Connection method Speech Monitoring 35 Connection method Loud 35 Connection method Ordinary 35 Alarm Management with Automatic Calls 36 Registration 37 Over Air Registration 37 Operation Notice 38 Accessibility and Voice Quality 38 Maintenance 39 Charge the Battery 39 Charging Spare Batteries 39 Change the Clip 40 Troubleshooting 41 Maintenance 42 Desktop Charger 42 Charging Rack 42 ...

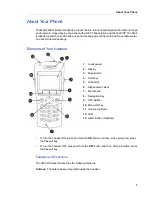
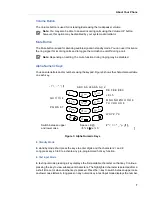
Страница 7: ...Elements of Your Handset To turn the handset ON press and hold the ON button and then when prompted press the Yes soft key To turn the handset OFF press and hold the OFF button and then when prompted press the Yes soft key Features and Functions The 5606 Wireless Handset has the following features Antenna The antennae are integrated inside the handset 1 Loudspeaker 2 Display 3 Mute Button 4 Soft k...

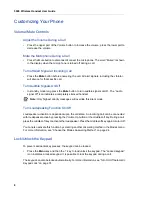
Страница 8: ... may result in nuisance calls It also prevents accidental calls to emergency services numbers like 911 999 or 112 To disable the key lock feature press the key and then press YES Currently mobile IP phones do not support Enhanced 911 E911 operation If emergency services are required it is necessary to keep the system administrator and the location database current Tips for your Comfort and Safety ...

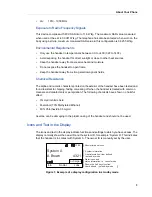
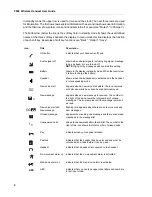
Страница 9: ...d resistant to chipping fading or wearing off when the handset is treated with common cleaners and disinfectants or perspiration The following chemicals have shown no harmful effect 3 Hydrochloric Acid M alcohol 70 Methylated Ethanol 60 Chlorhexidin 0 5mg ml Acetone can be damaging to the plastic casing of the handset and should not be used Icons and Text in the Display The icons and text in the d...

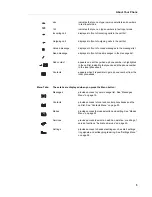
Страница 10: ...is activated and the handset is in loudspeaking mode New voice mail appears when a new voice mail exists The icon remains until all voice mails have been heard and or removed New message appears when a new message is received The number to the right of the icon shows the total number of unread messages The icon remains until the message is marked as read New voice mail and New message flashing ico...

Страница 11: ...ist indicating that you can add the phone number to the local phonebook Contacts appears when it is possible to get a phone number from the local phonebook Menu Tabs These tabs are displayed when you press the Menu button Messages provides access to your message list See Messages Menu on page 19 Contacts provides access to local and central phonebooks and the call list See Contacts Menu on page 20...

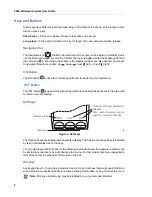
Страница 12: ...andset on OFF Button The OFF button is used for disconnecting calls and switching the handset off It is also used to return to an idle display Soft keys Figure 2 Soft keys The three soft keys are located just beneath the display The function of each soft key is indicated by text in the display above the keys You can define specific functions for the soft keys in standby mode for example a soft key...

Страница 13: ... In text input mode pressing a key displays the first available character on that key Continue pressing the key to view subsequent characters The highlighted character is selected after a a short time out or when another key is pressed Press the key to switch between upper case and lower case letters A long press on any numeric key in text input mode displays the number Note You may also be able t...

Страница 14: ...ilenced handset Turn Loudspeaking Function On Off Loudspeaker activation is dependent upon the call state An incoming call can be connected with loudspeaker active by pressing the Volume Up button or the middle soft key During a call press the middle soft key to activate the loudspeaker Press the middle soft key again to turn it off You can also activate this function by selecting another answerin...

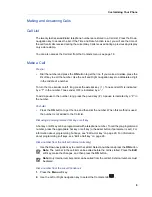
Страница 15: ...se is indicated by a P in the number Post dial Press the ON button to get the line and then dial the number When this method is used the number is not added to the Call List Dial using a pre programmed hot key or soft key A hot key or soft key can be programmed with a telephone number To call the pre programmed number press the appropriate hot key or soft key or headset button if parameter is set ...

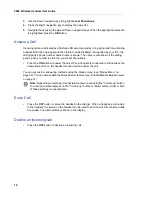
Страница 16: ...he ON button to answer the call When a headset is connected to the handset the answering button on the headset can be used to answer the call You can set custom answering methods using the Modes menu see Modes Menu on page 22 You can also enable the Quick Answer feature see Enable Disable Quick Answer on page 31 End a Call Press the OFF button or place the handset in the charger When a headset is ...

Страница 17: ...he call 3 Wait for an answer announce the transfer and then press OFF to hang up and connect the other two parties To terminate the transfer and return to the held call press the R key and then press 1 Conference To conference with another party during an active call 1 Put the active call on hold Press the R key 2 Dial the number of the third party with whom you want to conference 3 Press the R ke...

Страница 18: ...umber on which to park the call and then press the ON button 3 Inform the called party of the waiting call To retrieve a parked call 1 Press the ON button to go off hook 2 Dial the feature access code for Call Park Retrieve immediately followed by the directory number on which the call is parked and then press the ON button Call Forward To set Call Forwarding 1 Press the ON button to go off hook 2...

Страница 19: ...p Do Not Disturb is activated To deactivate Do Not Disturb 1 Dial the feature access code for Do Not Disturb Cancel and then press the ON button 2 When you hear a dial tone press the OFF button to hang up Do Not Disturb is deactivated Direct Page Direct Paging allows you to page a party through the party s handsfree speaker 1 Dial the feature access code for Direct Page and then press ON 2 Dial th...

Страница 20: ...s you to twin your desk phone with an external PSTN connected phone yourcell phone forexample Calls arriving at the desk phone ring the cell phone simultaneously until one or the other is answered or if unanswered are forwarded to voice mail You can use the 5606 wireless handset as a destination twinned device for your desk phone For information about using your handset with Mobile Extension refer...

Страница 21: ...ng handset notifies you of a message The message tone breaks through silent mode if the message is urgent but can be silenced by pressing the Mute button Messages are shown on the display The size of the text can be changed see Change Text Size on page 30 and the orientation can be changed see Set New Messages to be Displayed Upside down on page 31 Press any key except alarm mute and volume button...

Страница 22: ...of the display You can program a soft hot key with an SMS function Sending SMS is a system dependent function Send an SMS There are three ways to send an SMS Select the Messages tab and press the Down navigation key to enter Send SMS Use a programmed soft hot key see Edit a Soft key on page 28 Use the Services menu see Services Menu on page 25 1 Enter the destination address or get it from the Loc...

Страница 23: ...sending handset are shown Voice Mail A new voice mail is indicated by the words VOICE MAIL in the handset display 1 Press the Listen soft key 2 Follow the voice mail instructions to hear your message To access the Voice Inbox 1 Press the Menu soft key 2 Use the Left or Right navigation key to select the Messages tab 3 Use the Down navigation key to highlight Voice Mail and then press the Right nav...

Страница 24: ...choose a menu tab and then press the Down navigation key to open it The menu title appears and the first alternative is highlighted 2 Use the Up or Down navigation keys to move through the list Press the Right navigation key to select an alternative To back up in Menu mode If you entered the menu using the Right navigation key you can use the Left key to back up one step If you entered the menu us...

Страница 25: ...h the list 6 Do one or more of the following to view a message press the Right navigation key to delete the current message press the Delete soft key Confirm the deletion to exit the message and return to the message list press the Left navigation key To delete all messages 1 While viewing a message press the Options soft key Delete all is displayed 2 Press the Select soft key Delete all messages ...

Страница 26: ...d prompt is displayed 3 Enter the first letter or letters in the name and then press OK The first name and number corresponding to your search will appear You can also enter the entire name to narrow the search results 4 Use the Up and Down navigation keys to move through the list You can choose to delete or edit the entry Press the Left navigation key to step back To Add an Entry to the Local Pho...

Страница 27: ...e and number appear Edit the name first Press the asterisk key to switch between upper and lower case characters Press the C soft key to clear an entry 3 Press the Down navigation key to edit the number You can use the Left navigation key to move through an entry and add or delete a character digit in the middle of a name number 4 Press the Save soft key Entry saved is displayed The handset will a...

Страница 28: ...e option is highlighted 5 Press the Select soft key Number deleted is displayed The handset automatically returns to the call list Delete All Numbers in the Call List 1 With the Contacts tab selected press the Down navigation key to enter the Contacts menu 2 Highlight Call list and press the Right navigation key The first entry is highlighted 3 Press the Options soft key The Delete option is highl...

Страница 29: ...the Up or Down navigation keys to highlight the mode to which you want to change 3 Press the Select sofkey The name of the highlighted mode is displayed and then the handset automatically returns to the list You can program a hot key or a soft key to change modes See Edit a Hot key on page 29 or Edit a Soft key on page 28 for more information Change Mode Settings 1 With the Modes tab selected pres...

Страница 30: ...cted with loudspeaking function turned on when you can press the ON button Auto loud When using this method calls are automatically connected with loudspeak ing function turned on 4 When you have highlighted the appropriate method press the Select soft key The name of the selected method is displayed The handset automatically returns to the list and the new answering method is highlighted Use the ...

Страница 31: ... want to add For example if you want this service to open a door enter OPEN DOOR 4 Press Save The new service name is highlighted and added to the list 5 Press the Down navigation key until Function Not Used is highlighted 6 Press the Change soft key The following functions are listed Data send Data with prefix Phone Call SMS 7 Highlight the function you want and then press the Select soft key 8 E...

Страница 32: ...ed The handset automatically returns to the Services menu Settings Menu 1 Press the Menu soft key or the Up Down navigation key to enter the menu 2 Select the Settings tab and press the Down navigation key to enter the Settings menu The alternatives in the Settings menu are as follows Alert signals use this setting to change all audible signals and the vibrator Alarm settings available for the 560...

Страница 33: ...e the Down navigation key to select which ring signal to change Internal calls External calls or Call back 5 Press the Right navigation key to select 6 Press the Down navigation key to choose the signal you want Beep Low Medium High Mixed 7 To test the volume level during selection press the Play soft key Press Stop Select or the Left navigation key to stop the test 8 When you have selected a leve...

Страница 34: ...n navigation keys to highlight Soft key and then press the Right navi gation key 3 Highlight the soft key position you want to edit and then press the Right navigation key 4 Press the Edit soft key Name _ is displayed 5 Enter a name with maximum seven characters and then press Save A confirmation is displayed and the handset automatically returns to the Soft key list 6 Press the Down navigation ke...

Страница 35: ...anguage 1 With the Settings tab selected press the Down navigation key to enter the Settings menu 2 Use the Down navigation key to highlight General and then press the Right navigation key Phone call Press Select Choose a method to end calls Ordinary Auto disconnect or PTT and then press Select Enter phone number and then press Save Note It is possible to toggle the tone sender in the entered numb...

Страница 36: ...d then press the Right navigation key 3 Use the Down navigation key to highlight Phone lock and then press the Right navigation key 4 Highlight Lock phone and then press the Select soft key The handset is now locked Change the Lock Code 1 With the Settings tab selected press the Down navigation key to enter the Settings menu 2 Use the Down navigation key to highlight General and then press the Rig...

Страница 37: ...ighlight General and then press the Right navigation key 3 Use the Down navigation key to highlight Auto key lock and then press the Change soft key The Auto key lock feature is enabled disabled In standby mode a locked keypad is indicated by the Locked keypad icon Enable Disable Quick Answer 1 With the Settings tab selected press the Down navigation key to enter the Settings menu 2 Use the Down n...

Страница 38: ...unique global GAP identity number for the SIM card IPEI The unique global GAP identity number for the handset SW version Here you can see which version of the handset software you have AP SW version The Alarm Module software If the Alarm Module is not connected it will be indicated with NC Not Connected Select IP DECT Base Station 1 With the Settings tab selected press the Down navigation key to e...

Страница 39: ...e Hot key toggles the alarm The No movement alarm on icon displays to indicate that the No movement alarm is enabled Send No movement alarm The No movement alarm will go off when you have not moved within a preset time the default is 30 seconds Before the alarm is activated a warning signal sounds and the No movement on icon flashes If you do not cancel the alarm by pressing any key or the headset...

Страница 40: ... before Warning for No movement and Man down Alarms Your administrator can set the time before the warning for no movement and man down alarms to be delayed for ten minutes that is no movement and man down conditions will not be detected during that time When the time runs out the warning signal sounds Press the Mute button to delay the time to next warning for another ten minutes Alarm with Data ...

Страница 41: ...ode and the speaker is muted This gives the answering party the opportunity to listen and make an appropriate decision for action Areas of use are people working alone within fields like treatment of offenders social work medical care and psychiatry It provides a high level of security and the opportunity to survey the situation at the alarm site Connection method Loud Your administrator can chang...

Страница 42: ...not be used for alarm transmission automatic calls after alarm can be used to send the alarms to the system In this case the your administrator sets the SIM parameter so that Hot keys 6 to 9 are associated with the different types of alarms Note In these systems the call will be disconnected automatically ...

Страница 43: ...navigation key to highlight Register and then press the Right navigation key 4 Press the Down navigation key to enter the system menu and then press New 5 Enter the new system name and then press OK The set displays its IPDI number 6 Press OK 7 When prompted enter the PARK code and then press OK 8 When prompted enter the AC code and then press OK The handset searches for the corresponding system a...

Страница 44: ... User Guide 38 Logout Users To logout enter the supplementary services feature access code for logout and the optional AC code and then hang up For example where 11 is feature code for logout and 1234 is the AC code 11 1234 ...

Страница 45: ...ystem contact your system administrator For best voice quality avoid positioning near computer radio or similar Out of Coverage When you leave the system s coverage area a short beep will sound and No System is displayed Note When re entering the coverage area it can take a moment before the handset automatically registers into the system ...

Страница 46: ...ery and is then placed in a charger it remains switched off when fully charged To start the handset press and hold the ON button If the handset is active when placed in the charger it remains active when fully charged Charging Spare Batteries Spare batteries can be charged in the wall mounted Charging Rack equipped with the battery pack adapter Figure 5 Inserting a battery in the Charging Rack equ...

Страница 47: ...here is an error Remove the battery and re insert it in the charging slot Change the Clip A hinge type belt clip is mounted on the 5606 Cordless Handset at delivery The clip can be replaced with a covering plate supplied or a swivel type belt clip that can be ordered separately Tools required Pozidriv Point size 1 Note It is not possible to charge spare batteries in the Desktop Charger ...

Страница 48: ...s out of coverage Stop the beep with the mute button and move into range Note When re entering the coverage area it can take a couple of minutes before the handset automatically registers into the system or It is a no system warning Remove and then insert the battery again to make the handset connect to the system automatically Poor voice quality For best voice quality avoid positioning near compu...

Страница 49: ... adapter is needed The wall mounted Charging Rack and its power supply provide a modular system that enables a number of installation configurations Each power supply can support several charging racks with four positions for handsets and or batteries in each rack see Data Sheet Charging Rack TD 92382GB As the handset cannot distinguish between a Desktop Charger and Charging Rack it is recommended...

Страница 50: ......

Отзывы: