background image

11

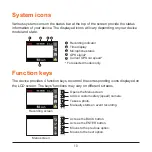
Switching screens

Once you connect the rear camera and start recording, the 

 icon will appear on 

the screen. You can switch the front and rear camera images by pressing   .

Setting the date and time

To make sure that the date and time of your recordings are correct, check the 

settings before you begin recording.
1. Press 

 to access the Settings Menu.

2. Select 

System 

>

 Date/Time

.

3. Do one of the following:

l

 Select 

Use GPS time

, and then select the time zone of your location. The 

system will set date and time according to the GPS location.

Note:

 This feature is not available on all models.

l

 Select 

Manual

, and the system will display the date and time setting screen. 

Use 

 / 

 to adjust the value of the selected field; press 

 and repeat the 

step until all fields have been changed. 

4. When done, press 

 .

Содержание 5415N5780005

Страница 1: ...User Manual MiVue C380D...

Страница 2: ...C does not warrant this document is error free MiTAC assumes no liability for damage incurred directly or indirectly from errors omissions or discrepancies between the device and the documents Note No...

Страница 3: ...omputer 8 Turning the dash cam on 9 Power button 9 Shutting down the dash cam 9 System icons 10 Function keys 10 Switching screens 11 Setting the date and time 11 Recording in driving mode 12 Continuo...

Страница 4: ...ng 18 System 19 Format 19 MiVue Manager 20 Installing MiVue Manager 20 Playing the recording files 20 For more information 23 Caring for your device 23 Safety precautions 24 About charging 24 About th...

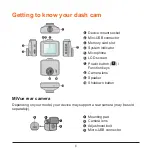
Страница 5: ...ystem indicator 5 Microphone 6 LCD screen 7 Power button Function keys 8 Camera lens 9 Speaker 10 Shutdown button MiVue rear camera Depending on your model your device may support a rear camera may be...

Страница 6: ...mera lens and no reflective material is placed near the lens Please keep the lens clean l If the car s windscreen is tinted with a coating it may impact the recording quality l To ensure the highest q...

Страница 7: ...r dash cam in a vehicle securely 1 Mount the dash cam 2 Mount the rear camera optional 1 2 3 Note l Before sticking the mounting pad it is recommended to clean the windscreen with rubbing alcohol l If...

Страница 8: ...ere with the vehicle s airbags or other safety features If you only use the dash cam without connecting the rear camera in your vehicle simply connect the car charger to the dash cam and then plug it...

Страница 9: ...ording The dash cam supports the Class 10 memory cards with 8 GB 128 GB capacity You should use separate MicroSD cards for recording and for regular data storage Hold the card MicroSD by the edges and...

Страница 10: ...button for 2 seconds to manually turn the dash cam on and off Shutting down the dash cam Occasionally you may need to perform a hardware reset when the dash cam stops responding or if it appears to be...

Страница 11: ...s 4 GPS signal 5 Current GPS car speed For selected models only Function keys The device provides 4 function keys to control the corresponding icons displayed on the LCD screen The keys functions may...

Страница 12: ...u begin recording 1 Press to access the Settings Menu 2 Select System Date Time 3 Do one of the following l Select Use GPS time and then select the time zone of your location The system will set date...

Страница 13: ...he Normal category for file playback Event recording By default if an event happens such as a sudden impact high speed driving an aggressive turn or an accidental crash during continuous recording the...

Страница 14: ...icon will appear on the screen When the Parking mode detection is enabled the system will enter the Parking mode when the car stops moving for about 5 minutes In the Parking mode parking recordings c...

Страница 15: ...gress press to take a photo This function is not available when the rear camera is connected l Press Camera The photos can be found in the Photo category for file playback Playback mode To select a vi...

Страница 16: ...ete Deletes the file Safety camera alerts Caution For legal reasons the safety camera function is not available in all countries You can receive alerts to warn you about the locations of safety speed...

Страница 17: ...o add a custom safety camera in the current location press on the recording screen 2 The next time when you pass by the location you will receive alerts by the dash cam 3 To view the information of th...

Страница 18: ...will alert you at a preset distance Short Medium or Long when a safety camera is detected l Alert Method l Smart Alert Sets the alert distance function according to the current GPS car speed l Standa...

Страница 19: ...in Parking mode Video Recording l Video Clip Length Sets the length of each video clip for a continuous recording 1 min 3 min or 5 min l WDR Enables the Wide Dynamic Range WDR function to improve the...

Страница 20: ...vel l LCD Standby l Always On Keeps the LCD on l 10 sec 1 min 3 min Sets the timer for the LCD to turn off automatically after recording starts l HUD Turns off the LCD in specified time but still disp...

Страница 21: ...and access the card on the computer via a card reader You are advised to copy the recording files to your computer for backup and playback 2 Start MiVue Manager on the computer l By default MiVue Man...

Страница 22: ...d below the video playback screen l On the dashboard panel click to display the map screen l The G sensor chart displays data in 3 axis waveform about the car s shift forward backward X to the right l...

Страница 23: ...formation of MiVue Manager 6 Exports the GPS information of the selected file in the KML format to the specified location on your computer 7 Uploads the selected file to Facebook YouTube 8 In the play...

Страница 24: ...surface can easily be scratched Avoid touching it with sharp objects Non adhesive generic screen protectors designed specifically for use on portable devices with LCD panels may be used to help prote...

Страница 25: ...nnect the charger to a proper power source The voltage requirements are found on the product case and or packaging l Do not use the charger if the cord becomes damaged l Do not attempt to service the...

Страница 26: ...ning is not available Signal reception can be affected by situations such as bad weather or dense overhead obstacles such as trees tunnels viaducts and tall buildings l The GPS positioning data is for...

Страница 27: ...cturer cannot be held responsible for modifications made by the User and the consequences thereof which may alter the conformity of the product with the CE Marking Declaration of conformity Hereby MiT...

Отзывы: