29
Version C
Mini-Cam
Proteus Lite
Connection of Camera to Crawler
NOTE!
Ensure that power to the crawler is switched
OFF
before connecting or
disconnecting the camera by using the
ALL-STOP
button on the CCU.
A red light will illuminate next to this button when power to the crawler
is
OFF
.
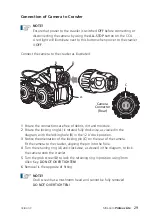
Connect the camera to the crawler as illustrated:
1
Ensure the connections are free of debris, dirt and moisture.
2
Ensure the locking ring (
A
) is rotated fully clockwise, as viewed in the
diagram, with the locking hole (
B
) in the 12 o’clock position.
3
Notice the orientation of the locking pin (
C
) on the rear of the camera.
Fit the camera to the crawler, aligning the pin into the hole.
4
Turn the retaining ring (
A
) anti-clockwise, as viewed in the diagram, to lock
the camera onto the crawler.
5
Turn the grub screw (
D
) to lock the retaining ring in position using 3mm
Allen Key.
DO NOT OVER TIGHTEN!
6
Removal is the opposite of fitting.
NOTE!
Grub screw has a mushroom head and cannot be fully removed.
DO NOT OVER TIGHTEN!
D
B
A
Camera
Connector
(Rear)
C
Содержание Proteus Lite
Страница 1: ...Original Instruction Manual Version C...
Страница 2: ...2 Version C Mini Cam Proteus Lite...
Страница 108: ...108 Version C Mini Cam Proteus Lite...
Страница 112: ...112 Version C Mini Cam Proteus Lite...
Страница 113: ...113 Version C Mini Cam Proteus Lite Notes...
Страница 114: ...114 Version C Mini Cam Proteus Lite Notes...
Страница 115: ......

