2-15
Chapter 2 Basic Operation
2
2
2
2
27
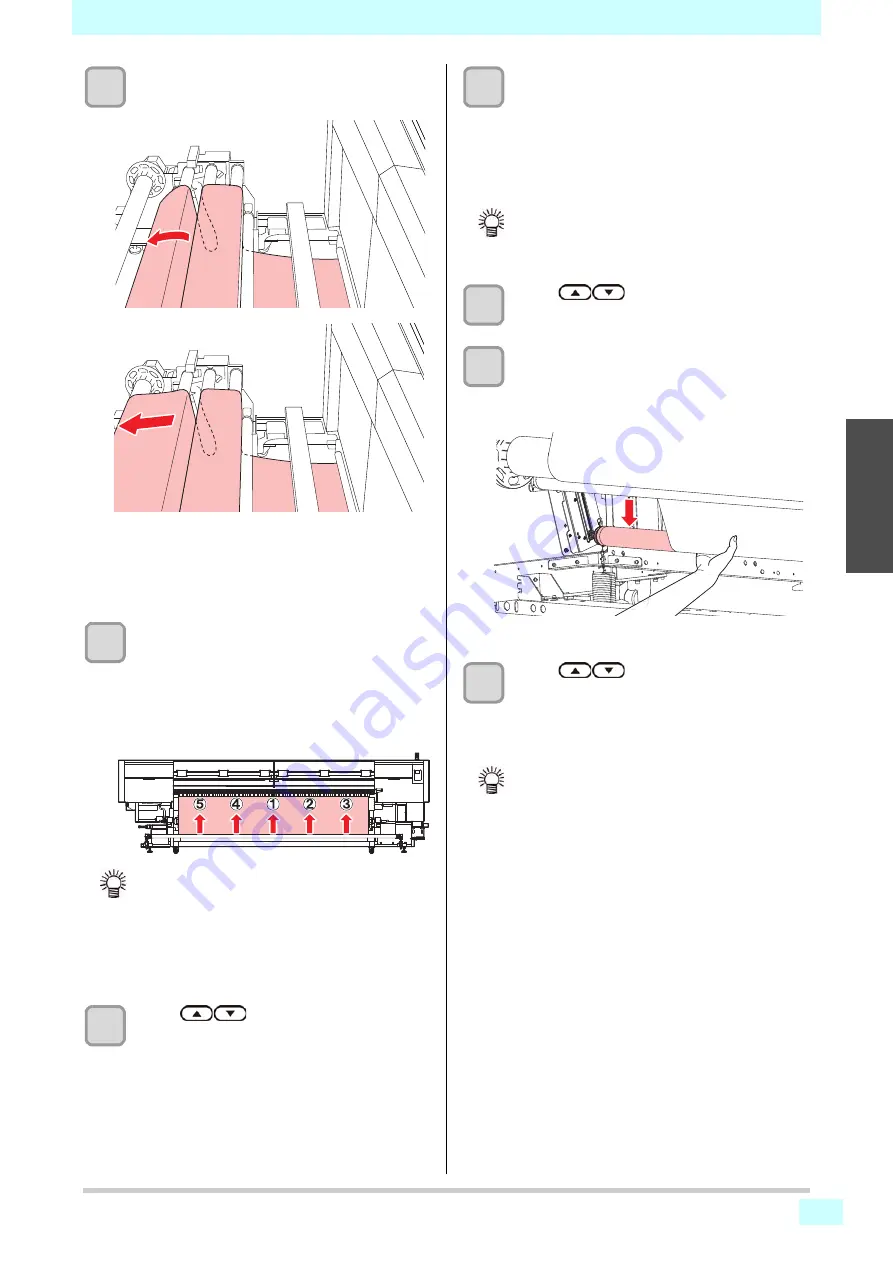
Feed the media through the top of lapel bar
7 until it reaches the take-up device.
• Make sure that the media is fed straight.
• Check that neither end of the media is curling and
wrapping around the lapel bars. Pay particular
attention to the lapel bar for the coloring heater as
it is difficult to check.
28
Secure the media on the take-up device.
(1)
As indicated, fix the media on the paper core
with tape so that the printed surface is
“revoluted”.
• Along the paper core, fix the media on
several positions with tape in the order in the
figure so that the media may not wrinkle.
29
Press
to loosen the media.
• Loosen the media until it reaches to the floor.
30
With switches of the take-up device, roll up
the media about once.
(1)
Making the left switch to [MANUAL] and the
right
↑ ↓
switch to the direction taking up
the media, take up the media.
(2)
Just before the media stretched tight, turn
the left switch to [AUTO] to stop.
31
Press
to loosen the media.
• Loosen the media until it reaches to the floor.
32
At the front, lift the tension- bar down
slowly.
• Remove the stopper, and then while holding the
tension bar, unlock it, and then lower it.
33
Press
to lift the tension-bar up
and to stretch the loosened media.
• Turn the switch to [AUTO]. Tension-bar lifts, taking
up the media, and automatically stops at the
proper position.
• Surface waviness or ruck may affect the quality of
currently printed image.
When fixing media with tape, align the media
along the direction indicated with an arrow in the
figure.
• If you pull the media too much when fixing with
tape, the media tension may not be even. And, it
may negatively affect the media feeding.
• Rolling up the media too tight, covers of take-up
device opens and an error [Cover Open] appears.
In this case, open the right cover of the take-up
device, and loosen the tension of the media.
• When the tension bar does not move upward even
if you press the [
][
] switch, stretch the slack
media by operating the switch.
(1)
Set the
↑↓
switch to the take-up direction
of the media, and turn the switch to
[MANUAL]. (The tension-bar is lifted.)
•
When the media is fed and the tension-bar
is not lifted, turn the ↑↓ switch to the other
side.
(2)
When the tension bar rises, tension is
applied to the media, so turn the switch to
[AUTO] to stop the tension bar.
(3)
Turn the
↑↓
switch to the take-up direction
of the media.
• The media between the take-up device and
carriage cannot be printed.
Содержание Tx500P-3200DS
Страница 1: ...MIMAKI ENGINEERING CO LTD URL http mimaki com Original instructions D203118 13 ...
Страница 30: ...1 16 Chapter 1 Before Use ...
Страница 126: ...4 30 Chapter 4 Maintenance ...
Страница 148: ...5 22 Chapter 5 Troubleshooting ...
Страница 154: ...Chapter 6 Appendix 6 6 ...
Страница 156: ... 2016 MIMAKI ENGINEERING CO LTD MM FW 2 00 ...


