00110230w Rev 10/20
13 of 24
TIP
The continue-arrow in the lower right
screen indicates more menu options
V
Counting Process
before continuing with this section.
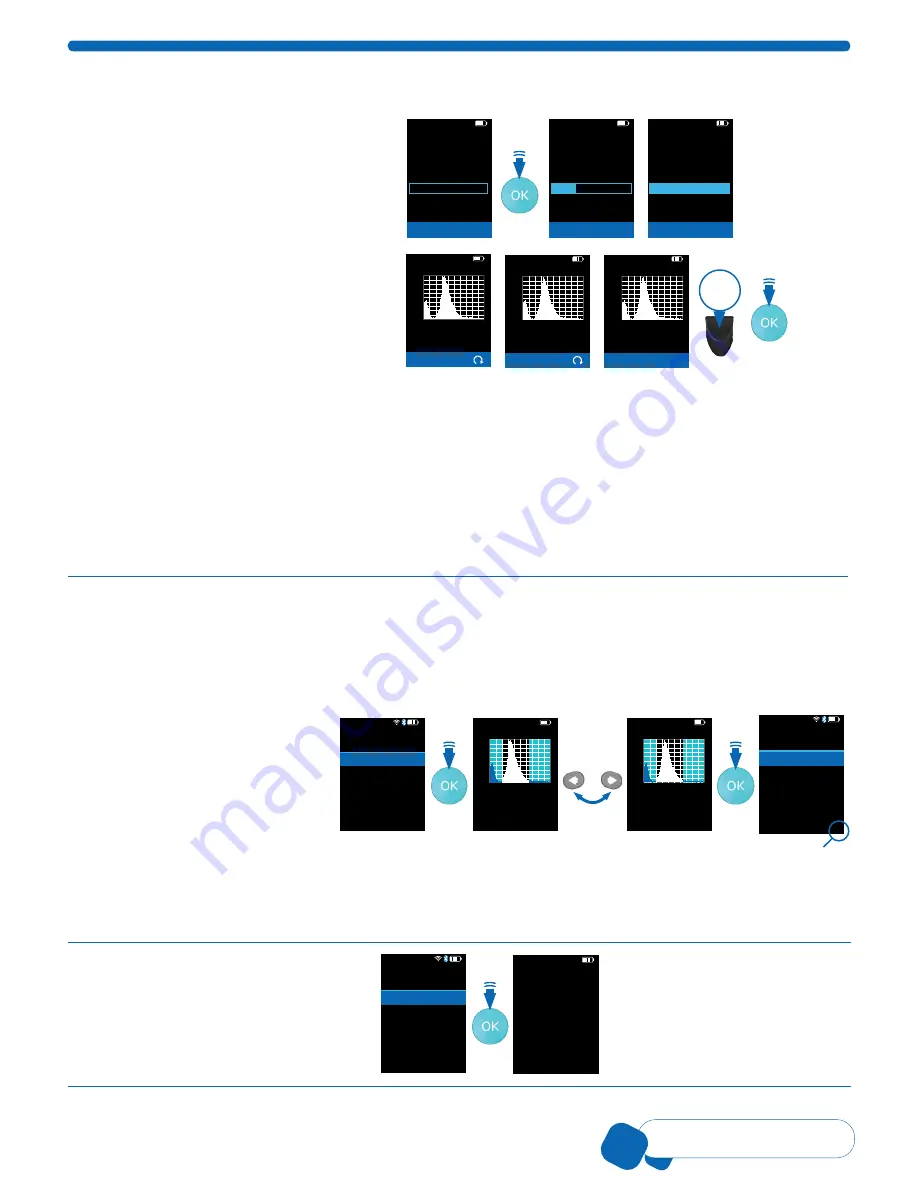
1. Immediately after mixing, submerge
the tip of the sensor into the middle of
the sample tube solution and press the
OK button to begin counting. Resting
the sensor against the tube bottom may
result in inaccurate results. It is normal
to hear the pump clicking.
01-Feb-18 14:16
Counting Process
Ready
Submerge
the Sensor . . .
then press OK
60µm Sensor
01-Feb-18 14:16
Counting Process
Loading Sample . . .
Keep the Sensor
submerged
60µm Sensor
01-Feb-18 14:16
Counting Process
Counting . . .
Lift the Sensor
out of the Sample
60µm Sensor
Note:
It is important to press the
OK button only after the sensor is
submerged, and keep it submerged as
long as the screen displays
Keep Sensor
submerged
. Do not to rest your thumb
on the EJECT button during sampling,
as it can cause inaccurate results.
01-Feb-18 14:16
Counting Process
Calculating . . .
Count
0
900
36
24 30
18
12
6
Dia . in µm
60µm Sensor
01-Feb-18 14:16
Counting Process
Saving . . .
Count
0
900
36
24 30
18
12
6
Dia . in µm
60µm Sensor
01-Feb-18 14:16
Counting Process
Eject Sensor to continue
Count
0
900
36
24 30
18
12
6
Dia . in µm
Count Complete
2. Scepter™ 3.0 will beep when sample loading is completed and the sensor can be lifted out of the solution.
Pause briefly, while Scepter™ 3.0 creates the histogram. Press the EJECT button to eject the sensor into
an appropriate cast off container when directed to do so on the screen. Discard used sensors appropriately.
Scepter™ 3.0 Sensors are not reuseable.
3. When the count is complete, the histogram is automatically created. The concentration and diameter
or volume will be displayed on the screen. Press the OK button to save (up to 999 histograms in the
Scepter™ 3.0 memory), and open the
Histogram Explorer .
Press the OK button to return to Home screen.
Changing the histogram gating method and other features are done in
Histogram Explorer
.
Note:
Files are automatically named:
ScepterID.Sample#.Date_time.png (or .csv)
.
Note
: When using Scepter™ 3.0 Test Beads, set gating to Auto for best results.
Histogram Explorer
Up to 999 histograms can be saved for future review. When the display screen shows Disk Full, the acquired
data can no longer be saved. To continue, histograms must either be deleted or uploaded to a computer.
Note:
The counting procedure can still be performed when the disc is full, but histograms and data will
not be saved. To delete histograms, refer to
.
Histogram Explorer can be found
two ways:
From the Main Menu
, select
Histograms, and the last saved or
acquired histogram will be shown.
Scroll to see the next histogram.
Press the OK button to select.
01-Feb-18 14:16
Menu
Home
<
Histograms
Settings
Help
01-Feb-18 14:16
Histogram
Test 3 03-Dec-17
Count
0
900
36
24 30
18
12
6
Dia . in µm
3 .342e5
15 .682
/mL
µm
Conc .
Dia .
01-Feb-18 14:16
Histogram
Test 2 29-Nov-17
Count
0
900
36
24 30
18
12
6
Dia . in µm
3 .254e5
15 .785
/mL
µm
Conc .
Dia .
01-Feb-18 14:16
Histogram
Back
Go to Home
Edit Analysis
Switch to Volume
Scale Y Axis Count
Export to USB
<
After Counting Process
, the histogram will be displayed.
Press the OK button to select. The Histogram Explorer Menu will appear. The blue “continue-arrow”
is in the lower right corner, indicating additional option(s) can be viewed by scrolling down.
Go to Home
Prompts to start new sample count.
01-Feb-18 14:16
Histogram
Back
Go to Home
Edit Analysis
Switch to Volume
Scale Y Axis Count
Export to USB
<
01-Feb-18 14:16
Home
Attach the Sensor
to begin . . .
EJECT
((BEEP
))
CONTINUE-ARROW


