background image

Your oven has a range of functions for
preparing a wide variety of recipes.

Depending on the function selected,
different heating elements are switched
on and sometimes combined with the
fan (see details in parentheses).

Conventional Heat

V

(Top heat/grill e bottom heat
element)

For baking and roasting traditional
recipes, preparing soufflés and cooking
at low temperatures.

If using an older recipe or cookbook,
set the oven temperature for
Conventional Heat 10 °C lower than that
recommended. This won't change
cooking times.

Bottom Heat

X

(Bottom heat element)

Use this function towards the end of
cooking to reheat or brown the base of
a cake, quiche or pizza.

Grill

Y

(Top heat/grill element)

For grilling and toasting bread, open
sandwiches etc. and browning baked
dishes.

Rapid Heat-up

S

(Top heat/grill e ring heat
e fan)

For pre-heating the oven compartment
quickly.
The oven function required must then
be selected once the desired
temperature has been reached.

Fan Plus

U

(Ring heat e fan)

This function is used for baking and
roasting on different levels at the same
time.
A lower temperature can be selected
than when using Conventional heat

V

,

as the fan distributes the heat to the
food straight away.

Fan Grill

\

(Top heat/grill e fan)

For grilling thicker cuts of meat
(e.g. roulades, chicken). Lower
temperatures can be used than when
using the Grill

Y

function, as the fan

distributes the heat to the food straight
away.

Defrost

P

(Fan)

For the gentle defrosting of frozen food.

Overview of functions

25

Содержание H6090B

Страница 1: ...nd installation instructions Oven To prevent the risk of accidents or damage to the appliance it is essential to read these instructions before it is installed and used for the first time M Nr 09 608 510 en AU NZ ...

Страница 2: ...exiClip telescopic runners 20 Fitting and removing the FlexiClip telescopic runners 20 Oven controls 23 Safety features 23 Cooling fans 23 Vented oven door 23 PerfectClean treated surfaces 23 Catalytic enamelled back wall 23 Using for the first time 24 Before using for the first time 24 Heating up the oven for the first time 24 Overview of functions 25 Operation 26 Tips on saving energy 26 Residua...

Страница 3: ...born soiling on the FlexiClip telescopic runners 49 Cleaning the catalytic enamelled back panel 49 Removing soiling caused by spices sugar and similar deposits 49 Removing oil and grease soiling from the catalytic enamelled panel 50 Removing the door 51 Dismantling the door 52 Fitting the door 55 Removing the shelf runners with FlexiClip telescopic runners 56 Removing the back panel 57 Lowering th...

Страница 4: ...ance please read these instructions carefully before using it for the first time They contain important notes on installation safety use and maintenance Miele cannot be held liable for non compliance with these instructions Keep these instructions in a safe place and ensure that new users are familiar with the contents Pass them on to any future owner Warning and Safety instructions 4 ...

Страница 5: ...ble for outdoor use The oven is intended only to cook bake roast grill defrost bottle dry fruit etc Any other usage is at the owner s risk This oven is not intended for use by persons including children with reduced physical sensory or mental capabilities or lack of experience and knowledge unless they are supervised whilst using it or have been given instruction concerning its use by a person res...

Страница 6: ...ognising the dangers of misuse Cleaning work may only be carried out by older children under the supervision of an adult Children should be supervised near the appliance Ensure that they do not play with the appliance Children may be able to wrap themselves in packing material or pull it over their heads with the risk of suffocation Keep children away from any packing material Warning and Safety i...

Страница 7: ...ren do not touch the appliance when it is being used External parts of the oven such as the door glass control panel and the vents become quite hot Danger of injury The maximum load capacity for the door is 15 kg Children can hurt themselves on an open door Ensure that children do not sit on or swing on the door Warning and Safety instructions 7 ...

Страница 8: ...there is any doubt the household wiring system should be inspected by a qualified electrician Before connecting the appliance to the mains supply make sure that the rating on the data plate voltage and frequency corresponds to that of the household supply This data must correspond in order to avoid risk of damage to the appliance Consult a qualified electrician if in any doubt Do not connect the a...

Страница 9: ...the connection cable supplied is damaged a special connection cable must installed by a Miele approved service technician see Electrical connection During installation maintenance and repair work the appliance must be disconnected from the mains electricity supply e g if the oven lighting is faulty see Problem solving guide It is only completely isolated from the electricity supply when the mains ...

Страница 10: ...g cool air must not be excessively heated by other heat sources e g fuel furnaces If the oven is installed behind a furniture door do not close the door while the oven is in operation Heat and moisture would build up behind a closed furniture door potentially causing damage to the oven the furniture unit and the flooring Wait until the oven has cooled down completely before closing the furniture d...

Страница 11: ... Due to the high temperatures radiated objects left near the appliance could catch fire Never leave the appliance unattended when cooking with oil or fats as these are a fire hazard if allowed to overheat Do not attempt to extinguish oil or fat fires with water Switch off the oven and smother the flames by keeping the oven door closed Make sure that you keep to the recommended grilling times when ...

Страница 12: ... Do not switch the oven off completely while food is inside it but select the lowest possible temperature for the oven function you are using This will ensure the fan will automatically continue to run Cover any food which is left in the oven to be kept hot as moisture in the food could lead to corrosion damage in the oven This also prevents the food from drying out Never cover the floor of the ov...

Страница 13: ... plastic containers that are indicated by the manufacturer as being suitable for use in ovens Do not use the appliance to heat up or bottle food in sealed jars and tins Pressure will build up inside them and they can explode causing damage to the appliance as well as the risk of injury and scalding Do not leave the oven door open unnecessarily as someone may trip over it or be injured by it The ov...

Страница 14: ...g purposes see Cleaning and care Ensure they are correctly fitted after cleaning and never operate the oven without the shelf runners fitted The catalytic enamelled back panel can be removed for cleaning purposes see Cleaning and care Ensure it is correctly fitted after cleaning and never operate the oven without the back panel fitted Warning and Safety instructions 14 Accessories Use only genuine...

Страница 15: ...e disposed of safely and kept out of the reach of babies and young children Danger of suffocation Disposing of your old appliance Electrical and electronic appliances often contain materials which if handled or disposed of incorrectly could be potentially hazardous to human health and to the environment They are however essential for the correct functioning of your appliance Therefore please do no...

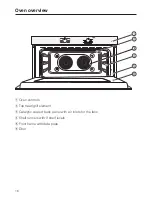
Страница 16: ...aOven controls bTop heat grill element cCatalytic coated back panel with air inlets for the fans dShelf runners with 3 shelf levels eFront frame with data plate fDoor Oven overview 16 ...

Страница 17: ...to select the temperatures for cooking programmes The temperature selector can be turned clockwise as far as it will go and then back again When the temperature selector is in the ß position it can be retracted by pushing it in Temperatures are printed on the temperature selector and on the control panel Temperature indicator light 6 The temperature indicator light 6 lights up whenever the oven is...

Страница 18: ...ery Included in delivery are the operating and installation instructions for using the oven functions screws for fixing the oven to the housing unit various accessories Standard and optional accessories Depending on model All ovens are supplied with shelf runners a universal tray and baking and roasting rack rack for short Depending on the model Miele ovens may be supplied with the accessories lis...

Страница 19: ...and rack with non tip safety notches Universal tray Rack The universal tray and rack are inserted into the oven between the two rails of a shelf runner Always position the rack as illustrated above The universal tray and rack have non tip safety notches which prevent them being pulled right out when they only need to be partially pulled out When pushing the rack back in always ensure that the safe...

Страница 20: ...elescopic runners is 15 kg Fitting and removing the FlexiClip telescopic runners Danger of burning Make sure the oven heating elements are switched off and the oven interior is cool The FlexiClip telescopic runners are fitted in between the two rails that make up a shelf level The telescopic runner with the Miele logo must be fitted on the right When fitting or removing the telescopic runners do n...

Страница 21: ...ing and roasting insert The grilling and roasting insert should be placed in the universal tray when grilling or roasting The juices from the food being cooked collect under the insert This prevents them from spitting and making the oven dirty The juices can then be used for making gravy and sauces The surface has been treated with PerfectClean enamel Pizza tray HBF 27 1 This circular pan is suita...

Страница 22: ... number of your Miele oven dish when ordering a lid Depth 22 cm Depth 35 cm HUB61 22 HUB62 22 HUB 61 35 HBD 60 22 HBD 60 35 Suitable for induction cooktops Oven dish HUB 61 35 cannot be used in conjunction with its lid because the total height of these two items exceeds the height of the oven cavity Catalytic enamelled liners Back wall Order this spare part if the catalytic enamel has become ineff...

Страница 23: ...ved and disassembled for cleaning purposes See Cleaning and care PerfectClean treated surfaces Surfaces treated with PerfectClean enamel are characterised by their exceptional anti stick properties and ease of cleaning Food can be taken off easily and soiling from baking and roasting is simple to remove You can cut up food on surfaces treated with PerfectClean enamel However do not use ceramic kni...

Страница 24: ...n and clean them see Cleaning and care Before heating up the oven it is a good idea to wipe the interior out with a damp cloth first This way any dust or bits of packaging that may have accumulated in the oven compartment during storage and unpacking will be removed Select Fan Plus U The oven heating lighting and cooling fan will switch on Select the maximum temperature 250 C Heat up the oven for ...

Страница 25: ...a Grill Y Top heat grill element For grilling and toasting bread open sandwiches etc and browning baked dishes Rapid Heat up S Top heat grill element ring heat element fan For pre heating the oven compartment quickly The oven function required must then be selected once the desired temperature has been reached Fan Plus U Ring heat element fan This function is used for baking and roasting on differ...

Страница 26: ...you can turn the temperature selector down to ß about 5 minutes before the end of cooking The heating elements will switch off and the residual heat in the oven will be sufficient to finish cooking the food Using the oven Place the food in the oven if the cooking programme does not require pre heating Select the required oven function with the function selector The oven lighting and the fan will s...

Страница 27: ...f sirloin joints and fillets Conventional Heat V cakes or biscuits with a short baking time up to 30 minutes delicate mixtures e g sponges dark bread doughs beef sirloin joints and fillets Rapid Heat up Do not use Rapid Heat up S to pre heat the oven when baking pizzas or delicate mixtures e g small baked goods with a high sugar content pizza choux pastries sponges They will brown too quickly Sele...

Страница 28: ...ome cases cakes might not cook properly Always place baking tins on the rack Position rectangular tins with the longer side across the width of the rack for optimum heat distribution and even baking results When baking cakes with fresh fruit toppings and deep sponge cakes place the tin on the universal tray to catch any spillages and keep the oven cleaner Baking paper greasing All Miele accessorie...

Страница 29: ...oden skewer into the centre It is ready if the skewer comes out clean without dough or crumbs sticking to it Shelf levels The shelf level on which you place your food for baking depends on the oven function and number of trays being used Fan Plus U 1 tray Shelf level 2 2 trays Shelf levels 1 3 The univsersal tray should be placed underneath the baking tray if you are using a universal tray and a b...

Страница 30: ...treusel cake Fresh fruit cake Gugelhupf Stollen White bread Dark rye bread 2 3 Pizza 3 4 Onion tart 3 4 Apple turnovers 3 4 150 170 150 170 140 160 150 170 160 180 170 190 220 240 150 170 150 170 1 1 1 1 1 1 1 1 1 3 50 60 55 65 45 65 55 65 45 55 50 60 10 20 35 45 25 30 Choux pastry Eclairs 3 170 190 1 3 30 50 Puff pastry 3 4 170 190 1 25 35 Meringues Macarons 3 100 140 1 3 25 60 The data for the r...

Страница 31: ...4 170 190 160 180 160 180 160 180 160 180 160 180 1 2 2 1 1 1 15 20 45 55 15 25 80 95 60 80 50 70 Yeast mixtures Streusel cake Fresh fruit cake Gugelhupf Stollen White bread Dark rye bread 2 3 Pizza 3 4 Onion tart 3 4 Apple turnovers 3 4 160 180 170 190 140 160 150 170 160 180 180 200 220 240 180 200 160 180 2 2 1 2 1 1 2 2 2 50 60 55 65 45 65 55 65 50 60 50 60 25 40 25 30 Choux pastry Eclairs 3 1...

Страница 32: ...sting Notes on the roasting chart Temperature 6 As a general rule select the lower temperature given in the chart If higher temperatures are used the meat will brown on the outside but will not be properly cooked through When cooking with Fan Plus U select a temperature 20 C lower than when using Conventional Heat V Select a temperature of approx 10 C lower than quoted in the roasting chart for me...

Страница 33: ...g on the height of the food Useful tips Browning Browning only occurs towards the end of the roasting time If cooking with a roasting dish remove the lid about halfway through the roasting time if a more intensive browning result is desired Standing time At the end of the programme take the roast out of the oven wrap in aluminium foil and leave to stand for about 10 minutes This helps retain juice...

Страница 34: ...g approx 1 kg 160 180 70 120 180 200 70 120 Gammon joint approx 1 kg 170 190 60 70 200 220 60 70 Meat loaf 3 approx 1 kg 160 180 80 90 170 190 80 90 Veal approx 1 kg 170 190 70 120 190 210 70 120 Leg of lamb approx 2 kg 160 180 90 120 180 200 90 120 Rack of lamb3 170 190 50 60 190 210 50 60 Poultry approx 1 kg 160 180 65 75 180 200 65 75 Poultry approx 2 kg 160 180 100 120 180 200 90 110 Poultry a...

Страница 35: ...rified butter Do not cover meat during cooking The cooking duration is approx 2 4 hours and depends on the weight and size of the meat as well as the desired degree of doneness and browning Low temperature cooking procedure Use the universal tray with the rack placed on top of it Do not use the Rapid Heat up S function to pre heat the oven Place the rack together with the universal tray on shelf l...

Страница 36: ...eal temperature to be eaten straight away Serve on pre heated plates with very hot sauce or gravy to prevent it cooling down too quickly Cooking durations Core temperatures Meat Duration min Core tempe ratur C Sirloin joint Rare 60 90 55 60 Medium 120 150 65 70 Well done 180 240 70 75 Pork fillet 120 150 65 80 Gammon 150 210 75 80 Saddle of veal 180 210 65 75 Saddle of lamb 90 120 65 75 Boned Use ...

Страница 37: ... The top heat grill element is ready for use when it glows red Fan Grill For grilling thicker items e g rolled meat poultry pieces The top heat grill element and fan are switched on alternately Grilling dishes Use the universal tray with the rack or grilling and roasting insert if available on top The juices from the food being cooked collect under the insert This prevents them from spitting and m...

Страница 38: ...urn the food halfway through the cooking time Testing to see if cooked One way of finding out how far through a piece of meat has been cooked is to press down on it with a spoon Rare If there is very little resistance to the pressure of the spoon it will still be red on the inside Medium If there is some resistance the inside will be pink Well done If there is great resistance it is cooked through...

Страница 39: ...ttle lemon juice over the fish Grilling Place the rack or the roasting and grilling insert if available in the universal tray Place the food on top Select the required oven function and the temperature Pre heat the top heat grill element for approx 5 minutes with the door closed Danger of burning Use oven gloves when placing food in the oven turning or removing it and when adjusting oven shelves e...

Страница 40: ...usages 180 2 3 15 20 Lean scotch fillet steak 220 3 6 12 Chicken breast fillet plain or a dry marinade 200 3 14 18 Chicken breast fillet with a wet marinade 200 3 14 18 Whole butterflied chicken 200 1 30 35 Thin white fish fillets in universal tray 220 3 6 10 Thick fish fillets cutlets or steaks on grilling and roasting insert placed in the universal tray 200 3 10 15 Oily fish on grilling and roas...

Страница 41: ...and bacon Pre heat grill for at least 15 minutes Select the appropriate shelf level for the thickness of the food Thinner foods can be positioned on shelf 3 while thicker foods should be grilled on shelf 2 Grill until food is golden brown and crispy Door must be closed for grilling Grilling 41 ...

Страница 42: ...on the rack over the universal tray to catch the defrosted liquid so that the meat is not lying in this liquid Meat and poultry need to be fully defrosted before cooking Fish on the other hand can be partially defrosted before cooking Defrost so that the surface is sufficiently soft to take herbs and seasoning Defrosting times The time needed for defrosting depends on the type and weight of the fo...

Страница 43: ...y rise in the jars Reduce the temperature at the right time to avoid the produce boiling over Fruit Cucumbers Turn the function selector to Lighting T as soon as bubbles are visible in the jars Then leave the jars in the oven for a further 25 30 minutes Vegetables Reduce the temperature to 100 C as soon as bubbles are visible in the jars Bottling duration min Asparagus carrots 60 90 Peas beans 90 ...

Страница 44: ...tray Select Fan Plus U or Conventional Heat V Select a temperature of 80 100 C Place the universal tray on shelf level 2 If you are using Fan Plus U you can dry on shelf levels 1 3 at the same time Food Drying time Fruit 2 8 hours Vegetables 3 8 hours Herbs 50 60 minutes Use Conventional Heat V for drying herbs Reduce the temperature if condensation begins to form in the oven Danger of burning Wea...

Страница 45: ... items of frozen food such as oven chips can be cooked on the baking tray or universal tray Place baking paper on the tray so that they cook gently Use the lowest temperature recommended on the manufacturer s packaging Turn several times during cooking Preparation Eating food which has been cooked correctly is important for preventing food poisoning or other ailments Only bake cakes pizza chips et...

Страница 46: ...use a breakage in certain circumstances Unsuitable cleaning agents To avoid damaging the surfaces of your appliance do not use cleaning agents containing soda ammonia acids or chlorides cleaning agents containing descaling agents on the oven front abrasive cleaning agents e g powder cleaners and cream cleaners solvent based cleaning agents stainless steel cleaning agents dishwasher cleaner glass c...

Страница 47: ...lytic back panel for instructions on how to keep the back panel clean It is best to remove normal soiling im mediately using a clean sponge and a solution of hot water and washing up liquid or with a clean damp microfibre cloth After cleaning make sure all residual cleaning agents are thoroughly removed with clean water This is particularly important when cleaning surfaces treated with PerfectClea...

Страница 48: ...alytic panels before using oven spray The chemicals used in oven sprays will damage catalytic enamel rendering it ineffective Very stubborn soiling on PerfectClean treated enamel can be cleaned using the Original Miele oven cleaner It must be applied to cold surfaces in accordance with instructions on the packaging Non Miele oven spray must only be used in a cold oven and for no longer than a maxi...

Страница 49: ... been cleaned This will not affect the functioning of the runners in any way Cleaning the catalytic enamelled back panel Soiling from oil and fat is burnt off catalytic enamel when very high temperatures are used in the oven The higher the temperature the more effective the process Exposure to scouring agents abrasive brushes or sponges and oven sprays can cause catalytic enamel to lose its self c...

Страница 50: ...r The length of time required will depend on the level of soiling If the catalytic coating is very heavily soiled with oil and grease a film can form on the surfaces of the oven interior during the cleaning process Danger of burning Allow the oven to cool down before cleaning by hand Clean the inside of the door and the oven interior with a clean sponge and a solution of hot water and washing up l...

Страница 51: ...ning them as far as they will go Do not attempt to take the door off the retainers when it is in the horizontal position as the retainers will spring back against the oven Do not use the handle to pull the door off the retainers as the handle could break Raise the door up till it rests open Holding the door securely at both sides and lift it upwards off the retainers Make sure you take it off stra...

Страница 52: ...rapers Please also read the general notes on cleaning the oven front before cleaning the glass panes Oven spray will damage the aluminium trims inside the door These should only be cleaned using hot water and washing up liquid applied with a clean sponge or a clean damp microfibre cloth Be especially vigilant after dismantling the door that the glass panes do not break Danger of injury Always remo...

Страница 53: ...nd pull it out Remove the seal from the pane Clean the door panes and other individual parts with a clean sponge and a solution of hot water and washing up liquid or a clean damp microfibre cloth Dry all parts with a soft cloth Then reassemble the door carefully Secure the seal to the middle pane Cleaning and care 53 ...

Страница 54: ...r pane with the matt printed side facing downwards into the plastic strip and place it between the retainers Flip the two glass pane retainers inwards to close them The door is now reassembled and is ready to fit back on the oven Cleaning and care 54 ...

Страница 55: ... the door goes back on straight Open the door fully It is essential that the locking clamps lock securely when the door is refitted after cleaning Otherwise the door could work loose from the retainers and be damaged Flip both locking clamps back up as far as they will go into a horizontal position Cleaning and care 55 ...

Страница 56: ...e FlexiClip telescopic runners separately beforehand please follow the instructions in Features Fitting and removing the FlexiClip telescopic runners Danger of burning Make sure the oven heating elements are switched off and the oven interior is cool Pull the runners out of the holder 1 at the front of the oven and then pull them out of the oven 2 Refit in the reverse order Ensure that all parts a...

Страница 57: ...k panel and take it out Clean the back panel see Cleaning and Care Cleaning the catalytic back panel Refit in the reverse order Carefully refit the back panel The air inlets must appear as they do in Oven overview Reconnect the oven to the electricity supply Lowering the top heat grill element Danger of burning Make sure the oven heating elements are switched off and the oven interior is cool Remo...

Страница 58: ...n the casing of the oven yourself Problem Possible cause and remedy The oven does not heat up You have only selected an oven function or a temperature Select both a function and a temperature There is no power to the oven Check whether the mains fuse has tripped If it has contact a qualified electrician or Miele A noise can be heard after a cooking process The cooling fan is switched on When the t...

Страница 59: ... unevenness If the unevenness is pronounced check whether the correct temperature and shelf level have been selected The material or colour of the baking tin is not suitable for the oven function With Conventional Heat V light coloured shiny tins are less suitable Use matt dark coloured tins FlexiClip telescopic runners do not push in or pull out smoothly The bearings in the FlexiClip telescopic r...

Страница 60: ...nd withdraw the plug from the socket or disconnect the mains fuse or remove the screw out fuse in countries where this is applicable Turn the lamp cover a quarter turn anti clockwise to release it and then pull it together with its seal downwards to take it out Replace it with a new halogen lamp Osram 66725 AM A 230 V 25 W G9 Refit the lamp cover together with its seal and turn clockwise to secure...

Страница 61: ...e the model and serial number of your appliance when contacting Miele This information is given on the data plate visible on the front frame of the oven with the door fully open Warranty This appliance has a manufacturer s warranty period of 2 years For further information please refer to your warranty booklet After sales service and warranty 61 ...

Страница 62: ...liance is hard wired depending on country an additional means of disconnection must be provided for all poles When switched off there must be an all pole contact gap of 3 mm in the isolator switch including switch fuses and relays according to EN 60335 Connection data The required connection data can be found on the data plate located on the oven frame visible when the door is open Please ensure t...

Страница 63: ...to a single phase 230 V 50 Hz supply with a 3 core cable The wires in the mains lead are coloured in accordance with the following code Green yellow earth Blue neutral Brown live WARNING THIS APPLIANCE MUST BE EARTHED Electrical connection 63 ...

Страница 64: ... in a base unit HAL 90 cm trim available as an optional accessory is only required when building the oven into a base unit Fix the HAL 90 cm trim into the unit cut out under the worktop see lower section of diagram Ovens with glass front Ovens with metal front Building in diagrams 64 ...

Страница 65: ...Installation in a tall unit Ovens with glass front Ovens with metal front Building in diagrams 65 ...

Страница 66: ...Front dimensions Dimensions are given in mm A H6090B 42 mm B Ovens with glass front 2 2 mm Ovens with metal front 1 2 mm Building in diagrams 66 ...

Страница 67: ... power supply to the oven isolator switch Installing the oven Connect the mains cable from the oven to the isolator Lifting the oven by the door handle can damage the door It is advisable to remove the door before installing the appliance see Cleaning and Care Removing the door and remove accessories from the oven cavity This will make it easier to install in its niche and you will not be tempted ...

Страница 68: ...68 ...

Страница 69: ...69 ...

Страница 70: ...70 ...

Страница 71: ...71 ...

Страница 72: ...M Nr 09 608 510 0 en AU NZ H6090B 4 ...

Отзывы: