background image

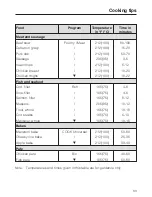
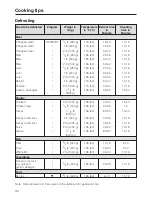
Food

Program

Temperature

in °F (°C)

Time in

minutes

Meat and sausage

Beef stew

Poultry / Meat

212 (100)

80-100

Cutlets in gravy

|

212 (100)

15-20

Pork ribs

|

212 (100)

50-70

Sausage

|

205 (95)

3-5

Veal chops

|

212 (100)

6-12

Chicken breast

|

212 (100)

10-20

Chicken thighs

e

212 (100)

18-22

Fish and seafood

Cod, fillet

Fish

165 (75)

4-8

Sole, fillet

|

165 (75)

4-6

Salmon, fillet

|

165 (75)

8-12

Mussels

|

205 (95)

10-12

Trout, whole

|

165 (75)

10-18

Cod steaks

|

165 (75)

6-10

Mackerel, whole

e

165 (75)

10-15

Bakes

Macaroni bake

COOK Universal

212 (100)

50-60

Cheesy rice bake

|

212 (100)

25-35

Apple bake

e

212 (100)

30-40

Pate

Chicken pate

Bio

165 (75)

40-60

Fish pate

e

165 (75)

60-80

Note:

Temperatures and times given in this table are for guidance only.

Cooking tips

33

Содержание DG 155

Страница 1: ...Operating instructions Steam oven DG 155 DG 155 1 DG 155 2 DG 155 3 To prevent accidents and machine damage read these instructions before installation or use UV M Nr 05 229 041 ...

Страница 2: ...ng the oven on 19 Selecting a program 19 Program table 20 Adjusting the temperature 21 Changing the preset temperature permanently 22 Setting the cooking time 23 Starting the cooking process 24 Changing a program 26 At the end of cooking 27 Insufficient water water container not in place 28 Overheating protection 29 Safety lock 30 Cooking tips Suitable containers 31 Steaming 32 Defrosting 36 Meal ...

Страница 3: ...nd cooking containers 43 Removable door and drip plate 44 Cooking compartment 45 Runners 45 Connector 46 O Ring 47 Descaling lock 48 Descaling 49 Frequently asked questions Electrical connection After sales service Data Plate 54 Help protect our environment Disposal of packing materials 55 Disposal of an old appliance 55 Contents 3 ...

Страница 4: ... and may void the warranty Before installation or service disconnect the power supply to the work area by removing the fuse tripping the circuit breaker or switching off the power main Ensure that the power is not restored to the appliance during maintenance or repair work Be certain your appliance is properly installed and grounded by a qualified technician To guarantee the electrical safety of t...

Страница 5: ... purposes This appliance must only be operated after it has been correctly installed in cabinetry This is necessary to ensure that all electrical components are shielded Only use the appliance for its intended purpose Any other use is at the owner s risk and could be dangerous Scalding and Burning hazards When in use the oven particularly the inside of the door as well as the outer side by the ven...

Страница 6: ... of children Danger of suffocation Before discarding an old appliance disconnect it from the electrical supply cut off the power cord and remove any doors to prevent hazards Appliance damage Do not heat unopened containers of food in the oven Pressure will build up causing an explosion that will damage the cooking compartment To prevent condensation which could corrode the appliance do not leave c...

Страница 7: ...s In the event of damage or a defect turn off the appliance immediately After it has been turned off isolate it from the main power supply and contact the Miele Technical Service Department Ensure that the power is not restored to the appliance during maintenance or repair work While the appliance is under warranty repairs should only be performed by a Miele authorized service technician Otherwise...

Страница 8: ...or seal cSide runners with 4 levels dTemperature sensor eAir Outlet fVent gSteam inlet hWater container contact iFeed tube for water return jWater container connector kWater Valve lDrip channel Guide to the steam oven 8 ...

Страница 9: ...Program selector nProgram display oDescale k pInsufficient water p qTemperature z and Timer x display Buttons with light bars r Decrease Increase z x Temperature Cooking time sStop and Start Guide to the steam oven 9 ...

Страница 10: ...also be reordered if necessary Drip tray 3 5 pints 1 7 l For catching excess liquids Rack To place cooking containers on 2 cooking containers perforated 3 2 pints 1 5 l For steaming Side runners Cookbook Water container Accessories 10 ...

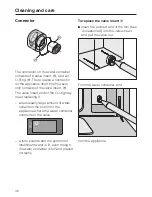
Страница 11: ...leaning and care O Ring for more details Connecting valve with Valve insert t white creates a bridge between the water container j and the appliance k O Ring u black These two parts along with the tool see Accessories optional can be ordered individually or together as a repair kit Accessories 11 ...

Страница 12: ... Capacity in pt l Height in inches cm DGG 2 solid 4 2 0 2 3 8 6 DGG 3 solid 6 5 3 1 2 3 8 6 DGGL 4 perforated 6 5 3 1 2 3 8 6 Tool For removing and inserting the valve insert This part can be ordered individually or together with the connecting valve parts see Accessories connecting valve as a repair kit Accessories 12 ...

Страница 13: ...program selector is at 0 Press and hold the button while turning the program selector to DESCALE k 4 1 will appear in the display The 1 represents the program number The 4 represents the water hardness level Press or to select the level III 3 II 2 or I 1 corresponding to your water hardness The selected water hardness level will be stored in memory as soon as the program selector is turned to anot...

Страница 14: ...selector The following will be displayed Press Start The time will count down from 33 minutes as shown in the display Do not turn the program selector during this period or the descaling program will have to be restarted A tone will sound when there are 8 minutes remaining and the following will alternate in the display Empty the water container refill it with another quart 1 l of fresh water and ...

Страница 15: ...he water container then open the door Hot steam will escape when the door is opened Remove empty and thoroughly dry the water container Wipe out the oven interior with an absorbent cloth Remember to wipe down the vent and the drip channel Leave the door open until the moisture in the cooking compartment has evaporated Before using for the first time 15 ...

Страница 16: ...SCALE k Release the button 4 1 will appear in the display Press the z g repeatedly until F9 appears in the display Press the button C9 will appear in the display Turn the program selector to 0 The conversion is now stored If you wish to revert back to F follow the previous instructions until C9 appears in the display Press the button F9 will appear in the display Turn the program selector to 0 Bef...

Страница 17: ...own in 10 F increments Therefore the temperature shown in F does not always correspond exactly with the temperature specified in C i e the actual measurable temperature This discrepancy in temperature is nominal and will not cause a significant difference in cooking time or results Temperature in C Corresponding Temperature in F 100 boil 95 205 90 195 85 185 80 175 75 165 70 155 65 145 60 135 55 1...

Страница 18: ... the 1 0 l and 1 25 l markings Never exceed the max level marker 1 quart 1 l of water is enough for a cooking time of approximately 20 minutes 1 1 2 quarts 1 25 l for a cooking time of approximately 60 minutes Insert the drip tray to catch condensed water Push the water container into the appliance until it connects Operation 18 ...

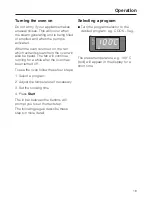
Страница 19: ...running for a while after the oven has been turned off To use the oven follow these four steps 1 Select a program 2 Adjust the temperature if necessary 3 Set the cooking time 4 Press Start The lit bar between the buttons will prompt you to set the next step The following pages describe these steps in more detail Selecting a program Turn the program selector to the desired program e g COOK Veg The ...

Страница 20: ...95 212 90 100 For all types of vegetables COOK Poultry Meat 212 100 195 212 90 100 For all types of meat and poultry suitable for steaming COOK Fish 165 75 155 205 70 95 For all types of fish COOK Bio 165 75 155 175 70 80 For food requiring very gentle cooking DEFROST 125 55 115 140 50 60 For defrosting meat fish fruit etc REHEAT 205 95 175 212 80 100 For reheating food DESCALE For descaling Opera...

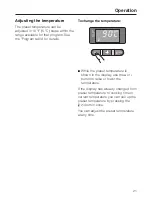
Страница 21: ...To change the temperature While the preset temperature is shown in the display use the or button to raise or lower the temperature If the display has already changed from preset temperature to cooking time or current temperature you can call up the preset temperature by pressing the z g button once You can adjust the preset temperature at any time Operation 21 ...

Страница 22: ...rogram selector to DESCALE k 4 1 will appear in the display Press the z g button 1002 will appear in the display 2112 will appear if the temperature is set to F The flashing figures in the first three positions show the temperature 100 C in the above example The figure in the fourth position number 2 in the example shows the program number see table To change the preset temperature for this progra...

Страница 23: ...een set The cooking time can be changed as long as it appears in the display i e before the beginning of cooking as well as during cooking Press the z g button to switch between the temperature and cooking time display To achieve favorable results using the suggested cook times do not cook more than 6 8 servings at a time Regard the recommendations about the cooking containers see Cooking tips Sui...

Страница 24: ...Starting the cooking process Press Start The two light bars will go out and the display will change to show the current temperature of the cooking compartment and the temperature symbol z Operation 24 ...

Страница 25: ... soon as the set temperature has been reached the display will change to show the cooking time and the time will begin to count down This is indicated by the colon flashing between the figures Please note that if the cooking temperature selected is 185 F 85 C or higher and the cooking time is longer than 30 minutes the steam generating unit will turn off 3 minutes before the end of cooking to make...

Страница 26: ...f you have only interrupted the program briefly you will see the time remaining continue to count down after the door has been closed If the program has been interrupted for a longer period the oven will have cooled and will need to heat up again In this case the display will show the current oven temperature rising until it reaches the set temperature When the set temperature has been reached the...

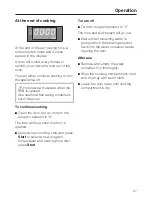
Страница 27: ...o not turn the program selector to 0 The tone will stop once the door is opened Select a new cooking time and press Start or select a new program temperature and cooking time then press Start To turn off Turn the program selector to 0 The tone and all displays will go out Wait until all remaining water is pumped from the steam generator back into the water container before opening the door After u...

Страница 28: ...dd more water if needed Push the water container fully into position and close the door Press Start Cooking will now continue as normal After a program has ended with the program selector at 0 If there is water in the steam generating unit and the container is not in place a tone will sound and F1 will appear in the display Reposition the water container in the appliance and close the door Press S...

Страница 29: ...omatically The oven has shut off if during operation the display only shows the temperature decreasing after starting a new program the oven temperature fails to rise To reset the oven Turn the program selector to 0 and allow the appliance to cool Restart the program If the appliance still does not heat contact the Miele Technical Service Department for assistance Operation 29 ...

Страница 30: ...SCALE k Press the button for at least 5 seconds The symbol a for the safety lock will appear in the display Turn the program selector back to 0 The appliance cannot be used again until the safety lock is deactivated To deactivate the safety lock Select DESCALE k Press the button for at least 5 seconds until the a symbol goes out Operation 30 ...

Страница 31: ... used for larger items It is best to space food as much as possible so steam can surround each piece Dense dishes such as casseroles or food such as peas or asparagus which have little space between them will take longer to cook because the steam has less space to work in It is best to use 2 or 3 shallow containers for these foods You can also use your own containers and dishes However please note...

Страница 32: ...bbage shredded 212 100 4 10 Potatoes unpeeled 212 100 15 20 Potatoes peeled 212 100 10 15 Carrots sliced 212 100 3 6 Carrots whole 212 100 8 15 Brussels sprouts 212 100 8 15 Celery sliced 212 100 8 10 Spinach 212 100 6 8 Asparagus 212 100 7 9 White cabbage chopped 212 100 15 25 Savoy cabbage chopped 212 100 10 15 Stuffed peppers e 195 90 40 50 Tomatoes Bio 165 75 2 5 Note Temperatures and times in...

Страница 33: ...00 18 22 Fish and seafood Cod fillet Fish 165 75 4 8 Sole fillet 165 75 4 6 Salmon fillet 165 75 8 12 Mussels 205 95 10 12 Trout whole 165 75 10 18 Cod steaks 165 75 6 10 Mackerel whole e 165 75 10 15 Bakes Macaroni bake COOK Universal 212 100 50 60 Cheesy rice bake 212 100 25 35 Apple bake e 212 100 30 40 Pate Chicken pate Bio 165 75 40 60 Fish pate e 165 75 60 80 Note Temperatures and times give...

Страница 34: ... small Bio 165 75 12 18 Potato dumplings large 165 75 20 40 Bread dumplings e 165 75 20 22 Eggs Boiled COOK Universal 212 100 4 10 Casserole e 212 100 12 15 Fruit Apples COOK Universal 212 100 3 6 Apple slices 212 100 2 5 Pear halves 212 100 3 5 Peaches 212 100 2 4 Dried fruit e 212 100 5 7 Desserts Creamy desserts in portions COOK Universal 195 90 30 40 Soufflé in portions 195 90 15 20 Steam pudd...

Страница 35: ... should cook on only one level Fish can be cooked on more than one level at 195 F 90 C However when cooking at this temperature please note that cooking times will be reduced by several minutes To avoid any transfer of tastes caused by moisture dripping from above solid containers should be used under any perforated containers When cooking with fluids fill solid containers to the lower rim Food li...

Страница 36: ...on 2 lb 1000 g 115 50 40 50 10 15 Cutlets sausages 1 3 4 lb 800 g 135 60 25 35 15 20 Poultry Chicken 2 lb 1000 g 135 60 40 50 15 20 Chicken legs 1 4 lb 150 g 135 60 20 25 15 Turkey 4 1 2 lb 2000 g 135 60 80 90 15 20 Turkey drumsticks 1 lb 500 g 135 60 40 45 10 15 Turkey drumsticks 2 lb 1000 g 135 60 45 55 10 15 Duck 2 lb 1000 g 135 60 40 50 10 15 Goose 4 1 2 lb 2000 g 135 60 80 90 10 15 Fish Fille...

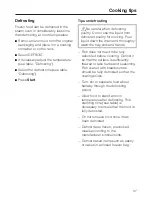
Страница 37: ...nd thoroughly wash the tray sink and hands Fish does not need to be fully defrosted before cooking Defrost it so that the surface is sufficiently thawed to take herbs and seasoning Fish coated with breadcrumbs should be fully defrosted so that the coating sticks Turn stir or separate food about halfway through the defrosting period Allow food to stand at room temperature after defrosting This stan...

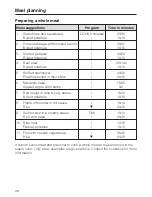
Страница 38: ...r skins 40 50 20 40 6 Macaroni bake Stewed apple with raisins 75 85 3 5 7 Red mullet in wine veg sauce Boiled potatoes 15 20 10 15 8 Fillets of flounder in dill sauce Rice e 10 14 20 25 9 Stuffed sole in a creamy sauce Rice with peas Fish 10 12 20 25 10 Blue trout Parsley potatoes 12 18 10 15 11 Fish with oriental vegetables Rice e 35 45 20 25 It is both economical and practical to cook a whole me...

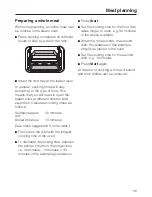
Страница 39: ...iled potatoes 10 minutes See menu suggestion 3 in the table First place the dish with the longest cooking time in the oven To calculate its cooking time subtract the shorter time from the longer time i e 40 minutes 10 minutes 30 minutes in the example given above Press Start Set the cooking time for the food that takes longer to cook e g 30 minutes in the above example When the tone sounds the sec...

Страница 40: ... 90 50 65 Vegetables Beans Peas Carrots 195 90 195 90 195 90 120 120 90 The given times are for 1 quart 1 l glasses 1 pint 0 5 l glasses times reduced by 15 min 1 cup 0 25 l glasses times reduced by 20 min For detailed information on canning see the supplied cookbook Insert the drip tray at the lowest runner and place the rack above it Put the prepared jars all the same size on the rack ensuring t...

Страница 41: ...d to blanch vegetables to prepare them for freezing Put the prepared vegetables cleaned washed chopped etc into a perforated cooking container Place the container on the rack in the oven and insert the drip tray at the lowest level Blanch using COOK Universal at a temperature of 195 F 90 C Set a time of 1 2 minutes Press Start Once blanched plunge the vegetables into cold water to cool quickly You...

Страница 42: ... clean and thoroughly rinse the bottles Space the individual parts out on the rack ensuring that they do not touch one another This allows the hot steam to reach all sides Select COOK Universal The recommended temperature of 212 F 100 C is suitable for disinfection Set a time of 15 minutes Allow to dry naturally and use as soon as possible after disinfection All parts of the bottles must be comple...

Страница 43: ...and a solution of warm water and non abrasive liquid detergent Dry with a soft cloth Stainless steel Stainless steel surfaces can be cleaned using a non abrasive stainless steel cleaner To help prevent soiling a conditioner for stainless steel can also be used Apply sparingly with even pressure Stainless steel colored controls Clean the buttons and knobs with a sponge and a solution of warm water ...

Страница 44: ...clamps are touching the frame of the oven interior While holding the door with both hands lift the door until the hinges disengage Remove the door If necessary the drip plate w can be removed for cleaning After cleaning dry it and slide back into the oven with the cut out to the rear To refit the door Place the door on the hinges and slide down Open the door fully and push the clamps back down Clo...

Страница 45: ...d warm water Wipe the interior with clean water and dry with a soft cloth Runners The side runners can be removed before cleaning the cooking compartment Pull on the knobs to release the runners a Then pull each runner out of the oven b The runners can be cleaned with water and liquid detergent or in a dishwasher To refit the runners reverse the above steps Insert them into the rear of the oven an...

Страница 46: ...ng if an unusually large amount of water collects in the bottom of the appliance where the water container connects to the valve a tone sounds and the symbol for insufficient water is lit even though the water container is full and placed correctly To replace the valve insert t Insert the pointed end of the tool see Accessories into the valve insert and pull the valve out From the water container ...

Страница 47: ...appens the black O Ring u should be lubricated with a very small amount of the silicone grease supplied Leave the O Ring on the connector while doing do Take care when using silicone grease Remove any silicone grease from your skin by washing with soap and water If silicone gets into the eyes flush with plenty of clean water If silicone is swallowed seek medical attention When lubricating the O Ri...

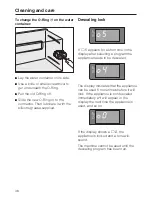
Страница 48: ...If j 5 appears for a short time in the display after selecting a program the appliance needs to be descaled The display indicates that the appliance can be used 5 more times before it will lock If the appliance is not descaled immediately a 4 will appear in the display the next time the appliance is used and so on If the display shows a j 0 the appliance is locked and a tone will sound The machine...

Страница 49: ...til it engages Turn the program selector to DESCALE k A small j will appear in the display next to the symbol for descaling k and a program time of 33 minutes will also appear At the same time the light bar between the Stop and Start buttons will illuminate Press Start The descaling program can only be canceled during the 1st minute after pressing the Start button A new program cannot be selected ...

Страница 50: ...ng the door Take the water container out of the appliance empty and dry with a soft cloth Wipe out the oven interior with an absorbent cloth Remember to wipe down the vent and the drip channel Leave the door open until the moisture in the cooking compartment has evaporated and the interior is dry If there is a power failure during the descaling process 33 minutes will show in the display once powe...

Страница 51: ...bout 1 minute by switching off the power main or tripping the circuit breaker Reconnect the power and turn the appliance on If it still does not heat contact the Miele Technical Service Department a great deal of steam comes out of the appliance while it is in use It is possible that the appliance was not thoroughly rinsed during the Descaling program before it was used for the first time Refer to...

Страница 52: ...onnector section for details k j 0 The appliance has locked and requires descaling see Descaling the oven cavity temperature and the temperature symbol are flashing in the display There was a power failure during a program Press Start after turning the appliance off program selector at the 0 position a continual tone is heard and F1 appears in the display Check whether the water container is in th...

Страница 53: ...minal leads 1 black wire L1 1 red wire L 2 and 1 green wire GND which have to be connected to a dedicated junction box Connect the black wire to L1 the red wire to L2 and the green wire to GND ALSO SEE THE WIRING DIAGRAM PROVIDED WITH THE APPLIANCE For CDN only The appliance is provided with 3 terminal leads 1 black wire L1 1 red wire L 2 and 1 green wire GND which have to be connected to a dedica...

Страница 54: ...nt USA 1 800 999 1360 techserv mieleusa com CDN1 800 565 6435 service miele ca When contacting the Technical Service Department please quote the model and serial number of your appliance These are shown on the data plate Data Plate Please attach the data plate in the space provided below After sales service 54 ...

Страница 55: ...dren Danger of suffocation Disposal of an old appliance Old appliances contain materials that can be recycled Please contact your local recycling center about the possibility of recycling these materials Disposal of an old appliance Before discarding an old appliance disconnect it from the electricity supply cut off the power cord and remove any doors to prevent hazards Help protect our environmen...

Страница 56: ...M Nr 05 229 041 01 Alteration rights reserved 4504 ...

Отзывы: