background image

CELLTRON


MAX

Midtronics Inc.     7000 Monroe Street     Willowbrook, IL 60527

www.midtronics.com

• 

 28  

Chapter 7: Battery Manager

  If  there  is  no  reference  value  for  the  string  you  are 

testing, you can use a reference value for the jar mod-

el in the BATTERY MANAGER database.

The  BATTERY  MANAGER  also  allows  you  to  edit  existing 

battery manufacturer data or create new ones.  You can also 

edit  battery  model  parameters  and  conductance  reference 

values.
1.  With the ARROW keys, highlight the BATTERY MANAGER 

icon  and  press  the  ENTER  key.   The  SELECT  MANUFAC-

TURER screen appears on the lower screen.

2.  For  an  existing  battery  manufacturer,  use  the  ARROW 

keys to scroll to the desired manufacturer and press EN-

TER. For a new manufacturer, press the create button.

3.  Proceed to one of the three options below:

Changing a Reference Value

Use this option to change the baseline reference value used 

for testing.”
1.  Use  ARROW  keys  to  highlight  BATTERY  MANAGER,  and 

press ENTER.

2.  Use  ARROW  keys  to  highlight  a  manufacturer  (or  USER 

VENDOR for an unlisted manufacturer), and press ENTER.

3.  Use ARROW keys to highlight a model name.
4.   Press ENTER to accept. BATTERY DETAIL screen appears. 

Use  ARROW  keys  to  highlight  reference  and  press  EN-

TER.

5.  EDIT  REFERENCE  screen  appears.  Use  ARROW  keys  to 

increment or decrement the reference value. Press F2 to 

save.

adding Jar Model Information

This  option  lets  you  add  a  jar  or  model  to  an  existing 

manufacturer in the Battery Manager.
1.  With the ARROW keys, select a manufacturer and press 

the ENTER key.

2.  Press F2 to create models.
3.  Follow the onscreen prompts to insert the desired manu-

facturer information.

4.  Press  ENTER  to  save  your  changes  or  BACK  to  go  exit 

without saving.

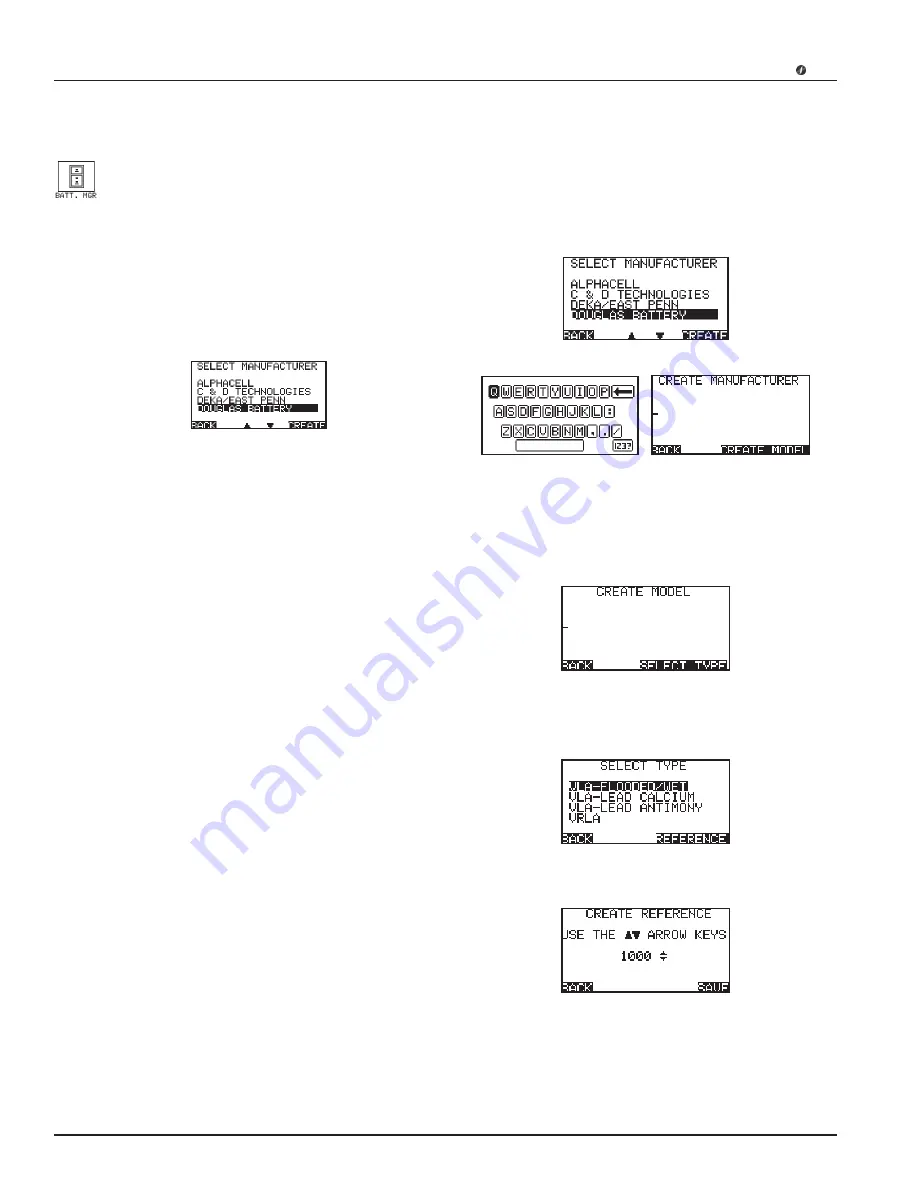
adding Battery Manufacturer Information

1. SELECT MANUFACTURER screen.

Press soft key F2 to create a battery manufacturer.


2.  With the ARROW keys, select MODEL.
An alphanumeric display keypad appears on the upper screen 

and a CREATE MODEL is displayed on the lower screen. 
Then press F2 key to create model.

Use the alphanumeric entry and then press soft key F2.
3.   Select TYPE
 SELECT TYPE screen appears

Highlight Battery Type and press F2 soft key
CREATE REFERENCE screen appears 

Use ARROW keys to change the reference value and press F2 

soft key to save.

Содержание CELLTRON MAX

Страница 1: ...INSTRUCTION ManuAl March 2010 167 087C CELLTRON MAX Universal Stationary Battery Analyzer For testing stationary batteries in UPS systems power utility and telecommunications industries...

Страница 2: ......

Страница 3: ...13 DMM 13 Utilities 13 Chapter 2 Reference Values 14 Testing Sample Jars 15 String Summary Average 15 Chapter 3 Site Setup 16 New Site 16 Create Site 16 Create Plant 16 Create String 16 Existing Site...

Страница 4: ...9 Conductance Threshold 29 Date Time 29 Language 30 Mode 30 Display 30 Contrast Level 31 Backlight Time 31 Time Out 31 Straps 31 Internal Battery 31 Speaker 32 Temperature 32 Test Mode 32 Quick Test 3...

Страница 5: ...y may result in a risk of electric shock or fire 1 4 Test batteries in a dry well ventilated area 1 5 Do not expose the tester to rain or snow Personal Precautions 2 1 Always have someone within range...

Страница 6: ...rubber gloves Wear a protective apron or shop coat Perform service work only for which you have been trained Do not disconnect the battery cables from power systems during the test without authorizat...

Страница 7: ...onnectorized Test Cable Options Dual contact clamps Dual contact probes Custom cables by quotation Power Requirements 7 2 V 2500 mAh NiMH internal swappable battery and charger Display LCD FSTN x2 66...

Страница 8: ...RAQ software The CELLTRON MAX is designed for testing stationary batteries used in UPS systems power utility and telecommunications industries Also the Celltron MAX can test generator start batteries...

Страница 9: ...rook IL 60527 www midtronics com CELLTRON MAX 9 CELLTRON MAX Kit CELLTRON MAX Tester IR Printer Tester cables with locking connectors for interchangeable probes and clamps Collapsable Probe Extenders...

Страница 10: ...h an AC adapter 120 Vac 60 Hz Handheld printer with infrared receiver for data transmitted by the CELLTRON MAX includes battery charger output 10 2 Vdc 800 mA for charging the printer s NiMH batteries...

Страница 11: ...after ap proximately 2 minutes of inactivity to conserve its battery pack 11 USB ports Thumb drive and product updates 12 AC power adapter charger port Hot Keys Eight Hot Keys are located on the botto...

Страница 12: ...lection Two soft keys are located at the top of the control panel Their functions will vary depending on what mode the analyzer is in at the time Alphanumeric Entry Some selections require you to use...

Страница 13: ...an serve as a digital multimeter With it you can measure DC or AC voltage and DC current Icon Function Measures voltage within a range of 0 to 18 Vdc Estimates voltage within a range of 0 to 20 V peak...

Страница 14: ...ing and use the highest conductance value as a reference value Use the average from STRING SUMMARY after you test the string Refer to Using the average in STRING SUMMARY in this chapter Use REFERENCE...

Страница 15: ...ar cases 3 Test the jars 4 Test one jar five times in a row on float charge Conduc tance results should be within 2 of each other NOTE If the test results do not conform to this pattern an electrical...

Страница 16: ...a new Plant 1 Use the ARROW keys to highlight the character on the character map that you want to select and press the EN TER soft key to select it The character will appear on the lower screen Repeat...

Страница 17: ...select and press the EN TER soft key to select it The character will appear on the lower screen Repeat this process to complete the line 2 When you ve completed the line press the NEXT soft key to sav...

Страница 18: ...tep the NUM OF JAR number up or down by by one highlight the or and press ENTER The number ad vances by one each time the ENTER button is press 5 Use ARROW keys on the screen to move the cursor 6 Pres...

Страница 19: ...RESH OLD and press the ENTER key The EDIT THRESHOLD CONDUCTANCE screen appears on the lower screen 2 Use the ARROW keys to select UPPER or LOWER CONDUC TANCE THRESHOLD and press the ENTER key 3 Use th...

Страница 20: ...ry library or by using the unit to calculate a value based upon internal analysis of the results 1 Use the ARROW keys to highlight REFERENCE and press the ENTER key A screen appears to establish the r...

Страница 21: ...r Farenheit AC Ripple This option sets the measurement for AC ripple detection DC Float V Use this option to input the float voltage of a string into the tester memory for recordkeeping DC Float A Use...

Страница 22: ...hierarchy of the sites available for data upload appears on the top screen and bottom screens of the tester 2 Use the ARROW keys to highlight the Site Plant or String you want to upload and press the...

Страница 23: ...DELETE soft key to complete the deletion or press the CANCEL soft key to return to the CQ SYNC menu Delete All The DELETE ALL function allows you to delete all of the site plant string and jar data st...

Страница 24: ...at this process to ex pand the hierarchy to show the jar you want to retest 3 Use the ARROW keys to highlight the desired jar and press ENTER A RETEST JAR screen appears on the lower screen All Test 1...

Страница 25: ...and return to the Main Menu Temperature 1 Use the ARROW keys to select TEMPERATURE and press TEST The tester will begin retesting the temperature of the selected jar using the settings saved in the T...

Страница 26: ...e with an analog meter graphic 1 From the Main Menu highlight the DMM icon and press the SELECT ITEM soft key 2 Use the ARROW keys to highlight the AC VOLTS icon and press the SELECT ITEM soft key The...

Страница 27: ...CHANGE TO FFT MODE to edit and press the ENTER key 2 Use the ARROW keys to increase or decrease the hori zontal scaling value Scaling options include 5ms 10ms 20ms 50ms and100ms The changes to the ho...

Страница 28: ...listed manufacturer and press ENTER 3 Use ARROW keys to highlight a model name 4 Press ENTER to accept Battery detail screen appears Use ARROW keys to highlight reference and press EN TER 5 EDIT REFER...

Страница 29: ...ess the ENTER key Or press the BACK soft key to return to the Main Menu without saving your changes Voltage Threshold 1 Use the ARROW keys to highlight the voltage threshold to edit and press the ENTE...

Страница 30: ...t key to save your changes or the BACK soft key to return to the Main Menu without saving your changes Mode The MODE utility let s you determine if the tester au tomatically tests the next battery in...

Страница 31: ...ith the ARROW keys highlight TIME OUT to edit and press the ENTER key 2 Use the ARROW keys to increase or decrease the number of minutes 3 Press ENTER to save your changes or BACK to return one screen...

Страница 32: ...ar Select Celsius or Fahrenheit as the unit of measure before setting your test parameters in BATTERY SETUP The last saved TEMP selection becomes the default unit of measure 1 From the Main Menu highl...

Страница 33: ...GEN BAT and press the EN TER key The CRANKING BATTERY TEST screen appears on the lower screen 2 Use the up or down ARROW keys to select between GEN ERATOR BATTERY and FLEET VEHICLE 3 Press the SAVE so...

Страница 34: ...key is used to adjust the tester s in ternal speaker volume Main Menu Use the MAIN MENU hot key to jump directly to the Main Menu screen at any time Retest The RETEST hot key lets you quickly retest u...

Страница 35: ...pter from the analyzer and the AC outlet NOTE The maximum charge time is 3 to 4hours Do not overcharge Replacing the analyzer battery pack If the screen does not power on after recharging replace the...

Страница 36: ...ter IR transmitters and print again Make sure the printer is on The printer shuts off after two minutes of inactivity to conserve the battery To turn the printer on briefly press the MODE button The g...

Страница 37: ...unit This limited warranty applies only to the CELLTRON ULTRA analyzer and does not cover any other equipment static damage water damage overvoltage damage dropping the unit or damage resulting from e...

Отзывы: