background image

Different calibration procedures

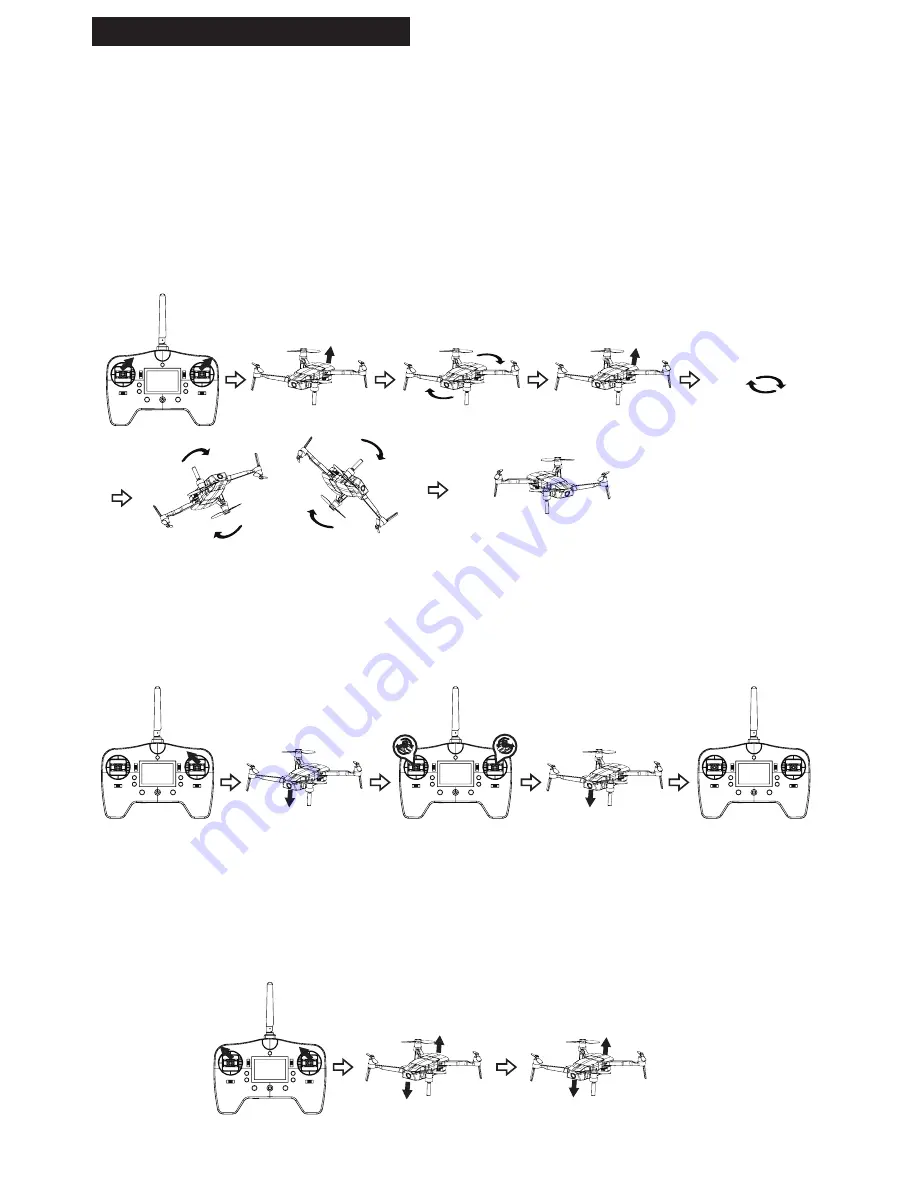
1) Electronic compass calibration

This is very important to operate this calibration before your first flight with the drone. 

Explantion videos are 

available on Midrone website or on Midrone Youtube channel.

Switch ON the drone and wait for the stand by mode (2 long beeps). Switch ON the R/C and wait for the 
pairing with the drone (see pairing section above in this manual). Push the direction lever and throttle lever 
upwards to the right with an angle of 45 degrees. Now the drone starts to calibrate, the front led lights glow 
solid and the rear led lights flash slowly, then put the drone horizontally and make it rotate few times at 360 
degrees with your hand, until the red led indicators flash quickly. After that, put the drone  in vertical position 
and make it rotate few times at 360 degrees. And finally perfom some movements with “8 shaped” circles
untilall LED lights of the drone switch OFF. At this point the calibaration succeeded. You can now switch it 
ON again the drone and start to use it.
If the calibration failed, you need to switch off the drone and restart it, and try this procedure again.

2) Remote control calibration

In standby mode, push the direction lever and throttle lever upwards and to the center with an angle of 45 
degrees. Now the remote control starts to calibrate, the front led indicators start to flash slowly and the rear 
led lights glow solid. Now rotate the 2 levers several times at 360 degrees all the way around until front led 
indicators start to flash rapidly, then release the two levers back to the middle position. All led indicators 
come back to previous status after R/C calibration succeeded.

3) Horizontal (Board level) calibration of the drone

First place the drone on a flat level surface before operating the horizontal calibration.
In standby mode, push the throttle lever and the direction lever upwards to the left with an angle of 45 
degrees. When the front led indicators glow solid and and rear led indicators starts breathing (variation of 
color instensity) you can release the 2 levers and the led indicators come back to previous status when the 
calibration is finished. If the calibaration failed, you need to turn off and restart the drone, and try this
procedure again.

-6-

Rear LED
flashes slowly

Rear LED 
flashes quickly

Vertical

360°

Front LED 
flashes slowly

Front LED 
flashes rapidly

360°maximum 
rotate all around

360°maximum 
rotate all around

Release two levers

Red rear led 
start breathing

LED lights back to previous
 status if successed

Horizontal

360°

All LED lights switch off 
when calibration is finished

White front led 
glow solid

Содержание BEE 520

Страница 1: ...ate assembly and proper use to prevent any accidents The user of this device must use it responsibly and ensure not cause any damage to third parties or to objects belonging to third parties This prod...

Страница 2: ...and behavior of the drone can sometimes be unstable it is strongly advised to use it in places away from the crowds tall buildings or trees high voltage cables to prevent injury to the user or other p...

Страница 3: ...from the drone turn ON the remote controller you will hear 2 shorts beeps followed by a long beep 5 Connect WIFI enter into phone Wifi settings select wifi named Bee520 xxxx in the list of available...

Страница 4: ...12 2 3 4 5 6 7 8 9 10 11 12 Before taking photos or videos you need to insert a micro SD card in the memory slot at the side of the drone The cards must be recent SDHC with suffisant writing speed to...

Страница 5: ...y The left rear led indicator glows solid The rear led lights flash alternatively The rear right led indicator flashes rapidly Two rear led indicators flash rapidly Both rear and front led indicators...

Страница 6: ...throttle lever upwards and to the center with an angle of 45 degrees Now the remote control starts to calibrate the front led indicators start to flash slowly and the rear led lights glow solid Now ro...

Страница 7: ...s You can pre set the height via APP before RTH When the GPS signal is not sufficient The auto return is not available When the drone rises to 10 meters but not reach the pre set height press the RTH...

Страница 8: ...direction The stick controls the rotating speed of the drone Pushing the stick further away from center results in a faster drone rotation speed The direction stick controls the drone s front and back...

Страница 9: ...n your smartphone then switch ON the drone After a few seconds you will see a new Wifi network name starting by Bee520 in the list of the available networks select it and confirm the connection The Wi...

Страница 10: ...photo video settings Enter control interface screen to pilot the drone Enter the help menu Album interface Select photo or video menu then select the desired photo or video Tap on this icon to share d...

Страница 11: ...lcome screen 24 Enter waypoint menu Gravity mode switch tap this icon then tilt your smartphone slightly to any direction The drone will fly to the same direction accordingly Video button tap this but...

Страница 12: ...h other on the map because if the mobile phone appears to a different location on the map the drone will fly to this direction The accuracy of the mobile phone position on the map can vary following t...

Страница 13: ...r on the map because if the mobile phone appears to a different location on the map the drone will fly to this direction The accuracy of the mobile phone position on the map can vary following the reg...

Страница 14: ...clear place away from obstacles such as trees buildings and away from the crowd Improper handling may result in loss of the drone or may result in injuries to persons or damages to nearby objects 2 Th...

Страница 15: ...AUTO during the Waypoint session Tap again on the icon to exit the waypoint mode when the drone finished its route The status of the drone comes back to POSHOLD mode in the status bar 15 Tap the icon...

Страница 16: ...ou are located near buildings Please choose a clear location away from buildings such as field or park The weather conditions can also affect the satellite reception 4 The flying time of the drone is...

Страница 17: ...ith no signs of tampering The guarantee is not applicable for Damage resulting from misuse accident shock Damage resulting from the inability to use the product Damage resulting from a fault of the us...

Страница 18: ...hout prior notification The latest updates will be available on our website www midrone eu Our company shall under no circumstances be held liable for injury or damage caused by errors or omissions in...

Отзывы: