background image

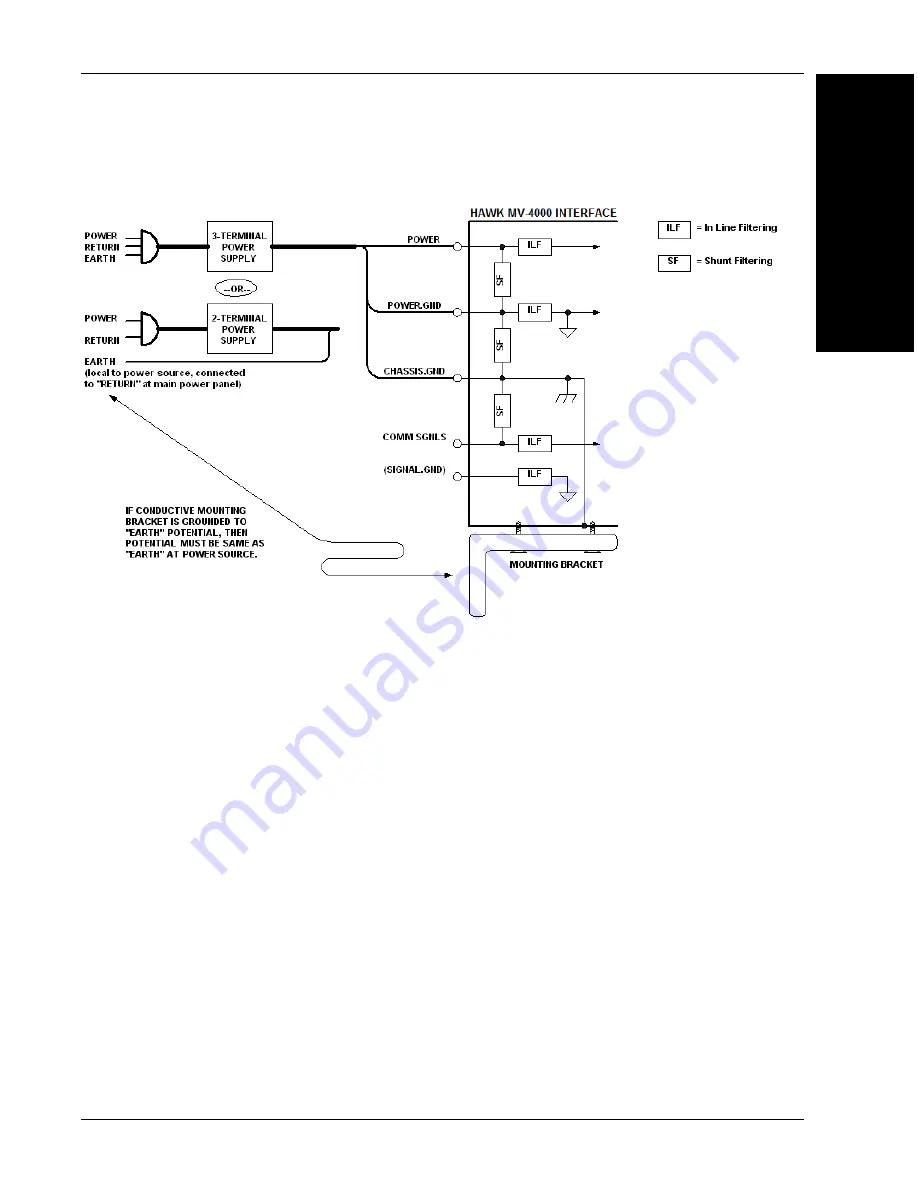
Ground and Shield Considerations

System Components

2

HAWK MV-4000 Smart Camera Guide

2-39

Expected Power and Ground Connections for Proper Operation

Grounding Notes

Ensure that mounting bracket “Earth” is at the same potential as power source “Earth”.

Supply “Return” and “Earth” ground must be stable, low-impedance reference points.

“2-Terminal Power Supply” must still provide an “Earth” connection to the imager.

“Signal Ground” can be used for communications and/or discrete signal ground 

reference. It must 

not

 be used as Power Ground or Earth Ground.

Содержание HAWK MV-4000

Страница 1: ...HAWK MV 4000 Smart Camera Guide 84 9007433 02 Rev A ...

Страница 2: ...er with no intention of infringement Disclaimer The information and specifications described in this manual are subject to change without notice Latest Manual Version For the latest version of this manual see the Download Center on our web site at www microscan com Technical Support For technical support e mail Americas_support microscan com EMEA_support microscan com APAC_support microscan com Ch...

Страница 3: ...0 Smart Cameras have been tested for compliance with CE Conformité Européenne requirements and have been found to conform to applicable CE standards The CE Declaration of Conformity for this product is available from Microscan upon request HAWK MV 4000 Smart Cameras have been tested by an independent electromagnetic compatibility laboratory in accordance with the applicable specifications and inst...

Страница 4: ...le Règlement sur le brouillage radioélectrique édicté par Industrie Canada EU Notice European Union WARNING These are class A products In a domestic environment these products may cause radio interference in which case the user may be required to take adequate measures AVERTISSEMENT Ces appareils sont des produits informatiques de Classe A Lorsque ces appareils sont utilisent dans un environnement...

Страница 5: ...trical specifications section in the HAWK MV 4000 Smart Camera Guide for voltage and current ratings There are no user serviceable parts inside this product Contact Microscan for repair or replacement To maintain IP67 conformity all unused connectors on the HAWK MV 4000 must be capped and the optional IP case must be screwed firmly into place This product meets Category 1 installation requirements...

Страница 6: ...ts and Accessories 2 2 HAWK MV 4000 Dimensions 2 6 Label Information 2 10 Mounting Connecting and Wiring 2 11 Connecting to the I O Interface 2 17 Input Output Wiring Using Flying Lead Cable 61 9000151 01 2 37 Ground and Shield Considerations 2 38 Electrical and I O Specifications 2 40 Environmental Specifications 2 41 Status Indicators 2 42 Adding a HAWK MV 4000 to a Network 2 43 Setting Up a Job...

Страница 7: ...ronmental Specifications C 6 Dimensions C 7 Digital I O and Power Adapter Cable Connector C 8 100 1000 Base T Connector C 10 VGA USB Connector C 11 Liquid Lens Connector C 13 APPENDIX D MVMonitor Web Page D 1 Using the MVMonitor Web Page D 2 APPENDIX E CloudLink Web HMI E 1 Connecting E 2 Application Overview E 3 Application Bar E 4 Pages Panels and Widgets E 5 APPENDIX F Serial Commands F 1 APPEN...

Страница 8: ...anual This manual contains detailed information about how to configure and operate the HAWK MV 4000 Smart Camera Manual Conventions Items emphasizing important information are bolded Menu selections menu items and entries in screen images are indicated as Run triggered Modify etc ...

Страница 9: ...HAWK MV 4000 Smart Camera Guide 1 1 1 Introduction 1 CHAPTER 1 Introduction HAWK MV 4000 Smart Camera ...

Страница 10: ...WK MV 4000 is able to store load and run up to 50 simple or complex jobs Processing times reach near PC speeds enabling the camera to keep up with line rates of up to 6 000 parts per minute and speeds of over 300 inches per second The camera is also equipped with real time Digital I O RS 232 and GigE Ethernet ports Through these communication channels the user can control and trigger the unit as w...

Страница 11: ...able of near PC processing speeds 32 GB of eMMC and 2 GB of RAM for storing and running many large and complex jobs Real time Digital I O RS 232 and GigE comm channels IP67 rated design when lens cover is installed for use in industrial environments Simplified configuration with AutoVISION Software Advanced configuration with Visionscape FrontRunner software Custom UI creation and machine integrat...

Страница 12: ...l reading for any size mark Fast inline 1D and 2D symbol verification and validation Color inspection and verification Package Contents Before you install AutoVISION Software and connect the HAWK MV 4000 Smart Camera please take a moment to confirm that the following items are present HAWK MV 4000 Smart Camera HAWK MV 4000 Adapter Cable 61 9000132 01 Microscan Tools Drive USB flash drive containin...

Страница 13: ...rs that include lenses and lens caps are available in the Microscan Product Pricing Catalog and through Microscan s Order Management System Additional accessories and lights can be purchased separately Part Number Camera Name Description 8X11 0000 PPPP HAWK MV 4000 03 HAWK MV 4000 Monochrome 0 3 MP 640 x 480 1 4 CMOS Sensor 8X12 0000 PPPP HAWK MV 4000 13 HAWK MV 4000 Monochrome 1 3 MP 1280 x 1024 ...

Страница 14: ...ns Cover B Software 1 Machine Vision S Sensor Type 1 VGA Mono 2 1 3 MP Mono 3 2 MP Mono 4 5 MP Mono 5 VGA Color 6 1 3 MP Color 7 2 MP Color 8 5 MP Color L Lens 0 No Lens 1 2 3 Standard Def 2 2 3 High Def 3 1 High Def FF Lens Focal Length 00 No Lens XX Focal Length mm A Accessories 0 L Lighting 0 PPP License 100 AutoVISION Sensor 101 AutoVISION 102 AutoVISION Visionscape 103 AutoVISION Verification...

Страница 15: ...em Components 2 CHAPTER 2 System Components This section contains specific information about system components as well as information to help you connect your HAWK MV 4000 Smart Camera Note There are no user serviceable parts inside the camera ...

Страница 16: ... 8013 0000 0102 HAWK MV 4000 20 2 0 Megapixel 1920 x 1200 Mono AutoVISION Visionscape 8013 0000 0103 HAWK MV 4000 20 2 0 Megapixel 1920 x 1200 Mono AutoVISION Verification OCV 8013 0000 0104 HAWK MV 4000 20 2 0 Megapixel 1920 x 1200 Mono AutoVISION Visionscape Verification OCV 5 0 Megapixel Mono 8014 0000 0100 HAWK MV 4000 50 5 0 Megapixel 2592 x 2048 Mono AutoVISION Sensor 8014 0000 0101 HAWK MV ...

Страница 17: ...esolution 2 3 Sensor 98 9000168 01 Lens C Mount 9 mm Standard Resolution 2 3 Sensor 98 9000169 01 Lens C Mount 12 5 mm Standard Resolution 2 3 Sensor 98 9000170 01 Lens C Mount 16 mm Standard Resolution 2 3 Sensor 98 9000171 01 Lens C Mount 25 mm Standard Resolution 2 3 Sensor 98 9000172 01 Lens C Mount 35 mm Standard Resolution 2 3 Sensor High Resolution for 2 3 Sensors Gauging Verification 98 90...

Страница 18: ...V 4000 Adapter to QX 1 M12 Plug Screw On 3 m 98 000103 02 QX 1 Interface Device 99 000020 02 QX Photo Sensor M12 4 Pin Plug NPN Dark On 2 m 99 000020 01 QX Photo Sensor M12 4 Pin Plug NPN Dark Off 2 m 20 610024 01 Trigger Connector 4 Pin Plug Screw Terminal Field Wireable Self Wiring Smart Series Illuminator Control Cables 61 9000135 01 Y Cable HAWK MV 4000 Adapter to Smart Series Illuminator and ...

Страница 19: ...over Universal Mount 8212 2350 0104 HAWK MV 4000 13 AutoVISION Visionscape Ver OCV 35 mm High Res Lens IP Cover Universal Mount 2 0 Megapixel Standard Lens 8113 1160 0104 HAWK MV 4000 20 AutoVISION Visionscape Verification OCV 16 mm Std Lens IP Cover Universal Mount 8113 1350 0104 HAWK MV 4000 20 AutoVISION Visionscape Verification OCV 35 mm Std Lens IP Cover Universal Mount 2 0 Megapixel High Res...

Страница 20: ...Chapter 2 System Components 2 6 HAWK MV 4000 Smart Camera Guide HAWK MV 4000 Dimensions Standard HAWK MV 4000 Front ...

Страница 21: ...HAWK MV 4000 Dimensions System Components 2 HAWK MV 4000 Smart Camera Guide 2 7 Standard HAWK MV 4000 Back ...

Страница 22: ...Chapter 2 System Components 2 8 HAWK MV 4000 Smart Camera Guide Standard HAWK MV 4000 Side ...

Страница 23: ...HAWK MV 4000 Dimensions System Components 2 HAWK MV 4000 Smart Camera Guide 2 9 Standard HAWK MV 4000 Base ...

Страница 24: ...de Label Information Each HAWK MV 4000 Smart Camera has a label that contains important information about that camera M N The model name of the camera P N The Microscan part number of the camera MAC The MAC address of the camera S N The serial number of the camera ...

Страница 25: ...11 Mounting Connecting and Wiring Mounting the HAWK MV 4000 Mount the camera 1 securely as required by the application Universal Mount and APG Mount Mounting holes M4x0 7 thread 4 mm deep 20 tripod mounting hole Mounts on standard tubing with 6 mm hardware Adapter to standard APG mount ...

Страница 26: ...T or twisted pair Ethernet 10Base T VGA USB Connector Provides connectivity between the HAWK MV 4000 and a display device and or USB device such as a keyboard or a mouse Digital I O and Power Connector Receives power from an external power source This connector can also receive trigger input and send receive general auxiliary I O signals to from third party I O devices In addition the connector ha...

Страница 27: ...ed with camera 61 9000132 01 8 Cable HAWK MV 4000 M12 to Flying Leads 3 m no adapter required 61 9000151 01 9 QX Cordset HAWK MV 4000 Adapter to QX 1 M12 Plug Screw On 1 m or 3 m 61 0001XX 02 10 QX 1 Interface Device 98 000103 02 11 QX Photo Sensor M12 4 Pin Plug NPN Dark On or Dark Off 2 m or 99 000020 0X Trigger Connector 4 Pin Plug Screw Terminal Field Wireable Self Wiring 20 610024 01 12 Y Cab...

Страница 28: ...Leads M12 to Flying Leads Cable 3 m 61 9000151 01 Pin Signal Wire Color 1 Output Common Red Blue 2 Analog Output Black 3 Output 3 Pink 4 Power Brown 5 Trigger White 6 Input Common Red 7 Input 2 Green 8 Input 3 Violet 9 Input 1 Yellow 10 Output 1 Gray 11 Ground Blue 12 Output 2 Gray Pink 5 2 4 1 15 6 8 ...

Страница 29: ... System Components 2 HAWK MV 4000 Smart Camera Guide 2 15 Ethernet Configuration with QX 1 and NERLITE Smart Series Illuminator 5 2 4 1 15 6 14 7 11 10 9 11 NERLITE Smart Series Illuminator 13 Power Supply 12 Pin Socket Photo Sensor ...

Страница 30: ...4000 Smart Camera Guide Ethernet Configuration Y Cable for Illuminator Control and Camera Power 15 5 6 7 14 NERLITE Smart Series Illuminator NERLITE Smart Series Illuminator NERLITE Smart Series Illuminator Power Supply 12 Pin Socket 12 2 4 1 ...

Страница 31: ... automatically connected to the correct input channel Input Signals Trigger Sensor Input 1 Input 2 Input 3 Input Common Outputs Three of the signals are outputs They support sinking NPN configurations and operate at up to 24V nominal It is possible to connect one of the outputs in a sourcing PNP configuration but the other two outputs would no longer be available All three outputs are configurable...

Страница 32: ...flows from the positive potential towards the negative potential A sinking device provides a path to sink current toward ground or to the return path A sinking device does not provide power A sourcing device provides a path that sources current it provides a path from the power source In the following diagram the device on the right is the sourcing device and the device on the left is the sinking ...

Страница 33: ...g output signals based on an NPN type transistor They need to be connected to an external power source because on their own they are not capable of providing voltage to drive a device They are typically connected in a sinking configuration because they only have one dedicated pin Output1 Output 2 Output 3 External Strobe respectively and share their other pin Output Common So typically a sourcing ...

Страница 34: ...e output signal the connected device and the power source depends entirely on the type of device to which you connect Equivalent circuit only When an output signal is on the circuit between its Output pin and Output Common pin is closed allowing current to flow from the Output pin to the Output Common pin if the Output pin is attached to a power source or a sourcing device When an output signal is...

Страница 35: ...ut to calculate the required resistance for your external pull up pull down resistor if necessary In the connections above the pull up circuitry causes an inversion if the input of the device is connected to the Output pin When the output signal is on the circuit between its Output pin and Output Common pin is closed and current flows from the power source to the Output Common pin So the observed ...

Страница 36: ...0 if you accidentally connect their corresponding output signal to a device that sources sinks more current than HAWK MV 4000 can safely transmit If more than 50 mA of current goes through your HAWK MV 4000 the fuse will eventually trip After disconnecting your HAWK MV 4000 the fuse will reset only after it has sufficiently cooled The diagram below depicts HAWK MV 4000 s onboard fuse Equivalent ci...

Страница 37: ...n Output Common About the Connections in the Following Subsections The following subsections detail how to connect the most common third party devices to the HAWK MV 4000 output signals Ground is only shown in the following subsections for reference in case you need to reference your return path to ground Power as depicted in the following diagrams represents a nominal voltage of up to 24 V 10 For...

Страница 38: ...Output Signal To a Sourcing Input Connect a HAWK MV 4000 output signal to a sourcing input as shown below Equivalent circuit only Note When connecting a resistive load sourcing device instead of an input sensing sourcing device the same connection would be used as displayed above ...

Страница 39: ...l to a sinking input as shown below In this case the pull up circuitry is used to source the current to the sinking input Equivalent circuit only Important In this configuration the other two output signals are not available Note When connecting a resistive load sinking device instead of an input sensing sinking device the same connection would be used as displayed above ...

Страница 40: ...output signal to a sinking input as follows Note that in this configuration you will need to connect an external pull up resistor Since your HAWK MV 4000 output signals can sink up to 50 mA use the documentation of your sinking device to calculate the required resistance for your external pull up resistor if necessary Equivalent circuit only ...

Страница 41: ... output signal to an inductive load input follow the diagram as shown below An inductive load device such as a traditional relay requires that you use a flyback diode to protect HAWK MV 4000 from over and under voltage as shown below This diode should be connected as close as possible to the input and voltage source of your inductive load device Equivalent circuit only ...

Страница 42: ...pecifications of the on and off voltage levels see the Electrical specifications section in Appendix C General Specifications Each of the four available input signals has one dedicated pin Trigger Input 1 Input 2 and Input 3 and shares its other pin Input Common with the other input signals You can connect the input signals in a sinking or sourcing configuration Since the input signals share a com...

Страница 43: ... required when you connect the Input Common pin to the electrical return path and the third party output device is in a sinking configuration In this case select a resistor value that will not overcurrent the output device and instead provide just enough current and voltage to your HAWK MV 4000 input signals according to the electrical specifications subsection in Appendix C General Specifications...

Страница 44: ...wing current connect a 2 2 kOhm external bleeder resistor between the Input and Input Common pins For example Equivalent circuit only About the Connections in the Following Subsections The following subsections detail how to connect the most common third party devices to the HAWK MV 4000 input signals Note that HAWK MV 4000 input signals are optically isolated Ground is only shown in the following...

Страница 45: ... Interface System Components 2 HAWK MV 4000 Smart Camera Guide 2 31 Connecting a Sourcing Output Device to an Input Signal Connect a sourcing output device to HAWK MV 4000 input signal as shown below Equivalent circuit only ...

Страница 46: ... System Components 2 32 HAWK MV 4000 Smart Camera Guide Connecting a Sinking Output Device To an Input Signal Connect a sinking output device to a HAWK MV 4000 input signal as shown below Equivalent circuit only ...

Страница 47: ...face System Components 2 HAWK MV 4000 Smart Camera Guide 2 33 Connecting a 3 Wire PNP Proximity Sensor to an Input Signal Connect a 3 wire PNP proximity sensor to a HAWK MV 4000 input signal as shown below Equivalent circuit only ...

Страница 48: ...m Components 2 34 HAWK MV 4000 Smart Camera Guide Connecting a 3 Wire NPN Proximity Sensor to an Input Signal Connect a 3 Wire NPN proximity sensor to a HAWK MV 4000 input signal as shown below Equivalent circuit only ...

Страница 49: ...he input signal to source the current that is to connect an input signal on a positive power wire connect the 2 wire device to the input signal as shown below You must also install an external bleeder resistor between the Input Common pin and brown wire of the proximity sensor Equivalent circuit only The bleeder resistor s value should guarantee that the minimal required current is provided to the...

Страница 50: ...mart Camera Guide For the input signal to sink the current connect the 2 wire device to input signal as shown below Install the external bleeder resistor between the blue wire of the proximity sensor and the Input Common pin Equivalent circuit only ...

Страница 51: ...t Wiring Using Flying Lead Cable 61 9000151 01 M12 to Flying Leads Cable 3 m 61 9000151 01 Pin Signal Wire Color 1 Output Common Red Blue 2 Analog Output Black 3 Output 3 Pink 4 Power Brown 5 Trigger White 6 Input Common Red 7 Input 2 Green 8 Input 3 Violet 9 Input 1 Yellow 10 Output 1 Gray 11 Ground Blue 12 Output 2 Gray Pink ...

Страница 52: ...ircuits and all junction boxes must be grounded directly to an earth ground in compliance with local and national electrical codes Ground Loops Ground loops signal degradation due to different ground potentials in communicating devices can be eliminated or minimized by ensuring that both the host imager and their power supplies are connected to a common earth ground An earth ground is provided thr...

Страница 53: ...ure that mounting bracket Earth is at the same potential as power source Earth Supply Return and Earth ground must be stable low impedance reference points 2 Terminal Power Supply must still provide an Earth connection to the imager Signal Ground can be used for communications and or discrete signal ground reference It must not be used as Power Ground or Earth Ground ...

Страница 54: ...Vc c Regardless of whether the signal is sinking or sourcing this measurement is the same Optoisolated Input Signals Operating Voltage 24 V 26 V abs max Input Current Sink or Source 3 5 mA max d 1 mA min e d Maximum input current at max ON voltage The connected device must not limit the current to a value lower than this e Minimum input current at min ON voltage Can be used to calculate bleeding r...

Страница 55: ...vironmental Specifications For indoor use only Maximum altitude 2 000 meters Operating temperature 0 to 50 C 32 F to 122 F 1 Ventilation requirements Natural convection Pollution degree 2 environment Over voltage category I Ingress protection rating IP67 1 Under current testing conditions ...

Страница 56: ...f your HAWK MV 4000 The POWER and USER LEDs typically display one of the following sets of colors LED Color Description Power User Off Off HAWK MV 4000 has no power Red Red Power is available but the HAWK MV 4000 is not responding Red Orange Memory initialization error detected Orange Orange Red Blinking Thermal trip detected Orange Orange BIOS execution in progress Orange Green BIOS execution com...

Страница 57: ...our network Default Device Name By default HAWK MV 4000 comes factory configured with a unique device name The device is preprogrammed with a Class C static IP address 192 168 0 100 This name is used when connecting to a network and is of the form The last four hexadecimal digits of your HAWK MV 4000 s MAC address are used as the numeric part of the device name Both the network name of your HAWK M...

Страница 58: ...y setup and deployment For more complex vision applications the system can be upgraded from AutoVISION to Visionscape 1 Mount and connect the HAWK MV 4000 hardware 2 Plug in the power supply 3 Select your HAWK MV 4000 in the AutoVISION Connect view create a job and adjust camera settings AutoVISION s Connect view allows you to select your device and configure its settings and to create a new job T...

Страница 59: ...n decimal of the device MAC Address with subnet Class B 255 255 0 0 Set your PC to the same subnet 192 168 0 1 for example To access the camera s health status enter the address http your camera name 8088 in a browser where your camera name is the name of the device HAWK3204E8 for example Modify camera settings in the Details area at the left of the Connect view Create Load or Upload a job using t...

Страница 60: ...ce you have selected your camera adjusted its settings and created a new job you will move to the Image view This view allows you to Auto Calibrate the camera and to manually adjust the camera s Exposure Gain and Focus and also to set the Lighting Mode On Off or Strobe ...

Страница 61: ...a job from the camera you will proceed to the Edit view to refine your machine vision job The Camera parameters below the captured image allow you to set Gain Exposure Focus Trigger and Lighting Inspection Outputs options allow you to connect your job to the outside world This is also the view where you can add multiple tools to the job The tool icons are located above the main view area ...

Страница 62: ... 4000 Smart Camera Guide 5 Run the Job in AutoVISION Going to the Run view will automatically download your job to the camera and start it running 6 Save the Job Click the Save to Camera icon on the File menu bar to save the job to the camera ...

Страница 63: ...ime in the camera definition file located in the C Microscan Vscape Drivers CamDefs directory The IO Line Debounce High Time and IO Line Debounce Low Time can be added to the file as in the example below Debounce time is 100 μs The minimum value for IO Line Debounce Time is 0 µs which disables software debounce altogether The maximum value is 268432 µs Standard debounce as described for the trigge...

Страница 64: ...ly using a pulse width specified in usecs Usecs Per Frame 16667 Fastest time to acquire a frame 60 FPS for HAWK MV 4000 CMOS Camera 1 Disables timeout feature IO Configuration GPIO Edit Mask 0x0000 GPIO Defaults 0x0001 1 General Purpose Input 3 General Purpose Outputs GPIO Count 4 GPIO Inputs 1 GPIO Outputs 3 Sensors 1 One input dedicated to Trigger signal Strobes 0 Virtual IO 2048 IO Line Debounc...

Страница 65: ... determines the height of the WOI All the highlighted fields shown in the example above must be changed when creating a partial scan camdef The file name must also be changed showing the WOI size in the name X Offset This value must be a multiple of 32 Y Offset This value must be a multiple of 2 Stride This value must be a multiple of 32 Rows This value must be a multiple of 2 Minimum size X of 32...

Страница 66: ...Chapter 2 System Components 2 52 HAWK MV 4000 Smart Camera Guide ...

Страница 67: ...HAWK MV 4000 Smart Camera Guide 3 1 3 Lighting 3 CHAPTER 3 Lighting This section describes HAWK MV 4000 Smart Camera illumination options ...

Страница 68: ...nts of your application you may need external lighting from Microscan s NERLITE family of machine vision lighting products Consider the following when setting up your application Is the surface of the object flat slightly bumpy or very bumpy Is the surface matte or shiny Is the object curved or flat What is the color of the object or area being inspected Is the object moving or stationary Machine ...

Страница 69: ...o maximize light for the short exposure times needed in dynamic applications ON OFF mode allows the external illuminator to be enabled and disabled using the HAWK MV 4000 s I O Control is achieved using Output 3 on the camera Item Description Part Number 1 Smart Series Light NER 011660XXXG 2 QX 1 Interface Device 98 000103 02 3 Cable Adapter HAWK MV 4000 to QX 1 61 9000132 01 4 Cordset Common M12 ...

Страница 70: ...01 or Assembly Cable QX 1 to Smart Series and Camera On Off 61 9000136 01 or Assembly Cable QX 1 to Smart Series and Camera Strobe 61 9000137 01 3 Cordset Common M12 12 Pin Socket to M12 12 Pin Plug 1 m 61 000162 02 or Cordset Common M12 12 Pin Socket to M12 12 Pin Plug 3 m 61 000148 02 4 Cable Adapter HAWK MV 4000 to QX 1 61 9000132 01 5 Cordset Host Ethernet M12 8 Pin Plug to RJ45 1 m 61 000134 ...

Страница 71: ...HAWK MV 4000 Smart Camera Guide A 1 A Selecting a Lens A APPENDIX A Selecting a Lens This section contains information about choosing the best lens to suit your application ...

Страница 72: ...led the object distance A simple formula can be used to compute any of the four parameters The formula is Sensor Size Focal Length Field of View Object Distance Example The application requirement is for a 75 mm wide field of view at an object distance of 200 mm using the 1 3 MP sensor What is the required focal length of the lens Rearrange the equation as follows Focal Length Sensor Size Field of...

Страница 73: ...ur created by a lens not matched with the pixel size The second of the two diagrams shows a crisp image created with a lens matched with the pixel size The HAWK MV 4000 sensors all have a pixel size of 4 8 microns The standard HAWK MV 4000 comes with 3 lens types The first is a standard low cost lens for 5 to 7 micron pixels This lens is adequate for most inspection and reading applications The se...

Страница 74: ...x 0 5 4 μm 98 9000165 01 KIT LENS C MOUNT F1 6 8MM 5MP 2 3 70 mm 1 6 1 99 2 3 100 M25 5 x 0 5 4 μm 98 9000166 01 KIT LENS C MOUNT F1 6 12MM 5MP 2 3 70 mm 1 6 1 26 2 3 100 M25 5 x 0 5 4 μm 98 9000154 01 KIT LENS C MOUNT F1 6 16MM 5MP 2 3 70 mm 1 6 0 6 2 3 100 M25 5 x 0 5 4 μm 98 9000163 01 KIT LENS C MOUNT F1 9 35MM 5MP 2 3 70 mm 1 9 0 1 2 3 200 M25 5 x 0 5 4 μm 98 9000164 01 KIT LENS C MOUNT F1 6 ...

Страница 75: ...e Adapter HAWK MV 4000 to QX 1 61 9000134 01 Cable Ethernet X Code RJ45 CAT 6A 1 m 61 9000134 02 Cable Ethernet X Code RJ45 CAT 6A 3 m 61 9000134 03 Cable Ethernet X Code RJ45 CAT 6A 5 m 61 9000135 01 Cable M12 to Smart Series and Camera Power 1 m 61 9000136 01 Cable M12 to Smart Series and Camera On Off 1 m 61 9000137 01 Cable M12 to Smart Series and Camera Strobe 1 m 61 9000143 01 Cable M12 to U...

Страница 76: ...le Adapter HAWK MV 4000 to QX 1 The 61 9000132 01 Cable Adapter HAWK MV 4000 to QX 1 allows the HAWK MV 4000 to be connected to the QX 1 accessory and any Microhawk M12 accessory cables The cable is directional and must be connected as labeled for proper function and to avoid potential damage to the camera ...

Страница 77: ... 4000 Smart Camera Guide B 3 61 9000134 0X Cable Ethernet X Code RJ45 CAT 6A 1 m 3 m 5 m The 61 9000134 01 02 and 03 Cable Ethernet X Code RJ45 CAT 6A 1m 3m 5m respectively has an X Code M12 Ethernet connector on one end and standard RJ45 on the other ...

Страница 78: ...low a light to be connected to the camera without the need of the QX 1 61 9000135 01 Cable M12 to Smart Series and Camera Power 1 m 61 9000136 01 Cable M12 to Smart Series and Camera On Off 1 m 61 9000137 01 Cable M12 to Smart Series and Camera Strobe 1 m The M12 connector on the input side can then be connected directly to a flying leads cable or other control device ...

Страница 79: ...es Cable Specifications B HAWK MV 4000 Smart Camera Guide B 5 97 000012 01 Power Supply M12 12 Pin Socket 1 3 m The 97 000012 01 Power Supply M12 12 pin Socket 1 3 m is a 90 254 VAC 24VDC power supply M12 12 Pin Socket ...

Страница 80: ...t Camera Guide Appendix B Cable Specifications 99 000020 02 Trigger M12 4 Pin Plug NPN Dark On 2 m The 99 000020 02 Trigger M12 4 pin Plug NPN Dark On 2 m is a photo sensor with a 4 pin M12 connector 99 000020 02 Schematic ...

Страница 81: ...HAWK MV 4000 Smart Camera Guide C 1 C General Specifications C APPENDIX C General Specifications This section contains specifications for the HAWK MV 4000 Smart Camera ...

Страница 82: ...c to 4 sec External Trigger Latency Typical value from OFF to ON 7 1 μs 7 2 μs External Trigger to Output Strobe Delay Typical value from OFF to ON 9 1 μs 9 2 μs Specifications HAWK MV 4000 20 HAWK MV 4000 20C HAWK MV 4000 50 HAWK MV 4000 50C CMOS Sensor Geometry 2 3 Type 1 Type Format Monochrome Color Monochrome Color Make and Model ON Semiconductor Python Family NOIP1SN or NOIP1SE Effective Reso...

Страница 83: ...age source to the common input signal Input 3 For voltage expectations see Electrical Specifications subsection of the HAWK MV 4000 specifications section later in this appendix Whether all the input signals are sinking or sourcing is dependent upon the connection of the common input signal Three optoisolated output signals used to connect devices up to 24 V Note that these output signals are sink...

Страница 84: ... MV 4000 works with the Varioptic Caspian C 39N0 160 I2C or C 39N0 250 I2C lens liquid lens This electronically focus controllable C mount lens fits within the optional IP lens case The Varioptic lens connects to the liquid lens connector inside the lens case housing of your HAWK MV 4000 General Care and Cleaning To clean the unit housing use a small amount of mild detergent cleaner on a cleaning ...

Страница 85: ...V using 1 kW ON to OFF Response 50 ms to reach 11 Vc c Regardless of whether the signal is sinking or sourcing this measurement is the same Optoisolated Input Signals Operating Voltage 24 V 26 V abs max Input Current Sink or Source 3 5 mA max d 1 mA min e d Maximum input current at max ON voltage The connected device must not limit the current to a value lower than this e Minimum input current at ...

Страница 86: ...ntilation requirements Natural convection Pollution degree 2 environment Over voltage category I Ingress protection rating IP67 Mechanical Specifications 1 Under current testing conditions HAWK MV 4000 03 03C 13 13C 20 20C 50 50C Connectors M12 8 pin connector for 100 1000 Base T Ethernet M12 12 pin plug connector for VGA USB M12 12 pin socket connector for digital I O and power Certification IP67...

Страница 87: ...V 4000 Smart Camera Guide C 7 Dimensions Dimensions HAWK MV 4000 03 03C 13 13C 20 20C 50 50C Weight 460 39 g 16 24 oz Length without connectors 75 mm 2 95 x 75 mm 2 9 2 mm 0 079 Height without lens 54 mm 2 13 2 mm 0 079 Width 75 mm 2 95 2 mm 0 079 Front Back Side Base ...

Страница 88: ...or 100 1000 Base T connector the VGA USB connector and the liquid lens connector Digital I O and Power Adapter Cable Connector The digital I O and power connector of the adapter cable is an M12 12 pin plug connector that transmits and receives digital I O signals provides an analog reference voltage for an inline control system lighting controller and provides power to your HAWK MV 4000 ...

Страница 89: ... you can build your own To build your own digital I O and power cable parts can be purchased from Pin Signal Name 1 Output Common 2 Analog Output 3 Output 3 4 Power 5 Trigger 6 Input Common 7 Input 2 8 Input 3 9 Input 1 10 Output 1 11 Ground 12 Output 2 Cable Information Manufacturer Phoenix Contact GmbH and Co KG Part Number SAC 12P MS 3 0 PVC SC0 Order No 1554788 Description Sensor Actuator Cabl...

Страница 90: ...imilar cable from an alternate source For an alternate source of 100 1000 Base T cables contact Pin Signal Name Description 1 MDI_1 Bidirectional data A 2 MDI_1 Bidirectional data A 3 MDI_2 Bidirectional data B 4 MDI_2 Bidirectional data B 5 MDI_4 Bidirectional data D 6 MDI_4 Bidirectional data D 7 MDI_3 Bidirectional data C 8 MDI_3 Bidirectional data C Cable Information Manufacturer Phoenix Conta...

Страница 91: ... as follows Standard Display Resolution Analog Video Maximum Refresh Rate 1920 x 1200 RGB 60 Hz 1920 x 1080 RGB 60 Hz 1600 x 1200 RGB 60 Hz 1280 x 1024 RGB 85 Hz 1024 x 768 RGB 85 Hz 800 x 600 RGB 85 Hz 640 x 480 RGB 85 Hz Pin Signal Name Description 1 USB PWR 5 V supplied from your HAWK MV 4000 to USB peripherals 2 USB_DATA_P USB data 3 USB_DATA_N USB data 4 USB_REF USB reference 5 RED_VID_OUT R ...

Страница 92: ...ram of the VGA USB cable showing the connection between the HAWK MV 4000 VGA USB connector on one end and the HD 15 and USB connectors on the other This cable can be purchased separately from Microscan 61 9000147 01 A USB only cable no VGA connector can also be purchased from Microscan 61 9000143 01 ...

Страница 93: ...om a Varioptic Caspian C 39N0 160 I2C or C 39N0 250 I2C lens The secondary 3 pin plug connector from the Varioptic lens is not used This connector is located inside the lens cap housing of the HAWK MV 4000 The pinout for the liquid lens connector is as follows Pin Signal Name Description 1 PWR Power supply 5 V 2 GND Ground 3 SDI Serial data line signal 4 SCK Serial data clock signal 5 Unused Unuse...

Страница 94: ...Appendix C General Specifications C 14 HAWK MV 4000 Smart Camera Guide ...

Страница 95: ...AWK MV 4000 Smart Camera Guide D 1 D MVMonitor Web Page D APPENDIX D MVMonitor Web Page This section explains how to connect to the MVMonitor web page and how to interpret the information displayed there ...

Страница 96: ...tion about the camera s network identity and the state of the runtime is provided To connect to the page simply enter the name of your camera at the specific port 8088 For example if your camera is named HAWK3204ce you would connect to its web page in your browser by entering this in the address bar http hawk3204ce 8088 The web page will look similar to this See the next page for descriptions of t...

Страница 97: ...s Count Gives a count of the number of log files that have been created in the VscapeRuntime Logs folder Access Log Files Link Clicking this link will take you to an FTP page where you can download any of the log files to your local PC Launch CloudLink Clicking Launch CloudLink opens the HAWK MV 4000 Smart Camera s web based runtime monitoring interface in a separate browser tab More information a...

Страница 98: ...Appendix D MVMonitor Web Page D 4 HAWK MV 4000 Smart Camera Guide ...

Страница 99: ...in the documentation folder C Microscan Vscape Documentation during AutoVISION Visionscape installation for detailed information about configuring and using the CloudLink web HMI CloudLink supports Windows 7 32 bit and 64 bit and Windows 10 CloudLink requires an HTML5 compatible browser Internet Explorer 11 or later Google Chrome Firefox Mobile Safari iPhone iPad Mobile Chrome on Android devices T...

Страница 100: ...ess in this case is http localhost CloudLink also works with Visionscape Software and with AutoVISION s Emulator To connect to a software based job running in FrontRunner or AutoVISION First be sure the job is running and then type the following into your browser s address bar Note You must specify port 8080 for a PC based connection If you are connecting to a PC based system from a different mach...

Страница 101: ...contrast CloudLink behaves more like an application expanding to fill the browser window and automatically adapting to any changes in the dimensions of the window Although CloudLink allows you to define and use multiple display pages they are all contained within a single web page The browser stores a maximum of 50 images The camera stores images image thumbnails and data records that can be reque...

Страница 102: ...are three components to the Appplication Bar A set of page selection buttons In the example above they appear as tabs but the style can be customized if necessary A logo The position and contents of the logo can be customized A toolbar The toolbar provides access to various CloudLink settings and modes The position and size of the toolbar can be customized ...

Страница 103: ...pty page to demonstrate the arrangement of the panels on a page Note the names which start with panel It is not necessary to know these names to use CloudLink however they do have significance if there should be need for customization Customizing CloudLink requires the modification of CSS Cascading Style Sheets The names shown correspond to the CSS class selector for that panel The purpose of the ...

Страница 104: ...E 6 HAWK MV 4000 Smart Camera Guide Each panel has special layout and behavior properties that can be exploited to create a wide variety of different layouts The following table summarizes the position and properties of each panel ...

Страница 105: ...ink Web HMI E HAWK MV 4000 Smart Camera Guide E 7 If a panel does not have content i e no widgets are placed in it it is hidden from view with the other panels adjusted to occupy the available space Examples of possible page layouts ...

Страница 106: ...Appendix E CloudLink Web HMI E 8 HAWK MV 4000 Smart Camera Guide ...

Страница 107: ...Smart Camera Guide F 1 F Serial Commands F APPENDIX F Serial Commands This section provides descriptions of the serial commands that can be sent to the camera via TCP Telnet port AutoVISION Terminal or HyperTerminal ...

Страница 108: ...ubtags The command is terminated by a carriage return and or line feed character Include an index to get a single value from an array such as GET int1 If the index is omitted the full array of values will be returned in a comma separated list of values Send Get tagname service tagname service to get the value of a tag within the global data service To get the value of a tag within another service ...

Страница 109: ...in a snapshot The following example will retrieve an image from the camera with these settings Protocol ymodem Format png Quality N A Inspection second inspection GETIMAGE transfer ymodem format png inspection 2 The following example will retrieve an image from the camera with these settings Protocol ymodem Format jpg default Quality 50 Inspection first inspection default GETIMAGE transfer ymodem ...

Страница 110: ...re creates a fixed size streamd0 RAMdisk to receive the avz over FTP If size is omitted the default RAM disk size is used to create streamd0 The size of streamd0 is limited to available contiguous RAM minimum target contiguous RAM 2 User FTPs the job to streamd0 JOBLOAD mem r Loads avz from streamd0 into RAM deletes the RAMDisk streamd0 and optionally starts the job if r is specified JOBINFO slot ...

Страница 111: ...tometry settings Gain Exposure and Focus QUERYFOCUSUNITS Queries the units being used for autofocus mm 0 or inches 1 QUERYWHITEBAL Returns white balance settings RED gain BLUE gain and GREEN gain QUICKFOCUS Performs an autofocus by analyzing the area around the specified point READY insp n Queries if inspection is waiting for a trigger Defaults to first inspection is not specified REBOOT noload Re...

Страница 112: ...avp insp1 snapshot1 acq1 gain 2 0 paths are not case sensitive and do not need to be fully qualified if unique SET avp acq1 gain 2 0 will set the same gain value if there is only one acquire Control tags in the AVP service such as START STOP and TRIGGER act as momentary switches SET avp start 1 is equivalent to the ONLINE command avp start will reset immediately and always read as 0 Success Return...

Страница 113: ...the VIO index must be in the allowed range for Virtual I O points within Visionscape The virtual I O line will be set high then low If VIO Index is not specified VIO1 is assumed Fail Return Return ERROR followed by the reason for the failure For example ERROR No such trigger when the index specified n is out of range of virtual triggers WHITEBAL Performs automatic calibration of white balance sett...

Страница 114: ...Appendix F Serial Commands F 8 HAWK MV 4000 Smart Camera Guide ...

Страница 115: ... Recovery is provided with each camera This section describes in detail the process for saving and restoring the device s operating system This includes restoring to factory settings accessing the ResQDisk Utility backing up your OS restoring a backed up OS and capturing OS images Note All the screens depicted in this section occur in a pre installation environment and were therefore captured exte...

Страница 116: ...toring your camera to Microscan factory settings You can do this by copying the following folder to the USB key The folder should be copied directly to the USB key s top level directory and restored later once you have reset your camera to factory defaults Note You will also need to restore your software licenses from the USB key to your camera To do this copy the contents of the Licensing folder ...

Страница 117: ...to Microscan Factory Settings Operating System Recovery G HAWK MV 4000 Smart Camera Guide G 3 4 The Microscan ResQDisk Utility will appear shortly Click Next 5 Click I agree at the Software License Terms screen ...

Страница 118: ...Appendix G Operating System Save and Restore G 4 HAWK MV 4000 Smart Camera Guide 6 Click Restore OS 7 Click Yes selection box then Next ...

Страница 119: ...tings Operating System Recovery G HAWK MV 4000 Smart Camera Guide G 5 8 Open the dropdown to select the drive to restore which should say Disk 0 Model Generic R1J58L Size 28GB click Next 9 Click Yes All data on the camera will be lost ...

Страница 120: ... and the device will power off 11 Unplug and re plug the device The camera will now be restored to the FACTORY image Click OK 12 After the unit has rebooted log in Plug in the HAWK Recovery USB key Finally restore your licenses and Jobs using Windows Explorer as documented in Restore to Microscan Factory Settings ...

Страница 121: ...an Rescue Utility Operating System Recovery G HAWK MV 4000 Smart Camera Guide G 7 Access Microscan Rescue Utility If you can boot to Windows 1 Select the Start button then choose Settings 2 Select Update and Security ...

Страница 122: ...Appendix G Operating System Save and Restore G 8 HAWK MV 4000 Smart Camera Guide 3 Select Recovery 4 Under Advanced Startup select Restart Now ...

Страница 123: ...g System Recovery G HAWK MV 4000 Smart Camera Guide G 9 5 After your PC restarts to the Choose an Option screen select Troubleshoot 6 Next select Microscan Rescue Utility Follow steps 4 13 in the Restore to Microscan Factory Settings section ...

Страница 124: ...sign in screen hold the Shift key down while you select Power Restart in the lower right corner of the screen 2 Follow steps 5 and 6 in the Access Microscan Rescue Utility section If you can t boot to Windows 1 During system boot press F8 This starts the Advanced Boot Options 2 Select Repair Your Computer 3 Follow steps 5 and 6 in the Access Microscan Rescue Utility section ...

Страница 125: ...ent Note If the hard drive is corrupted or the system cannot boot see Restore to Microscan Factory Settings for more details Back Up OS This operation allows you to save back up your current OS to a storage device so you can restore it later using the Microscan Rescue Utility s Restore OS feature Important Before continuing this operation disable the Unified Write Filter UWF To save back up the op...

Страница 126: ...Appendix G Operating System Save and Restore G 12 HAWK MV 4000 Smart Camera Guide 3 After your PC restarts and displays the Choose an Option screen select Troubleshoot 4 Select Microscan Rescue Utility ...

Страница 127: ...ck Up Restore Capture the OS Image with Microscan Rescue Utility Operating System Recovery G HAWK MV 4000 Smart Camera Guide G 13 5 The Microscan Rescue Utility will display 6 Accept the License Agreement ...

Страница 128: ...ckup image It is not recommended to save the backup images in the OS partition or the virtual drive X Instead insert an external USB storage device with enough space at least 16 GB depending on the size of the OS partition If you do not add a file name the default file name will be W10HAWK wim Important The device used to save the backup image should be formatted as NTFS 9 Click Go to save the ima...

Страница 129: ...Image with Microscan Rescue Utility Operating System Recovery G HAWK MV 4000 Smart Camera Guide G 15 10 When complete you will see the following message 11 Click OK to shut down your device 12 Power down and then re power the device ...

Страница 130: ...was backed up Warning This utility will reformat and erase all data currently on your hard drive If you have external drives connected be sure to select the correct drive or disconnect all external hard drives to prevent data being erased by accident To restore your backup image do the following 1 Access the Microscan Rescue Utility See previous section 2 Click Next to select Backup OS automatical...

Страница 131: ... Click Back then click Restore OS 4 Select your backup wim file W10HAWK wim from where you saved it and select Disk 0 from the dropdown Click Next Note that these files are created with the backup option described later in this section This will begin restoring the OS you selected and will shut down when complete Re power the device ...

Страница 132: ...ws will pop up You can ignore it or click Cancel to close the window 3 When you are done configuring your unit go back to the OSConfig exe Capture OS tab and click the Reboot and Launch Capture Tool button Before launching the System Preparation Tool Sysprep to reseal the image it will delete the msuser account click OK to continue The system will reboot and run Sysprep to reseal the image When th...

Страница 133: ...erased To create a USB storage device to restore one or more Microscan HAWK units do the following 1 Access the Microscan Rescue Utility see the Access Microscan Rescue Utility section 2 Accept the License Agreement 3 Select the Copy Microscan Rescue Tool to USB Storage Device option from the menu 4 Follow all on screen instructions Note that you must provide the Microscan Factory Image or your cu...

Страница 134: ...Appendix G Operating System Save and Restore G 20 HAWK MV 4000 Smart Camera Guide ...

Страница 135: ... Config application serves many purposes each of which is described in this section This application is used to determine OS and firmware versions add and remove languages turn on the hard drive write filter show hard drive wear show End User License Agreements and capture your OS for backup of your system ...

Страница 136: ...on Below this you will see the Product ID Owner Organization Computer Name and IP Address of the device You may have this display open automatically on startup by checking the Automatic popup of this dialog box at startup checkbox Windows defender is disabled by default You can enable it by clicking the Turn ON Windows Defender button Windows updates are also disabled by default You can enable the...

Страница 137: ...cking ENABLE UWF enables the Windows Universal Write Filter on the device If you enable this any changes made to the device will not be written to the hard disk and will be lost on reboot Clicking DISABLE UWF disables the Windows Universal Write Filter again after reboot The UWF is disabled by default ...

Страница 138: ...ix H OS Config Application H 4 HAWK MV 4000 Smart Camera Guide Capture OS Tab See Operating System Save and Restore for more information about backing up the device You can also click on the More info button ...

Страница 139: ...nguages Tab Select to install or to uninstall using the Available Display Languages radio buttons then select a language to add or remove from the device Follow the screen prompts Click the More info button for instructions on enabling the language in Windows Click Apply when ready ...

Страница 140: ...Smart Camera Guide eMMC Tab This tab shows embedded Multi Media Controller information This is a display of the type of memory used for the hard drive It shows statistics on the wear state of the actual hardware devices and can warn of issues with them ...

Страница 141: ...EULA Tab Operating System Recovery H HAWK MV 4000 Smart Camera Guide H 7 EULA Tab This tab allows you to display the Microsoft and Microscan End User License Agreements ...

Страница 142: ...Appendix H OS Config Application H 8 HAWK MV 4000 Smart Camera Guide You must click I agree on each screen to acknowledge you understand the licensing terms ...

Отзывы: