background image

©2021 Micro-Air Corp 


August 2, 2021, revision 1.4 

Operating the thermostat 

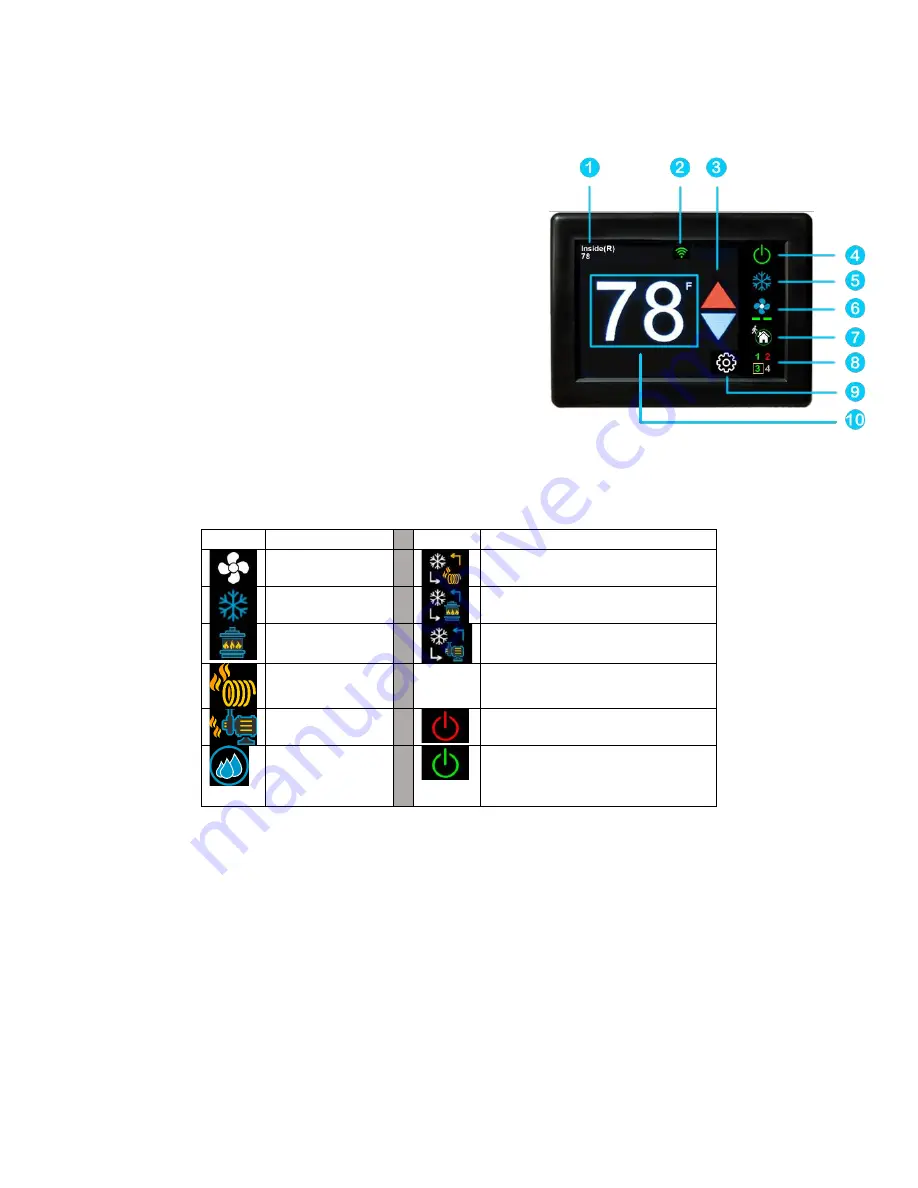
Main screen 


1.


Inside temperature shows the ambient temperature of 
the room. 

2.


WIFI indicator shows the state of the WIFI connection.  
Green indicates WIFI is connected properly, Red 
indicates connection to router only, bars indicate signal 
strength, and no symbol indicates no connection.  

3.


Raise and lower the temperature set point using the 
red and blue arrows.  

4.


Use the power button to turn the system on or off. 
Button is red for off and green for on. 

5.


Pressing the mode icon changes from cooling or 
heating modes depending on what is available in your system. See table 2 for a list of all possible 
modes. 
 

Table 2 


6.


Pressing the fan icon selects between manual (always on) fan speeds and automatic fan speeds. 
Automatic will turn the fan off after the heating or cooling cycle is completed. See table 3 for 
available fan speeds.


Icon 

Action 


Icon 

Action 


Fan only 


Automatic cool/heat strip 


Cool Only 


Automatic cool/furnace 


Furnace 


Automatic cool/heat pump 


Heat strip 


Heat pump 


Zone off 


Aqua Heat 
mode (future 
option) 


Zone on 

Содержание EasyTouch 351

Страница 1: ...1 2021 Micro Air Corp August 2 2021 revision 1 4 EasyTouch 351 Operating Manual Revision 1 4...

Страница 2: ...nd cool set points 9 Schedule screen 10 Setting a change event 10 12 or 24 hour format 10 Setting the time 10 Enabling the schedule 10 Settings Screen 11 Gas Heat Override 12 Smart device application...

Страница 3: ...tangular locking tab on the bottom of the thermostat with a small screw driver Pull the thermostat away from the wall from the bottom The second style has up and down arrows to change temperature a re...

Страница 4: ...rminals on the back of EasyTouch labeled SIG GND and 12V They will be connected to the push terminals on the back of the EasyTouch thermostat Use the information in Table 1 to determine the connection...

Страница 5: ...Step 2 Screw in one screw and level the buttons so the display will be straight when installed Step 3 Screw in second screw making sure the two buttons remain level Step 4 Remove mounting tab before...

Страница 6: ...using either Bluetooth or WIFI Apps may be loaded from the Google Play store or Apple App store The first time the app is opened it will ask to create an account A WIFI connection on your smart devic...

Страница 7: ...wer button to turn the system on or off Button is red for off and green for on 5 Pressing the mode icon changes from cooling or heating modes depending on what is available in your system See table 2...

Страница 8: ...de allows setting a heating and a cooling set point and automatically changing from heating to cooling 8 The zone selection button will show a zone in green when it is turned on The zone number will s...

Страница 9: ...ht time heating temperature It can also be used to control the temperature extremes when you are away from the RV The mode selected must be an automatic mode to allow both heating and cooling operatio...

Страница 10: ...temperature the system will try to achieve after the time that was set 12 or 24 hour format 2 Press the time in the upper right to change 12 and 24 hour time formats Setting the time 3 Time zone is se...

Страница 11: ...changes before a cycle begins in furnace or aqua mode 6 Bluetooth is used to reset the Bluetooth password This password is saved from your account password Only one account at a time may access the th...

Страница 12: ...n WIFI symbol Tap Check for Updates and follow the prompts Notifications Notifications provide a way for the thermostat to communicate back to a smart device like a tablet or phone These notifications...

Страница 13: ...4 GHz network and not a 5GHz or 6GHz network Set the security to WPA2 and TKIP AES if you are having trouble The thermostat has a limit of 31 characters for the SSID and 50 for the password The number...

Страница 14: ...rmostat is to be added 1 Press Add on the top of the selection screen Apple or press the settings gear and Add Device Android 2 The second thermostat should be listed in the new selection window Selec...

Отзывы: