background image


Other Models 

18 

©2018 Micro-Air 

Rev 1.01 

Polar Cub #1 


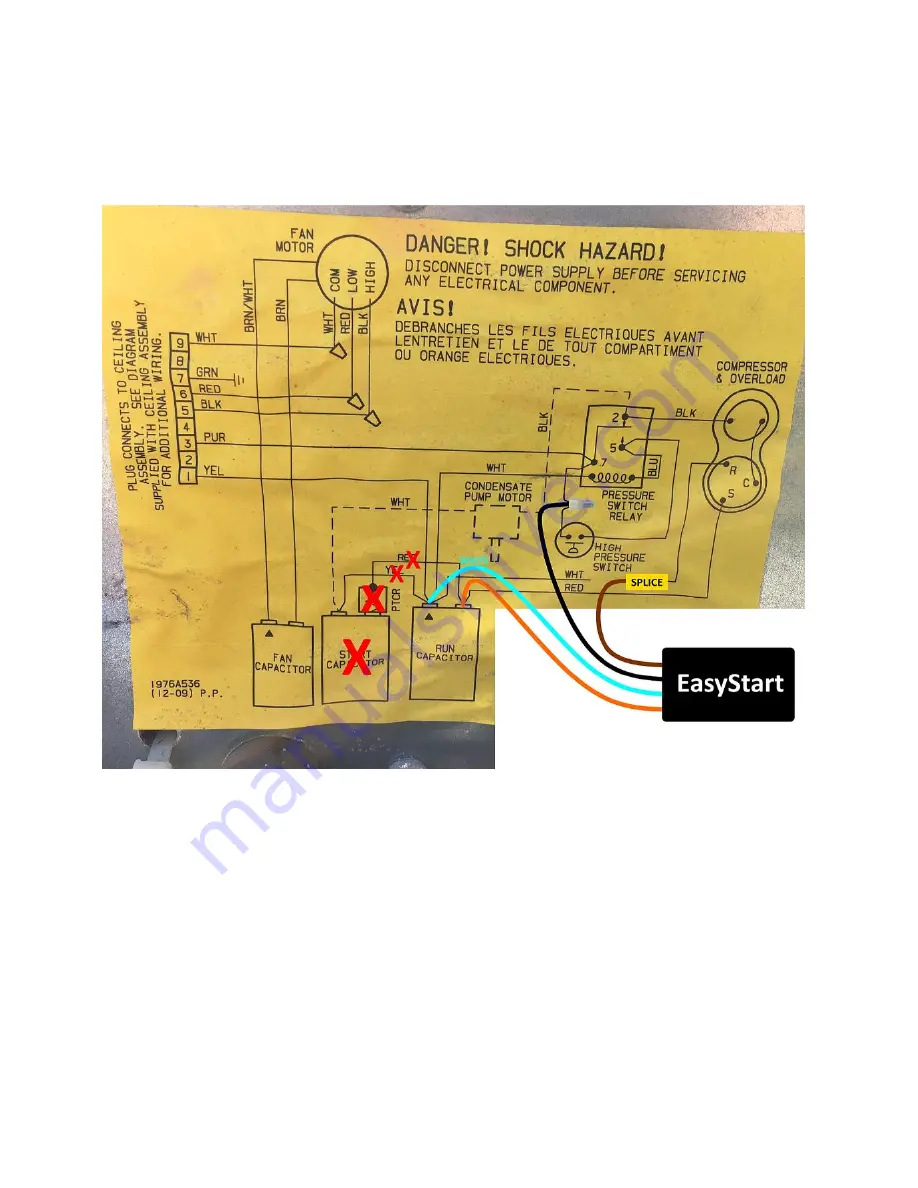
Red X indicates wires and components that are to be removed. Not all systems have these 

components. If the run capacitor has only a single red wire on the HERM terminal or a single red wire on the 
terminal group opposite the white/yellow wire group then there is no start components and the red X’s can be 
ignored.  


Содержание EasyStart 364

Страница 1: ...CM1 3 Mach 1 3 3 10 15 high profile models 4 Wiring diagram 4 Mounting locations 5 Routing the wire 5 Identifying the wires 6 Making the connections 6 Brown wire 6 White wire 7 Orange wire 7 Black wire 8 Removing existing start components 8 Mach 8 low profile models 9 Model identification and wiring diagrams 9 Style 1 9 Style 2 10 Mounting location 11 Identifying the wires 12 Routing the wire 12 M...

Страница 2: ...on contained in this manual can be used to install EasyStart on most Coleman brand air conditioning units Similar models are grouped together as the installation is very comparable for these units Safety first Follow standard electrical safety guidelines for your locality when working with your air conditioner If you are uncomfortable working on your air conditioner please seek professional help f...

Страница 3: ...operly made If the wire pulls out the joint was not done correctly and must be redone It is better to test every joint during the install than to find out on a hot day that the crimp failed Installation kit for Coleman Mach KIT 364 CM1 Note some of the items in this kit are meant for use in the Coleman low profile systems as well and will therefore not be used in this described installation 1 End ...

Страница 4: ...tart is connected shows a PTCR and start capacitor The right dashed block shows a start relay configuration The dashed components inside each block show that those components may not be installed in either configuration There may be 2 or 3 capacitors inside of the electric box EasyStart installs the same way regardless of the configuration used in your air conditioner Follow the instructions in th...

Страница 5: ...cabinet Clean and dry the selected mounting area Use double sided foam tape to secure the enclosure to the air conditioner in one of the identified areas The green arrow in Image 1 shows the location or the door for the electric box Remove the screws to gain access to the inside of the box Routing the wire The electrical box wire entry is sealed with a putty as shown in image 2 Pull back the putty...

Страница 6: ... the white wire from the compressor into the electric box to the top of the run capacitor as indicated by the green arrow in image 4 Disconnect the white wire and cut off the connector on the end Strip about inch 1 27cm of insulation from the white wire and from the BROWN wire from EasyStart Twist both wires together and crimp them with and end splice connector as shown in image 5 Note Some instal...

Страница 7: ...ITE wire from EasyStart to the run capacitor on the same terminal group as the yellow wire indicated by the yellow arrow in image 6 Orange wire Place a blue female quick connect terminal on the ORANGE wire from EasyStart and crimp it tightly Connect the ORANGE wire to the red wire terminal group on run capacitor shown by the orange arrow in image 7 Image 6 Image 7 ...

Страница 8: ... PTCR green arrow in image 10 Previous owners may have also installed a hard start kit that replaces these components These components form a circuit that connect from the yellow wire side of the run capacitor to the red wire side of the run capacitor Image 7 shows a single red wire connecting to the run capacitor If your system has only this single red wire then there are no start components in y...

Страница 9: ... 1 and style 2 Diagrams are normally installed on the electric box inside cover Style 1 Image 11 shows the early model low profile unit The picture is shown with the fan removed for easier access Capacitors are mounted inside the metal box in the center of the AC unit The EasyStart wiring connections will all be made inside this box Image12 shows the wiring diagram shipped with this model Image 11...

Страница 10: ...s are mounted outside the box as indicated by the blue arrow in the image Wiring connections to EasyStart will all be made inside the electric box in the center of the unit just under the fan Image 14 shows the wiring diagram shipped with this unit and modified to show EasyStart Image 13 Image 14 ...

Страница 11: ...ow suggested mounting locations Removing the fan will give better access to wiring and mounting Clean and dry the selected mounting area Use double sided foam tape provided in the installation kit to secure the enclosure to the air conditioner in one of the identified areas Image 15 ...

Страница 12: ... by the green arrow in Image 16 The connections these wires make inside the electric box will be used to connect EasyStart in the next installation steps Routing the wire Route the wires into one of the wire entries on the side of the electric box There is usually enough room where the compressor wires enter the box to add the EasyStart wires Secure any excess wire using the wire ties supplies in ...

Страница 13: ...the wire to the connector block and unplug the wire from the connector block see arrow 2 in Image 17 Install the yellow male quick connect on the BROWN wire from EasyStart and crimp the connector Connect the unplugged white wire into the BROWN wire from EasyStart White Wire Place a yellow female quick connect terminal on the WHITE wire from EasyStart and crimp the connector Connect the WHITE wire ...

Страница 14: ...onnections and secure the ends out of the way with a wire tie This is pointed to by arrows 1 and 4 on Image 17 however the wires must be traced back from the capacitor to be sure the correct wires are disconnected Disconnect the two remaining red wires from the compressor from the PTCR and remove the PTCR Reconnect the red wires to the PTCR terminals on the connection block Orange wire Install a p...

Страница 15: ...male quick connect on the BROWN wire from EasyStart and crimp the connector Connect the unplugged white wire into the BROWN wire from EasyStart White Wire Place a yellow female quick connect terminal on the WHITE wire from EasyStart and crimp the connector Connect the WHITE wire from EasyStart to the empty terminal on the run capacitor created when the white wire from the compressor was disconnect...

Страница 16: ...apacitor it has two brown wires connected to it Disconnect both red and yellow wires from the start capacitor Follow the wires to the other end of the wire Disconnect and remove the wires Disconnect any remaining red wires from the compressor from the PTCR and remove the PTCR Reconnect the wires to the PTCR terminals on the connection block Orange wire Install a piggyback quick connect on the ORAN...

Страница 17: ...ll models we have come across so far The wires from the compressor are Black to the compressor overload and compressor run winding White to the compressor run winding Red to the compressor start winding Additionally purple supplies power to the system from the control relay and splices to EasyStart Black Mounting location varies for these models however it is always possible to find an appropriate...

Страница 18: ...ponents that are to be removed Not all systems have these components If the run capacitor has only a single red wire on the HERM terminal or a single red wire on the terminal group opposite the white yellow wire group then there is no start components and the red X s can be ignored ...

Страница 19: ...r Models 19 2018 Micro Air Rev 1 01 Polar Cub 1 Alternate This alternate drawing shows the black wire connection being made in the purple wire instead of the black wire that goes to the high pressure switch ...

Страница 20: ...ey are installed Not all systems have these components If the run capacitor has only a single red wire on the HERM terminal or a single red wire on the terminal group opposite the white yellow wire group then there is no start components and the red X s can be ignored The red X by the run capacitor indicates the white wire is disconnected from the yellow wire terminal and reconnected to the BROWN ...

Страница 21: ... Micro Air Rev 1 01 TSR Mach 3 The TSR Mach 3 is an older model that is still similar to other models here The diagram is included because it is drawn visibly different from the other models The wiring is however the same ...

Страница 22: ...ctually two compressors in one box therefore two EasyStart units are required The box is typically basement or under coach mounted As with other models start components are removed by removing the red and yellow wires from the run capacitor that go to the PTCR and start capacitor ...

Страница 23: ...ir conditioning unit 2 Set the thermostat to start the air conditioner compressor Heat mode may be used if you are using a heat pump model 3 The compressor will start up shortly after the fan starts Let the compressor run for 30 seconds 4 Set the thermostat to turn off the compressor 5 Set the thermostat to start the compressor again 6 EasyStart will wait 5 minutes from the time the compressor sto...

Страница 24: ...If it s a slide thermostat it must be set for full cool 4 Is it too cold for the compressor to start We often get calls where a slide thermostat will not work under 70 F 21 2 C ambient Try heat mode if you have a heat pump and it is too cold or warm the RV with the heater first 5 Check your line voltage when the compressor tries to start and make sure it is not dropping below 108 VAC Some RV s hav...

Страница 25: ...ical photocopying recording or otherwise without prior written consent by Micro Air Corporation Every precaution has been taken in the preparation of this manual to insure its accuracy However Micro Air Corporation assumes no responsibility for errors and omissions Neither is any liability assumed nor implied for damages resulting from the use or misuse of this product and information contained he...

Отзывы: