background image

34008486EN/AA

 - Page 39

6. Life Cycle Monitoring (LCM)

Reset or disable LCM  


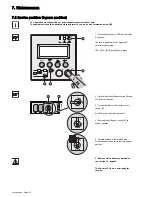
In case of any LCM messages displayed:

 For temporary reset: press the escape button


more than 3 seconds, into Status and Alarm screen

to cancel temporary the 

alarm status.
The alert will be repeated twice each 30 days.

 For permanent reset: press the enter button


more than 3 seconds, into LCM warning screen, to cancel permanently this LCM 

event. 

At any time:
To Disable all LCM messages select "disable all" ,into LCM menu.
Be careful: you will not be aware of any LCM events that can happen on the UPS if you disable all LCM messages.

Содержание Pulsar MX Frame 15000 RT

Страница 1: ...34003641FR AA Page 1 T H E U N I N T E R R U P T I B L E P O W E R P R O V I D E R www mgeups com Installation and user manual Pulsar MX Frame 15000 RT 20000 RT...

Страница 2: ...34008486EN AA Page 2...

Страница 3: ...o comply with regulations and in view of correct disposal The Material Safety Data Sheets MSDS for the batteries are available on our web site For more information or to contact the Product Environmen...

Страница 4: ...ntroduction Pictograms Important instructions that must always be followed Information advice help Visual indication Action Audio signal In the illustrations on the following pages the symbols below a...

Страница 5: ...on to the communication port by relays 16 Installation of communication card 17 Remote Power Off communication port 17 2 5 Required protective devices and cable cross sections 18 Recommended upstream...

Страница 6: ...quence 28 3 3 Operating modes 29 Normal mode 29 Battery mode 29 3 4 Return on Normal AC source 29 3 5 UPS shutdown 30 4 Access to measurements and personalisation data 4 1 Display organisation 31 4 2...

Страница 7: ...wapping the power sub module 40 Disconnecting the power sub module 40 Reconnecting the power sub module 40 7 2 Hot swapping the battery sub module 40 Disconnecting the battery sub module 40 Reconnecti...

Страница 8: ...x445x738 mm 27 x 18 x 29 inches Weights Pulsar MX Frame 71 kg 157 lbs Pulsar MX Frame 15 000 RT 194 kg 428 lbs Pulsar MX Frame 20 000 RT 239 kg 527 lbs Dimensions H x W x D Pulsar MX Frame 15 000 RT 2...

Страница 9: ...10A thermal switch 7 15A thermal switch 8 Normal AC source terminal block 9 Bypass AC source terminal block 10 Output terminal block 11 Slot for optional communication card 12 Manual Bypass switch 13...

Страница 10: ...down scroll up 7 Escape cancel button 8 Enter confirm button 9 UPS OFF button 10 UPS ON button 11 Rectifier LED 12 Battery LED 13 Inverter LED 14 Bypass LED 15 Load powered LED 1 Sub modules detection...

Страница 11: ...nnectors for automatic detection of battery module s 2 Battery circuit breaker 3 Connectors for battery modules to the UPS or to the other battery modules The Battery Integration System is intended fo...

Страница 12: ...9 Network Management card 10 3 or 4 Battery sub modules 3 for 15 000 RT 4 for 20 000 RT 11 3 or 4 Power sub modules 3 for 15 000 RT 4 for 20 000 RT Packaging must be destroyed according to waste mana...

Страница 13: ...owed to install the UPS or battery module in a hermetically closed environment without any exchange of air 1 Use packaging as shown 2 Place Pulsar MX Frame on its side 3 Remove the 4 screws of the 4 w...

Страница 14: ...owed to install the UPS or battery module in a hermetically closed environment without any exchange of air Follow steps 1 to 4 for rack mounting the UPS onto the rails The rails and the necessary moun...

Страница 15: ...ighest level 4 2 Remove the 4 fixing screws of the mounting screws to free the power sub module space Repeat the operation 2 for the battery sub module space 3 Insert the power sub module and attach t...

Страница 16: ...1 communications cable to the serial port on the computer equipment 2 Connect the other end of the communication cable 1 to the RS232 2 communications port on the UPS The UPS can now communicate with...

Страница 17: ...ch a device that allows to trip all breaker s located upstream 1 and downstream 2 Pulsar MX RT This can be achieved by means of a shunt trip 1 If not the output devices could be powered again through...

Страница 18: ...n is not achieved and may result in a potential power interruption to the connected devices 15000 20000 RT D curve 125 A Single phase input To UPS Normal AC source and or Bypass AC source Three phases...

Страница 19: ...Bypass AC inputs Main low voltage switchboard MLVS load Change in SEA between upstream and downstream or galvanic isolation required Main low voltage switchboard MLVS load The transformer is not neces...

Страница 20: ...in SEA between upstream and downstream or galvanic isolation required MLVS 1 MLVS 2 load Frequency converter without Bypass AC input Configuration used when the frequency of the application differs fr...

Страница 21: ...pass AC inputs Main low voltage switchboard MLVS load Change in SEA between upstream and downstream or galvanic isolation required Main low voltage switchboard MLVS load The transformer is not necessa...

Страница 22: ...nge in SEA between upstream and downstream or galvanic isolation required MLVS 1 MLVS 2 load Frequency converter without Bypass AC input Configuration used when the frequency of the application differ...

Страница 23: ...e of connection must be carried out by qualified electrical personnel Before carrying out any connection check that the upstream protection device Normal AC source is open O OFF 1 Remove the 2 screws...

Страница 24: ...d 3 Connect the 3 cables to the normal AC source terminal block 4 Connect the 3 cables to the output terminal block 5 Be sure that input selection selector 1 is set to single phase position 1 Be sure...

Страница 25: ...erminal block 4 Connect the 3 cables to the output terminal block 5 Remove cover and put input selection selector 3 to three phase position 1 Remove the one phase metal strap 1 2 Remove the metal jump...

Страница 26: ...tion 2 8 Fix the terminal block cover This type of connection must be carried out by qualified electrical personnel 1 Push up the moving tray 1 2 Push in the moving tray 1 3 Fix the 2 screws of the te...

Страница 27: ...the other end of the battery cable to the second EXB battery power connector 10 of the above EXB 5 Connect the battery detection cable to the second EXB battery detection connector 11 and the other e...

Страница 28: ...the upstream circuit breaker not included to the I position ON The equipments are powered via the Bypass AC source but not protected by the UPS Batteries are recharging an 8 hour recharge period is ne...

Страница 29: ...ry Under normal condition Normal AC source available LED 1 is ON LEDs 2 3 4 are green The equipments are protected by the UPS LEDs 1 2 are ON LEDs 3 4 5 are green The audio alarm beeps every 10 second...

Страница 30: ...UPS It is powered via the Bypass AC source If the UPS is set in frequency converter mode the equipments will not be powered If the Normal AC source is out of tolerance the UPS will generate a 10ms out...

Страница 31: ...ttery capacity Press the scroll button 1 a number of times to point the UPS set up or Maintenance menu Press the Enter button 2 to get access Status and Alarms Measurements UPS input measurements UPS...

Страница 32: ...of tolerance Interrupt Time 10 ms 20 ms 200 ms Break time calibration during load transfer on Normal AC source out of tolerance Overload Prealarm 105 40 50 70 Alarm if threshold is overrun Redundancy...

Страница 33: ...ad Battery capacity Alarm History Read Description Date Hour Alarm xxx 10 alarms can be stored automatically Erase No Yes System Diagnosis Module detection Status for each module Manual Batt Test Manu...

Страница 34: ...press the Enter button 4 and the scroll button 5 to get access to further details In case of LCM WARNING refer to LCM section see section 6 page 38 if LED 6 is ON The equipments are no longer supplied...

Страница 35: ...nnections are correct call the after sales support department and follow the sub module replacement procedure see section 7 page 40 A internal power sub module 1 fault is detected Press the Enter butt...

Страница 36: ...Check battery connections see section 2 9 page 27 Or Insert the missing batteries sub modules see section 2 3 page 15 NO BATTERY MODULE No battery sub module is detected next to an inserted power sub...

Страница 37: ...he battery test Use Enter button 1 to display details Call the after sales support department Follow the battery sub module replacement procedure see section 7 2 page 40 FRAME FAULT Internal chassis f...

Страница 38: ...s of your installation Autonomy time with mains 2 out of tolerance overloads number load level in Battery ambient temperature time on inverter time on mains 2 LCM warning details Signification FOR A S...

Страница 39: ...creen to cancel temporary the alarm status The alert will be repeated twice each 30 days For permanent reset press the enter button more than 3 seconds into LCM warning screen to cancel permanently th...

Страница 40: ...dispose of batteries in a fire The battery may explode Do no open or mutilate batteries Released electrolyte is harmful to the skin and eyes It may be toxic Servicing of batteries should be performed...

Страница 41: ...bypass mode LED 2 is ON LEds 3 4 are green 2 Unlock the Manual Bypass switch 5 and set to the test position 3 Turn off the Normal AC source circuit switch 6 All LEDs on the front display are off 4 Set...

Страница 42: ...in the center of the manual bypass switch 1 to unlock it 2 Set the bypass switch 1 to test position 3 Turn on the Normal AC source input switch 2 4 Set the bypass switch 1 to normal position 1 Press a...

Страница 43: ...re MGE UPS SYSTEMS 140 avenue Jean Kuntzmann Zirst Montbonnot St Martin 38334 St Ismier Cedex FRANCE Tel 33 0 4 76 18 34 14 Fax 33 0 4 76 18 45 21 training mgeups com www mgepowerlearning com Catalogu...

Страница 44: ...ted input voltage Input voltage range Frequency Power factor Harmonic distortion Leakage current Single phase 230 V Three phase 400 V 120 156 V to 280 V 3 50 60 Hz autoselection 0 99 5 1 1 20 mA max 3...

Страница 45: ...he equipments directly to the AC source Transfer of the equipments to the manual bypass enables UPS maintenance without interrupting the supply of power to the connected equipments Normal AC source No...

Страница 46: ...34008486EN AA MGE UPS SYSTEMS T H E U N I N T E R R U P T I B L E P O W E R P R O V I D E R 140 Avenue Jean Kuntzmann ZIRST Montbonnot St Martin 38334 Saint Ismier Cedex France www mgeups com...

Отзывы: