background image


Page 67


Step 4: 

 
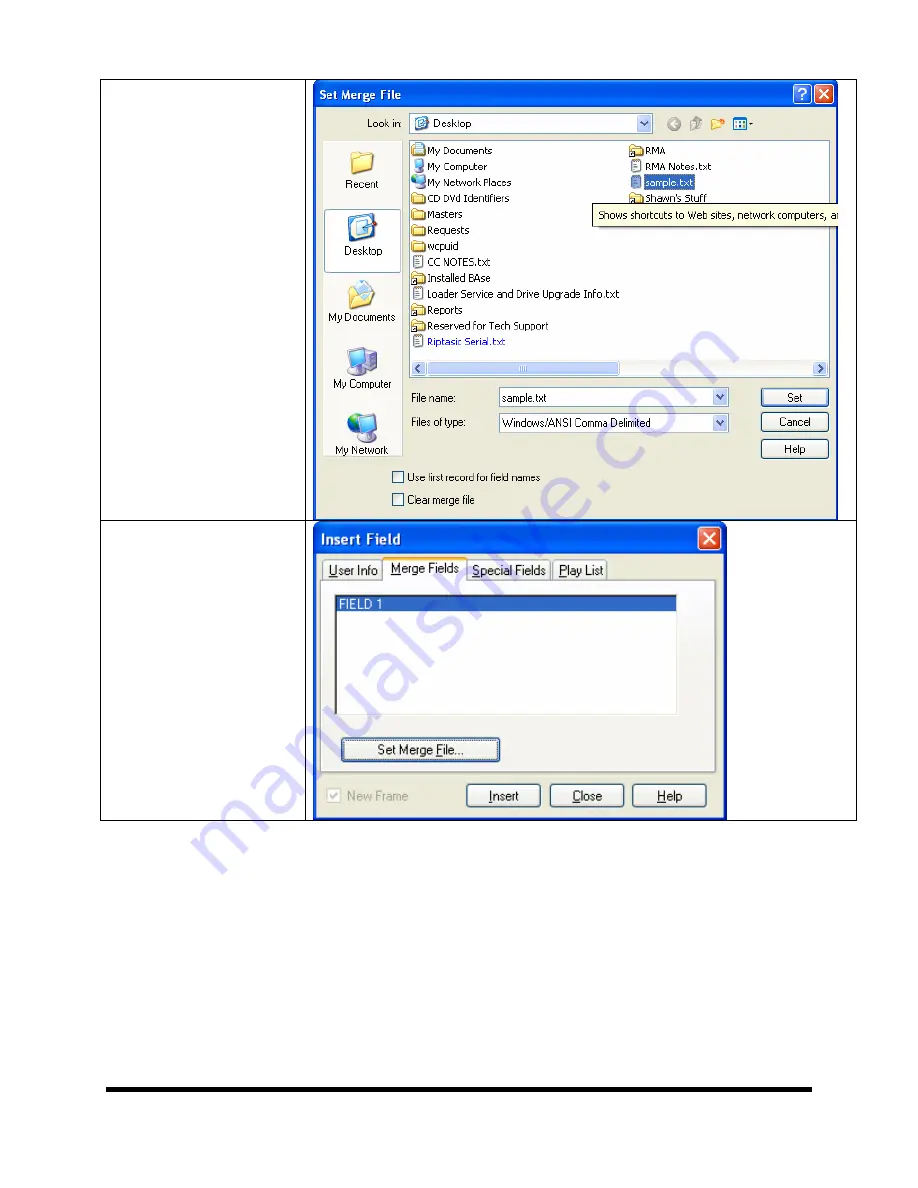
Now click the Set Merge File 
button.  Now the Set Merge 
File Dialog appears. 
 
Locate your CSV File and 
select it. 
 
Once selected, click the Set 
button on the right. 


You’ll notice the window in 
the center of Insert Field 
Dialog has now changed.  
 
It now contains the name of 
Field 1.  This is the Field that 
we are going to use.  Select it 
and Press the Insert button. 
 
The field will be inserted 
behind this dialog.  If there are 
no more fields that you wish to 
insert it will be necessary to 
press the Close button. 


Содержание Scribe series

Страница 1: ...Series Operator s Guide Version 5 0 23 and Higher...

Страница 2: ...e purchase and the warranty is NOT transferable This warranty does not apply to malfunctions caused by misuse negligence accident or alteration nor is MF DIGITAL responsible for consequential damages...

Страница 3: ...2 A Note About Aborting Job in Progress Be Patient 12 THE SCRIBE APPLICATION 13 STARTING THE SCRIBE APPLICATION 13 Selecting STANDARD or ADVANCED mode 13 SCRIBE APPLICATION LAYOUT 14 Reviewing and cha...

Страница 4: ...ASTERS AT A TIME 47 DATA IMPORT RIPPING DATA CDS OR DVDS 49 MULTI DISC BATCH JOBS 51 SCRIBE CSV SYNTAX 52 SCRIBE CSV SYNTAX 52 SAMPLE LINE IN A CSV 52 VALUE DEFINITIONS 52 LOG FILES 53 JOB LOG 53 JOB...

Страница 5: ...ures Include Networkable Ethernet onboard comes complete with unlimited seat Windows Network Client Heavy duty robotics as well as the fastest robotics makes for the ideal copier for those mission cri...

Страница 6: ...has a PC onboard so there is no need to buy or dedicate a PC to operate it The package includes Scribe duplication system Power cord Scribe Software Manual CD What you will also need PC compatible VGA...

Страница 7: ...photo sensors that can be adversely affected by direct light sources Avoid placing the system in direct sunlight under halogen or mercury vapor lights or other close and very bright light sources If y...

Страница 8: ...city ranges from 250 discs to 600 discs depending on model and setup Making the connection The Scribe requires a Monitor Keyboard and mouse to use it properly While these items are not included they a...

Страница 9: ...r With PicoJet let print cartridges park Switch the Scribe power switch to on position Note The Scribe uses Microsoft s Windows XP operating system To get the most out of the Scribe it is recommended...

Страница 10: ...eps Double click on the ScribeSetup and the installer screen will appear ScribeSetup will begin extracting the files to install When presented with the first dialog screen Click NEXT to continue When...

Страница 11: ...en will now be displayed Place some blank CDs or DVDs into the input hopper followed by the master CD or DVD you wish to copy If the master is a DVD you must use DVD blanks If the master is a CD you m...

Страница 12: ...at PDF files Adobe PDF files should be made as ded in Creating Using Adobe Acrobat PDF Files Also be sure your printer is attached as ded in the manual that accompanied your printer and is selected on...

Страница 13: ...wn such as a work order number Click FINISH when you are ready The Jobs in Progress section of the Job Manager TAB will now show the status of the job you just started The will now load the master dis...

Страница 14: ...k the MF Digital Scribe Icon The Scribe application screen will now be displayed Selecting STANDARD or ADVANCED mode When first started you are in standard Standard mode is best suited for those who d...

Страница 15: ...ggle between these modes simply by enabling and disabling the Advanced Authoring Tools Scribe Application Layout The Scribe application is organized into either two or five cards depending on if Advan...

Страница 16: ...TAB allows you to pre master an audio CD from WAV or MP3 files Settings Defines settings and default file locations Premium Utilities add in plug ins can be found here They include batch audio CD rip...

Страница 17: ...top of the tab is the Scribe s version information This lets you know what version of Scribe you are currently running The settings below the version information may be customized The following secti...

Страница 18: ...els click the Browse button to the right of the CD labels default folder field When creating a new job this will be the default folder that the Scribe opens to browse for a label file path Printer Dri...

Страница 19: ...en enabled SHAKE DISC will perform a slight shaking motion with each pick of disc from an input hopper If the discs are somewhat sticky this can help in separating them Only enable this in the event y...

Страница 20: ...low ink warning Simply enter the email address and push the Set Button This also requires a POP account to be setup on the Scribe Machine using Outlook Express Note When setting up the POP account in...

Страница 21: ...eating a data disc image To create a data disc image Click the Data Image Editor tab The screen will now read The Data Image Editor tab is divided into four panes The top left pane lists all of the na...

Страница 22: ...ch as volume label publisher data preparer as well as the desired file system Create CD image ISO Creates a real disc image file ISO for CD or UDF for DVD Real image files are self contained and the o...

Страница 23: ...s in the lower right pane represent the contents of the CD being created fig 2 Creating renaming and removing Folders In the bottom left pane first click at the point you wish to insert a folder or on...

Страница 24: ...ob is submitted for recording rather than when the disc image is created For example specifying dynamic content when creating a CD or DVD layout would allow a job to be run every week that records the...

Страница 25: ...the source data will always be available to the Scribe A physical image file ISO for CD UDF for DVD is an exact replica of the final disc and contains all of the source data It is therefore best used...

Страница 26: ...yright File Optionally enter the file name that provides copyright information about the CD Abstract File Optionally enter the file name that des the contents of the CD Bibliographic File Optionally e...

Страница 27: ...me for the physical image file and click the Save button Loading An Existing Script File Once a data disc image script file has been saved it can be modified at a later date To load an existing script...

Страница 28: ...Editor tab is divided into four panes The top left pane lists all the names and icons of the disk drives available to the Scribe as well as files and folders on the currently selected disk drive sourc...

Страница 29: ...CD layout to a disc image script file ISC CD Image properties Unlike with data discs the properties button audio discs allows you to optionally change only the disc s UPC code Create CD image Creates...

Страница 30: ...allows you to select a range of contiguous tracks while CTRL allows you to selectively pick multiple tracks As additional tracks are added drag and drop them in at the desired insertion point Removin...

Страница 31: ...STANDARD RECORDING CODE ISRC is an optional 12 character descriptor that identifies a specific track on an audio CD Each track can have its own unique ISRC consisting of 2 alphanumeric characters coun...

Страница 32: ...lag Right click the desired audio track in the lower left pane and select Edit The screen will now read To enable Copy Prohibit bit select the Copy Prohibit box so that it is checked or uncheck the bo...

Страница 33: ...e silence indicator over the trashcan in the bottom right of the Audio tab and release the mouse button Click the Yes button Or Right click the silence indicator and select Delete Inserting Editing An...

Страница 34: ...ames Click the OK button To remove subindexes Right click the subindex you wish to remove in the lower right pane Select Delete or Drag the subindex over the trashcan in the bottom right of the Audio...

Страница 35: ...e button on the toolbar The screen will now read Select the volume and directory where you want to save the physical image file Enter the name for the physical image file and click the Save button Loa...

Страница 36: ...box as shown to the right will appear 2 Now enter the Artist information 3 Now enter the Album information 4 Click OK This information will be written to your disc when you burn it To Track CD Text 1...

Страница 37: ...Track Information as well as ISRC codes in this dialog 5 To add Artist Track and ISRC codes to each track you would need to repeat these steps for each track added to the compilation This information...

Страница 38: ...mage and label files The middle pane is the ACTIVE JOBS window that lists all the jobs currently being recorded or printed by the Scribe Information displayed for each job includes its assigned Job na...

Страница 39: ...job is complete the screen will read To continue producing the job place additional blank discs onto the input spindle and click the Yes button To stop the job click the No button and the remainder o...

Страница 40: ...can simply load up the input bin s with several blanks same type as master then a master disc CD or DVD Repeat this for each master you wish to copy in this batch mode Each time a disc with data is e...

Страница 41: ...copy this master again you can read copy in one step by starting a COPY job and selecting MASTER DISC as displayed in the next section 1 Select the Archive only button as seen in fig 1 2 Click browse...

Страница 42: ...Page 41 4 The Job parameters will then be displayed Give your job a name and select a priority 5 Click Finish and the Scribe will run the job fig 4...

Страница 43: ...copy process the Scribe will reject the additional master You may also select browse and choose an existing disc image 4 You will then want to choose the Operations and Options for your job Copy Test...

Страница 44: ...of this manual for tips on making these files Enter the desire number of copies and optionally select Print before copying verifying for use when using BizCDs and BizCD adapter and or Ignore low ink...

Страница 45: ...will be copies of each master placed in to the input bin s 1 Select the Relay mode job button as seen in fig 1 2 Click Next 3 Select the Operations and options for the relay mode job 4 Click Next 5 If...

Страница 46: ...ch your masters were loaded fig 4 6 The Job parameters will then be displayed Give your job a name and select a priority 7 Click Finish and the Scribe will run the job 7 The Job parameters will then b...

Страница 47: ...ng with these files 4 Enter a quantity of discs for the job Optionally you may choose to ignore low ink level A note about Ignore Low Ink Level Competitive systems continue to attempt to print even wh...

Страница 48: ...area to start a new job Select the Multi disc archive button as seen in fig 1 2 Click Next 3 Click on the up and down arrows to set the desired number of discs to be read in In the example to the rig...

Страница 49: ...name extension fig 4 4 Click NEXT and the confirmation screen depicted in fig 5 will be displayed Load the masters into the input bin The top most disc will be assigned the first image filename on the...

Страница 50: ...ces to newer high capacity storage platforms such as high density optical disc storage area networks or other network attached storage devices 1 On the Job Manager TAB click the New button to the righ...

Страница 51: ...Disc2 and so on fig 3 If you wish to modify this double click on the entry you wish to change fig 4 Select the desired destination folder if other than the default then enter the desired sub folder n...

Страница 52: ...ike this MDBJ C Reserved for Tech Support Test Files Test Image Files TEST DVD UDF image 5MB udf 2 job2 Y When the CSV is imported into Scribe the dialog appears as shown in the picture to the right I...

Страница 53: ...P55 p55_VMAX p rn 1 v job4 Y Optional value to set CD recording rate to 16 Check the validity of the syntax in your CSV file Value Definitions Batch Descriptor Indicates to scribe that this is a Multi...

Страница 54: ...Customized subfolders for contents of each disc YES Quantity 25 Done 1 Rejected 0 Job name New Job Start time 11 16 06 19 21 13 Completion time 11 16 06 19 22 39 Status Finished without errors Job ty...

Страница 55: ...eating the SureThing Label file STD To create a SureThing label file open SureThing CD Labeler and click on the FILE button Now Select New the following dialog will appear In the Choose Media Type men...

Страница 56: ...u and choose save As shown in the image to the right The SAVE AS dialog will appear in the Filename box below type in the name of your label file We suggest that you save the file in the D Labels fold...

Страница 57: ...esktop then click on CONROL PANEL From the control panel click on PRINTERS AND FAXES Right click on RIMAGE PERFECT IMAGE PRINTER PF and select properties Click on the ADVANCED TAB and set the PRINT DI...

Страница 58: ...save your label as a BTW for future editing Fig C To create a prn you must use the Print feature after you have created your label Click on File Print In the NAME text box be sure the RIMAGE PERFECT a...

Страница 59: ...again unless you reinstall the printer driver If you purchased your printer and copier at the same time this was pre configured at the factory Double click MY COMPUTER on the desktop then click on CON...

Страница 60: ...Page 59 Making a PRN label file Select the MF Digital PicoJet 600 and click Finish Design your CD DVD label...

Страница 61: ...TD file To create the compatible file a PRN file click on FILE PRINT Be sure to leave No of Labels set to 1 Under Additional Options at the bottom of this dialog box click on Advanced and check off Pr...

Страница 62: ...ly be created Folders in the path MUST already exist It is a good idea choose the labels folder defined on the settings TAB of the Scribe software You have usefully created a PRN file Note A prn file...

Страница 63: ...s similar for other graphics applications Open Adobe Photoshop From the File Menu choose Open Browse to find the PDF template that you downloaded and choose that file click the open button You will be...

Страница 64: ...simply the Reader From the File Menu choose Print Under the Printer section of the Print Dialog change the Printer name to the PDF Printer acrobat versions vary in names Fig F Click the OK button You...

Страница 65: ...ique information on your discs To take advantage of this feature Please follow the steps below Step 1 Launch the SureThing CD Labeler and choose the correct template for your Printer For this example...

Страница 66: ...Windows Operating System You can also use Microsoft Excel and simply export to a CSV format A CSV format is information that is separated by commas hence the name Comma Separated Value Using Notepad...

Страница 67: ...oose Save As 3 Change the Save As Type drop down menu to CSV 4 Name your CSV file 5 Select a location and choose Save Step 3 Now that we have our CSV file all set lets Merge it with our STD File In Su...

Страница 68: ...on on the right You ll notice the window in the center of Insert Field Dialog has now changed It now contains the name of Field 1 This is the Field that we are going to use Select it and Press the Ins...

Страница 69: ...STD a filename and click Save Using Headers in your CSV Document If you would like your CSV Document to contain headers this option is supported and can be easily be implemented Headers are the names...

Страница 70: ...tains a field name entitle Names In this example please note the option use first record for field names is checked which is indicated by the red box Selecting this option tells SureThing that your CS...

Страница 71: ...Merge Although Client supports the printing of STD files it DOES NOT support STD files with merge If you wish to print STD Files with Merge you can take advantage of the UNC Method The Universal Namin...

Страница 72: ...les back to your local machine leave them in the Shared Folder you created 5 Submit the STD File to your Scribe Server via Scribe Client You will see the information being printed uniquely on your dis...

Страница 73: ...2 Warning Color Cartridge is low You may Install a new cartridge now and click Resume to continue or click Resume to produce up to 10 more prints with low ink or click Cancel to abort the job Low Ink...

Отзывы: