Backlight operation (LT 320 only)
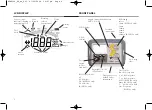
The RCDT320 LCD display may be backlit. The backlight function can be
selected at any time while the instrument is switched on by pressing the
BACKLIGHT
J
button.
The backlight function will switch off automatically 15 seconds after the
instrument has finished testing.
Display warning symbols
G
Refer to user manual.
Any time the warning triangle is displayed the operator should refer to
the user manual for further information.
L
Range lock
Displayed at any time the [TEST] button is locked in the on position.
Battery condition indication. Refer to page 16.
f
Fuse blown indicator, appears when an instrument fuse has failed.
Refer to page 16.
>280V
Displayed on the RCDT310 indicates a supply voltage in excess
of the allowed is present.
hot
Indicates the instrument needs to cool down before it can continue
loop testing
Setup Procedure
Note:
Line reversal and RCD touch voltage configuration features are
only available on the instruments as per the relevant tables in the
specification section of this document.
Reverse polarity detection / Touch voltage setting
To select Polarity reversal acceptance or rejection:
1. With the instrument switched OFF, hold down the [TEST] button and
turn the range knob to any ON position.
2. Keep the button held down until the instrument displays the ‘SET’
warning.
3. Now release the [TEST] button.
4. Press the [TEST] button again to view the current setting for
line/neutral swapping.
5. The display shows ‘L+L’ (instrument will perform tests with L & N
swapped) or ‘L+N’ (instrument will not perform tests with L & N
swapped).
6. Press the [LOCK] button or the PFC button to change the setting.
7. Press the [TEST] button to exit from the set-up menu.
RCD Touch voltage selection
To set the touch voltage inhibit limit:
1. With the instrument switched OFF, hold down the [TEST] button and
turn the range knob to any ON position.
2. Keep the button held down until the instrument displays the ‘SET’
warning.
3. Now release the [TEST] button.
4. Press the [TEST] button twice to view the current settings for the
touch voltage.
9
RCDT300_UG_en_V01 07/05/2004 12:07 pm Page 9
Содержание RCDT300 Series
Страница 20: ...20 RCDT300_UG_en_V01 07 05 2004 12 07 pm Page 20...
Страница 21: ...21 RCDT300_UG_en_V01 07 05 2004 12 07 pm Page 21...
Страница 22: ...22 RCDT300_UG_en_V01 07 05 2004 12 07 pm Page 22...
Страница 23: ...23 RCDT300_UG_en_V01 07 05 2004 12 07 pm Page 23...


