McIntosh MVP891 Скачать руководство пользователя страница 18

18

Your McIntosh MVP891 has been factory config

-

ured for default operating settings that will allow you 

to immediately enjoy superb video and high fidel-

ity audio from a Blu-ray 3D Disc. It also reproduces 

Blu-ray Disc (2D), DVD-Audio, SACDs and CDs with 

unparalleled sonic purity. If you wish to make changes 

to the factory default settings perform the following 

steps, if not proceed to “How to Operate the MVP891” 

starting on page 26.
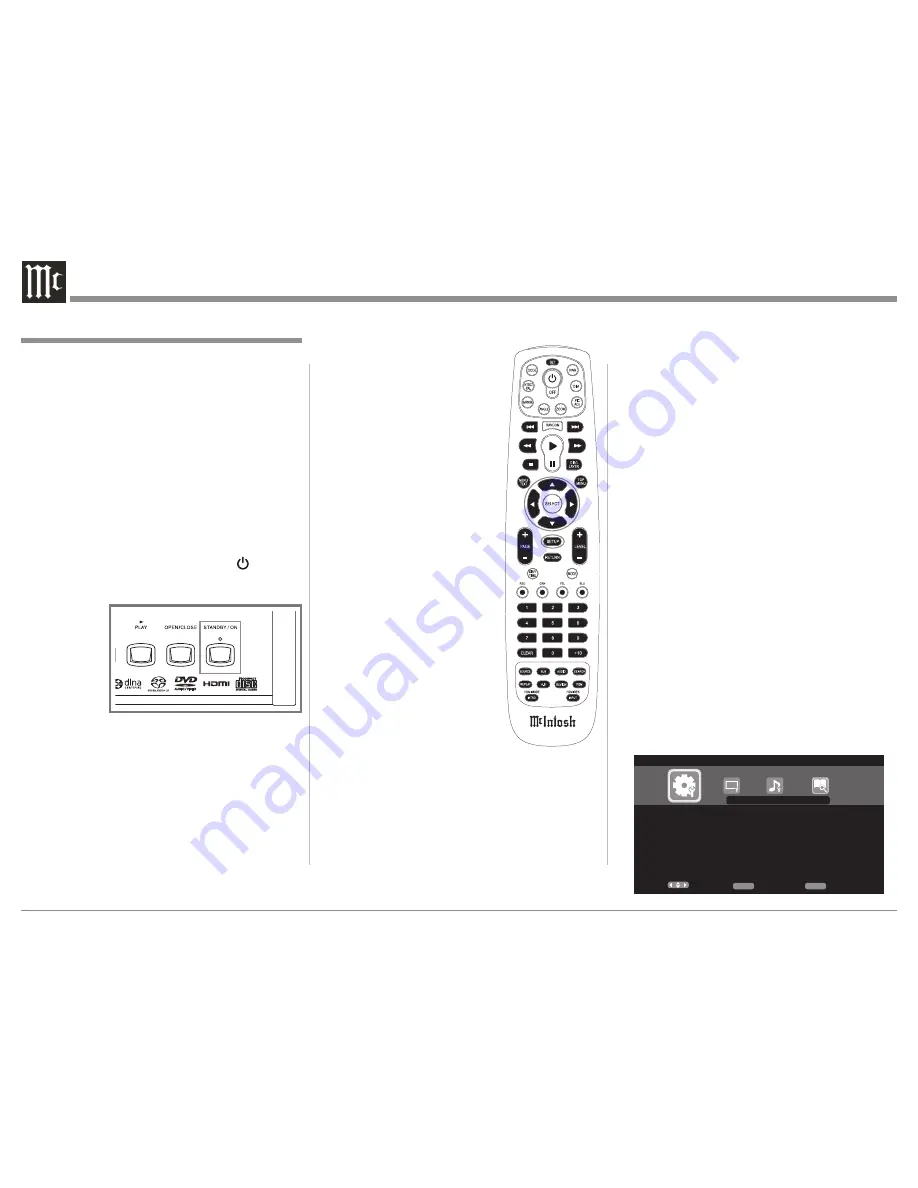
Power

The Red LED above the STANDBY/ON switch lights 

to indicate the MVP891 is connected to AC Power. 

To Switch ON the MVP891, press the STANDBY/

ON Push-button on the Front Panel or the      (Power) 

Push-button on the Remote Control. The STANDBY 

Red LED will flash during the initialization process. 

Refer to figures 

1 and 2.

Note: When the MVP891 is switched On, it will take 

from 20 to 30 seconds for initialization of 

the internal circuitry to take place before the 

player is ready to begin operation.

Adjustments and Setting changes

All of the adjustments and settings are performed by 

using the extensive On-Screen Menu System. The 

On-Screen Menuing System is interactive. The abil-

ity to change a menu item setting or have access to a 

menu item setting (some may 

be “grayed out”) is dependent 

on the operational state of the 

player and the choices made in 

other menu items. Some menu 

choices require more than one 

step to complete.

The active selection in a list of 

options is indicated by a dot 

located to the left side of the 

selection, e.g. ●ON. When a 

disc is playing in the MVP891 

and the STOP Push-button is 

pressed once (the disc play-

back is paused), some but not 

all menu items are available 

for change. To make all of the 

menu items available for pos-

sible change, the playback of 

the disc must be stopped which 

requires two presses of the 

STOP Push-button.

Note: The MVP891 must 

be connected to 

a MONITOR/TV 

either through an 

A/V Control Center 

or directly, for setup 

and use. The Remote 

Control supplied with the McIntosh MVP891 

has several Push-buttons labeled differently 

than as indicated on the On Screen Menu, 

please refer to the Instructions in this Owner’s 

Manual for the correct Push-button.

Checking the Network Connection

The following example will illustrate how to navigate 

through the built-in MVP891 SETUP Mode and the 

multiple On-Screen Menus.

One of the many features the MVP891 has is the 

ability to display On-Screen Videos from "You Tube" 

via the Internet Network Connection.

Occasionally, McIntosh might make available 

Firmware Updates for the MVP891. These Updates 

would be from the McIntosh Computer Server via a 

Network Internet Connection. The MVP891 will au

-

tomatically scan for an update when first switched On 

(with no disc in the tray). If an update is available, the 

MVP891 will display a message On-Screen for several 

seconds. For more information about the MVP891 and 

Network Connections refer to pages 22 and 36.

With the MVP891 connected to your Home 

Network via a Network Router with an active Internet 

Access Device connected, perform the following 

steps:

1. If there is a disc playing in the MVP891 press the 

STOP Push-button twice.

2. Press the SETUP Push-button on the Remote 

Control and the last selected Setup Menu Item will 

appear on the Monitor/TV screen. The figure 3 

illustration is of the “General Settings” Menu and 

options.

Introduction to the MVP891 Setup Mode

Figure 1

Figure 2

HOME

Figure 3

Select

Confirm

ENTER

Exit

SETUP

System

General Setting

Language

Ratings

Network

Others

Содержание MVP891

Страница 1: ...McIntosh Laboratory Inc 2 Chambers Street Binghamton New York 13903 2699 Phone 607 723 3512 www mcintoshlabs com MVP891 Audio Video Player Owner s Manual...

Страница 2: ...ED PERSONNEL To prevent the risk of electric shock do not remove cover or back No user serviceable parts inside CAUTION Invisible Laser Radiation when open DO NOT stare into the beam or view directly...

Страница 3: ...the provided plug does not fit into your outlet consult an electrician for replacement of the obsolete outlet 10 Protect the power cord from being walked on or pinched particularly at plugs convenien...

Страница 4: ...2 567 7 333 929 7 212 872 other U S and worldwide patents issued pending DTS HD the Sym bol DTS HD and the Symbol together are registered trademarks DTS HD Master Audio Essential is a trademark of DTS...

Страница 5: ...k 13903 Phone 607 723 1545 Fax 607 724 0549 Customer Service If it is determined that your McIntosh product is in need of repair you can return it to your Dealer You can also return it to the McIntosh...

Страница 6: ...s a high quality in line HDMI Buffer Converter would be required for reliable digital signal transmission via the HDMI Connections 11 The MVP891 basic transport functions may also be controlled by usi...

Страница 7: ...891 will play most of the following discs however some recorded discs may not be able to play due to the condition of the recording BD Video BD 3D Video Super Audio CD SACD CD R CD RW Picture CD Kodak...

Страница 8: ...assembly This unique design allows reading many different types of Audio and Video Disc For mats Advanced Transport The MVP891 has a new vibration resistant transport with an advanced digital servo fo...

Страница 9: ...n the next page pertaining to installing the MVP891 into cabinets Dimensions 17 1 2 44 45cm 6 15 24cm Front View of the MVP891 5 3 8 13 69cm 4 5 8 11 75cm 13 1 4 33 65cm 17 43 18cm Rear View of the MV...

Страница 10: ...lowing minimum spacing dimensions for cool opera tion Allow at least 6 inches 15 24cm above the top 2 inches 5 08cm below the bottom 3 inches 7 62cm behind the rear panel and 2 inch 5 08cm on each si...

Страница 11: ...t POWER CONTROL IN receives turn on signals from a McIntosh component and POWER CONTROL OUT sends turn on signals on to another McIntosh Component IR INput for connecting an IR Receiver DATA IN receiv...

Страница 12: ...ptionally connect an external Sensor to the McIntosh MVP891 Audio Video Player IR IN Jack HDMI Connections 6 Connect a HDMI Cable from the McIntosh MVP891 Audio Video Player HDMI OUT to the HDMI Input...

Страница 13: ...13 Notes...

Страница 14: ...nel Alphanumeric Display from bright to off Use to switch power On to the MVP891 Use to view on screen the current title chapter group or track number along with direct access to change it using the n...

Страница 15: ...ush button to return to the previ ous setup menu Setup Press the SETUP Push button to access the Initial Setup Menu Subtitle Press the SUB Subtitle Push button to access the Subtitle menu and the Subt...

Страница 16: ...Card Use to Pause during playback of a disc or USB Drive playback Stops disc or USB drive playback Selects the SACD or CD Audio Layer from a hybrid disc Selects the video signal output at the HDMI Out...

Страница 17: ...being decoded is Dolby Digital or Dolby True HD Indicates when the two digits be low are display ing the Group or Title Number Indicates the programmed Track Group Play Mode is active Indicates when...

Страница 18: ...r change To make all of the menu items available for pos sible change the playback of the disc must be stopped which requires two presses of the STOP Push button Note The MVP891 must be connected to a...

Страница 19: ...en Setup Display The Icon are from left to right General Settings Video Settings Audio Settings and System Information 3 Using the Down Directional Push buttons on the Remote Control select Network Re...

Страница 20: ...on Various 22 Connection Test 22 DHCP Auto 22 BD Live Permitted 22 Proxy Setting Disable 22 Others Close Caption Off 22 Angle Mark Off 22 PIP Mark Off 22 Secondary Audio Mark Off 22 DivX Registration...

Страница 21: ...ntrol Contact the TV manufacturer for additional information Initialize Cancel OK Use to reset all MVP891 settings to the factory default configuration Firmware Update Check for Update Start Please re...

Страница 22: ...e connection to the Internet DHCP Auto Manual Auto the DHCP function automatically configures the MVP891 Network Connection Manual allows network settings to be entered manually for networks not suppo...

Страница 23: ...MI Color Space YCbCr RGB Normal RGB Enhanced The vast majority of TVs will produce the best picture quality using the default settting of YCbCr Some Monitors Projectors such as dual purpose video comp...

Страница 24: ...s and DTS Master HD to the HDMI Output1 PCM decodes all types of Dolby Digital and DTS audio signals and sends them out as multichannel PCM Digital Signal Off switches off all Audio Output from the HD...

Страница 25: ...ies down to 35Hz within 3dB of the midrange frequencies If a Loudspeaker can not reproduce bass frequencies down to 35Hz within 3dB of the midrange frequencies it is considered SMALL Note Contact your...

Страница 26: ...P891 is connected to AC Power To Switch ON the MVP891 press the STANDBY ON Push button on the Front Panel or the Power Push button on the Remote Control The STANDBY Red LED will flash during the initi...

Страница 27: ...or the choice of selections and various Audio Video Playback Parameters 2 When the MVP891 is connected to a HDTV not compatible with Blu ray 3D Discs an error message will appear On Screen How to Play...

Страница 28: ...known as Resume Stop Press Play and the disc will start playing again from the disc time where Stop was pressed Press Stop twice for a complete stop and return to the beginning of a disc Notes 1 Depe...

Страница 29: ...ner to Repeat Mode except it allows the repeating of a specific disc segment on a continuous basis Refer to figure 39 1 Start playing the part of the disc you desire to have repeated 2 Press the A B P...

Страница 30: ...press the PLAY Push button 7 To cancel the Program Playback Mode press the STOP Push button twice Search Mode Depending on the type of disc playing back the Search Function allows for rapid selection...

Страница 31: ...for this MVP891 It is to be entered during the DivX registration process Using an Internet Web Browser on a computer go to http vod divx com Notes 1 Registration is not needed to play free DivX movie...

Страница 32: ...ixed at 1080i 1080P Resolution output is fixed at 1080P 1080P242 Resolution output is fixed at 1080P24 2 When the HDMI Res is set to 1080P at 24 frames per second video material not recorded at 24 fra...

Страница 33: ...ness in the medium detail of the image 6 to 6 Hue color tone Adjusts the facial tones toward red or green 6 to 6 Chroma Level Adjusts the intensity of the color in the image 6 to 6 Setup Level2 Adjust...

Страница 34: ...re Video Figure 55 Secondary Audio In Picture Audio Secondary Audio from the Picture in Picture when available on a Blu ray Disc Bonus View and BD Live is outputted by the MVP891 The Secondary Audio C...

Страница 35: ...35 Figure 57 Figure 56 Figure 55 Figure 54 MVP891 Video Settings and Adjustments con t Figure 58 Figure 59...

Страница 36: ...di cates 00001 then press the Front Panel SOURCE Push button once and then wait until the display indicates NO DISC before proceeding Firmware Update Before starting the Update Process Before proceedi...

Страница 37: ...rs On Screen the MVP891 aready has latest Firmware and no update is nec essary at this time If there is a firmware update available press the SELECT Push button to begin the update process Refer to fi...

Страница 38: ...xial 0 5V p p 75 ohm Digital Signal Format Sampling Frequencies 44 1kHz 48 0kHz 96 0kHz and 192 0kHz Transport Laser Beam Wavelength 630nm 810nm Laser Power CLASS I General Specifications Video Specif...

Страница 39: ...pping damage Use the original shipping carton and interior parts only if they are all in good serviceable condition If a shipping carton or any of the interior part s are needed please call or write C...

Страница 40: ...cts is the policy of McIntosh Laboratory Incorporated who reserve the right to improve design without notice Printed in the U S A McIntosh Laboratory Inc 2 Chambers Street Binghamton NY 13903 www mcin...

Отзывы: