background image


  Video Intercom Vandal-Resistant Door Station

·

User Manual


89 


9.6


Video Intercom Configuration 

Click the icon 

  on the control panel of the client software or click 

View -> Video 

Intercom

 to open the Video Intercom page. On the Video Intercom page, you can 

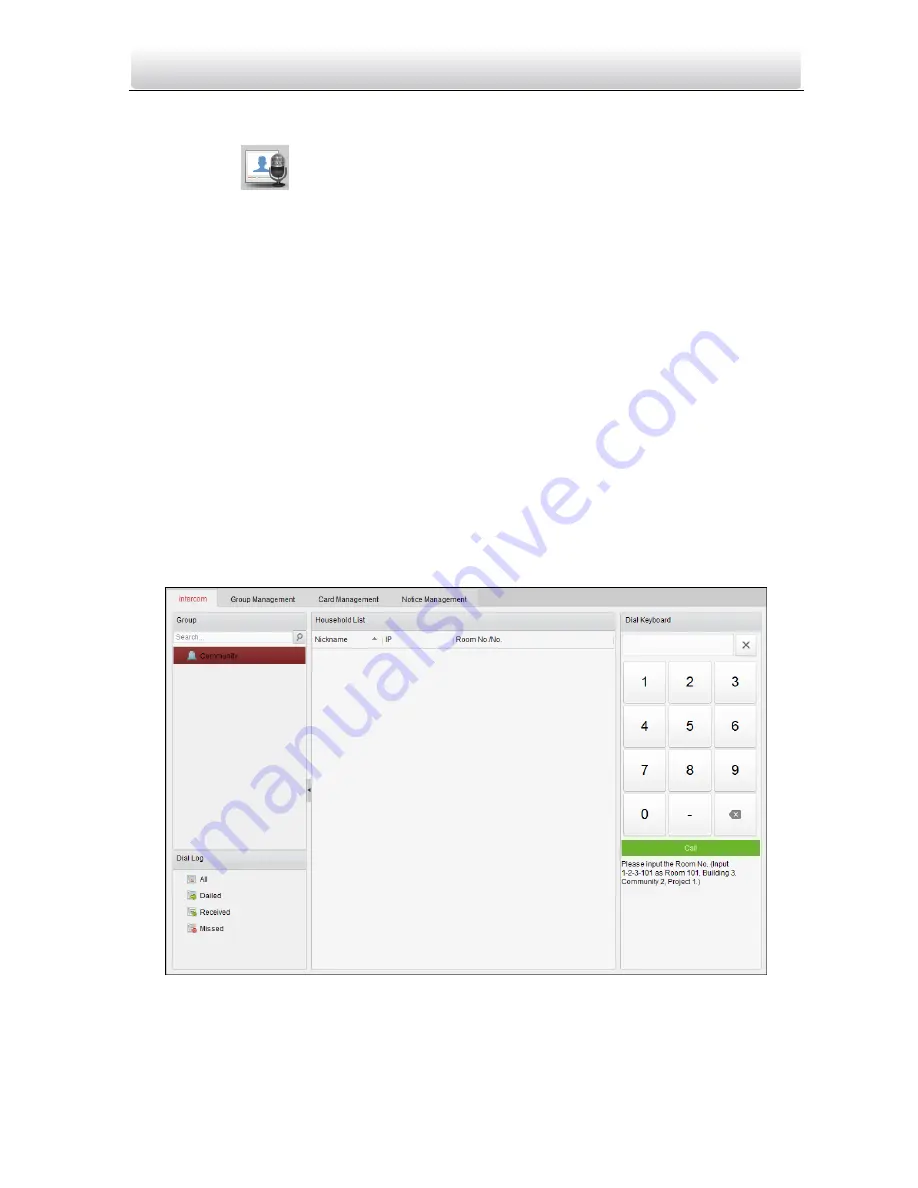
control video intercom devices remotely. There are 4 modules on the Video Intercom 
page: 

Video Intercom: 

Start visual communication with door stations, and manage 

incoming calls from indoor stations and door stations and master stations. Refer 
9.6.2

 Video Intercom

 for detail steps. 

Group Management:

 Construct virtual communities according to the real 

community situations, and assign door stations and indoor stations to the 
community accordingly. Refer 9.6.1

 Group Management 

for detail steps. 

Note: 

You should manage groups first before starting the visual communication 

with indoor stations or door stations.


Card Management:

 Add unauthorized cards to the client software, and issue card 

to the door station via the client software.   

Note: 

The vandal-resistant door station does not support the card management. 


Notice Management:

 Send information to indoor stations, search information, 

search call logs, and search unlocking logs. Refer 9.6.3

 Notice Management

 for 

detail steps. 


Figure 9-10


Intercom Interface 

Содержание PB-13V

Страница 1: ...1 1 1 1 1 1 1 1 Video Intercom Vandal Resistant Door Station User Manual...

Страница 2: ...AL OPERATION PRIVACY LEAKAGE OR OTHER DAMAGES RESULTING FROM CYBER ATTACK HACKER ATTACK VIRUS INSPECTION OR OTHER INTERNET SECURITY RISKS HOWEVER OUR COMPANY WILL PROVIDE TIMELY TECHNICAL SUPPORT IF R...

Страница 3: ...rrect the interference by one or more of the following measures Reorient or relocate the receiving antenna Increase the separation between the equipment and receiver Connect the equipment into an outl...

Страница 4: ...product documentation for specific battery information The battery is marked with this symbol which may include lettering to indicate cadmium Cd lead Pb or mercury Hg For proper recycling return the b...

Страница 5: ...When the product is installed on wall or ceiling the device shall be firmly fixed If smoke odors or noise rise from the device turn off the power at once and unplug the power cable and then please con...

Страница 6: ...ecause the acidic sweat of the fingers may erode the surface coating of the device cover Please use a soft and dry cloth when clean inside and outside surfaces of the device cover do not use alkaline...

Страница 7: ...Activation via Batch Configuration Tool 13 5 3 Activation via Client Software 14 6 Local Operation 16 7 Remote Operation via Web Browser 17 7 1 Access to the Door Station 17 7 2 Live View 18 7 2 1 Liv...

Страница 8: ...ing 73 8 5 2 Upgrading Devices 75 9 Remote Operation via Client Software 77 9 1 System Configuration 77 9 2 Device Management 78 9 2 1 Adding Video Intercom Devices 78 9 2 2 Modifying Network Informat...

Страница 9: ...ent device it is mainly applied in the villa for improving the living security 1 2 Main Features Basic Functions Video intercom function supporting the communication with the master station the app an...

Страница 10: ...ia NTP and batch configuration function Supports Web remote access and OSD display Supports motion detection Additional Features ISAPI Internet Server Application Programming Interface and ONVIF Open...

Страница 11: ...Optical Fiber Door Station Resident 1 Indoor Station IPC Video Audio Distributor Outer Door Station Estate LAN Switch Indoor Extension 1 Indoor Extension 2 One Resident Center Master Station Master S...

Страница 12: ...Illumination Supplement Light 4 Call Button 5 Loudspeaker Note Default settings of call button when you press the call button it calls the resident and when you hold down the call button it calls the...

Страница 13: ...larm Input A2 GND Grounding ALARM OUT B1 COM Grounding Signal B2 NO Door Lock Relay Output Connect Electric Strike B3 NC Door Lock Relay Output Connect Electric Bolt or Magnetic Lock 3 2 Wiring Descri...

Страница 14: ...equired to set the output of terminal AI to be door status via Batch Configuration Tool or the client software or the web browser Figure 3 3 Door Magnetic Wiring 3 2 3 Exit Button Wiring To connect ex...

Страница 15: ...n Wiring 3 2 4 Alarm Device Input Wiring When you set the output of terminal AI to be custom via Batch Configuration Tool or the client software or the web browser you can connect any alarm input devi...

Страница 16: ...s power off during the installation Make sure the wall is strong enough to withstand 4 times the weight of the door station Check the specification of the product for the installation environment 4 1...

Страница 17: ...tall the Plate 2 Insert terminal blocks into the interfaces of the door station body and connect the network cable Interfaces Power Alarm In Alarm Out Terminal Blocks Network Interface Network Cable F...

Страница 18: ...tective Shield Door Station Main Body Figure 4 4 Fix the Main Body to the Shield 4 Hook the door station to the wall mounting plate tightly Hooks Figure 4 5 Hook the Door Station to the Plate 5 Use th...

Страница 19: ...Video Intercom Vandal Resistant Door Station User Manual 11 Set Screw Rubber Plug Figure 4 6 Secure the Door Station...

Страница 20: ...b browser and click Enter to the activation interface Figure 5 1 Activation Interface Web 3 Create a password and confirm the password STRONG PASSWORD RECOMMENDED We highly recommend you create a stro...

Страница 21: ...a minimum of 8 characters including at least three of the following categories upper case letters lower case letters numbers and special characters in order to increase the security of your product An...

Страница 22: ...you create a strong password of your own choosing Using a minimum of 8 characters including at least three of the following categories upper case letters lower case letters numbers and special charact...

Страница 23: ...Video Intercom Vandal Resistant Door Station User Manual 15 You can hold the Ctrl or Shift key to select multiple devices in the online devices and click Activate to activate devices in batch...

Страница 24: ...n Call Button Figure 6 1 Call Button of Door Station Notes Besides the indoor station you can also unlock the door by the master station the client software and the web When the video intercom between...

Страница 25: ...er 32 bit Internet Explorer 8 0 to 11 Steps 1 Open the web browser 2 Input the IP address of the door station in the address bar and press the Enter key to enter the login interface 3 Input the user n...

Страница 26: ...e device IP address gets locked if the admin user performs 7 failed password attempts 7 2 Live View 7 2 1 Live View Page Purpose The live view page allows you to view the real time video capture image...

Страница 27: ...live video on the display window of live view Toolbar Set the stream type enable disable the two way audio unlock the door start stop the live view capture pictures record the video files and adjust t...

Страница 28: ...live view page click on the tool bar to capture the live pictures and click to record the live video The saving paths of the captured pictures and record files can be set on the Configuration Local pa...

Страница 29: ...ed size of the manually recorded and downloaded video files to 256M 512M or 1G After the selection the maximum record file size is the value you selected Save record file to Set the saving path for fo...

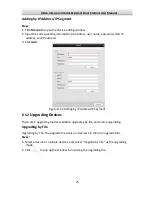
Страница 30: ...5 Device Basic Information Time and DST Settings Purpose You can follow the instructions in this section to configure the time synchronization and DST settings Time Settings Steps 1 Enter the Time Se...

Страница 31: ...on 2 Configure the following settings Server Address IP address of NTP server NTP Port Port of NTP server The default NTP port No is 123 Interval The time interval between the two synchronizing action...

Страница 32: ...lick Save to save the settings DST Purpose For regions using the summer time DST daylight saving time settings can be configured according to the actual needs Steps 1 Enter the DST settings interface...

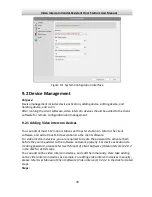
Страница 33: ...door station restore door station parameters export import configuration parameters and upgrade firmware Enter the Upgrade and Maintenance interface Configuration System Maintenance Upgrade Maintenan...

Страница 34: ...stations needing configuring Steps 1 Click Export to export the current configuration file and save it to the certain place 2 Click Browse to select the saved configuration file and then click Import...

Страница 35: ...end time 3 Click Search to search log files The matched log files will be displayed on the Log interface User Management Steps 1 Enter the User Management interface Configuration System User Manageme...

Страница 36: ...etting the community No the building No the unit No the floor No or the device No Steps 1 Enter the device No settings interface Configuration Video Intercom Device No Settings Figure 7 13 Set the Dev...

Страница 37: ...ximum message duration of the door station on the operation time settings interface Steps 1 Enter the operation time settings interface Configuration Video Intercom Operation Time Settings Figure 7 14...

Страница 38: ...ut output refers to the Alarm In terminal and the Alarm Out terminal You can connect external devices to the door station via these terminals The door station has 1 Alarm In terminal AI and 1 Alarm Ou...

Страница 39: ...by pressing or holding down the call button Default settings of the call button when you press the call button it calls the resident and when you hold down the call button it calls the center Steps 1...

Страница 40: ...The camera of the door station switches between the day mode and the night mode according to the configured time period 4 Set the start time day and the end time day The start time and the end time re...

Страница 41: ...ameters you should close the web browser Please reopen the web browser and log in again with the new IP address of the door station Linked Network Settings Purpose Linked network parameters involve th...

Страница 42: ...e Port 2 Set the HTTP port HTTPS port and server port of the door station HTTP Port The default HTTP port No is 80 and it can be changed to any port No which is not occupied The unoccupied HTTP port r...

Страница 43: ...ttings and the user name and password are required for logging in the FTP server For your privacy and to better protect your system against security risks we strongly recommend the use of strong passw...

Страница 44: ...s Purpose The system can be configured to send an Email notification to all designated receivers if an alarm event is detected e g motion detection event Before you start Please configure the DNS Serv...

Страница 45: ...st three of the following categories upper case letters lower case letters numbers and special characters in order to increase the security of your product Proper configuration of all passwords and ot...

Страница 46: ...guring Video Audio Settings Video Settings Steps 1 Enter the video settings interface Configuration Video Audio Video Figure 7 25 Video Settings Main Stream 2 Select the stream type of the door statio...

Страница 47: ...e rate describes the frequency at which the video stream is updated and it is measured by frames per second fps A higher frame rate is advantageous when there is movement in the video stream as it mai...

Страница 48: ...ge which ranges from 1 to 100 and the default value is 50 Saturation describes the colorfulness of the image color which ranges from 1 to 100 and the default value is 50 Hue describes the quality of t...

Страница 49: ...2 Input the desired information in the textbox Notes Up to 4 texts are configurable 6 You can use the mouse to click and drag the red text frames in the live view window to adjust the OSD position 7...

Страница 50: ...k Draw Area Drag the mouse on the live video to draw a motion detection area Click Stop Drawing to finish drawing one area 4 Optional Click Clear All to clear all of the areas 5 Optional Move the slid...

Страница 51: ...the current arming schedule or click Save to save the settings 4 Move the mouse to end of each day a green copy icon appears You can click the icon to copy the current time schedule to other days Fig...

Страница 52: ...ccurs please refer to Section 5 3 8 to complete Email setup in advance Upload to FTP Capture the image when an alarm is triggered and upload the picture to the configured FTP server Notes Set the FTP...

Страница 53: ...Video Intercom Vandal Resistant Door Station User Manual 45 Figure 7 33 Alarm Uploading Settings 2 Check the checkbox of Delayed Door Alarm 3 Click Save to save the settings...

Страница 54: ...d configure the device via LAN Local Area Network you need connect the device in the same subnet with you PC You can edit network parameters via batch configuration tool and the client software Here t...

Страница 55: ...add the device to the tool or the software firstly 3 ways for adding the device are supported adding active online devices within your subnet adding device by IP address and adding device by IP segme...

Страница 56: ...add the device by inputting IP address Steps 1 Click to pop up the adding devices dialog box Figure 8 5 Adding Button 2 Select IP Address in the adding mode drop down list 3 Input the IP address and s...

Страница 57: ...ut port No user name and password Figure 8 8 Adding by IP Segment 5 Click OK to search and add the devices whose IP addresses are within the range of the defined IP segment to the device list 8 3 Conf...

Страница 58: ...u can view basic information the device type and serial No and version information of the device Figure 8 10 Device Information General Click System General to enter device general parameters settings...

Страница 59: ...t the server address NTP port and synchronization interval DST 1 Check the checkbox of Enable DST to enable DST 2 Input the start time and end time of DST and set the DST bias 3 Click the Save button...

Страница 60: ...rs of device and reset the device to inactive status 8 Click Import Configuration File and the import file window pops up Select the path of remote configuration files Click Open to import the remote...

Страница 61: ...6 Remote Upgrade Note By clicking Restore Default Settings all default settings excluding network parameters and user information will be restored By clicking Restore All all default settings includin...

Страница 62: ...word and confirm password should be identical After editing the password of device click button from the device list the added device will not be there You should add the device again with new passwor...

Страница 63: ...ries 2 Select the device type from the drop down list and set the corresponding information 3 Click Save to enable the device number configuration Note For main door station the serial No is 0 For sub...

Страница 64: ...Elevator to enter the access control and elevator settings interface Note The door station does not support the elevator controlling function Figure 8 21 Access Control and Elevator Settings 2 Select...

Страница 65: ...ut Configuration 2 Set the input mode Disabled Exit Button Door Status Custom Disabled The function of the AI terminal is disabled Exit Button The AI terminal supports connecting to the exit button Do...

Страница 66: ...ave to enable the settings Note If enabling Quick Press for Calling Center you should call resident by holding down the call button and call center by quickly pressing the call button Motion Detection...

Страница 67: ...then the whole live video screen belongs to the draw motion detection area 5 Optional Click to delete the selected motion detection area 6 Optional Click to delete all motion detection areas 7 Optiona...

Страница 68: ...n adjust the time period to the desired time by either moving the time bar or input the exact time period 3 Select a time period click to delete the selected one 4 Click to delete all configured time...

Страница 69: ...inkage Send an email with alarm information to a user or users when an event occurs Note To send the Email when an event occurs please complete the Email configuration in advance in Section 8 3 3 Uplo...

Страница 70: ...time and the end time require configuring when the supplement light mode is scheduled switch The camera of the door station will stay at day mode during the start time and end time Note The interval...

Страница 71: ...Click Network Linked Network Configuration to enter linked network configuration interface Figure 8 26 Linked Network Configuration 2 Input the SIP server IP address the management center IP address...

Страница 72: ...No is 21 To enable anonymity or not is according to whether the FTP server enables anonymity After configuring the FTP parameters the captured pictures of door station will be uploaded to the FTP serv...

Страница 73: ...nformation settings window Figure 8 29 Information Settings 2 Input the user name and the email address 6 Set the following parameters SMTP Server IP address or host name e g smtp 263xmail com of the...

Страница 74: ...d special characters in order to increase the security of your product Proper configuration of all passwords and other security settings is the responsibility of the installer and or end user 7 Click...

Страница 75: ...settings 8 3 4 Video Display Video Parameters Steps 1 Click Video Display Video Parameters to enter the video parameters interface Figure 8 32 Video Display 2 Select the channel No 3 Select the resol...

Страница 76: ...lay interface Figure 8 33 Video Display OSD Settings 2 Check the corresponding checkbox to select the display of camera name date or week if required 3 Edit the camera name in the text field of Camera...

Страница 77: ...of the video quality can be selected Lowest Lower Low Medium Higher and Highest Frame Rate Set the frame rate The frame rate describes the frequency at which the video stream is updated and it is mea...

Страница 78: ...l community situation and then assign devices to the community accordingly Figure 8 36 Setting a Community Structure 8 4 2 Setting Main Sub Door Station Setting a Main Door Station Purpose You can act...

Страница 79: ...nked network parameters for the main door station SIP IP address master station IP address center IP address center port No subnet mask and gateway address 5 Select an online door station input the lo...

Страница 80: ...parameters sub door station amount floor No start IP address end IP address and then click Calculate to generate the sub door station end IP address and sub door station No like 1 1 1 1 automatically...

Страница 81: ...configured it prompts the note Configuring main door station parameters succeeded 8 5 Batch Upgrading In the device list area click to enter the batch upgrading interface Figure 8 39 Batch Upgrading...

Страница 82: ...istant Door Station User Manual 74 Figure 8 40 Login 2 Select a device input the user name and password and click Login Device 3 Click Add Device and the device is added to the batch upgrading tool Fi...

Страница 83: ...ess end IP address 3 Click Add Figure 8 42 Adding by IP Address IP Segment 8 5 2 Upgrading Devices There are 2 upgrading modes available upgrading by file and online upgrading Upgrading by File Upgrad...

Страница 84: ...ine Upgrading The batch upgrading tool will search the latest upgrading file for the device automatically You upgrade the device or devices via the local upgrade files Steps 1 Select a device or multi...

Страница 85: ...e video intercom parameters accordingly Steps 1 Open the System Configuration page Control Panel Maintenance and Management System Configuration Video Intercom 2 Click the Video Intercom tab to enter...

Страница 86: ...master stations in total to the client software and add at most 16 door stations to the client software For video intercom devices you are required to create the password to activate them before they...

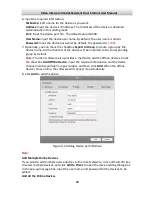
Страница 87: ...Video Intercom Device and add indoor station and master station To add door station In the Server tab select Encoding Device Outdoor Device and add door station 3 The active online devices in the same...

Страница 88: ...of the device will be imported to the corresponding group by default Note The client software also provides a method to add the offline devices Check the checkbox Add Offline Device input the require...

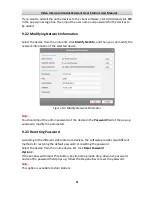
Страница 89: ...9 3 Modify Network Parameter Note You should input the admin password of the device in the Password field of the pop up window to modify the parameters 9 2 3 Resetting Password According to the diffe...

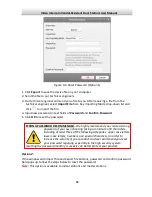
Страница 90: ...STRONG PASSWORD RECOMMENDED We highly recommend you create a strong password of your own choosing Using a minimum of 8 characters including at least three of the following categories upper case letter...

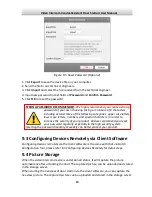
Страница 91: ...in order to increase the security of your product And we recommend you reset your password regularly especially in the high security system resetting the password monthly or weekly can better protect...

Страница 92: ...cked in the the software package When installing the the client software check the checkbox of Storage Server to enable the installation of storage server 1 Click the icon on the desktop to run the st...

Страница 93: ...HDD from the list and click Format You can check the formatting process from the process bar and the status of the formatted HDD changes from Unformatted to Normal Status Figure 9 7 Format HDDs Note F...

Страница 94: ...r drop down list Note You can click Storage Server Management to add edit or delete the storage server 4 Check the checkbox of Picture Storage to store the alarm pictures of the camera when event occu...

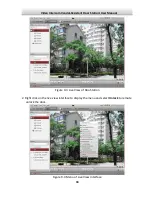
Страница 95: ...hen the 60 of the storage space can be used for storing the captured pictures 6 Click Save to save the settings 9 5 Live View Purpose The live view page allows you to view the real time video capture...

Страница 96: ...l Resistant Door Station User Manual 88 Figure 9 3 Live View of Doo Station 2 Right click on the live view interface to display the menu and select Unlock to remote unlock the door Figure 9 4 Menu of...

Страница 97: ...teps Group Management Construct virtual communities according to the real community situations and assign door stations and indoor stations to the community accordingly Refer 9 6 1 Group Management fo...

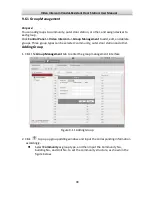
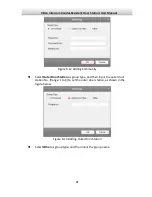
Страница 98: ...edit and delete groups Three group types can be selected community outer door station and other Adding Group 1 Click the Group Management tab to enter the group management interface Figure 9 11 Adding...

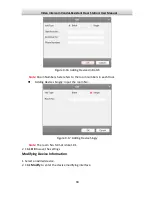
Страница 99: ...12 Adding Community Select Outer Door Station as group type and then input the outer door station No Range 1 to 9 to set the outer door station as shown in the figure below Figure 9 13 Adding Outer D...

Страница 100: ...d cleaning staff etc and you can assign cards to these staff and configure different permissions to them 3 Click OK to complete group adding Assigning IP Devices to Group After adding groups to Commun...

Страница 101: ...r Station set a No for the door station 3 Click OK to save the settings Assigning Analog Devices to Group When assigning analog devices to group only analog indoor stations are supported 1 Click Add A...

Страница 102: ...Numbers here refers to the room numbers in each floor Adding Devices Singlly Input the room No Figure 9 17 Adding Device Singly Note The room No format is like 101 2 Click OK to save the settings Mod...

Страница 103: ...added device 2 Click Remove to pop up a dialog box Figure 9 19 Information 3 Click OK to complete the group deleting operation 9 6 2 Video Intercom Receiving Call from Door Station Purpose When the d...

Страница 104: ...n instead of the client software Click Unlock to unlock the building or villa door via the client software no matter whether answering the call from door station or not Click Answer to answer the call...

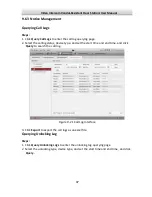
Страница 105: ...calling status device type and set the start time and end time and click Query to search the call log Figure 9 21 Call Log Interface 3 Click Export to export the call logs as an excel file Querying U...

Страница 106: ...on User Manual 98 Figure 9 22 Unlocking Log Interface 3 Click Export to export the unlocking logs as an excel file 9 7 Device Arming Control Steps 1 Select Tool Device Arming Control to pop up device...

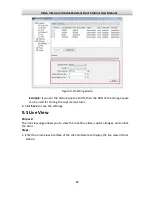
Страница 107: ...status of the device as armed and the alarm information will be auto uploaded to the client software when alarm occurs Figure 9 24 Device Arming Control Figure 9 25 Alarm Events Note After adding the...

Страница 108: ...owling and echo The distance between two devices is recommended to be longer than 10 meters Devices here refer to indoor station door station doorphone and master station Wiring Cables Cable Specifica...

Отзывы: