background image

13

OPERATING INSTRUCTIONS

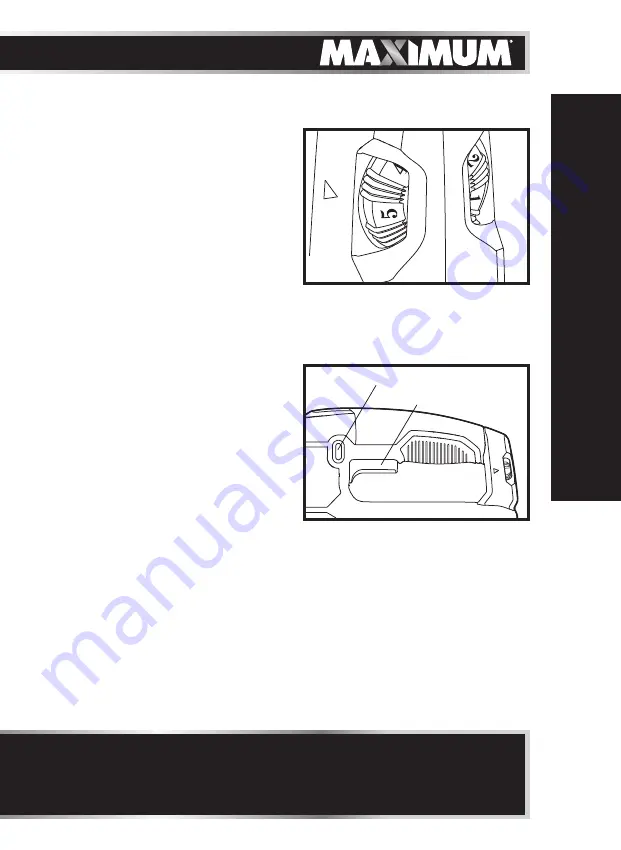
VARIABLE-SPEED DIAL (

fig 6

)

Your jigsaw is equipped with a variable-
speed dial. The optimal jigsaw cutting 
speed or stroke rate depends on the 
material being cut, the type of blade 
being used, and the feed rate preferred 
by the operator. At the “0” position, there 
is no blade action. The “5” position results 
in the highest speed. Select the speed 
that is appropriate for the material and 
the project at hand.

The best speed for a particular application is largely determined by experience, 
though, as a general rule, slower speeds are for denser materials and faster 
speeds for softer materials.

TRIGGER SWITCH AND LOCK-ON 
BUTTON (

fig 7

)

1.  Connect the power cord of your jigsaw 

to a standard household power outlet.

2.  To turn the saw ON, depress the on/off 

trigger switch.

3.  To turn the tool OFF, release the 

trigger switch.

4.  To lock the on/off trigger switch in the 

“on” position, press the trigger switch and hold it on, then press in the lock-on 
button. Release the trigger switch and then release the lock-on button. The lock-
on button allows the operator to keep the jigsaw running without squeezing the 
trigger switch. This feature is convenient for continuous sawing applications.

5.  To release the lock-on button, press and release the trigger switch.

6.  The speed can be adjusted from the minimum to maximum SPM as set on 

the variable speed dial and the pressure you apply to the trigger. Apply 
more pressure to increase the speed and release pressure to decrease speed. 
Regardless of the pressure applied on the trigger, the tool speed will not 
exceed the maximum speed setting selected on the variable-speed dial.

OPER

A

TING INS

TRUCTIONS

fig 6

NOTICE:

 When the jigsaw is used at low speed settings for an extended 

length of time, the motor temperature will rise due to slower speeds of the 
internal cooling fan. In such cases, it is necessary to occasionally run the tool at 
full speed for a few minutes to keep the motor running at high efficiency.

fig 7

Lock-on button

Trigger switch

Содержание 054-7287-8

Страница 1: ...INSTRUCTION MANUAL Model No 054 7287 8 IMPORTANT Please read this manual carefully before using this product and save it for reference Orbital Jigsaw...

Страница 2: ......

Страница 3: ...ns 13 Maintenance 17 Troubleshooting 18 Parts List 19 Warranty 22 NOTE If any parts are missing or damaged or if you have any questions please call our toll free helpline at 1 888 670 6682 SAVE THESE...

Страница 4: ...A Variable Speed 0 3000 SPM no load Bevel Angle Range 0 15 30 45 left and right Cutting Capacity Softwood 3 15 16 100 mm Cutting Capacity Aluminum 19 32 15 mm Cutting Capacity Mild Steel 5 16 8 mm Str...

Страница 5: ...viced by a qualified service technician For more information call the toll free helpline at 1 888 670 6682 READ ALL INSTRUCTIONS THOROUGHLY SAVE THESE INSTRUCTIONS GENERAL POWER TOOL SAFETY WARNINGS W...

Страница 6: ...drugs alcohol or medication A moment of inattention while operating power tools may result in serious personal injury Use personal protective equipment Always wear eye protection Protective equipment...

Страница 7: ...sharp cutting edges are less likely to bind and are easier to control Use the power tool accessories and tool bits etc in accordance with these instructions taking into account the working conditions...

Страница 8: ...chatter or vibrate if blade speed is too slow at beginning of cut and possibly kickback When removing the blade from the tool avoid contact with skin and use proper protective gloves when grasping th...

Страница 9: ...3 Orbit selection lever 8 Plastic overshoe 4 One touch blade change lever 9 Blower switch 5 Variable speed dial 10 Blade guide KEY PARTS DIAGRAM WARNING Remove the jigsaw from the package and examine...

Страница 10: ...PORTANT INFORMATION Before attempting to use this tool become familiar with all of its operating features and safety requirements For optimum performance and safety read the following operating instru...

Страница 11: ...the blade shank forward while inserting the blade After inserting the blade in position the one touch blade change lever will return automatically to its original position fig 2 4 Verify that the bla...

Страница 12: ...insert and press the insert into the saw or the plastic overshoe INSTALLING THE EDGE GUIDE fig 5 The edge guide is used for straight cutting 1 Insert the bar of the edge guide through the slots in th...

Страница 13: ...the trigger switch and hold it on then press in the lock on button Release the trigger switch and then release the lock on button The lock on button allows the operator to keep the jigsaw running with...

Страница 14: ...pplication This chart is intended as a guideline only and test cuts in scrap material should be performed first to determine the best setting for your project Orbit Setting Orbit Action Material Type...

Страница 15: ...ate 5 Accurate work requires a trial cut Measure the work after cutting and reset the angle as necessary Repeat the setting until the correct bevel is achieved 6 If the base plate will not tighten as...

Страница 16: ...ing areas only 6 Rest the base plate on the workpiece so that the blade is not in contact with the workpiece 7 Turn on the jigsaw and bring it to the maximum desired cutting speed before applying the...

Страница 17: ...that may affect operation If abnormal vibration or noise occurs turn the tool off immediately and have the problem corrected before further use MAINTENANCE WARNING To avoid accidents always disconnec...

Страница 18: ...mp slot with a brush The blade dropped from the chuck The clamp didn t hold the blade tightly Re attach the blade and check whether it is tightly held before cutting Cutting is difficult Saw blade is...

Страница 19: ...19 EXPLODED VIEW PARTS LIST...

Страница 20: ...ocated Block 46 5700029000 Needle Bearing 13 5610079000 Thread Forming Screw 47 3700183000 Washer C 14 3550177000 Guiding Roller Support Pin 48 5660007000 Circlips For Shaft 15 2825282000 Roller Suppo...

Страница 21: ...8916000 Protecting Cover 31 2750835000 Rotor 65 3126718000 Anti splinter Insert 32 4860513000 Internal Wire Assembly 66 3810006000 Jigsaw Blade 33 2825279000 Bearing Support Assembly 201 3900026000 L...

Страница 22: ...the Service Provider c this warranty will not apply to any product or part thereof which is worn or broken or which has become inoperative due to abuse misuse accidental damage neglect or lack of prop...

Страница 23: ...equal to the time during which the Quebec retailer possesses the product in attempt to fulfill warranty obligations replaced product will not default to new product warranty conditions and n the retai...

Страница 24: ...amount paid by the purchaser to the retailer for the product to which this warranty applies Notice to Consumer This warranty gives you specific legal rights and you may have other rights which may va...

Отзывы: