41.
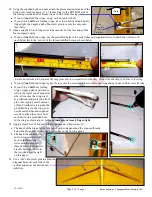
Starting from either side of the fuselage, insert the composite
wing rod through the two gull-shaped panels, centered midway
through the fuselage. (IMPORTANT: Apply a dab of paint at
the center of the wing rod to use to center the wing rod.)
42.
Place the right wing panel onto the wing rod and slide it toward
the fuselage. When the right wing panel‟s root rib gets to within
approx. 5 inches of the gull-shaped winglet, feed the connectors
and leads from the aileron servo and the flap & slat servo into
and through the gull-shaped winglet and into the fuselage.
(
Note
: Direct the aileron and flap servo‟s leads through your choice of the several openings in each wing panel‟s root ribs; True
to the original WWII Storch, this model offers you the option of folding wings; leave „slack‟ in the aileron and flap servo leads
inside the cabin for the wings to fold if you are assembling your Storch with folding wings.)
43.
As you continue sliding the wing panel toward
the fuselage, pull the servo leads inside the
fuselage. As the wing panel‟s root rib nears the
gull-shaped winglet, align the wing panel‟s hinge
parts with their corresponding slotted openings
at the rear of the gull-shaped winglet,
then continue sliding the wing panel until it is
fully seated against the gull-shaped panel.
44.
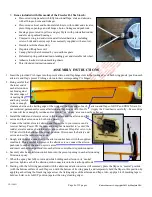
Insert a supplied 1/2-inch-long machine bolt
into the hole in the top of the gull-shaped winglet.
Press the bolt fully through all of the wing panel‟s metal hinge projections and
the winglet‟s slotted openings until the end of the bolt becomes visible at the
bottom of the wing.
45.
Position a supplied hex nut at the end of the bolt. Using a screwdriver, twist
the bolt clockwise to draw the nut up into the hex-shaped opening in the
bottom of the gull-shaped winglet.
46.
Repeat steps 42 through 45 for the left wing panel and its hinge bolt.
Note:
The original Storch was designed as a reconnaissance, liaison and air-
ambulance aircraft; extensive flight-testing has shown that this model, when
configured with folding wings, is capable of scale-like flying maneuvers;
however, it is not intended for advanced, stressful aerobatic flying.
If being able to fold back the wings is
not
a feature you value or desire, immediately proceed to step 47.
If you assemble your Storch
with
folding wings, the bolts that attach the left and right wing panels to their respective gull-
shaped winglets are the central part of each wing panel‟s „hinge‟ – And they must now be tested (and adjusted) as follows:
a.
Slide the composite wing rod left or right, into either wing panel, fold the wing panel back on the side that is now without
a wing rod, then remove the wing rod and fold the second wing panel back.
b.
If a hinge bolt restricts your ability to fold the wing, or if the hinge seems too loose, adjust as necessary for smooth,
slop-free folding operation; repeat this step until both hinges fold both directions smoothly and with no undue „play,‟
c.
Once the hinge bolts are properly adjusted, return the wing rod to its normal position, centered between the wing panels.
47.
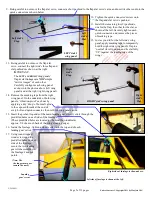
Insert and center the composite strut bracket through the precut openings in each side of the fuselage; secure the strut bracket
to the floor of the fuselage with a small amount of 5-minute epoxy.
48.
Position the Storch on a soft surface on its back.
Note:
If your Storch
will
have folding wings, your wing struts are non-
functional (cosmetic only) to allow the wings to
fold back for transport and to unfold for flight.
49.
Use bolts and nuts to attach the preattached metal
ends of the struts nearest the nose (as shown at
the right, each of these struts is approx.
14 inches long) to the TOP side of the
fuselage-mounted strut bracket on
each side of the fuselage.
Struts attached to the composite strut-
mounting bracket, as viewed from
the bottom-side of the fuselage.
LEFT
side’s
wing panel
LEFT
side’s
flap
RIGHT side’s wing panel
RIGHT side’s flap
Gull-shaped
winglet
Gull-shaped
winglet
Page 8 of 13 pages
V.2-150423
Entire Contents © Copyright 2013 by Maxford USA
Install the
shortest struts
closest to the
tail and the
longest struts
closest to the
nose.
Nose

