


Copyright Maxford USA 2019
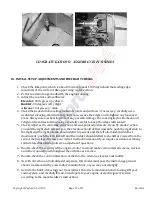
Step 2. Installation in the fuselage
1.
Pull out front and rear part of fuselage, slide composite positions pins into front
rear part. When you will be satisfied with test fit, glue front and rear part of fuselage into one piece.
2.
Place the fuselage upside down to get access to the opening in the fuselage bottom.
3.
Install your elevator servo, 2 rudder ser
4.
Connect the clevises of the two sets of elevator pull
5.
Install rudder cable rings on each side of fuselage. Guide rudder cable through rings, clip cable en
the rudder servo arm.
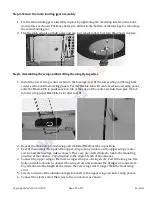
Step3. Mounting the tail surfaces and the tail wheel
1.
Test fit then glue the rudder and elevator to vert. fin and horiz
2.
Mount the stabilizer and fin onto the tail end of the fuselage
surface mounting bolts into the holes pre
bolts into the fin.
3.
Install scale Anti-spin Strakes onto the rear of turtle back with wood screws and epoxy.
4.
Insert the sharp end of the tail
to secure it in the fin. Tighten the two mounting screws to
sure the tail wheel strut can rotate freely in the
strut and tail wheel to the fuselage.)
5.
Mount the control horns onto the rudder and elevator.
6.
Connect the pull-pull control cables to the horns on the elevator and on the
the tension in the cables by turning the clevises clockwise or
threaded connector.
Page 8 of 13
Pull out front and rear part of fuselage, slide composite positions pins into front part, then test fit the
rear part. When you will be satisfied with test fit, glue front and rear part of fuselage into one piece.
Place the fuselage upside down to get access to the opening in the fuselage bottom.
rudder servos and throttle servo (if set up for gas) in the servo tray
Connect the clevises of the two sets of elevator pull-pull wires to the elevator servo arm.
Install rudder cable rings on each side of fuselage. Guide rudder cable through rings, clip cable en
Step3. Mounting the tail surfaces and the tail wheel
the rudder and elevator to vert. fin and horizontal stabilizer with CA.
Mount the stabilizer and fin onto the tail end of the fuselage by inserting the
surface mounting bolts into the holes pre-drill in the fuselage, then securely tighten these
spin Strakes onto the rear of turtle back with wood screws and epoxy.
the tail-gear strut into the hole pre-drilled in the fin
to secure it in the fin. Tighten the two mounting screws to secure the mounting plate. (Be
sure the tail wheel strut can rotate freely in the mounting plate as you secure the tail
fuselage.)
Mount the control horns onto the rudder and elevator.
pull control cables to the horns on the elevator and on the
the tension in the cables by turning the clevises clockwise or counter-clockwise on the
RS190529
part, then test fit the
rear part. When you will be satisfied with test fit, glue front and rear part of fuselage into one piece.
Place the fuselage upside down to get access to the opening in the fuselage bottom.
in the servo tray.
servo arm.
Install rudder cable rings on each side of fuselage. Guide rudder cable through rings, clip cable end to
stabilizer with CA.
by inserting the two long tail-
then securely tighten these
spin Strakes onto the rear of turtle back with wood screws and epoxy.
drilled in the fin and apply thin CA
secure the mounting plate. (Be
mounting plate as you secure the tail wheel
pull control cables to the horns on the elevator and on the rudder. Adjust
clockwise on the