background image

a

b

c

d

x 2

STAGE 13

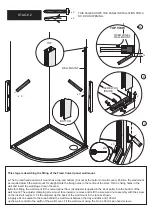
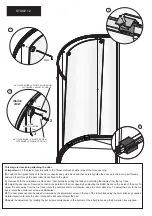
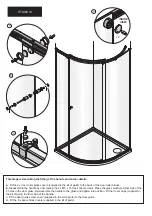
This stage is describing the fitting of the handle and colour details.

a.  

Fit the 2 x door roller block covers (supplied in the kit of parts) to the back of the door roller blocks.

b. 

Disassemble the handle by unscrewing the 2 x M5 x 16 Csk socket screws. Place the glass washers either side of the 

2 holes in the door glass. Re-assemble the handle to the glass and tighten into position. Fit the Cover caps (supplied in 
the kit of parts) to either side of the handle.

c. 

Fit the door guide screw cover (supplied in the kit of parts) to the door guide.

d.  

Fit the 6 x panel block covers (supplied in the kit of parts).

INSIDE

VIEW

Содержание ONE MOC

Страница 1: ...0950AF 01 19 MATKI ONE MOC CURVED CORNER SLIDER INSTALLATION PARTS LIST MATKI PLC CHURCHWARD ROAD YATE BRISTOL BS37 5PL TELEPHONE 01454 322888 CUSTOMER SERVICES EMAIL techsupport matki co uk...

Страница 2: ...ssembly should be installed onto a waterproof wall covering and installed after the Tray and wall coverings are in place Where Tiling lips are provided Trays should be let into the Wall with the Tilin...

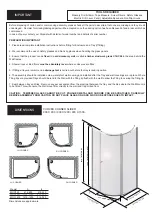
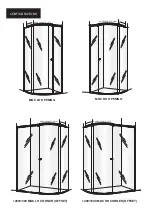
Страница 3: ...CONFIGURATIONS MOC LH OPENING MOC RH OPENING 1200 1500 MOC RH CORNER OFFSET 1200 1500 MOC LH CORNER OFFSET DOOR OPENS TO LEFT DOOR OPENS TO RIGHT DOOR OPENS TO LEFT DOOR OPENS TO RIGHT...

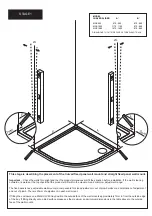
Страница 4: ...adjustable wall mounts to compensate for size adjustment or out of plumb walls or a combination of adjustment and out of plumb There is 20mm of adjustment in each wall mount If fitting the enclosure o...

Страница 5: ...he area b Before fitting the wall mount fit the curved panel floor rail adjuster supplied in the kit of parts into the bottom of the wall mount The adjuster clamping screw must face inwards remove and...

Страница 6: ...is at the maximum adjustment and can move freely b Lightly wet the edge of the fixed panel with soapy water gently lower the fixed curved panel onto the adjuster ensuring the adjuster screw locates in...

Страница 7: ...re fitting b Before fitting the floor rail remove and set aside the 2 x M5 x 12 socket screws from the floor rail bracket in the end of the curved fixed panel c Fit the floor rail over the floor rail...

Страница 8: ...t par rapport la bordure avant du receveur de douche Pour ajuster desserrez la vis d un tour complet resserrez apr s avoir ajust mais ne serrez pas trop Mettez le profil mural parfaitement d aplomb fa...

Страница 9: ...e wall mount glass guard is pushed up fully to allow the glass to easily slot into the wall mount Important The frame on the bottom of the fixed glass panel is slightly longer than the glass on one si...

Страница 10: ...o be fitted b Apply a bead of silicon in the floor rail at the end face of the straight fixed panel where the threshold cover is to be fitted c Fit the curved threshold cover onto the floor rail d App...

Страница 11: ...the top track wall mount cap and top track wall fixing adjuster to allow for fitting the top track d Lower the top track into position ensuring the top track glass clamps fit over the top edge of gla...

Страница 12: ...d insert the wall plug Secure the wall plate using the No 8 x 50mm pan head screw aligning the slot in the horizontal position c Lower the top track into position ensuring the top track glass clamps f...

Страница 13: ...etal to metal contact b If not vertical then adjustment may be required to the top track position via the adjustment in the top of the wall mount and wall adjuster in the top track Adjusting these wil...

Страница 14: ...lass clamp guards are fitted between the clamps and glass panels before tightening the set screws Do not over tighten c Tighten the wall mount cap adjuster screw with the 3mm allen key d Fit the Curve...

Страница 15: ...top track door roller guides by pulling the tabs and unfolding them away from the top track d Adjust the door panel if required so that it runs parallel to the door opening by adjusting the Roller bl...

Страница 16: ...andle by unscrewing the 2 x M5 x 16 Csk socket screws Place the glass washers either side of the 2 holes in the door glass Re assemble the handle to the glass and tighten into position Fit the Cover c...

Страница 17: ...e lined up with the top of the floor horizontal d Apply a thin bead of silicon along the bottom edge of both the wall mounts and all the way up the outside of both the wall mount extrusions between th...

Страница 18: ...CORATIVE PIVOT DISK 2 8400 A SILVER DECORATIVE HANDLE CAP 74 2 8582 AF DIN O Ring 0140 20 75 1 4681 AF MTK1 SLIDER CURVED DISK DISPLAY PACK 76 1 1005 CHROME MATKI CHROME EMBLEM 77 29 21 52 31 35 29 48...

Страница 19: ...261 AF PIVOT BLOCK ADJUSTER SCREW 24 2 8436 A SILVER PIVOT CLAMP BODY 25 3 1503 A SILVER M5 x 20 CSK SKT 26 4 8579 AF DIN O Ring 0190 20 27 4 1298 A SILVER M4 X 4 SOCKET SET SCREW A2 28 2 8432 GREY SL...

Страница 20: ...g bleach or solvents as the products will effect the anodised framework Under no circumstances use cleaners with a pH level exceeding 8 Matki does not recommend the use of Leave on shower cleaners on...

Отзывы: