background image

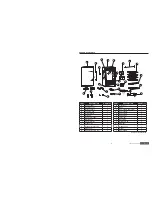
LISTA DE PIEZAS DE REPUESTO

Para obtener piezas de repuesto, llame a nuestro Departamento de Servicio al Cliente al 1-800-963-0211, 
de lunes a jueves de 8 a.m. a 6 p.m., y los viernes de 8 a.m. a 5 p.m., hora estándar del Este.

Impreso en China

Master Forge & M Design

®

 es una 

marca registrada de LF, LLC. Todos los 

derechos reservados.

48

Lowes.com/masterforge

A

X

B

C

D

Z

E

F

H

U

V

W

K

L

M

N

R

Y

Q

S

T

O

J

G

I

P

A2

A1

A3

PIEZA

DESCRIPCIÓN

PIEZA #

A

Kit del cuerpo

9907120041

B

Panel de control

9007120067

C

Soportes de las rejillas

9007120098

D

Rejilla de ahumado

9007120002

E

De

fl

 ector de goteo

9007120003

F

Bandeja de goteo

9007120009

G

Cargador de astillas de madera

9007120005

H

Recipiente para agua

9007120004

I

Bandeja para astillas de madera 9007120006

J

Bandeja de recolección de grasa 9007120081

K

Kit de abrazadera para la 

bandeja de recolección de grasa

9907120016

L

Kit con del panel de reborde 

derecho

9907120049

L

Kit del panel de reborde izquierdo 9907120050

M

Pata atornillable  ajustable

910050006

N

Kit de pata frontal derecha

9907120047

N

Kit de pata frontal izquierda

9907120048

PIEZA

DESCRIPCIÓN

PIEZA #

O

Kit de puerta

9907120059

P

Manija para puerta (estilo barra) 9907120052

Q

Kit de manija para puerta

9907120012

R

Kit de bisagras para puerta

9907120013

S

Kit de regulador de aire

9907120005

T

Luz

9907120018

U

Kit de pestillo para puerta

9907120004

V

Carcasa para las astillas de 

madera

9907120014

W

Hornilla

9907120011

X

Kit de cubierta con bisagras

9907120008

Y

Kit de ruedas

9907120017

Z

Kit de la manija posterior

9907120015

A1

Soporte del de

fl

 ector de goteo

9907120040

A2

Carcasa del panel de control

9907120042

A3

Kit de aditamentos

9007120097

5

SAFETY INFORMATION

Please read and understand this entire manual before attempting to assemble, operate or install 
the product.

When using electrical appliances, basic safety precautions should always be followed including 
the following:

• This manual contains important information necessary for the proper and safe use of this unit.
• Read and follow all warnings and instructions before using smoker and during use.
• Keep this manual for future reference.
• Some parts may have sharp edges. Handle with care.
• Burning wood chips give off carbon monoxide, which has no odor and can cause death.
• Do NOT burn wood chips inside homes, vehicles, tents, garages or any enclosed areas.
• Failure to follow these warnings and instructions properly could result in personal injury or death.
• For outdoor use only. Do NOT operate in an enclosed area.
• Unit MUST be on the ground. Do NOT place unit on tables or counters. Do NOT move unit 
  across uneven surfaces.
• Do NOT plug in electric smoker until fully assembled and ready for use.
• Use only approved grounded electrical outlet.
• Do NOT use during an electrical storm.
• Do NOT expose electric smoker to rain or water at anytime.
• To protect against electrical shock, do NOT immerse cord, plug or control panel in water or

other liquids.

• Do NOT operate any appliance with a damaged cord or plug, or after appliance malfunctions or 
  has been damaged in any manner. Contact Customer Service for assistance at 1-800-963-0211.
• Keep a 

fi

 re extinguisher accessible at all times while operating electric smoker.

• Do NOT let cord hang or touch hot surfaces.
• Do NOT place on or near a hot gas or electric burner, or in a heated oven.
• Keep children and pets away from electric smoker at all times. Do NOT allow children to use  
  electric smoker. Close supervision is necessary should children or pets be in area where electric 
  smoker is being used.
• Fuel, such as charcoal briquettes or heat pellets, are not to be used in electric smoker.
• Never use electric smoker as a heater.
• Use electric smoker only on a level, stable surface to prevent tipping.
• Do NOT touch HOT surfaces. 
• Do NOT allow anyone to conduct activities around electric smoker during or following its use until 
  the unit has cooled. Electric smoker is HOT during operation and remains HOT for a period of 
  time following use.
• The use of alcohol, prescription or non-prescription drugs may impair the user’s ability to properly 
  assemble or safely operate electric smoker.
• Avoid bumping or impacting electric smoker.
• Never move electric smoker when in use. Allow electric smoker to cool completely before moving 
 or storing.

Lowes.com/masterforge

Содержание 20071214

Страница 1: ...erial Number Purchase Date Questions problems missing parts Before returning to your retailer call our customer service department at 1 800 963 0211 8 a m 6 p m EST Monday Thursday 8 a m 5 p m EST Fri...

Страница 2: ...eContents HardwareContents Safety Information Preparation Assembly Instructions Operating Instructions Care and Maintenance Troubleshooting Limited Warranty Replacement Parts List 3 4 5 7 7 11 13 14 1...

Страница 3: ...Grease tray bracket 2 L Side panel 2 M Adjustable screw leg 2 PART DESCRIPTION QUANTITY N Front foot 2 O Door 1 P Door handle Bar style 1 Q Door handle 1 R Door hinge 1 S Air damper 1 T LED Light 1 U...

Страница 4: ...4 HARDWARE CONTENTS shown actual size AA M6 x 25 mm Screw Qty 16 ST4 x 16 mm Screw Qty 10 BB M6 x 9 mm Screw Qty 8 CC Lowes com masterforge...

Страница 5: ...s and instructions before using smoker and during use Keep this manual for future reference Some parts may have sharp edges Handle with care Burning wood chips give off carbon monoxide which has no od...

Страница 6: ...cante garantiza que sus productos no presentar n defectos de fabricaci n en el material ni en la mano de obra si se los ensambla correctamente se los utiliza de forma normal y se los cuida seg n las r...

Страница 7: ...emperatura desciende r pidamente o se apaga luego de algunas horas de uso 1 La unidad de control es defectuosa 1 Llame al Servicio al Cliente El controlador muestra un mensaje de error 1 El controlado...

Страница 8: ...esniveladas La manija posterior NO es para levantar la unidad La bandeja y el cargador de astillas de madera DEBEN estar en su lugar siempre que se utilice el ahumador De esta manera se minimiza el ri...

Страница 9: ...da para carne en el centro de la carne para que la lectura sea m s precisa Mantenga presionado el bot n MEAT PROBE SONDA PARA CARNE La pantalla LED le mostrar la temperatura interna de la carne Una ve...

Страница 10: ...ador de astillas de madera Gire la manija en direcci n de las manecillas del reloj hacia la marca de la flecha en el ahumador para descargar la madera La madera caer en la bandeja para astillas de mad...

Страница 11: ...enerating smoke Before starting unit place 1 2 cup of wood chips in chip loader Never use more than 1 2 cup of wood chips at a time Never use wood chunks Insert wood chip loader into smoker Wood chips...

Страница 12: ...sed LED display will return to set temperature or set time To use light Press LIGHT button to turn light on Press LIGHT button to turn light off To RESET control panel If control panel shows an error...

Страница 13: ...or and exterior of smoker simply wipe down with a damp cloth Do NOT use a cleaning agent Make sure to dry thoroughly Door seal and inside seam that seal attaches to MUST be cleaned with a damp cloth a...

Страница 14: ...ning 1 Call Customer Service Controller does not adjust heat 1 Controller malfunctioning 1 Call Customer Service Meat probe temperature does not show on display 1 Probe malfunctioning 1 Call Customer...

Страница 15: ...les generados al usar este producto contienen sustancias qu micas reconocidas por el estado de California como causantes de c ncer defectos cong nitos y otros da os en el aparato reproductivo 2 Este p...

Страница 16: ...podr a ocasionar lesiones personales graves e incluso la muerte Solo para uso en exteriores NO lo utilice en reas cerradas La unidad DEBE colocarse sobre el suelo NO coloque la unidad sobre una mesa...

Страница 17: ...36 ADITAMENTOS se muestran en tama o real AA Tornillo M6 x 25 mm Cant 16 Tornillo ST4 x 16 mm Cant 10 BB Tornillo M6 x 9 mm Cant 8 CC Lowes com masterforge...

Страница 18: ...e la bandeja de recolecci n de grasa 2 L Panel lateral 2 M Pata atornillable ajustable 2 PIEZA DESCRIPCI N CANTIDAD N Pata frontal 2 O Puerta 1 P Manija para puerta estilo barra 1 Q Manija para puerta...

Страница 19: ...e repuesto 35 36 37 39 39 43 45 46 47 48 Lowes com masterforge 17 FUMOIR LECTRIQUE NUM RIQUE ARTICLE 0416467 MOD LE 20071214 Num ro de s rie Date d achat Des questions des probl mes des pi ces manquan...

Страница 20: ...20 21 23 23 27 29 30 31 32 Lowes com masterforge 33 AHUMADOR EL CTRICO DIGITAL ART CULO 0416467 MODELO 20071214 N mero de serie Fecha de compra Preguntas problemas piezas faltantes Antes de volver a...

Страница 21: ...teau graisse 2 L Panneau lat ral 2 M Pied visser r glable 2 PI CE DESCRIPTION QUANTIT N Pied avant 2 O Porte 1 P Poign e de porte dans le style d une barre 1 Q Poign e de porte 1 R Charni re de porte...

Страница 22: ...20 QUINCAILLERIE INCLUSE grandeur r elle AA Vis M6 de 25 mm Qt 16 Vis ST4 de 16 mm Qt 10 BB Vis M6 de 9 mm Qt 8 CC Lowes com masterforge...

Страница 23: ...tente d un garage ou de tout autre espace clos Le non respect de ces avertissements et de ces instructions peut entra ner des blessures ou la mort Pour un usage l ext rieur seulement N utilisez PAS ce...

Страница 24: ...its chimiques reconnus par l tat de la Californie comme tant la cause de cancers d anomalies cong nitales et d autres probl mes li s aux fonctions reproductrices 2 Cet appareil contient des produits c...

Страница 25: ...quez avec le service la client le Le panneau de commande affiche un message d erreur 1 Le panneau de commande ne fonctionne pas bien 1 Communiquez avec le service la client le Le voyant d alimentation...

Страница 26: ...ilisation afin de les maintenir en bonne condition Le r glage maximal de la temp rature est de 135 C 275 F Ne d placez PAS l appareil sur des surfaces in gales La poign e arri re ne sert PAS soulever...

Страница 27: ...n MEAT PROBE et maintenez le enfonc L afficheur DEL indiquera la temp rature interne de la viande Une fois le bouton MEAT PROBE rel ch l afficheur DEL indiquera nouveau la temp rature ou la dur e r gl...

Страница 28: ...de morceaux de bois Ins rez le chargeur de copeaux de bois dans le fumoir Les copeaux de bois doivent tre de niveau avec le bord sup rieur du chargeur de copeaux de bois Tournez la poign e dans le sen...

Отзывы: