background image

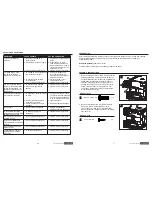
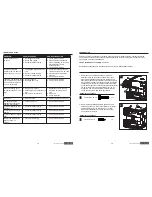
TROUBLESHOOTING

PROBLEM

POSSIBLE CAUSE

CORRECTIVE ACTION

Power light does not 
switch on.

1. Not plugged into outlet.
2. House fuse tripped.
3. Controller malfunctioning.

1. Check wall connection.
2. Make sure other appliances 
    are not operating on the same 
    electrical circuit. Check 
    household fuses.
3. Call Customer Service.

Unit takes excessive 
amount of time to heat up  
(longer than 60 - 70 min.). 

1. Unit plugged into an extension 
    cord.
2. Door not closed properly.
3. Controller malfunctioning.

1. Set unit so that an extension    
    cord does not have to be used.
2. Close door and fasten latch
    securely.
3. Call Customer Service.

There is a gap between the 
door and the smoker when 
in use and door latch has 
no more adjustment.

1. Door not aligned.
2. Damaged door seal.

1. Call Customer Service.
2. Call Customer Service.

Grease is leaking out of 
smoker through door and 
legs.

1. Drip pan not in place.
2. Excess grease or oil build-up in 
    unit.
3. Drain tube is not draining.

1. Reposition so hole lines up 
    with drain hole in bottom of 
    unit.
2. Clean unit.
3. Check drain tube.

No smoke.

1. No wood chips.

1. Add wood chips (see page 11).

Temperature rapidly 
decreased or shut down 
after few hours of use.

1. Faulty control unit.

1. Call Customer Service.

Controller displaying error 
message.

1. Controller malfunctioning.

1. Call Customer Service.

Power  light  is  on,  unit  isn’t                          
heating.

1. Controller malfunctioning.

1. Call Customer Service.

Controller does not adjust 
heat.

1. Controller malfunctioning.

1. Call Customer Service.

Meat probe temperature 
does not show on 
display.

1. Probe malfunctioning

1. Call Customer Service.

14

Lowes.com/masterforge

PREPARACIÓN

Antes de comenzar a ensamblar el producto, asegúrese de tener todas las piezas. Compare las piezas 

con la lista del contenido del paquete y la lista de aditamentos. No intente ensamblar el producto si falta 

alguna pieza o si estas están dañadas.

Tiempo estimado de ensamblaje

: 25 minutos

Herramientas necesarias para el ensamblaje (no se incluyen): Destornillador Phillips

INSTRUCCIONES DE ENSAMBLAJE

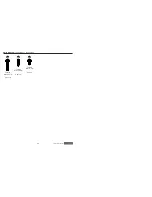
Aditamentos utilizados

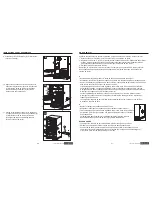
1.   Retire todos los componentes desde el interior del 

ahumador antes de comenzar a ensamblar. Coloque 

el ahumador cuidadosamente sobre su costado. Como 

alternativa, el ahumador puede colocarse boca abajo para 

el ensamble. Sin embargo, asegúrese de que el empaque 

de espuma permanezca en la parte superior para evitar 

que se dañe el panel de control. Asegure la pata frontal (N) 

a la parte inferior del cuerpo del ahumador (A) con los 

tornillos M6 x 25 mm (AA). Repita el procedimiento en 

el lado opuesto para la pata frontal (N) restante.

2.   Retire la pata atornillable ajustable (M). Aparte para 

utilizarla en el Paso 4. Fije el panel lateral (L) al cuerpo 
del ahumador (A) con los tornillos ST4 x 16 (BB).


 Repita el procedimiento en el lado opuesto para el 
panel lateral (L) restante.

1

2

Tornillo ST4 x 16

BB

Aditamentos utilizados

x 8

M

L

BB

A

39

Lowes.com/masterforge

Tornillo M6 x 25 mm

x 12

AA

A

AA

N

BB

Содержание 20071214

Страница 1: ...erial Number Purchase Date Questions problems missing parts Before returning to your retailer call our customer service department at 1 800 963 0211 8 a m 6 p m EST Monday Thursday 8 a m 5 p m EST Fri...

Страница 2: ...eContents HardwareContents Safety Information Preparation Assembly Instructions Operating Instructions Care and Maintenance Troubleshooting Limited Warranty Replacement Parts List 3 4 5 7 7 11 13 14 1...

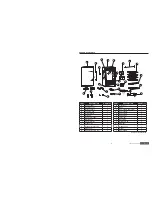
Страница 3: ...Grease tray bracket 2 L Side panel 2 M Adjustable screw leg 2 PART DESCRIPTION QUANTITY N Front foot 2 O Door 1 P Door handle Bar style 1 Q Door handle 1 R Door hinge 1 S Air damper 1 T LED Light 1 U...

Страница 4: ...4 HARDWARE CONTENTS shown actual size AA M6 x 25 mm Screw Qty 16 ST4 x 16 mm Screw Qty 10 BB M6 x 9 mm Screw Qty 8 CC Lowes com masterforge...

Страница 5: ...s and instructions before using smoker and during use Keep this manual for future reference Some parts may have sharp edges Handle with care Burning wood chips give off carbon monoxide which has no od...

Страница 6: ...cante garantiza que sus productos no presentar n defectos de fabricaci n en el material ni en la mano de obra si se los ensambla correctamente se los utiliza de forma normal y se los cuida seg n las r...

Страница 7: ...emperatura desciende r pidamente o se apaga luego de algunas horas de uso 1 La unidad de control es defectuosa 1 Llame al Servicio al Cliente El controlador muestra un mensaje de error 1 El controlado...

Страница 8: ...esniveladas La manija posterior NO es para levantar la unidad La bandeja y el cargador de astillas de madera DEBEN estar en su lugar siempre que se utilice el ahumador De esta manera se minimiza el ri...

Страница 9: ...da para carne en el centro de la carne para que la lectura sea m s precisa Mantenga presionado el bot n MEAT PROBE SONDA PARA CARNE La pantalla LED le mostrar la temperatura interna de la carne Una ve...

Страница 10: ...ador de astillas de madera Gire la manija en direcci n de las manecillas del reloj hacia la marca de la flecha en el ahumador para descargar la madera La madera caer en la bandeja para astillas de mad...

Страница 11: ...enerating smoke Before starting unit place 1 2 cup of wood chips in chip loader Never use more than 1 2 cup of wood chips at a time Never use wood chunks Insert wood chip loader into smoker Wood chips...

Страница 12: ...sed LED display will return to set temperature or set time To use light Press LIGHT button to turn light on Press LIGHT button to turn light off To RESET control panel If control panel shows an error...

Страница 13: ...or and exterior of smoker simply wipe down with a damp cloth Do NOT use a cleaning agent Make sure to dry thoroughly Door seal and inside seam that seal attaches to MUST be cleaned with a damp cloth a...

Страница 14: ...ning 1 Call Customer Service Controller does not adjust heat 1 Controller malfunctioning 1 Call Customer Service Meat probe temperature does not show on display 1 Probe malfunctioning 1 Call Customer...

Страница 15: ...les generados al usar este producto contienen sustancias qu micas reconocidas por el estado de California como causantes de c ncer defectos cong nitos y otros da os en el aparato reproductivo 2 Este p...

Страница 16: ...podr a ocasionar lesiones personales graves e incluso la muerte Solo para uso en exteriores NO lo utilice en reas cerradas La unidad DEBE colocarse sobre el suelo NO coloque la unidad sobre una mesa...

Страница 17: ...36 ADITAMENTOS se muestran en tama o real AA Tornillo M6 x 25 mm Cant 16 Tornillo ST4 x 16 mm Cant 10 BB Tornillo M6 x 9 mm Cant 8 CC Lowes com masterforge...

Страница 18: ...e la bandeja de recolecci n de grasa 2 L Panel lateral 2 M Pata atornillable ajustable 2 PIEZA DESCRIPCI N CANTIDAD N Pata frontal 2 O Puerta 1 P Manija para puerta estilo barra 1 Q Manija para puerta...

Страница 19: ...e repuesto 35 36 37 39 39 43 45 46 47 48 Lowes com masterforge 17 FUMOIR LECTRIQUE NUM RIQUE ARTICLE 0416467 MOD LE 20071214 Num ro de s rie Date d achat Des questions des probl mes des pi ces manquan...

Страница 20: ...20 21 23 23 27 29 30 31 32 Lowes com masterforge 33 AHUMADOR EL CTRICO DIGITAL ART CULO 0416467 MODELO 20071214 N mero de serie Fecha de compra Preguntas problemas piezas faltantes Antes de volver a...

Страница 21: ...teau graisse 2 L Panneau lat ral 2 M Pied visser r glable 2 PI CE DESCRIPTION QUANTIT N Pied avant 2 O Porte 1 P Poign e de porte dans le style d une barre 1 Q Poign e de porte 1 R Charni re de porte...

Страница 22: ...20 QUINCAILLERIE INCLUSE grandeur r elle AA Vis M6 de 25 mm Qt 16 Vis ST4 de 16 mm Qt 10 BB Vis M6 de 9 mm Qt 8 CC Lowes com masterforge...

Страница 23: ...tente d un garage ou de tout autre espace clos Le non respect de ces avertissements et de ces instructions peut entra ner des blessures ou la mort Pour un usage l ext rieur seulement N utilisez PAS ce...

Страница 24: ...its chimiques reconnus par l tat de la Californie comme tant la cause de cancers d anomalies cong nitales et d autres probl mes li s aux fonctions reproductrices 2 Cet appareil contient des produits c...

Страница 25: ...quez avec le service la client le Le panneau de commande affiche un message d erreur 1 Le panneau de commande ne fonctionne pas bien 1 Communiquez avec le service la client le Le voyant d alimentation...

Страница 26: ...ilisation afin de les maintenir en bonne condition Le r glage maximal de la temp rature est de 135 C 275 F Ne d placez PAS l appareil sur des surfaces in gales La poign e arri re ne sert PAS soulever...

Страница 27: ...n MEAT PROBE et maintenez le enfonc L afficheur DEL indiquera la temp rature interne de la viande Une fois le bouton MEAT PROBE rel ch l afficheur DEL indiquera nouveau la temp rature ou la dur e r gl...

Страница 28: ...de morceaux de bois Ins rez le chargeur de copeaux de bois dans le fumoir Les copeaux de bois doivent tre de niveau avec le bord sup rieur du chargeur de copeaux de bois Tournez la poign e dans le sen...

Отзывы: