


USER ASSIGN
F-1 THRU F-5
COLOR CHANNEL
SCAN
ASPECT
ZOOM
HV DELAY
MARKER
AUDIO METER
AUDIO PRESET 1
AUDIO PRESET 2
AUDIO PRESET 3
AUDIO PRESET 4
AUDIO PRESET 5
AUDIO PRESET 6
AUDIO PRESET 7
AUDIO PRESET 8
LAYOUT A
LAYOUT B
WAVEFORM MON
VECTORSCOPE
ClipGuide
TIMECODE
REMOTE
RETURN
PIN 1 THRU 8
(Pin 5 is Ground)
INPUT 1
INPUT 2
GAMMA 1.0
GAMMA 1.8
GAMMA 2.0
GAMMA 2.2
GAMMA 2.4
GAMMA 2.6
WHITEBLANCE D65
WHITEBALANCE D93
MONO
SCAN
ASPECT
ZOOM
HV DELAY
RED ONLY
BLUE ONLY
GREEN ONLY
MARKER
AUDIO METER
AUDIO PRESET 1
AUDIO PRESET 2
AUDIO PRESET 3
AUDIO PRESET 4
AUDIO PRESET 5
AUDIO PRESET 6
AUDIO PRESET 7
LAYOUT A
LAYOUT B
WAVEFORM MON
VECTORSCOPE
ClipGuide
TIMECODE LTC
TIMECODE VITC 1
TIMECODE VITC 2
On-Screen Menu
(continued)
11
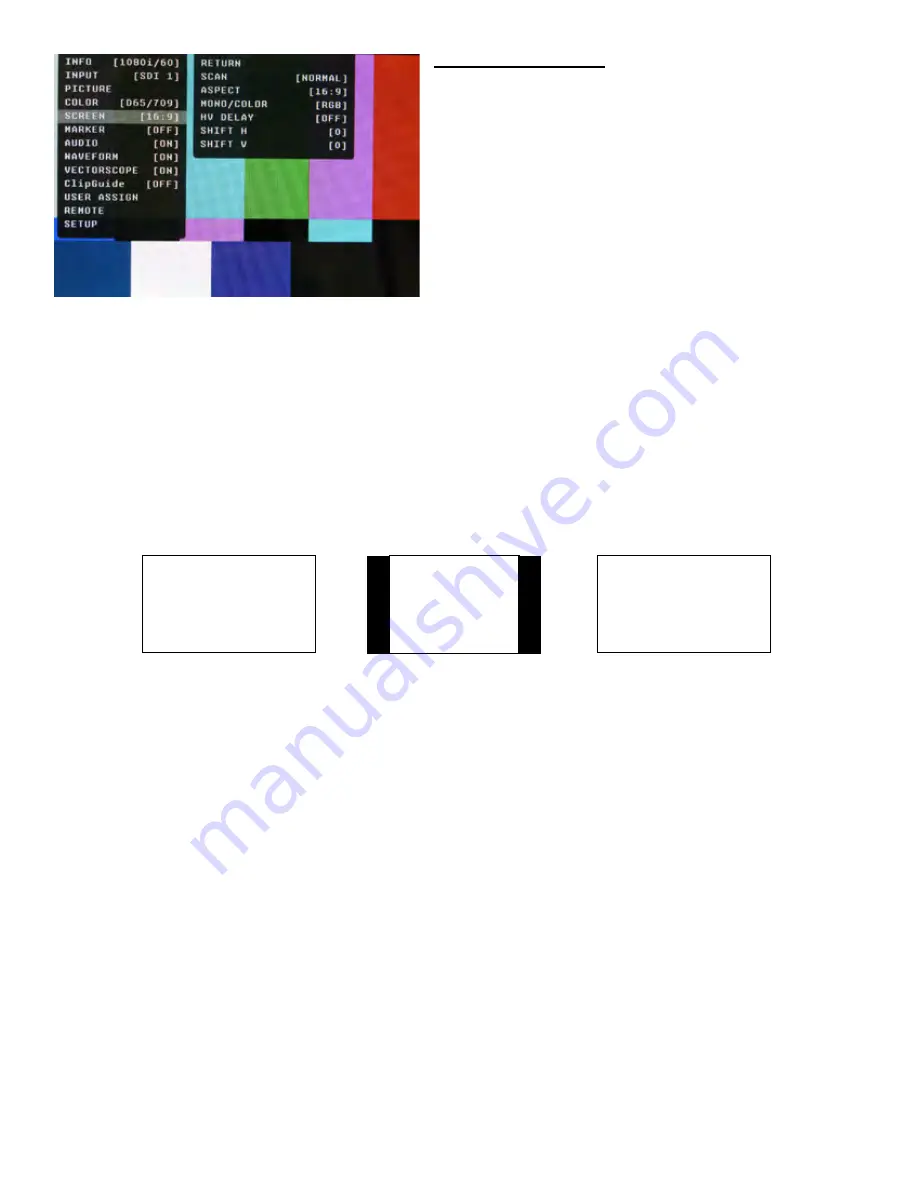
SCREEN SUBMENU
■
Scan
Normal (Zero Scan)
• Whole picture should be visible without any cropping.
• When in normal mode, it should not see non-active
areas such as SAV, EAV.
Over (End-User TV Production Scan)
• 5% of the picture is cropped and zoomed to fill the screen.
• After cropping, it will maintain correct aspect ratio and
center.
Zoom
• When in zoom mode, the center portion of the picture is
magnified to fill the screen by approximately 4x.
■
Aspect Ratio Settings
Use to switch between Full Screen, 4:3 and 16:9 aspect ratios.
The OR-434 monitor has a native resolution of 800 x 480 RGB pixels, so incoming images are automatically
scaled to fit the screen:
• In Auto mode, images are displayed in their native Aspect Ratio. SD is normally 4:3 / HD normally 16:9.
• In 4:3 mode, images are scaled to fill the maximum 4:3 portion of the screen (640 x 480), with black
bars filling the remainder of the screen, regardless of its original format.
• In 16:9 mode, images are scaled to fill the maximum 16:9 portion of the screen (800 x 480) regardless of
its original format.
■
Mono / Color
Use the Mono / Color modes for monitor calibration or to analyze individual color components of an image.
• RGB = displays all three colors (Normal display)
• Mono = displays as monochrome.
• Red Channel = displays red channel only.
• Green Channel = displays green channel only
• Blue Channel = displays blue channel only
• R+G = Red + Green
• R+B = Red + Blue
• G+B = Green + Blue
AUTO with 16:9 source
16:9 with 4:3 source
4:3 Mode with 16:9 source or
native 4:3 in AUTO mode.
■
H/V Delay
Use this setting to enable H & V Delay
• In H & V Delay mode, both horizontal sync and vertical sync are delayed, resulting in both horizontal
and vertical blanking periods being shown at the center of the screen.
■
Shift H
Use of the Joystick to change the value of this setting will shift the picture Horizontally. Negative values will
move the picture Right, while Positive values will move the picture Left. [0] is center value.
14


