background image

10

Connections

Tips

Depending on your TV and other equipment you wish
to connect, there are various ways you could connect
the player. Use only one of the connections
described below.

Please refer to the manuals of your TV, VCR, Stereo
System or other devices as necessary to make the
best connections.

For better sound reproduction, connect the player’s
AUDIO OUT jacks to the audio in jacks of your 
amplifier, receiver, stereo or audio/video equipment.
See “Connecting to Optional Equipment

on page 11.

Caution

– Make sure the DVD Player is connected directly to the

TV. Tune  the TV to the correct video input channel.

– Do not connect the DVD Player’s AUDIO OUT jack to

the phono in jack (record deck) of your audio system.

– Do not connect your DVD Player via your VCR. The

DVD image could be distorted by the copy protection
system. 

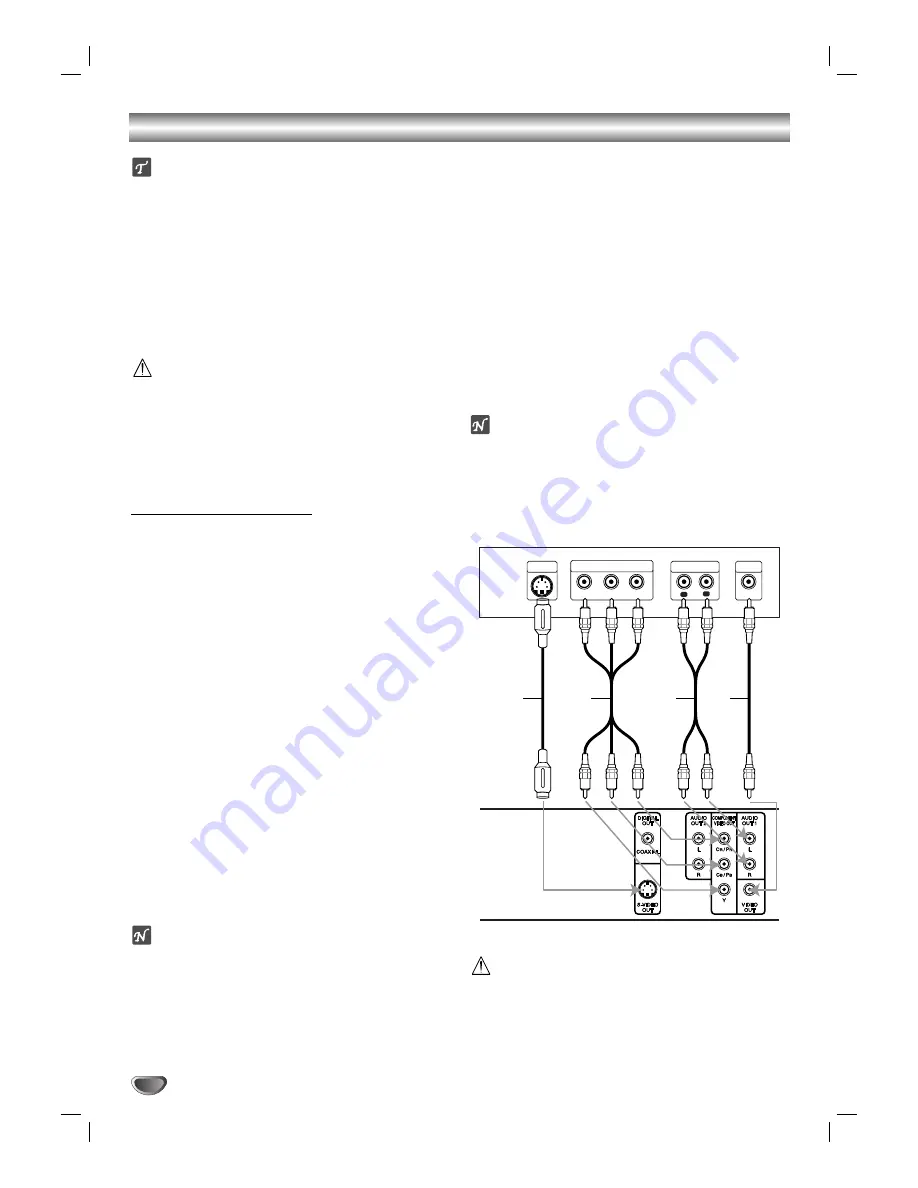
Connecting to a TV

Make one of the following connections, depending on
the capabilities of your existing equipment.

Video connection 

11

Connect the VIDEO OUT jack on the DVD Player to
the video in jack on the TV using the video cable 

(V)

.

2

2

Connect the Left and Right AUDIO OUT jacks of
the DVD Player to the audio left/right in jacks on the
TV 

(A)

using the audio cables.

S-Video connection 

11

Connect the S-VIDEO OUT jack on the DVD Player
to the S-Video in jack on the TV using the S-Video
cable 

(S)

.

2

2

Connect the Left and Right AUDIO OUT jacks of
the DVD Player to the audio left/right in jacks on the
TV 

(A)

using the audio cables.

Component Video (Color Stream

®

) connection

11

Connect the COMPONENT VIDEO OUT jacks on
the DVD Player to the corresponding in jacks on
the TV using an Y, C

B

/P

B

, C

R

/P

R

cable 

(C)

.

2

2

Connect the Left and Right AUDIO OUT jacks of
the DVD Player to the audio left/right in jacks on the
TV 

(A)

using the audio cables.

Notes

– Refer to the owner’s manual of your TV as well.
– Before you connect the DVD player to your TV, be

sure to turn off the power and unplug both units from
the wall outlet before making any connections.

Progressive Scan (Color Stream

®

pro) connection

If your television is a high-definition or “digital ready”
television, you may take advantage of the DVD
Player’s progressive scan output for the highest
video resolution possible. 

If your TV does not accept the Progressive Scan for-
mat, the picture will appear scrambled if you try
Progressive Scan on the DVD Player.

11

Connect the COMPONENT VIDEO OUT jacks on
the DVD Player to the corresponding in jacks on
the TV using an optional Y, C

B

/P

B

, C

R

/P

R

cable 

(C)

.

2

2

Connect the Left and Right AUDIO OUT jacks of
the DVD Player to the audio left/right in jacks on the
TV 

(A)

using the supplied audio cables.

Notes

– Set the Progressive to “On” on the setup menu for

progressive signal, see page 13.

– Progressive scan does not work with the analog video

connections (yellow VIDEO OUT and S-VIDEO OUT
jack). (See “Video mode setting”, page 25)

Caution

– Do not set the Digital Audio Output of this DVD player to

“Dolby Digital” unless you are connecting the DIGITAL
OUT jack of this DVD player to an AV decoder that has
the Dolby Digital decoding function. High volume sound
may damage your hearing as well as the speakers.

L

R

Y

Pb

Pr

COMPONENT VIDEO / 

PROGRESSIVE SCAN INPUT

AUDIO INPUT

L

VIDEO 

INPUT

S-VIDEO 

INPUT

Rear of TV

Rear of DVD player

S

A

V

C

Содержание VC4400

Страница 1: ...Model VC4400 User Guide 5 Disc DVD Changer...

Страница 2: ...energy and if not installed and used in accordance with the instruction manual may cause harmful interference to radio communications However there is no guarantee that interference will not occur in...

Страница 3: ...wider than the other A ground ing type plug has two blades and a third ground ing prong The wide blade or the third prong are provided for your safety If the provided plug does not fit into your outle...

Страница 4: ...a Angle 19 Changing the Audio Language 19 Changing the Audio Channel 19 Subtitles 19 Operation with Audio CD and MP3 WMA Disc 20 21 Playing an Audio CD and MP3 WMA Disc 20 Notes on MP3 WMA Recordings...

Страница 5: ...Code will appear on the TV screen Some DVD discs may not have a region code label even though their playback is prohibited by area limits Disc related terms Title DVD only The main film content or ac...

Страница 6: ...o not stick paper or tape on the disc Storing discs After playing store the disc in its case Do not expose the disc to direct sunlight or sources of heat or leave it in a parked car exposed to direct...

Страница 7: ...isplay window Shows the current status of the player Remote Sensor OPEN CLOSE Opens or closes the disc tray DISC SKIP Moves to the next available disc tray DISC EX CHANGE Changes a disc other than the...

Страница 8: ...ber on the program list or a mark on the MARKER SEARCH menu ZOOM Enlarges video image STOP 9 9 Stops playback PAUSE STEP Pauses playback temporarily press repeatedly for frame by frame playback SELECT...

Страница 9: ...t OPTICAL Digital audio out jack Connect to digital optical audio equipment AUDIO OUT1 Left Right Connect to an amplifier receiver or stereo system AUDIO OUT2 Left Right Connect to an amplifier receiv...

Страница 10: ...ENT VIDEO OUT jacks on the DVD Player to the corresponding in jacks on the TV using an Y CB PB CR PR cable C 2 2 Connect the Left and Right AUDIO OUT jacks of the DVD Player to the audio left right in...

Страница 11: ...o the DTS Licensing agreement the digital output will be in DTS digital out when DTS audio stream is selected Notes If the audio format of the digital output does not match the capabilities of your re...

Страница 12: ...search Audio language and Digital Audio Output mode Subtitle language Angle Sound Function Press 3 3 4 4 to select desired item Shows the current title number and total number of titles and skips to...

Страница 13: ...ity pictures with less flickering If you are using the COMPONENT VIDEO OUT jacks but are connecting the DVD Player to a standard ana log television set Progressive Scan to Off If you are using the Com...

Страница 14: ...e desired item and press SELECT ENTER The setting of the selected item is changed between On and Off Dynamic Range Control DRC With the DVD format you can hear a program s sound track in the most accu...

Страница 15: ...r one If no suitable alternative is found play back will stop You must enter the 4 digit password or change the rating level in order to play the disc 5 5 Press SELECT ENTER to confirm your rating sel...

Страница 16: ...ayer is 1 one Exchanging discs during playback Press DISC EX CHANGE on the front panel during playback to open the disc tray Press DISC SKIP to rotate the disc trays to the desired position The carous...

Страница 17: ...re and Frame by Frame playback 1 Press PAUSE STEP during playback The player will now go into PAUSE mode 2 You can advance the picture frame by frame by pressing PAUSE STEP repeatedly on the remote co...

Страница 18: ...layback The on screen display appears on the screen The Time Search box shows the elapsed playing time of the current disc 2 Within 10 seconds press 3 3 4 4 to select the Time Search icon in the on sc...

Страница 19: ...t allow you to access special features To use the disc menu press MENU Then press the appropriate number button to select an option Or use the 1 1 2 2 3 3 4 4 buttons to highlight your selection then...

Страница 20: ...SYSTEM for example Direct CD etc it is impossible to playback MP3 WMA files We recommend that you use Easy CD Creator which creates an ISO9660 file system 5 A single session disc requires MP3 WMA fil...

Страница 21: ...andom order and then stops RANDOM2 Plays all the tracks on current disc in random order and then plays all the tracks on each suc ceeding disc in random order and then stops RANDOM3 Plays 2 tracks ran...

Страница 22: ...PAUSE STEP again To flip the picture Press 3 3 4 4 during showing a picture to flip the picture horizontally or a vertically To rotate picture Press 1 2 during showing a picture to rotate the picture...

Страница 23: ...ist have played once 9 9 To resume normal playback from programmed playback select a track of CD list and then press SELECT ENTER PROG indicator disappears on the menu screen Programmed Playback with...

Страница 24: ...a Track from Program List 1 Press PROGRAM during playback Audio CD and MP3 WMA disc only or in the stop mode to enter the Program Edit mode The mark will appear 2 Press 2 to move to the Program list...

Страница 25: ...ons for Video Modes MODE1 The source material of the DVD video film material or video material is determined from disc information MODE2 Suitable for playing film based content or video based material...

Страница 26: ...er The batteries in the remote control are exhausted Remote control code is different between the DVD player and Remote control Correction Plug the power cord into the wall outlet securely Insert a di...

Страница 27: ...erlingua 7165 Irish 7384 Italian 7465 Japanese 7487 Javanese 7578 Kannada 7583 Kashmiri 7575 Kazakh 7589 Kirghiz 7579 Korean 7585 Kurdish 7679 Laothian 7665 Latin 7686 Latvian Lettish Code Language 76...

Страница 28: ...ds KZ Kazakhstan LA Laos LB Lebanon Code Country LC Saint Lucia LI Liechtenstein LK Sri Lanka LR Liberia LS Lesotho LT Lithuania LU Luxembourg LV Latvia LY Libya MA Morocco MC Monaco MD Moldavia MG Ma...

Страница 29: ...Video output 1 Vp p 75 negative sync RCA jack x 1 S Video output Y 1 0 V p p 75 negative sync Mini DIN 4 pin x 1 C 0 3 V p p 75 Component Video output Y 1 0 V p p 75 negative sync RCA jack x 1 CB PB...

Страница 30: ...Japan Inc 35 1 Sagami Ohno 7 Chome Sagamihara shi Kanagawa 228 8505 Japan U S A Marantz America Inc 1100 Maplewood Drive Itasca IL 60143 U S A EUROPE Marantz Europe B V P O Box 8744 5605 LS Eindhoven...

Отзывы: