background image

6

DVD Setup Menu

37

English

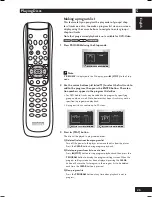
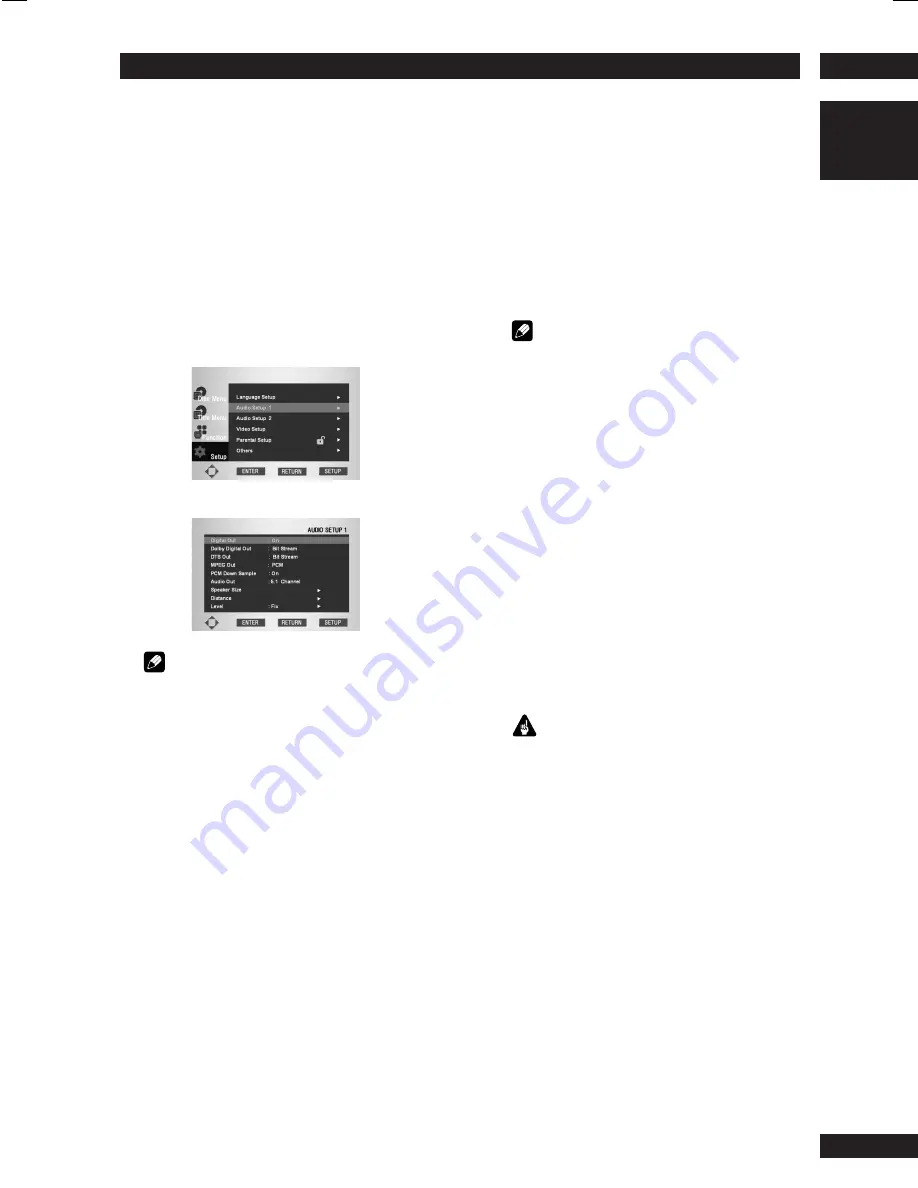
Setting up the Audio Setup 1

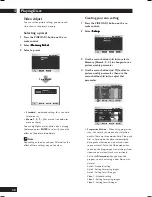
1 Press the SET UP button.

2 Select Setup

Setup

Setup

Setup

Setup using the cursor buttons (

5

/

), then press the cursor (

3

) or ENTER

button.

3 Select Audio Setup 1

Audio Setup 1

Audio Setup 1

Audio Setup 1

Audio Setup 1 using the cursor

buttons (

5

/

), then press the cursor (

3

)

or ENTER button.

4 Use the cursor buttons (

5

/

) to select the

desired item, then press the cursor (

3

) or

ENTER button.

 Note

To make the SETUP menu disappear or return to
the menu screen during setup, press the 

RETURN

or cursor button (

2

).

*

You only need to make this setting if you connected
this system to another component (AV amplifier,
etc.) using one of the digital outputs.

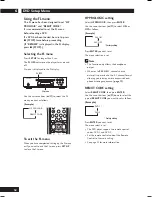
Digital Out

• Default setting: 

On

If at any time you need to switch off the digital
audio output, set this to 

Off

, otherwise leave it

On

. Note that you can’t switch on/off the optical

and coaxial outputs individually.

 Note

• Super Audio CD will not output digital sound.

• Audio is not output from the Digital Out plugs

when i.LINK is connected. (

page 55

)

Dolby Digital Out*

• Default setting: 

Bit Stream

If your AV amplifier (or other connected compo-
nent) is Dolby Digital compatible, set to 

Bit

Stream

, otherwise set to 

PCM

.

DTS Out*

• Default setting: 

Bit Stream

If your AV amplifier (or other connected compo-
nent) has a built-in DTS decoder, set this to 

Bit

Stream

, otherwise set to 

PCM

. Check the manual

that came with the other component if you’re
unsure whether it is DTS compatible.

 Important

• If you set to 

Bit Stream

 with a non-DTS

compatible amplifier, noise will be output when
you play a DTS disc.

• This setting cannot be chosen when playing a

dts-CD while HDMI is connected.
The setting is dependent on the connected
component.

MPEG Out*

• Default setting: 

PCM

If your AV amplifier (or other connected compo-
nent) is compatible with MPEG audio, set this to

Bit Stream

, otherwise set it to 

PCM 

(MPEG audio

is converted to more compatible PCM audio).
Check the manual that came with the other
component if you’re unsure whether it is MPEG
audio compatible.

Содержание DV9600

Страница 1: ...Model DV9600 User Guide Super Audio CD DVD Player CLASS 1 LASER PRODUCT LUOKAN 1 LASERLAITE KLASS 1 LASERAPPARAT ...

Страница 2: ...n exposed to rain or moisture does not operate normally or has been dropped Additional Safety Information This product should not be placed in a built in installation such as a bookcase or rack unless proper ventilation is provided or the manufacturer s instructions have been adhered to Apparatus shall not be exposed to dripping or splashing and that no objects filled with liquids such as vases sh...

Страница 3: ...ential installation This equipment generates uses and can radiate radio frequency energy and if not installed and used in accordance with the instructions may cause harmful interference to radio or television reception which can be determined by turning the equipment off and on the user is encouraged to try to correct the interference by one or more of the following measures Reorient or relocate t...

Страница 4: ...vided or the manufacturer s instructions have been adhered to To prevent fire or shock hazard do not place objects filled with liquids such as vases on the apparatus Do not insert anything into the equipment through the ventilation holes Do not handle the mains lead with wet hands Do not cover the ventilation with any items such as tablecloths newspapers curtains etc No naked flame sources such as...

Страница 5: ...ay Frame Advance Playback 20 Using the Page 21 Memorizing disc settings CONDITION MEMORY 21 Using the Random Play 22 Using the Repeat Play 23 Bookmarking a place in a disc 24 Making a program list 25 Switching Camera Angles 26 Switching Subtitle Language 26 Switching Audio Language 27 Using the Zoom Function 27 MP3 JPEG Play 28 Video Adjust 30 6 DVD Setup Menu Using the FL menu 32 Using the Setup ...

Страница 6: ... to 720p 1080i and 1080p video output signals by way of the scaling function and the HDMI jack see page 52 High quality 14 bit 216MHz Video D A converter 2 The unit uses a Video D A converter that performs D A conversion of all video signals in 14 bits and can perform 8X over sampling to let you enjoy beautiful video possible with DVD Furthermore NSV technology suppresses noise during DA conversio...

Страница 7: ...e trademarks of Digital Theater Systems Inc 5 TruSurround SRS and the symbol are trademarks of SRS Labs Inc TruSurround technology is incorporated under license from SRS Labs Inc 30 30 5m 16 feet Putting the batteries in the remote control 1 Open the battery com partment cover on the back of the remote control 2 Insert two AA R6P batteries into the battery compartment following the indications ª i...

Страница 8: ... discs Logo This unit can play DVD RW discs recorded as DVD Video format DVD RW discs that were recorded with copy once only permission cannot be played Audio CD compatibility Logos 12cm 5in or 8cm 3in discs Linear PCM digital audio Audio CD CD R and CD RW formats CDs are divided into tracks This unit can play CD R and CD RW discs recorded in Audio CD or Video CD format or with MP3 audio files Som...

Страница 9: ...o handle image data recorded in JPEG format no assurances are given that the player will be able to display image data recorded in all JPEG formats Display is limited to the display of files up to 30MB in size This player cannot display progressive JPEG images When writing JPEG files to CD R RW discs always be sure to set the writing format to ISO 9660 Level 1 Always be sure to specify a file exte...

Страница 10: ...d or other input device Set the remote switch to EXT EXTER NAL when using a flasher input Important Before making or changing any rear panel connec tions make sure that all components are switched off and unplugged from the wall outlet Note When connecting to a standard TV select 4 3 L Box or 4 3 Pan Scan in the TV Aspect setting see page 45 Connect the video output of the player directly to your ...

Страница 11: ...ny rear panel connec tions make sure that all components are switched off and unplugged from the wall outlet Note The HDMI output of this unit can be connected to a DVI jack on a TV or other device using a conversion adapter In this case it is necessary to use a TV or display with an HDCP compat ible DVI input see page 52 There may be no image output if connected to a TV or display that is not com...

Страница 12: ...i LINK cables 4 pin S400 i LINK connectors for connec tions to i LINK equipped receivers and other components Each i LINK connector acts simultaneously as both input and output page 55 Note If you listen to multichannel DVD Audio through one of the digital outputs it will be downmixed to stereo Also high sampling rate DVD Audio 192kHz or 176 4kHz will be downsampled to 96kHz 88 2kHz 48kHz or 44 1k...

Страница 13: ...ped from the factory Set HDMI under the Setup menu to use HDMI functions see page 52 8 Display page 14 Operation indications are displayed here 9 Dolby Head Phone Mode Each time it is pushed the operation changes as shown below DH 1 Reproduces a room that is small with little reverberation DH 2 Reproduces a room with more reverberation than DH1 DH 3 Reproduces a larger room than DH1 Bypass It outp...

Страница 14: ...page 21 20 VCD Lights when a Video CD is loaded CD Lights when a Audio CD is loaded 21 MP3 Lights when replaying MP3 audio 22 N Lights when NTSC has been selected as the TV system 23 P Lights when PAL has been selected as the TV system 24 M Lights when Multi has been selected as the TV system 25 V OFF Indicates that video output is turned off 26 D OFF Lights when the unit is set to Digital Out off...

Страница 15: ...he same setting as the remote control This setting is set to DVD1 when the unit is shipped from the factory see page 32 1 OPEN CLOSE Disc tray open close page 16 2 VIDEO ON OFF press to turn video output off and on 3 DISPLAY page 19 4 PROGRAM page 25 5 3 PLAY page 16 6 7 STOP page 16 7 4 PREV NEXT Skip page 16 Allows you to search forward backward through a disc Use to skip the title chapter or tr...

Страница 16: ...e at the point where the layers change This is not a malfunction Basic playback controls Button What it does 3 Starts playback DVD and Video CD if the display shows RESUME playback starts from the resume point 8 Pauses a disc that s playing 7 Stops playback DVD and Video CD Display shows RESUME Press 7 STOP again to cancel the resume function 1 1 Press for fast reverse scanning during play 2 Press...

Страница 17: ...e SET UP button on the remote control 2 Select Title Menu Title Menu Title Menu Title Menu Title Menu using the cursor buttons 5 then press the cursor button 3 or ENTER button And also select Title Menu Title Menu Title Menu Title Menu Title Menu using the TOP MENU button on the remote control Title Menu 1 Title 1 2 Title 2 3 Title 3 Note Depending on the disc the Title and Disc Menus may not work...

Страница 18: ...the cursor buttons 5 to highlight Function Function Function Function Function then press the cursor button 3 or ENTER button 3 The Function selection screen appears showing Info Info Info Info Information rmation rmation rmation rmation Zoom Zoom Zoom Zoom Zoom Bookmark Bookmark Bookmark Bookmark Bookmark and Repeat Repeat Repeat Repeat Repeat Information see page 19 Zoom see page 27 Bookmark see...

Страница 19: ...n the remote control 2 Use the cursor buttons 5 to select the desired item 3 Use the cursor buttons 2 3 to make the desired setup then press ENTER You may use the number buttons of the remote control to directly access a title chapter or to start the playback from the desired time 4 Pressing the DISPLAY button again will change the displayed disc time information DVD Video Title time Chapter time ...

Страница 20: ... playback can be adjusted from 1 8 normal playback speed to 1 2 normal playback speed in 4 steps using 1 REW To return to normal playback When the picture is paused or during slow playback pressing 3 PLAY restores normal playback operation Step Motion playback Viewing one frame at a time With this function DVDs and Video CDs can only be moved in the forward direction Press 8 PAUSE Each time the bu...

Страница 21: ...ever you load that disc The player can store settings for 20 discs after this memorizing another replaces the oldest one stored Condition Memory does not work with DVD Audio and DVD RW discs The settings memorized are Audio Language page 27 Subtitle Language page 26 Camera Angle page 26 On Screen Display page 50 To memorize settings for the current disc press CONDITION during playback To recall me...

Страница 22: ...wish to play using the Number buttons Pressing the 3 PLAY button will start random play within the designated group Tip During random play the 4 PREV and NEXT buttons function a little differently to normal 4 PREV returns to the beginning of the current track chapter You can t go back further than this NEXT selects another track chapter at random from those remaining You can t use random play toge...

Страница 23: ...o DVD Video Video CD CD Super Audio CD 2 Select Track Track Track Track Track Group Group Group Group Group A B A B A B A B A B Chapter Chapter Chapter Chapter Chapter Title Title Title Title Title A B A B A B A B A B Track Track Track Track Track All All All All All A A A A A B B B B B using the cursor buttons 2 3 3 Press ENTER 4 To return to normal play press REPEAT again then press the cursor b...

Страница 24: ...will change to a number 1 2 or 3 4 Press the MARKER button to turn off the display Recalling a Marked Scene 1 During play press the MARKER button on the remote control 2 Use the cursor buttons 2 3 to select a marked scene 3 Press 3 PLAY buttons to skip to the marked scene Clearing a Bookmark 1 During play press the MARKER button on the remote control 2 Use the cursor buttons 2 3 to select the book...

Страница 25: ...cks may be added to be program by specifying group numbers as well Note however that bonus tracks may not be specified in programmed playback A program list can contain up to 20 steps 3 Press 3 PLAY button The disc will be played in programmed order 1 Delete all selections from program list Turn off the power to the player or remove the disc from the player Press the CLEAR button during program pl...

Страница 26: ...gle indicator choose Angle Mark Off from the Others menu see page 50 Note Depending on the disc this feature may not work Switching Subtitle Language Many DVD Video discs have subtitles in one or more lan guages the disc box will usually tell you which subtitle lan guages are available You can switch subtitle language anytime during playback To display the subtitle language press SUBTITLE To selec...

Страница 27: ...itching audio channel DVD Audio Depending on the disc you may be able to switch channels when playing DVD Audio discs see the disc box for details To switch the audio channel use the cursor buttons 2 3 Switching audio channel Video CD On Video CDs you can switch between stereo just the left channel or just the right channel To switch the audio channel use the cursor buttons 2 3 Using the Zoom Func...

Страница 28: ... on the right side of the screen Up to 6 song files can be displayed at a time If you have more than 6 files on a disc press the cursor buttons 2 3 to bring them up on the screen 2 Use the cursor buttons 5 to select the desired song file then press ENTER to begin playback of the song file 3 Press the RETURN button and the music folder menu will appear on the right side of the screen Use the cursor...

Страница 29: ... image press ENTER on the remote control is displayed on the screen so push the ENTER button 3 The image begins to enter 4 Push the CLEAR button on your remote control to stop entry Note The user can only store 1 screen When a new image has been entered the old screen is erased If entry fails the data that was already recorded may also be lost When the entered image is displayed as the start up lo...

Страница 30: ... video source material Set to the Video mode when you know the program you are watching is from video source material such as animations Set to the Film mode when you know the program you are watching is from film source material Auto 1 Standard setting Auto 2 Setting for moving images Auto 3 Setting for still images Video 1 Standard setting Video 2 Setting for moving images Video 3 Setting for st...

Страница 31: ...t Chroma Level Adjusts how saturated colors appear Hue Adjusts the overall color balance between red and green Chroma Delay Compensates for misalign ment of the Y brightness and the C color components Gamma Adjusts the brightness of the darker images in the picture Black Setup Corrects floating black color Lip Sync Adjusts the time lag between the audio signal and the video signal from 0 to 200 ms...

Страница 32: ... two remote control codes DVD 1 and DVD 2 Set the remote control code of the Remote Control to the same setting See page 15 for more information REMOT CODE setting Select REMOT CODE then press ENTER Use the cursor buttons 5 down to select the type of REMOT CODE you want to set as follows Example DVD 1 DVD 2 Factory setting PL2 ON PL2 OFF Factory setting Using the FL menu The FL menu has been desig...

Страница 33: ... or region 1 Press the SET UP button on the remote control Select Setup Setup Setup Setup Setup using the cursor buttons 5 then press the cursor 3 or ENTER button Language Setup Setup of the Language page 35 Ÿ Audio Setup 1 and 2 Setup of the Audio Options pages 37 42 Video Setup Setup of the Display Options page 45 Use to select which type of screen you want to watch and several display options P...

Страница 34: ...CD Player Mode page 42 DVD Audio DVD Video CD Play Back page 43 CD DTS CD DTS Down Mix page 43 Stereo Lt Rt Audio DRC page 44 On Off TruSurround page 44 On Off Super Audio CD Play page 44 DSD PCM Video Setup page 45 TV Aspect page 45 4 3 L Box 4 3 Pan Scan 16 9 Wide 16 9 Squeeze Components Out page 47 Progressive Interlace Pause Mode page 47 Field Frame Auto Back Ground page 48 Logo Blue Black Cap...

Страница 35: ...guage Default setting English 1 Press the SET UP button 2 Select Setup Setup Setup Setup Setup using the cursor buttons 5 then press the cursor 3 or ENTER button 3 Select Language Setup Language Setup Language Setup Language Setup Language Setup using the cursor buttons 5 then press the cursor 3 or ENTER button 4 Select DVD DVD DVD DVD DVD Menu Menu Menu Menu Menu Language Language Language Langua...

Страница 36: ...uage Setup using the cursor buttons 5 then press the cursor 3 or ENTER button 4 Select Subtitle Subtitle Subtitle Subtitle Subtitle Language Language Language Language Language using the cursor buttons 5 then press the cursor 3 or ENTER button 5 Use the cursor buttons 5 to select English English English English English Select Auto if you want the subtitle language to be the same as the language se...

Страница 37: ...per Audio CD will not output digital sound Audio is not output from the Digital Out plugs when i LINK is connected page 55 Dolby Digital Out Default setting Bit Stream If your AV amplifier or other connected compo nent is Dolby Digital compatible set to Bit Stream otherwise set to PCM DTS Out Default setting Bit Stream If your AV amplifier or other connected compo nent has a built in DTS decoder s...

Страница 38: ...terminal see page 37 PCM Down Sample ON 48kHz 16 bit PCM 48kHz 16 bit PCM 44 1kHz 16 bit PCM 48kHz 16 bit PCM 44 1kHz 16 bit PCM 48kHz 16 bit PCM 44 1kHz 16 bit PCM 48kHz 16 bit PCM 44 1kHz 16 bit PCM 44 1kHz 16 bit PCM 44 1 48kHz 16 bit PCM No output produced 1 DVD Video DVD Audio Video CD Audio CD MP3 CD Super Audio CD Audio recording format PCM 48kHz 16 24 bit 96kHz 16 24 bit 44 1kHz 16 24 bit ...

Страница 39: ...ter Surround LS RS LFE MUTE 2 ch DOWNMIX Lch Rch 3 5 1 CH 2 CH 2 ch DOWNMIX Lch Rch Front Lch Rch Center Surround LS RS LFE MUTE Lch Rch 2 ch DOWNMIX Lch Rch 5 1 CH 2 CH 2 ch DOWNMIX Lch Rch MPEG MPEG MUTE Note Even if you set Audio Out to 5 1 Channel you ll only get sound from all speakers when playing a multi channel DVD Audio disc multi channel Super Audio CD disc Dolby Digital or DTS encoded D...

Страница 40: ...ed while either Auto or Multi PCM selected for the HDMI audio setting pages 54 55 Distance Default setting Unit Feet Distance 10 feet Set the distance from your main listening position to each speaker in the Distance screen The distance setting for any speaker that was set to Off in the Speaker Size screen will be disappeared For the other speakers enter the distance to the nearest 1 feet 0 3m You...

Страница 41: ...ge the correct gain levels set the Test Tone to Manual test tone from just that speaker or Auto test tone from each speaker in turn then adjust the gain so that all speakers appear to be the same volume from your listening position Follow the on screen displays to select speakers and set the Output Levels Many AV amplifiers allow you to make similar settings at the amplifier stage In this case set...

Страница 42: ...D audio The Super Audio CD Play setting enables you to select which area of the disc you want to play with the cursor buttons 2 3 Note If you select an area that isn t on the disc loaded a different area of the disc will play For example if you choose standard CD audio but the disc loaded is not a hybrid Super Audio CD the stereo Super Audio CD audio will play You can also select it using the S MO...

Страница 43: ...en DTS Digital Out has been set to PCM all digital output will be automatically set to stereo output no matter what DTS Down Mix setting has been specified When 2 Channel is selected by Audio Out the DTS multi channel s down mix method can be selected CD Play Back Default setting CD Replay DTS CD CD replay settings Use the cursor buttons 2 3 to select either CD or DTS CD CD Should be selected when...

Страница 44: ...you can simulate surround sound by setting TruSurround to On Note Works with DVD Video and VCD only The digital audio output is processed by TruSurround when playing 2 channel Dolby Digital DVDs or Video CDs with TruSurround On It is recommended that TruSurround be turned Off when connecting the player to your amp using a coaxial or optical connection How good the surround effect is varies with th...

Страница 45: ...n Letter Box mode widescreen software is shown with black bars at the top and bottom of the screen Pan Scan chops the sides off widescreen material to make it fit the 4 3 screen so even though the picture looks larger on the screen you re actually seeing less of the movie Press ENTER Note Some discs will not allow you to change the aspect ratio Setting up the Video Setup 1 Press the SET UP button ...

Страница 46: ...TV or monitor 16 9 Wide The picture is presented in widescreen 16 9 Wide 16 9 The picture is presented with black bars either side Screen format of disc TV Setting Appearance 4 3 16 9 Wide Player Setting Full Normal Full Normal 4 3 16 9 Squeeze This setting only has any effect with progressive output Full The picture is squashed Set to either Pan Scan or Letter Box The picture is squashed Set your...

Страница 47: ...ange the TV setting to Normal If your TV doesn t have settings to change the aspect ratio of the picture set this player to 16 9 Squeeze Note If you connect a TV that is not compatible with a progressive scan signal and choose one of the progressive scan settings you will not be able to see any picture at all With your TV con nected using either the composite or S Video terminals choose the Interl...

Страница 48: ...d count down PAL TV system detect 50 Hz PAL 60 Hz NTSC and automatically switch vertical amplitude resulting in a display without vertical shrinkage If your PAL TV does not have a V Hold control you may not be able to view NTSC discs because the picture may roll If the TV has a V Hold control adjust it until the picture stops rolling On some TVs the picture may shrink vertically leaving black band...

Страница 49: ...ss word screen appears to confirm the pass word Enter your password again The Parental Control screen appears Rating Level The Rating Level will work only when Use Password is set to Yes Use the cursor button 3 or ENTER to select Rating Level PARENTAL SETUP ENTER RETURN SETUP Change Password Yes Use Password 8 Rating Level Use the cursor buttons 5 to select a level e g Level 6 and press ENTER Disc...

Страница 50: ...in Password Off Angle Mark Bonus Group Pure Mode Auto Power Off Economy Mode HDMI i LINK Angle Mark Default setting On If you prefer not to see the camera icon on screen during camera angle scenes on DVD discs change this setting to Off OTHERS ENTER RETURN SETUP On Screen Display On On On On 30 Min Password Off Angle Mark Bonus Group Pure Mode Auto Power Off Economy Mode HDMI i LINK Bonus Group So...

Страница 51: ...y Mode HDMI i LINK This setting is for customized installation Please do not touch this setting Pure Mode Default setting Off If you play a CD or Super Audio CD while Pure Mode Mode1 or Mode2 is selected then Display Video Out and Digital Out shut off automatically And if you push the DIMMER button on the remote control during the Pure Mode ON for three sec onds only Display is displayed Display a...

Страница 52: ...images are not displayed properly on the TV or projector press and hold the CLEAR button on the Remote Control for three seconds Then return to Setup menu page 15 When the resolution changes the image may be corrupted or the output may take longer than normal When 480i 576i has been selected multi channel PCM at sampling frequency of 96kHz cannot be output The multi channel PCM is converted to 48k...

Страница 53: ...o and Component Video When black rise to the surface depending on the display black Setup in the Video Adjust ment set to OIRE Eight bit data is sent when YCbCr 1 4 4 4 is selected Ten bit data is sent when YCbCr 2 4 2 2 is selected You can enjoy full 10 bit advanced picture quality if the connected TV or projector supports YCbCr 2 4 2 2 Some monitors may use setting names that are different than ...

Страница 54: ...in 2 channel PCM or other 2 channel format are played the audio is output as 2 channel PCM The output formats are limited by the capabilities of the connected component For example if the disc is recorded in Dolby Digital but the connected component does not support Dolby Digital the audio is output as 2 channel PCM 2ch PCM In this mode audio is output as 2 channel PCM for all discs Select this mo...

Страница 55: ... HDMI jack i LINK This setting is used when the unit is con nected by i LINK to an i LINK compatible component Audio cannot be output simul taneously from the i LINK port and the analog digital HDMI or headphone audio jacks OTHERS ENTER RETURN SETUP On Screen Display On On On On 30 Min Password Off Angle Mark Bonus Group Pure Mode Auto Power Off Economy Mode HDMI i LINK On Press ENTER OTHERS ENTER...

Страница 56: ...ut MPEG Out SR9600 Marantz Bit Stream Dolby Digital Out This option allows you to select Bit Stream or PCM Outputs for audio Dolby Digital DTS MPEG The selected audio format is output to all components connected through i LINK Select one of the options with the cursor buttons 2 3 5 Note Select either multi channel output or 2 channel downmixed output for DVD Audio discs from Audio Out under Audio ...

Страница 57: ...audio from copyright protected DVD Video discs is converted to 48 kHz before being output from the i LINK port Set Audio Output under Audio Setup 1 to 5 1 Channel when outputting multi channel audio from DVD Audio discs see page 39 The play control of this unit and the input selector of an i LINK connected AV amplifier can be linked together Auto Play see page 56 When the i LINK indicator i LINK o...

Страница 58: ...red in one second i LINK functions are not guaranteed to connect and operate among all i LINK components The functions of each respective component determine whether data or control signals can be exchanged among i LINK components This unit s i LINK module was designed based on IEEE Std 1394a 2000 Standard for High Performance Serial Bus i LINK and the i LINK logo are trademarks of the Sony Corpor...

Страница 59: ...se malfunctioning of this unit In this case unplug the power cord and then plug back in This will usually reset the unit for proper operation If this does not correct the problem please consult your nearest MARANTZ service center If this operation is performed all memories in which the Program Memory page 25 Condition Memory page 21 Bookmark page 24 Capture page 29 and Video Adjust s Memory page 3...

Страница 60: ...y cold humid or hot environments including under direct sun light Don t glue paper or put stickers onto the disc or use a pencil ball point pen or other sharp tipped writing instrument These could all damage the disc For more detailed care information see the instructions that come with discs Do not load more than one disc into the player Discs to avoid Discs spin at high speed inside the player I...

Страница 61: ...ug or carpet or cover with cloth this may prevent proper cooling of the unit Place on an unstable surface or one that is not large enough to support all four of the unit s feet Moving the player If you need to move the player first press POWER ON OFF button on the front panel to turn the player off then unplug the power cord Never lift or move the unit during playback discs rotate at a high speed ...

Страница 62: ... an AV selector there is disturbance in the playback picture Due to the player s copy protection circuits connection of this device through a VCR or an AV selector may prevent recording or cause picture problems This is not a malfunction Troubleshooting Incorrect operation is often mistaken for trouble or malfunction If you think that there is some thing wrong with this unit check the points below...

Страница 63: ...Setup 1 menu settings Make sure that the Digital Out setting is set to On page 37 Check that the Dolby Digital and DTS settings are suitable for your amplifier check the amp s instruc tion manual Noticeable difference in DVD and CD volume DVDs and CDs use different recording methods This is not a malfunction Cannot play multi channel audio Make sure that 5 1 Channel is selected in the Audio Out me...

Страница 64: ...is not output from the connected i LINK component Select 5 1 channel from Audio Out under Audio Setup 1 page 39 The disc containing the MP3 tracks won t play If the disc is a recordable CD make sure that the disc is finalized Check that the track s are in the MPEG1 Audio Layer 3 format Check that the sampling rate of the track s are 44 1 or 48kHz Some MP3 tracks appear to be missing from a disc If...

Страница 65: ...cted in a daisy chain configuration The maximum transmission capacity of i LINK has been reached The i LINK connection configuration is being con firmed Audio may be inter rupted if this message occurs during playback The i LINK connection could not be established correctly Correction Reduce the number of connected components to 63 or less Disconnect the cable forming the loop Reduce the number of...

Страница 66: ...utput 2 Vrms 1kHz 0 dB Number of channels 2 Jacks RCA jack Audio output multi channel L R C SW LS RS Output level During audio output 2 Vrms 1kHz 0 dB Number of channels 6 Jacks RCA jack Audio characteristics Frequency response 4Hz to 44kHz DVD fs 96kHz 4Hz to 88kHz DVD Audio fs 192kHz S N ratio 130 dB Dynamic range 1 10 dB Total harmonic distortion 0 0008 Wow and flutter Limit of measurement 0 00...

Страница 67: ...7 Additional Information 67 English ...

Страница 68: ...egistered trademark www marantz com You can find your nearest authorized distributor or dealer on our website U S A Marantz America Inc 1100 Maplewood Drive Itasca IL 60143 U S A EUROPE Marantz Europe B V P O Box 8744 5605 LS Eindhoven The Netherlands ...

Отзывы: