Manhattan Plaza ST 200 Скачать руководство пользователя страница 10

10

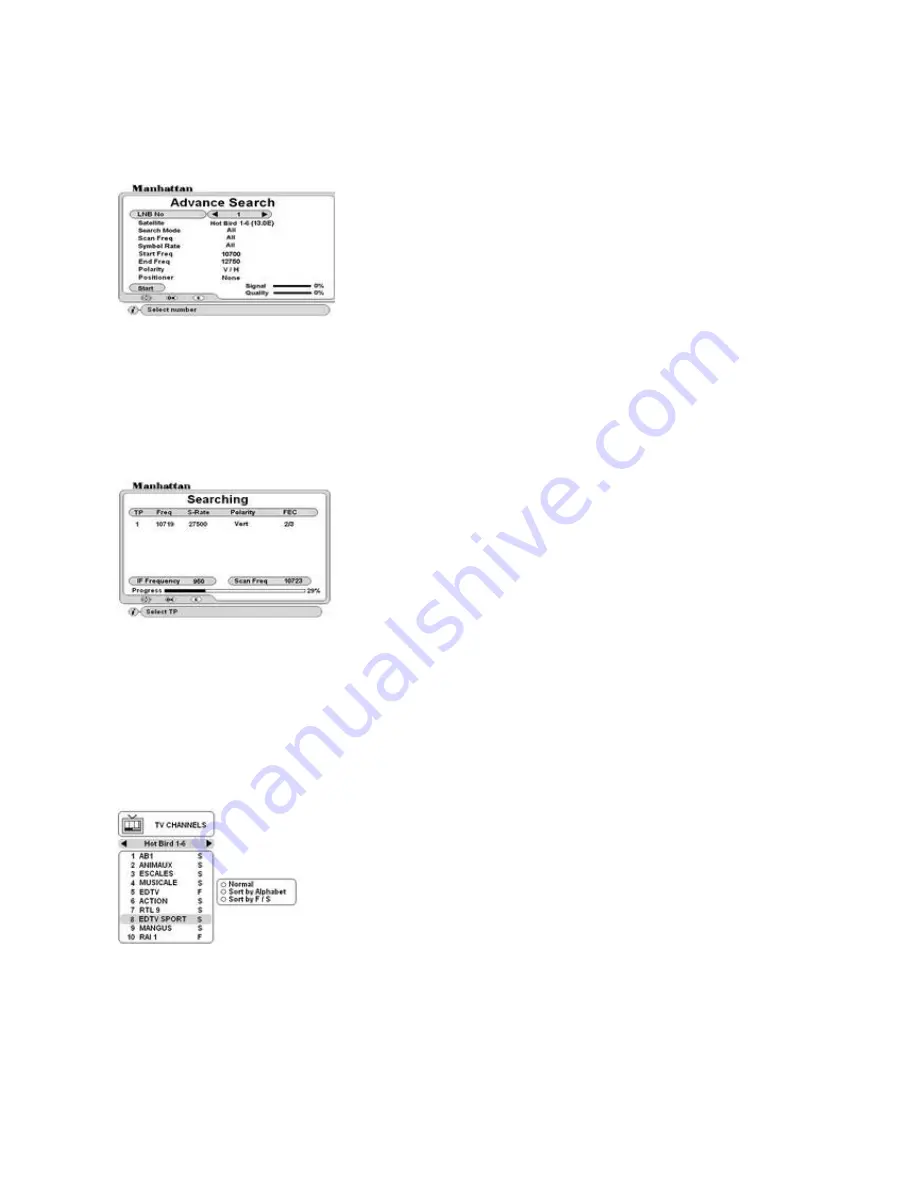
ADVANCE SEARCH: Special Feature
This  feature  is  used  when  you  want  to  search  a  satellite  for  any  new  channels  or  those  not  included  in  the 
Database or you do not have the full data of the channel.  In INSTALL menu, go to Advance Search
NOTE: Searching with this feature is slower than normal search.

Symbol Rate: Select option. If you select ALL it will scan with all Symbol Rates applicable. To define the symbol rate, 
select User Defined and press OK. A sub menu will appear. Select and press OK on the symbol rate you wish to apply 
and finally EXIT.
Start Freq: Using 0-9 keys, enter the start frequency here. The search will start from this frequency
End Freq: Using 0-9 keys, enter the end frequency here. The search will stop after this frequency

Polarity: select polarity.
Positioner: Select positioner if required. Configure this as described earlier.
Start: Press OK. TP search will start. Below Searching page will appear.

TUNING WIDEBAND LNB (in Advance Search)
Configure LNB as described earlier. Then in normal Channel Search configure skew to obtain signal and quality 
for each LNB No. Then exit the normal Channel Search menu this will store the skew settings. Now go to 
Advance Search and perform search for each LNB No that is configured for wideband.
NOTE: It is not possible to do index search in Advance Search and therefore each LNB No has to be tuned 
individually.

TO CHANGE CHANNEL OR SATELLITE
There are two ways of changing channel or satellite as below.

SORTING THE CHANNEL LIST
Press Green key to sort channels alphabetically.
Press Yellow key to sort channels Free To Air first followed by Scrambled.
Press Red key to return to normal list.

TO SELECT A CHANNEL WITHIN THE SAME SATELLITE

Press OK key and channel browser will appear on your screen.



Use CH and PAGE up / down keys to scroll through the list.



Press OK on required channel

TO SELECT A CHANNEL FROM ANOTHER SATELLITE



Use VOL up / down to change the list. 



Use CH and PAGE up / down to scroll through the list



Press OK on required channel. If you are using antenna positioner,  it 

will  automatically  move  to  the  required  satellite.  If  you  are  using 
DiSEqC switch, then it will switch to that antenna.

LNB No: Select number.
Satellite: Select satellite name.  
Search Mode: Select search option. Option + D includes data channels



ALL - All Video and Radio channels.



FTA - Free To Air Video and Radio channels



ALL + D -All Video, Radio and Data channels. 

Scan Freq: Select option. If you select All it will scan the complete frequency 
related to the LNB type you have selected. To define the frequency, select User 
Defined. 
This will allow you to enter the frequency on below menu lines.

Shows  serial  number  of  TP,  Frequency,  Symbol  Rate  (S/R),  Polarity  and  FEC  
found.

After the search for TP has finished, it will start channel search 
automatically and display the TV and Radio channels found.

Содержание Plaza ST 200

Страница 1: ...Digital Satellite Receiver PLAZA MODELS ST 250 ST 350 ST 400 ST 450 ST 500 ST 550 Instruction Manual English http www plaza st com ISSUE3 ...

Страница 2: ...DING SOFTWARE VIA PC 12 TELETEXT FUNCTION 12 TO SELECT SUBTITLES ON A CHANNEL 12 TO SELECT AUDIO LANGUAGE 12 TO ACTIVATE SLEEP TIMER 12 CHANNEL BANNER 12 ELECTRONIC PROGRAM GUIDE EPG 13 INSTALLING FAVORITE CHANNELS 13 VIEWING FAVORITE CHANNELS 13 TO RESET YOUR RECEIVER TO DEFAULT SETTINGS 13 TO LOCK MENU AND CHANNELS 13 CHANNEL EDIT 13 TO DELETE CHANNELS 13 TO RENAME CHANNEL 14 TO MOVE CHANNEL 14 ...

Страница 3: ...work TP with option of including Data channels Advanced Blind Search search option by All FTA All Data Built in Teletext Supporting Teletext and DVB Subtitle function SATCODX compatibility EPG access for current next and 7 days for on screen channel information Parental control facility by channel and menu locks 22 different favorite groups 11 TV 11 Radio Last channel recall facility and Last view...

Страница 4: ... VCR or CAMCORDER with S VIDEO capability FRONT PANEL CONNECTORS CONTROLS AND DEFINITIONS F1 STANDBY ON After connecting the power press this button to switch ON the receiver or to switch to STANDBY F2 DIGIT LED DISPLAY This will display the channel number or certain programming functions when using the menus In standby mode it will display the time F3 REMOTE CONTROL SENSOR Location of the infrare...

Страница 5: ...the MENU key to configure all your settings Language Select the required OSD language Transparency Adjust transparency of channel banner and channel list Info Display Select display time of the channel banner If you select On it will remain on until exit key is pressed Audio Lang Subtitle Lang Select default language This sets all channels to that language Screen Saver Select time to turn ON scree...

Страница 6: ...hannels from other sources such as terrestrial TV select COMP mode UHF Channel Select a UHF channel between 21 69 STORE After above settings move to store and press OK key Time Settings In standby mode the front display and channel banner will indicate the time after setting as below Year Month Date Hour Minutes Press VOL up down to select STORE After above settings move to store and press OK key ...

Страница 7: ...move to store and press OK key DiSEqC USALS menu Automatic positioner You can search and download up to 40 satellites at a time automatically using the DiSEqC USALS menu 0 Position To move to 0 centre position on motor STORE After above settings move to store and press OK key CONFIGURING DC ANTENNA POSITIONER For models with DC Positioner Connecting your Positioner R12 In channel search menu go to...

Страница 8: ...Data channels with Network Identification Table NIT FTA All TP for Free to Air Video and Radio channels with Network Identification Table Using DiSEqC USALS or DC Auto menu you can search and download up to 40 satellites automatically at a time Follow settings below Multisat Search Set index numbers for each satellite you wish to search LNB No If you are using more than one LNB select LNB referenc...

Страница 9: ...and select DiSEqC 1 2 or DC Manual Move the antenna until you find the correct position maximum signal and quality and store the position START Press OK to start search Using a mechanical polarizer for your lnb Connect the appropriate leads as shown on the output terminals R12 at the back of the receiver In INSTALL menu go to Antenna Settings and configure LNB as described earlier then configure t...

Страница 10: ...ch and therefore each LNB No has to be tuned individually TO CHANGE CHANNEL OR SATELLITE There are two ways of changing channel or satellite as below SORTING THE CHANNEL LIST Press Green key to sort channels alphabetically Press Yellow key to sort channels Free To Air first followed by Scrambled Press Red key to return to normal list TO SELECT A CHANNEL WITHIN THE SAME SATELLITE Press OK key and c...

Страница 11: ...e necessary to refer to this version number OTA Loader This menu is used when upgrading the receiver software via satellite Go to INSTALL menu and select Data Download Then select OTA Loader and finally select OTA Upgrade See following menus Common Interface After inserting card and CAM slots A or B will initialize showing the CAM type Select the slot you are using and press OK for sub menu Follow...

Страница 12: ...T TO SELECT SUBTITLES ON A CHANNEL Press SUB T Blue key Select required language and press OK The subtitles will appear after a few seconds If not transmitted it will state No Subtitles available TO SELECT AUDIO LANGUAGE You can select an audio by pressing LANG key The screen will display options on the top left Select required language and press OK To change the output press the AUDIO key repeate...

Страница 13: ... red When finished press EXIT Then store the settings To display correct EPG it is important to set the time first To display EPG what s on now and next press EPG red key Prog No Select program number or press OK Highlighted Event Press OK for details and PAGE up down for next page NOTE If there is no EPG transmitted it will state No Data After changing channel please allow few seconds before you ...

Страница 14: ... settings and exiting move down to STORE and press OK RECEIVER TO RECEIVER COPY FUNCTION You can copy the channel and user settings onto another receiver of the same model Follow below steps 1 Connect download cable to RS232 connectors R11 on both the receivers 2 Connect power to the master receiver from which you want to copy the data and switch it on Go to INSTALL menu and select Data Download E...

Страница 15: ...ou press STOP key TO WATCH A DIFFERENT FTA free to air CHANNEL WHILST RECORDING ANOTHER You can watch a different Free To Air channel but within the same TP whilst recording Press OK key for channel list and select a free to air channel within the same TP To resume to the channel being recorded press PLAY key NOTE If you are recording a scrambled channel with the aid of a CAM then it is not possib...

Страница 16: ...rent one then re tune your TV Select the appropriate TV Standard using TV Settings menu Bad picture with blocking or frozen Signal weak or noisy Check signal quality Antenna not in correct position Not responding to remote control Check the batteries in your remote control Replace with new You have lost or forgotten your password Apply master password or contact your Manhattan dealer SPECIFICATION...

Страница 17: ...nnectors 75 Ohm IEC 169 2 Male Female RF MODULATOR Frequency 470MHz to 860 MHz Channel Range UHF CH21 to 69 TV standard PAL BG I K PAL M NTSC M POSITIONER optional DC Motor Drive Output 36V DC 5A max Sensor Reed or Hall Effect switch Connections Push Terminals POWER SUPPLY MAIN Input Voltage 100 240 V AC 50 60Hz Type SMPS Power Consumption Max 30W Protection Separate Internal Fuse POWER SUPPLY POS...

Отзывы: