Makita M18 FUEL 2744-20 Скачать руководство пользователя страница 4

4

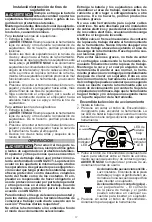
FUNCTIONAL DESCRIPTION

11

1.  Trigger

2.  Handle

3.  Power/Actuation 

selection

4.  Belt hook

5.  Rafter hook

6.  Hex wrench 


(backside of tool)

7.  Nail slot

8.  LED (backside of tool)

9.  Magazine

10.  Nail pusher

11.  Pusher release  

      button

12.  Striker

13. Workpiece contact  

      bracket

14. Depth adjustment

15. No-Mar pad

14

9

3

4

5

1

2

12

8

7

6

10

15

13

Cat. No.

2744-20

ASSEMBLY

WARNING

Recharge only with the charger 

specified for the battery. For spe

-

cific charging instructions, read the operator’s 

manual supplied with your charger and battery.

Removing/Inserting the Battery

To 

remove

 the battery, push in the release buttons 

and pull the battery pack away from the tool.

WARNING

Always remove battery pack before 

changing or removing accessories. 

To 

insert

 the battery, slide the pack into the body 

of the tool. Make sure it latches securely into place.

Attaching No-Mar Pad

The No-Mar pad on the nose of the tool protects the 

workpiece when the workpiece contact is compressed 

during actuation.

1. Remove the battery pack.

2. Snap the No-Mar pad into place over the points of 

the workpiece contact bracket.

3. Pull on the No-Mar pad to be certain it is properly 

secured.

4. To  remove  the  pad,  pull  the  pad  away  from  the 

workpiece contact bracket.

Installing/Removing Fastener Strips

WARNING

Always remove battery pack before 

changing or removing fasteners. 

Always wear safety goggles or glasses with side 

shields.

Keep fingers clear of fastener track of magazine. 

Pusher could pinch fingers, causing injury.


To

 install 

fastener strips:

1. Remove battery pack.

2. 

WARNING! 

Always point the tool away from yourself 

and others when installing fasteners. Failure to do 

so could result in injury. 

3. Slide the fastener strip into the nail slot and down 

toward the front of the tool. Be sure the point of the 

fasteners is pointed downward. 

WARNING! 

Use only 

recommended fasteners of the correct size, length, 

collation angle and head type as indicated on the 

tool's nameplate. Other fasteners could result in tool 

malfunction, leading to injury. 

4. Press and hold the pusher release button and slide 

the pusher back past the end of the fastener strips. 

5. Continue to hold the pusher, but release the button. 

Slowly slide the pusher forward until it rests against 

the fastener strip.

To 

remove

 fastener strips: 

1. Remove battery pack.

2. 

WARNING! 

Always point the tool away from yourself 

and others when installing fasteners. Failure to do 

so could result in injury. 

3. Press and hold the pusher release button and slide the 

pusher towards the front of the tool. Release the pusher.

4. Slide the nails back and out of the nail slot.

OPERATION

WARNING

To reduce the risk of injury, always 

wear safety goggles or glasses 

with side shields. The operator and other people 

in the work area must wear eye protection in ac-

cordance with ANSI Z87.1. Eye protection does not 

fit all operators in the same way. Make sure the eye 

protection chosen has side shields or provides 

protection from flying debris both from the front 

and sides. The employer is responsible for enforc

-

ing the use of eye protection by the operator and 

other people in the work area. When required, wear 

head protection in accordance with ANSI Z89.1.

To reduce the risk of injury to yourself and others, 

test the tool before beginning work each day ac

-

cording to the "Required Daily Testing" section. 

Do not use the tool unless you thoroughly under-

stand the actuation mode selected. 

Remove battery pack and fasteners before leaving 

the work area, moving the tool to another location, 

or handing the tool to another person. Failure to do 

so could result in serious injury.

Do not use this tool for fastening electrical 

cables.  It  is  not  designed  for  electric  cable 

installation and may damage the insulation of 

electric cables thereby causing electric shock 

or fire hazards.

NEVER wedge or hold back the workpiece contact 

mechanism during operation of the tool. Never 

attempt to clear a jammed workpiece contact by 

grasping the discharge area of the tool. Doing so 

could result in serious injury.

To avoid serious injury, do not attempt to prevent 

the recoil by holding the tool too firmly against 

Cat. No.

2744-20

Содержание M18 FUEL 2744-20

Страница 1: ...R S MANUAL MANUEL de L UTILISATEUR MANUAL del OPERADOR WARNING To reduce the risk of injury user must read and understand operator s manual AVERTISSEMENT Afin de réduire le risque de blessures l utilisateur doit lire et bien comprendre le manuel ADVERTENCIAPara reducir el riesgo de lesiones el usuario debe leer y entender el manual ...

Страница 2: ...y Keep your hair and clothing away from moving parts Loose clothes jewelry or long hair can be caught in moving parts If devices are provided for the connection of dust extraction and collection facilities ensure these are connected and properly used Use of dust collection can reduce dust related hazards Do not let familiarity gained from frequent use of tools allow you to become complacent and ig...

Страница 3: ...ered or not working properly This will cause unexpected actuation resulting in serious injury Always keep hands and body away from discharge area of the tool Never attempt to clear a jammed workpiece contact by grasping the discharge area of the tool Fasteners discharged from tool can cause serious injury if they contact hands or body Do not drive fasteners close to the edge of the workpiece Faste...

Страница 4: ...uld result in tool malfunction leading to injury 4 Press and hold the pusher release button and slide the pusher back past the end of the fastener strips 5 Continue to hold the pusher but release the button Slowly slide the pusher forward until it rests against the fastener strip To remove fastener strips 1 Remove battery pack 2 WARNING Always point the tool away from yourself and others when inst...

Страница 5: ...not attempt to prevent the recoil by holding the tool too firmly against the work 4 Remove your finger from the trigger and remove the tool from the workpiece Reload Indicator To indicate that the magazine is almost empty of fas teners about 4 5 left the workpiece contact will not compress preventing operation under usual pressure Install more fasteners to continue working WARNING NEVER wedge or h...

Страница 6: ...and hold the trigger and push the workpiece contact against a workpiece The tool must operate 9 Ifallprevioustestsworkproperly setthetoolforyour work Select the operation and load fastener strips 10 Set the depth of drive according to the Setting the Depth of Drive section 11 If all tests operate properly the tool is ready for use Repeat these tests before use each day or if the tool is dropped re...

Страница 7: ...BILITY OR FITNESS FOR A PARTICULAR USE OR PURPOSE TO THE EXTENT SUCH DISCLAIMER IS NOT PERMITTED BY LAW SUCH IMPLIED WAR RANTIES ARE LIMITED TO THE DURATION OF THE APPLICABLE EXPRESS WARRANTY AS DESCRIBED ABOVE SOME STATES DO NOT ALLOW LIMITATIONS ON HOW LONG AN IMPLIED WAR RANTY LASTS SO THE ABOVE LIMITATION MAY NOT APPLY TO YOU THIS WARRANTY GIVES YOU SPECIFIC LEGAL RIGHTS AND YOU MAY ALSO HAVE ...

Страница 8: ...ectrique approprié exécutera le travail mieux et de façon moins dangereuse s il est utilisé dans les limites prévues Ne pas utiliser l outil électrique si le commutateur ne permet pas de le mettre en marche ou de l arrêter Tout outil électrique qui ne peut pas être contrôlé par son commutateur est dangereux et doit être réparé Débrancher l outil et ou retirer le bloc piles si pos sible avant d eff...

Страница 9: ...amais tenter de débourrer l outil en agrippant la zone de décharge Les agrafes déchargées de l outil peuvent provoquer des blessures graves si elles touchent les mains ou le corps Ne pas planter d agrafes près du bord de la pièce Les agrafes peuvent glisser des bords et des coins ou pénétrer dans les matériaux fins ce qui en fait des projectiles capables de causer des blessures graves L outil ne d...

Страница 10: ...s lors de l installation des agrafes Ne pas procéder de la sorte peut en traîner des blessures 3 Faire glisser la bande d agrafes dans le logement du clou et vers le bas en direction de l avant de l outil Veiller à ce que la pointe des agrafes soit orientée vers le bas AVERTISSEMENT Utiliser uniquement des agrafes recommandées avec une taille une longueur un angle d assemblage et un type de tête a...

Страница 11: ...e la pièce à clouer en action nant le dispositif de déclenchement par contact 3 Presser la gâchette pour planter une agrafe AVERTISSEMENT Pour éviter les risques de bles sures graves ne pas essayer d empêcher le recul en maintenant l outil trop fermement contre la pièce 4 Enlever votre doigt de la gâchette et retirer l outil de la pièce Opérationdedéclenchementparcontact choc Le déclenchement par ...

Страница 12: ...ailler chaque jour ou si l outil est tombé a reçu un choc violent ou a été écrasé etc Complétez la liste de vérification suivante DANS L ORDRE Si l outil ne fonctionne pas normalement communiquer immédiatement avec un centre de service MILWAUKEE Ne jamais pointer l outil vers soi ni vers qui conque 1 Retirer le bloc piles 2 AVERTISSEMENT Ne jamais pointer l outil ni vers soi ni vers d autres perso...

Страница 13: ...iode de garantie applicable pour les radios de chantier le port d alimentation M12 la source électrique M18 le ventilateur de chantier et les chariots de travail industriels Trade Titan est d une durée d un 1 an à compter de la date d achat La période de garantie pour les Câbles de nettoyage des canalisations est de deux 2 ans à compter de la date d achat La période de garantie pour le Pistolet th...

Страница 14: ...ón adecuada para uso en exte riores El uso de una extensión adecuada para el uso en exteriores disminuye el riesgo de descarga eléctrica Si es inevitable utilizar una herramienta eléctrica en un lugar húmedo utilice un alimentador de corriente protegido con un interruptor de circuito por falla de conexión a tierra GFCI El uso de un GFCI reduce el riesgo de descarga eléctrica SEGURIDAD PERSONAL Man...

Страница 15: ...guridad de la herramienta eléctrica se mantenga Nunca dé servicio a baterías dañadas Únicamente el fabricante o proveedores de servicio autorizados deben dar servicio a las baterías REGLAS ESPECIFICAS DE SEGURIDAD PARA CLAVADORAS DE ACABADOS Siempre asuma que la herramienta contiene sujeta dores El manejo imprudente de la clavadora puede ocasionar el disparo inesperado de sujetadores y lesiones pe...

Страница 16: ...ro 2 8 mm 3 3 mm 0 113 0 131 Capacidad del cartucho 51 clavos SIMBOLOGÍA Volts Corriente continua Actuación secuencial única Contacto Bump Actuación Lea el manual del operador Use protección para los ojos No acerque las manos C US UL Listing Mark para Canadá y Estados Unidos DESCRIPCION FUNCIONAL 11 1 Gatillo 2 Empuñadura 3 Selección de encendido accionamiento 4 Gancho para cinturón 5 Gancho para ...

Страница 17: ... con ANSI Z89 1 Para disminuir el riesgo de lesiones para usted y para los demás pruebe la herramienta antes de comenzar a trabajar cada día de acuerdo con la sección Pruebas diarias requeridas No utilice la herramienta si no entiende a fondo el modo de accionamiento seleccionado Extraiga la batería y los sujetadores antes de abandonar el área de trabajo moviendo la her ramienta a otro lugar o ent...

Страница 18: ... la herramienta esté en modo de Accionamiento por contacto Sujete la empuñadura con firmeza deje que la herramienta haga el trabajo y no coloque una segunda mano en la parte superior de la herramienta Ajuste de la profundidad de inserción La profundidad de inserción puede ajustarse para tomar en cuenta el tamaño de los sujetadores y el material de la pieza de trabajo ADVERTENCIA Sepa qué hay detrá...

Страница 19: ... sido arrollada por un vehículo se atasca etc MANTENIMIENTO ADVERTENCIA Para reducir el riesgo de una lesión desconecte siempre la herramienta antes de darle cualquier manten imiento Nunca desarme la herramienta ni trate de hacer modificaciones en el sistema eléctrico de la misma Acuda siempre a un Centro de Ser vicio MILWAUKEE para TODAS las reparaciones Mantenimiento de las herramientas Adopte u...

Страница 20: ...IOR LIMITACIÓN O EXCLUSIÓN PODRÍA NO APLICARSE EN SU CASO ESTA GARANTÍA ES EXCLUSIVA Y REEMPLAZA TODAS LAS DEMÁS GARANTÍAS EXPRESAS ES CRITAS U ORALES EN LA MEDIDA EN QUE LO PERMITA LA LEY MILWAUKEE DESCONOCE CUALQUIER GARANTÍA IMPLÍCITA INCLUYENDO SIN LIMITACIÓN CUALQUIER GARANTÍAIMPLÍCITA DE COMERCIABILIDAD O IDONEIDAD PARAUN FIN O USO ESPE CÍFICO EN LA MEDIDA EN QUE DICHO DESCONOCIMIENTO NO SEA...

Отзывы: