


5 ENGLISH
NOTICE:
The battery power lamp blinks and the
battery cannot be charged if the battery or cleaner
is exposed to extreme temperatures.
NOTE:
The cleaner cannot be controlled while being
charged. To start the cleaner, unplug the charger from
the power source, disconnect the charging plug from
the cleaner, and then push the ON/speed change
button.
NOTE:
Under the following conditions, the battery is
about to reach its end of life (or damaged/malfunc-
tioned). Unplug the charger from the power supply,
then replace the battery.
•
The battery power lamp goes out shortly after
you begin to charge the cleaner.
•
The cleaner works only for a period shorter than
half of the normal operating time after the bat-
tery has been fully charged.
NOTE:
The battery can be recharged up to approx-
imately 500 times. The rechargeable times vary
depending on the conditions under which the battery
has been charged and discharged.
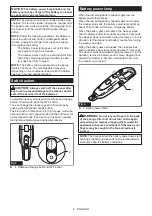
Switch action
CAUTION:
Always switch off the cleaner after
each use to prevent damage to the cleaner and to
extend the service life of the batteries.
To start the cleaner, simply push the ON/speed change
button. To switch off, push the OFF button.
You can change the cleaner speed in three steps by
pushing the ON/speed change button.
The first push on this button is for high speed mode, the
second push for max speed mode and the third push for
normal speed mode. Each push on this button repeats
the high/max/normal speed cycle alternatively.
1
2
Fig.3
►
1.
ON/speed change button
2.
OFF button
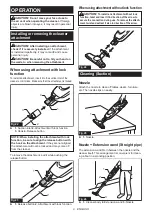
Battery power lamp
When the remaining battery capacity gets low, the
battery power lamp blinks.
When the remaining battery capacity gets much lower,
the cleaner stops and the battery power lamp lights up
about 10 seconds. At this time, charge the battery.
When the battery gets overheated, the cleaner stops
and the battery power lamp lights up about 10 seconds.
The cleaner does not actuate during the lamp on. In this
situation, let the cleaner and battery cool before turning
the cleaner on again.
When the battery gets overloaded, the cleaner stops
and the battery power lamp lights up about 10 seconds.
The cleaner does not actuate during the lamp on. In this
situation, remove the battery and remove clogging that
caused the cleaner to become overloaded. Then turn
the cleaner on to restart.
1
Fig.4
►
1.
Battery power lamp
WARNING:
Do not let your fingers in the back
of the sponge filter and do not turn on the appli
-
ance when you remove clogging that caused the
appliance to become overloaded. Otherwise, your
fingers may be caught in the fan and seriously
injured.
NOTE:
The time at which the battery power lamp start
blinking or lighting up depends on the temperature at
work place and the battery conditions.