


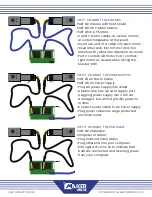
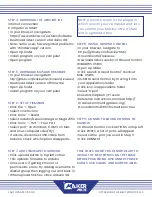


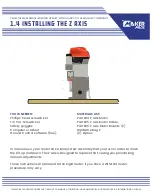


STEP 1: CONNECT THE MOTORS
PART #2 Arduino with Heat Shield
PART #11 X & Y Motor Cables
PART #13 X & Y Motors
• X and Y motor cables, as well as motors,
are interchangeable at this point
• Insert one end of a cable into each motor
• Insert other ends into to Ports 1 and 3 on
Arduino with yellow wire at bottom as shown
• Port 3 controls left motor Port 1 controls
right motor as viewed when facing the
Maslow CNC.
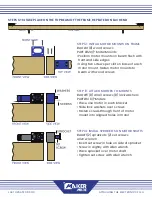
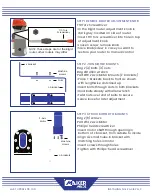
STEP 2: CONNECT THE POWER SUPPLY
PART #1 AC Power Cable
PART #3 DC Power Supply
• Plug DC power supply into shield
• Arduino also has a power supply port,
plugging power supply into it will not
damage it, but will not provide power to
motors
• Connect power cable to DC Power Supply
• Plug power cable into surge protected
electrical outlet
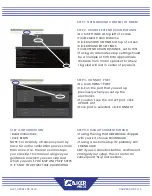
STEP 3: CONNECT THE USB CABLE
PART #9 USB Cable
Computer or tablet
• Plug USB cord into Arduino
• Plug other end into your computer
• USB light will come on to indicate that
board is connected and receiving power
from your computer
X
X
ATTACHING THE ELECTRONICS PG. 2
LAST UPDATE 06.01.19


