background image

36

R

EGULATORIAS

F

EDERAL

 C

OMMUNICATIONS

 C

OMMISSION

 (FCC) N

OTICE

 (U.S. O

NLY

)

This equipment has been tested and found to comply with the limits for a Class B digital device, pursuant to Part 

15 of the FCC Rules. These limits are designed to provide reasonable protection against harmful interference in a 
residential installation. This equipment generates, uses and can radiate radio frequency energy and, if not installed 

and used in accordance with the instructions, may cause harmful interference to radio communications. However, 

there is no guarantee that interference will not occur in a particular installation. If this equipment does cause 

harmful interference to radio or television reception, which can be determined by turning the equipment off and 

on, the user is encouraged to try to correct the interference by one or more of the following measures:

Changes or modifications not expressly approved by the party responsible for compliance could void the user’s 
authority to operate the equipment.

Use only RF shielded cable with ferrite core when connecting this monitor to a computer device. 
• 

   RF shield cable with ferrite core can be obtain from multiple retail outlets or Philips Factory Service Center.

•                The RF shield cable with ferrite core part number is 3138 198 71441.
•                If your RF shield cable without ferrite core, you can obtain the ferrite core from Philips Factory Service 
                 Center, installation as following.

• 

Reorient or relocate the receiving antenna. 

• 

Increase the separation between the equipment and receiver. 

• 

Connect the equipment into an outlet on a circuit different from that to which the receiver is connected. 

• 

Consult the dealer or an experienced radio/TV technician for help.

To prevent damage which may result in fire or shock hazard, do not expose this appliance to rain or excessive moisture. 
THIS CLASS B DIGITAL APPARATUS MEETS ALL REQUIREMENTS OF THE CANADIAN INTERFERENCE-CAUSING EQUIPMENT 
REGULATIONS.

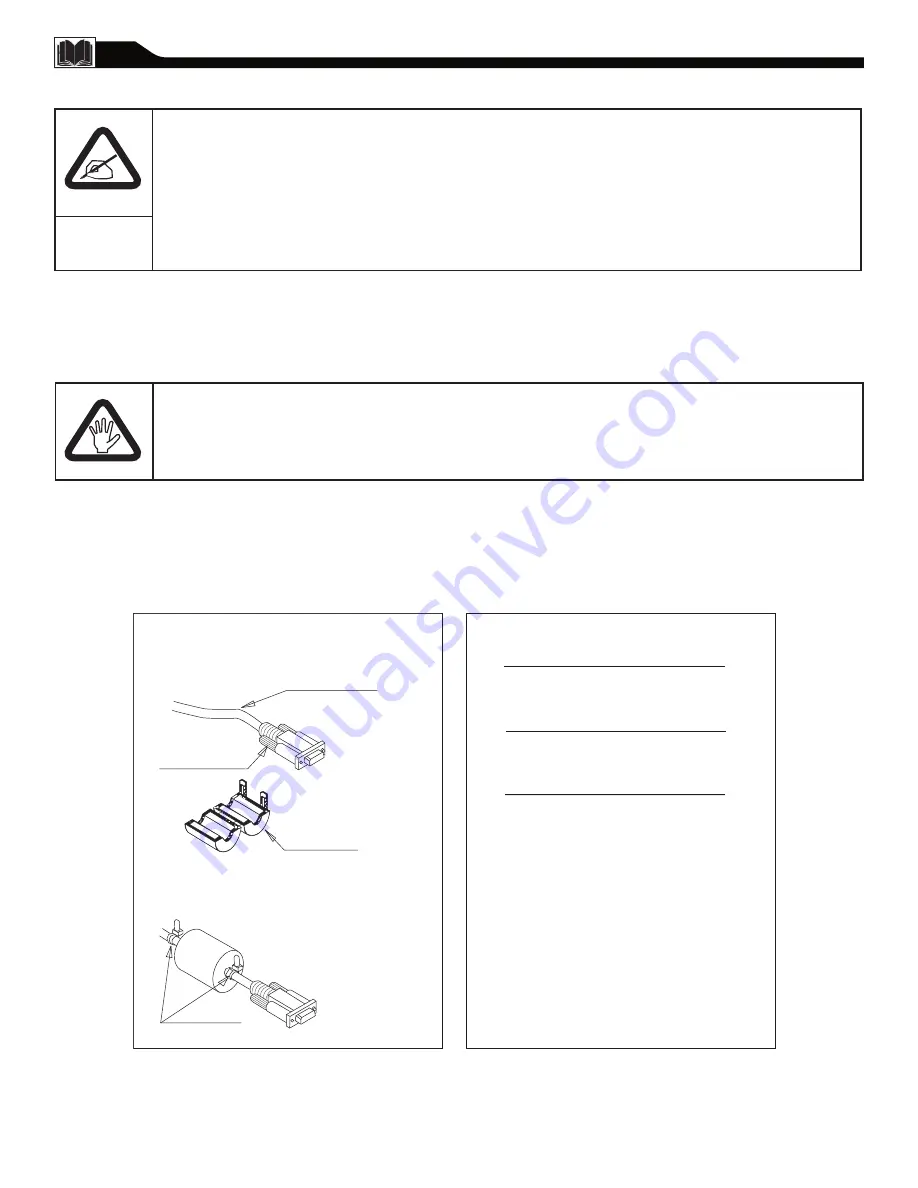
1.   Open the ferrite core.
2.   Locate the video connector that goes to the computer and 

plugs into the unit. Place the ferrite core as close to the 

video connector as possible, as shown in the  figure below.  

3.   Lock the ferrite core.


4.   Place two cable tie wrap on either side of the ferrite core 

to prevent it from sliding down the cable, as shown in the 

figure below. 

5.   Draw the tie wraps tight and cut off the excess leads.

Cable tie

Ferrite Core 


Installation


To ensure compliance of this unit to the 

Class B limits of the FCC Rules, Part 15, 

Subpart B.


This kit must be utilized when 

“non-ferrited” video cables are used 

with this unit. This instruction sheet 
gives the details for proper installation.


Additional FCC information may be 

found in the radio frequency interference

statement located in the user’s manual. 

Interface cable

Video connector

Ferrite Core 

Содержание 15MF500T - 15" Lcd Tv

Страница 1: ...EXIONES LA PRIMERA CONFIGURACI N Y CUALQUIERA DE SUS FUNCIONES QUEREMOS QUE EMPIECE A DISFRUTAR DE SU NUEVO PRODUCTO CUANTO ANTES LL MENOS ANTES DE PLANTEARSE LA DEVOLUCI N DEL PRODUCTO 1 800 705 2000...

Страница 2: ...que realizar ning n tr mite burocr tico adicional para obtener el servicio de garant a Noti caci n de seguridad del producto Al registrar el producto recibir una noti caci n directamente del fabricant...

Страница 3: ...s de seguridad globales internacionales recomendadas relacionadas con las propiedades de inclinaci n y estabilidad del dise o de su carcasa No ponga en peligro estas normas de dise o ejerciendo una fu...

Страница 4: ...18 Imagen inteligente y sonido inteligente Control de imagen inteligente 19 Control de sonido inteligente 19 Men Imagen Controles del men Imagen de TV 20 Men Audio Controles del men Audio de TV 21 Me...

Страница 5: ...Despliegue la base siguiendo la direcci n mostrada en el diagrama Coloque la unidad en posici n vertical El televisor estar listo para instalarse 1 2 3 INSTALAR ELTELEVISOR LCD EN LA PARED La base del...

Страница 6: ...onar los canales Apunte con el mando a distancia a la parte frontal del televisor LCD cuando utilice ste con aqu l Retire la tapa del compartimento de las pilas situada en la parte posterior del mando...

Страница 7: ...bt tulos ocultos Bot n de espera encendido Presione este bot n para encender o apagar el televisor LCD Bot n de apagado autom tico Presione este bot n para establecer el televisor LCD para que se apag...

Страница 8: ...ptador al enchufe hembra del televisor LCD situado en ste 1 CONEXI N B SICA DELTELEVISOR POR CABLE 2 1 Antena con cable de 75 Panel de conectores hembra posterior del televisor Antena exterior o inter...

Страница 9: ...l conector hembra V DEO VIDEO de color amarillo situado en el televisor Los cables de v deo normalmente est n marcados con el color amarillo y puede adquirirlos directamente de Magnavox o en los distr...

Страница 10: ...AUDIO AUDIO OUT izquierdo y derecho del otro equipo Conecte el otro extremo de los cables al conector hembra AUDIO situado en el lateral del televisor LCD Enchufe el adaptador de CC al conector hembr...

Страница 11: ...A DE S V DEO S VIDEO OUT para poder completar la conexi n descrita en esta p gina Enchufe un cable de S V deo al conector hembra S VIDEO S V DEO del otro equipo reproductor de DVD videoc mara etc y al...

Страница 12: ...elevisor LCD Enchufe el adaptador de CC al conector hembra ENTRADA de CC de 16 V DC IN 16V del televisor LCD Enchufe el cable de alimentaci n a una toma de corriente Encienda el televisor LCD y el otr...

Страница 13: ...DAPTADOR DE AUDIO conectado al conector hembra de salida de audio de su PC si est disponible mientras los otros extremos de los cables de audio se conectan a los conectores hembra AUDIO DE PC PC AUDIO...

Страница 14: ...ablecer el men en pantalla del televisor para que se muestre en ingl s franc s o espa ol Presione el bot n MEN del mando a distancia para ver el men en pantalla Presione el bot n CH para resaltar el m...

Страница 15: ...TV por cable o de una se al de antena Presione el bot n Men para ver el men en pantalla Presione el bot n CH para resaltar el men INSTALAR Presione el bot n VOL para entrar en el men INSTALAR Presione...

Страница 16: ...bot n CANAL o CANAL Presione el bot n MEN del mando a distancia para ver el men en pantalla Presione el bot n CH para resaltar el men INSTALAR Presione el bot n VOL para entrar en el men INSTALAR Pres...

Страница 17: ...para ver el men en pantalla Presione el bot n CH para resaltar el men INSTALAR Presione el bot n VOL para entrar en el men INSTALAR Presione el bot n CH para resaltar el men EDICI N CANALES Presione e...

Страница 18: ...one el bot n MEN repetidamente para hacer desaparecer el men de la pantalla 1 2 3 4 5 6 IDIOMA SINTONIZADOR PROGR AUTO AUDIO FUNCIONES INSTALAR IM GEN EDICI N CANALES REINICIO F BRICA CONTROLES PRINC...

Страница 19: ...tar en las opciones de imagen del men en pantalla El modo Personal es el nico modo que puede ajustar el usuario a trav s del men de con trol de imagen en pantalla CONTROL DE SONIDO INTELIGENTE La func...

Страница 20: ...OL para ajustar la opci n Presione el bot n CH o CH para ajustar otros controles de imagen Presione el bot n MEN repetidamente para hacer desaparecer el men CONTROLES DEL MEN IMAGEN DE TV Para ajustar...

Страница 21: ...duzcan cambios bruscos de volumen durante interrupciones comerciales o cuando cambie de canal Presione el bot n VOL o VOL para ajustar la opci n Presione el bot n CH o CH para ajustar otros controles...

Страница 22: ...ci n pensada para un p blico muy joven incluidos ni os de entre 2 y 6 a os de edad No se cree que este tipo de programaci n pueda asustar a los ni os TV Y7 dirigida a ni os mayores programaci n pensad...

Страница 23: ...igo Presione MEN repetidamente para hacer desaparecer el men de la pantalla 1 2 3 4 5 6 7 C C SOURCE P I P M E N U OK FUENTE FORMATO IMAGEN AUDIO FUNCIONES INSTALAR CONTROLES PRINC IM GEN TRANSCRIPCI...

Страница 24: ...esione el bot n VOL para bloquear el canal seleccionado actual o el bot n VOL para desbloquear un canal Presione MEN repetidamente para hacer desaparecer el men de la pantalla 1 2 3 4 5 6 7 8 Nota pue...

Страница 25: ...ONES Presione el bot n CH para seleccionar AUTOBLOQUEO Presione el bot n VOL C DIGO DE ACCESO aparecer en la pantalla Inserte el c digo de acceso mediante los botones num ricos Presione el bot n CH pa...

Страница 26: ...activar o desbloquear desactivar Presione MEN repetidamente para hacer desaparecer el men de la pantalla 1 2 3 4 5 6 7 8 9 C C SOURCE P I P M E N U OK FUENTE FORMATO IMAGEN AUDIO FUNCIONES INSTALAR CO...

Страница 27: ...OL para cambiar las opciones del men FORMATO IMAGEN Presione MEN repetidamente para hacer desaparecer el men de la pantalla 1 2 3 4 5 FUENTE FORMATO IMAGEN AUDIO FUNCIONES INSTALAR CONTROLES PRINC IM...

Страница 28: ...n que desea CC MUTE CC1 CC2 CC3 CC4 Txt1 Txt2 Txt3 o Txt4 1 2 3 4 5 Nota la transcripci n tambi n se puede activar presionando el bot n TRANSCRIPCI N CC del mando a distancia No todos los programas d...

Страница 29: ...oj de la imagen Ajuste manual este control permite ajustar manualmente la imagen cuando aparece en la pantalla Fase elimina las l neas de interferencia horizontales Reloj elimina las l neas de interfe...

Страница 30: ...a mayor profundidad y dimensi n al sonido de PC AVL Auto Volume Leveler es decir Control de volumen autom tico si esta opci n est activada AVL estabilizar el sonido que se escucha cuando se produzcan...

Страница 31: ...o de la funci n PIP Puede elegir el tama o que pre era Peque o Mediano Grande o PBP Picture Beside Picture es decir Imagen junto a imagen V deo permite seleccionar la fuente de v deo para PIP entre A...

Страница 32: ...GA VESA 60 59 940 31 469 2 800 x 600 SVGA VESA 56 56 250 35 156 3 SVGA VESA 60 60 317 37 897 4 1024 x 768 XGA VESA 60 60 004 48 363 Serie 20MF TV LCD de 20 No Resoluci n Modo Frecuencia vertical Hz Fr...

Страница 33: ...os ajustes de AUDIO En la p gina 19 o 21 encontrar m s detalles Si el sonido se escucha con mala calidad en el modo S V deo o V deo CVBS compruebe si ha conectado la se al de sonido correcta a la entr...

Страница 34: ...n Los marcadores de cotizaci n de bolsa que pueden aparecer en la parte inferior de la pantalla del televisor si el programa de televisi n cubre estas noticias Los precios y logotipos de los canales d...

Страница 35: ...17 Entrada de audio conector hembra 10 Est reo 4 7 9 21 30 F Funcionamiento del televisor b sico 6 G Garant a 1 2 4 39 Garant a limitada 4 39 Graves 4 21 30 I Idioma 4 14 ndice 4 35 Informaci n del s...

Страница 36: ...shield cable without ferrite core you can obtain the ferrite core from Philips Factory Service Center installation as following Reorient or relocate the receiving antenna Increase the separation betwe...

Страница 37: ...RF ne poss de pas de tore magn tique vous pouvez l obtenir aupr s du centre de service d usine Phillips Suivez les instructions ci dessous pour l installation R orienter ou d placer l antenne de r cep...

Страница 38: ...cto La reparaci n del producto y o el reemplazo de piezas debido a la instalaci n inadecuada a conexiones hechas a un suministro de voltaje inadecuado al abuso descuido mal uso accidentes reparaciones...

Отзывы: