Magicard Tango 2e Скачать руководство пользователя страница 4

www.magicard.com 

RIO 2e, TANGO 2e & TANGO +L Printers USER MANUAL 


Page 4 of 33 


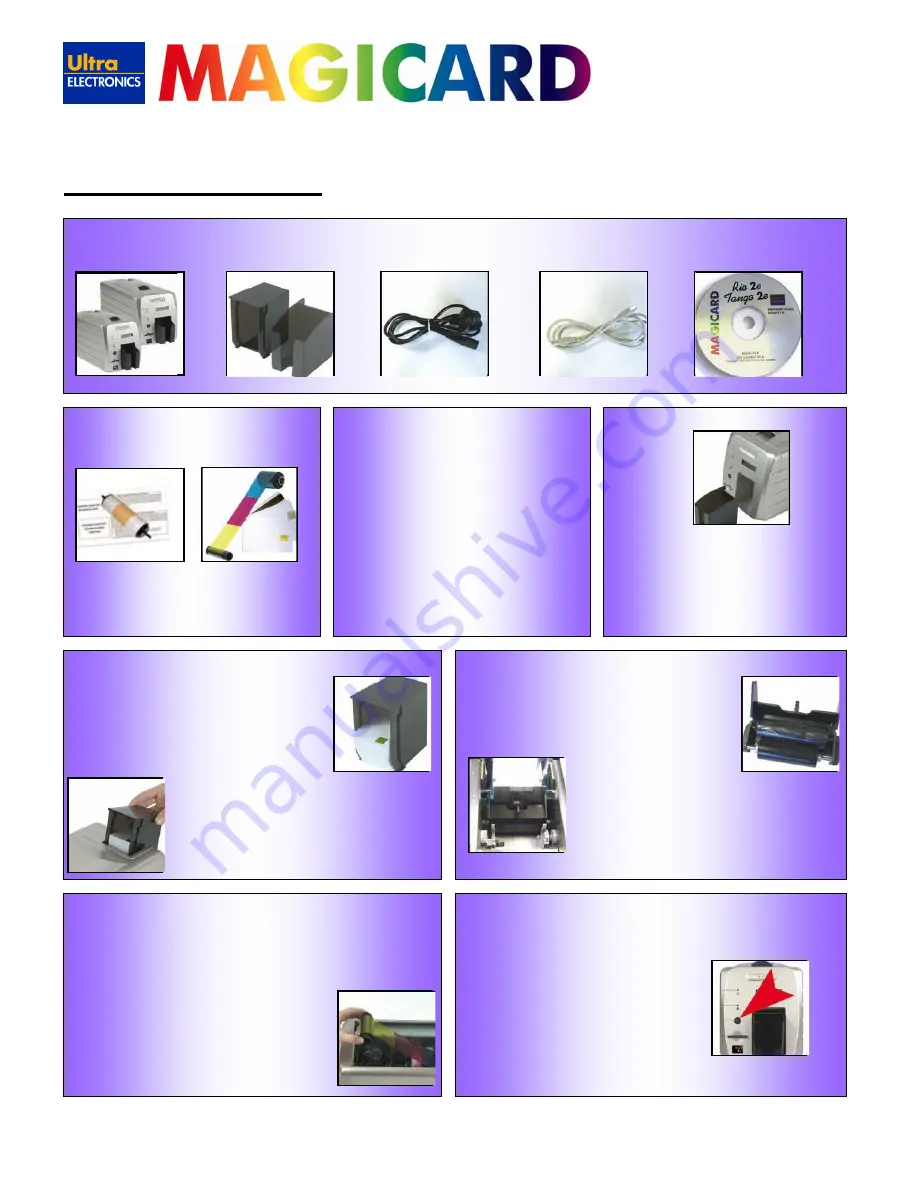
1. Installing the Printer 


1. 

Unpacking 


Rio 2e/Tango 2e  

  Hopper and Stacker  


Power Cable  


USB Cable    

Driver CD 


2.

 Consumables 

 
Cleaning Cards & Roller  

Dye Film and Cards 


Note: 

To complete installation and begin using 

your printer you will require a roll of Magicard 
dye-film and cards (not included).


3.

 Printer location requirements 

 
• Sufficient space for: 

opening the top cover 

cable access at the rear. 

allowance for air circulation. 

• An adequately ventilated dust free room. 

• Access to a properly grounded power supply. 

• Ambient tempe10 to 30 degrees C. 

• Relative humidity 20 - 70%. 

• Protection from direct sunlight and chemicals. 

• Protection from abrupt temperature changes. 


4.

 Attach the card output stacker 


Insert the card collection stacker into the 
aperture in the front panel and hook into place. 
The stacker can hold up to 50, 30mil thick cards, 
after which it should be emptied. The printer can 
be operated without the stacker if you wish. 

5.

 Attach the Card Feed Hopper 


1. Open a clean pack of cards and make sure they  

are not sticking together. Load the cards into the  
feed hopper. Avoid touching the card surfaces  
because finger marks can effect image quality. 

Note: 

When using magstripe cards, 

ensure the stripe is on the right and 
underneath when viewed from the front. 

2. Tilt the loaded hopper back as shown, and lower gently 

into the receptacle at the rear of the printer. You will 
be able to lower the hopper about an inch (25mm). 

3. At this point, tilt the hopper forward to the vertical 

position and lower all the way down until the hopper  
is completely within the body of the printer.


6.

 Prepare the cleaning cassette


Press down on the top cover, operate the top cover 
release catch and open the cover. First remove the 
white tape holding the black plastic cleaning cassette. 
Grip the handle between finger and thumb, then push 
and release the cleaning cassette. Remove the 

orange tape and protective layer 
from the disposable cleaning 
cassette roller. 

Note: 

This is a good time to familiarise yourself with the 

way that this automatic cleaning system is designed to 
operate. 

Finally replace the cleaning cassette by inserting the 
roller shaft into the U shaped guides and clicking into 
place.


7.

 Install the dye film 


1. Open a new roll of dye film. 

2. Place the loaded spool into the rear clips and press it into place. The 

orientation is correct when the bar code on the end of the spool to the left 
hand side when viewed from the front. Rotate to make sure that the slot 
engages with the lug. 

3. Place the empty take up spool into the front clips, 

and adjust the film tension so that the film is 
lying flat and straight between the two spools. 

4. Press the top cover down until it clicks into the 

closed position. The printer will automatically 
 recognize the type of film that has been loaded. 
 

8.

 Plug in the printer


Make sure that the printer is turned Off, i.e. the On/Off button is slightly 
protruding from the front panel. 
 
Plug the power supply lead provided into the 
socket on the rear panel of your printer, and 
the other end into a properly grounded 
electrical outlet.


Содержание Tango 2e

Страница 1: ...Page 1 of 33 Professional series ID card printers 3 year warranty User Manual Document No 687 Issue 6 00...

Страница 2: ...Cards 16 10 Cleaning your Printer 17 Cleaning is Important 17 Cleaning is Easy and Inexpensive 17 The Magicard Cleaning System 17 Cleaning Supplies 18 Every 350 Prints or Sooner 18 Every 1000 Prints...

Страница 3: ...power source within the limits marked on the rear panel label Take care not to spill any liquid on the printer Ensure that the power supply cord is not longer than 6 feet 2 metres and includes a prop...

Страница 4: ...the hopper about an inch 25mm 3 At this point tilt the hopper forward to the vertical position and lower all the way down until the hopper is completely within the body of the printer 6 Prepare the cl...

Страница 5: ...After several seconds the printer will print a test pattern on a card and feed it to the card output stacker This indicates that all is well with the printer i e cards loaded dye film loaded power is...

Страница 6: ...ck the start button then click on run Type D autorun where D is the drive letter for your CD drive then press the return key The driver CD Splash Screen will appear Select your printer model Rio 2e or...

Страница 7: ...Printer Driver Properties the Windows Logo should be printed in the centre of the card To configure the new Printer Driver s settings please see Section 11 Printer Driver Settings for a detailed expl...

Страница 8: ...n select the Install Driver option The driver installation will begin and the driver installation window will open 4 Ensure that the Install driver ready for USB option is NOT selected then press Next...

Страница 9: ...IP address e g IP_192 168 102 254 Caution Do not change this name Vista The Port Name will be entered as the IP address e g 192 168 102 254 Add IP_ to this e g IP_192 168 102 254 When prompted to sele...

Страница 10: ...nstall Driver option The driver installation will begin and the driver installation window will open 10 Ensure that the Install driver ready for USB option is NOT selected then press Next 11 Select th...

Страница 11: ...at LC6 600 one side only KO M9005 756 Colour front Black back LC8 300 front back YMCKOK M9005 758 Magicard Tango 2e Duplex Colour front color back LC1 175 Front Back YMCKO M9005 751 Ribbon Panel Layou...

Страница 12: ...spool into the front clips and adjust the film tension so that the film is lying flat and straight between the two spools 6 Gently close the top cover until it clicks into the closed position The pri...

Страница 13: ...is type of laminate roll covers the full card surface from edge to edge with a thin protective film It can also incorporate a holograph Custom holographic designs are available upon request Contact yo...

Страница 14: ...m to the ISO 7816 specification with the chip contacts being below the surface of the card It is unwise to print graphics or text directly adjacent to the chip as image quality may be affected For enc...

Страница 15: ...the improved thermal stability of the PVC Polyester material Laminator Profiles The driver has preset profiles for different card and laminate type Choose the profile which best matches your own circu...

Страница 16: ...d touching the card surfaces as finger oils will degrade the image quality 3 Tilt the hopper forward to the vertical position and lower all the way down until it is completely within the body of the p...

Страница 17: ...You use a Cleaning Card to remove dirt from the print path This should be used after every 350 prints every time you replace your ribbon If you print only a few cards a day we recommend that you clea...

Страница 18: ...nd into the card feed slot picture 1 Press the black button on the back of the printer located above the USB connector The card is drawn into the printer picture 2 and then ejected Repeat this several...

Страница 19: ...re 2 Push down lightly on it and then lift it out You now have the cassette and roller assembly out of the printer This is a two roller assembly The bottom roller is permanent and the top larger rolle...

Страница 20: ...elp file in HTML format this file gives an excellent clear explanation of each driver setting To view the driver s help file go to the printer preferences as described above and click on the Help butt...

Страница 21: ...the UltraDriver On the PC go to Start Control Panel Then select Add or Remove Programs Classic view Category view Select the Magicard Rio Tango 2e entry and click on Change Remove Choose the Magicard...

Страница 22: ...he settings shown in this tab unless requested to do so by Magicard Technical Support Stats Cmnds This tab contains 3 separate areas Statistics shows valuable information on printer usage Quick Comman...

Страница 23: ...rrect IP address Subnet mask and Default gateway for your network 4 Press the Save to FLASH button 5 Turn the printer OFF and then back ON again The IP settings will now be changed Mag Encoding For us...

Страница 24: ...ection 10 of this document Small Areas of Wrong Colour Small areas where 1 or more colour layers have been missed from the image 1 Dust and debris on surface of the card white ovals 2 Contaminated wit...

Страница 25: ...er Gives error message Card not found 1 Dirty rollers 2 Incorrect card size 1 Clean the rollers See section 10 of this document 2 Fit correct cards See section 7 of this document Cards fail to feed fr...

Страница 26: ...ation speed 3 Cards must be clean and dry Laminated cards are bent or distorted 1 Roller temperature too high 2 Lamination speed too slow 3 PVC cards are unsuitable for double sided lamination 4 Cards...

Страница 27: ...r MRAN will be issued to you Please have the product s model and serial number ready for warranty verification See label on the rear of the printer c Once it has been verified that you product is cove...

Страница 28: ...any source other than Ultra Electronics or have been used to print on anything other than card surfaces which are approved by Ultra and which will generally be made of PVC be completely flat and be fr...

Страница 29: ...r web site at www magicard com CALL EU 44 0 1305 762 115 Ultra Electronics Limited MAGICARD Service Centre Waverley House Hampshire Road Granby Estate Weymouth Dorset DT4 9XD UK Fax 44 0 1305 777 904...

Страница 30: ...e Road Granby Estate Weymouth Dorset DT4 9XD UK Tel 44 0 1305 784738 Fax 44 0 1305 777904 Email UKsales UltraMagicard com Web http www magicard com Sales for Latin America Contact Luis de la Cruz Offi...

Страница 31: ...naja Str Moscow 111250 Russia Tel 007 902 677 4394 Fax 007 095 362 7262 Email aam aamsystems ru Web www aamsystems ru Sales and Service for Singapore Malaysia Paclin Office Products PTE Ltd Blk 3023 U...

Страница 32: ...Causing Equipment Regulations Cet appareil num rique de la Classe B respecte toutes les exigences du Reglement sur le Materiel Brouilleur du Canada The EU Directives covered by this Declaration 89 33...

Страница 33: ...outh Dorset DT4 9XD United Kingdom Tel 44 0 1305 784 738 Fax 44 0 1305 777 904 email UKsales ultramagicard com Ultra Electronics Card Systems North American Sales Support Center 6711 176th Avenue NE R...

Отзывы: