Magic Chef CER3725AGW Скачать руководство пользователя страница 8

8

16026839

© 2006 Maytag Services

Specifications

Refer to individual Technical Sheet for specification
information.

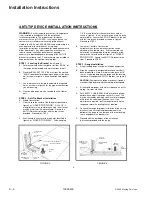
Placement of the Oven

This freestanding range must be placed in the kitchen or
comparable room.  All safety guidelines must be followed
and free air flow around the range is essential.

Do Not Block Air Vents

All air vents must be kept clear during cooking.  If air
vents are covered during operation, the oven may
overheat.  If this occurs, a sensitive, thermal safety device
automatically removes power to the oven, rendering the
oven inoperable.  The oven will remain in this state until it
has sufficiently cooled.

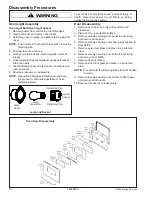
Location of Model Number

To request service information or replacement parts, the
service center will require the complete model, serial, and
manufacturing number of your freestanding range. The
number can be found on the oven chassis behind the
service drawer.  Open the service drawer to view the data.

Model

Number

General Information

Grounding Instructions

This appliance must be grounded. If an electrical short
circuit occurs, grounding reduces the risk of electric
shock by providing an escape wire for the electric current.
The cord for this appliance has a grounding wire with a
grounding plug.  Put the plug into an outlet that is properly
installed and grounded.

W AR NIN G

!

To avoid risk of electric shock, personal injury or death,
use grounding plug properly.

Ask a qualified electrician if you do not understand the
grounding instructions or if you wonder whether the
appliance is properly grounded.
Keep the electrical power cord dry and do not pinch or
crush it in any way.

For a permanently connected appliance: This appliance
must be connected to a grounded, metallic, permanent
wiring system, or an equipment grounding conductor
should be run with the circuit conductors and connected
to the equipment grounding terminal or lead on the
appliance.

WARNING

!

Attaching adapter ground terminal to wall receptacle
cover screw does not ground appliance unless the
cover screw is metal and not insulated, and wall
receptacle is grounded through the house wiring.
Consumer should have circuit checked by a qualified
electrician to verify receptacle is properly grounded.

Model Identification

Complete enclosed registration card and promptly return.
If registration card is missing:
• For Maytag product call 1-800-688-9900 or visit the

Web Site at www.maytag.com

When contacting provide product information located on
rating plate. Record the following:
Model Number:

___________________

Manufacturing Number:

___________________

Serial or S/N Number:

___________________

Date of purchase:

___________________

Dealer’s name and address:

___________________

Service

Keep a copy of sales receipt for future reference or in
case warranty service is required. To locate an authorized
servicer:
• For Maytag product call 1-800-688-9900 or visit the

Web Site at www.maytag.com

Warranty service must be performed by an authorized
servicer. We also recommend contacting an authorized
servicer, if service is required after warranty expires.

Parts and Accessories

Purchase replacement parts and accessories over the
phone. To order accessories for your product call:
• For Maytag product call 1-800-462-9824 or visit the

Web Site at www.maytag.com

Extended Service Plan

We offer long-term service protection for this new range.
• Dependability Plus

SM

 Extended Service Plan is

specially designed to supplement Maytag’s strong
warranty. This plan covers parts, labor, and travel
charges.   Call 1-800-925-2020 for information.

Содержание CER3725AGW

Страница 1: ...ormation Refer to individual Technical Sheet for information on specific models This manual includes but is not limited to the following Service This manual is to be used by qualified appliance techni...

Страница 2: ...cers and Consumers WARNING To avoid risk of severe personal injury or death disconnect power before working servicing on appliance to avoid electrical shock To locate an authorized servicer please con...

Страница 3: ...nstructions 8 ModelIdentification 8 Service 8 Parts and Accessories 8 Extended Service Plan 8 Range Description 9 TroubleshootingProcedures 10 TestingProcedures ComponentTestingProcedures 12 Quick Tes...

Страница 4: ...ction Inform consumer of the condition of range before leaving 2 Adhere to all local regulations and codes when performing service Recognize this symbol as a safety precaution WARNING If the informati...

Страница 5: ...Do not use a towel or a bulky cloth as a potholder Never leave range unattended while cooking Boilovers can cause smoking and may ignite Only certain types of glass ceramic earthenware or other glazed...

Страница 6: ...ub damage or move the gasket 2 Do Not Use Oven Cleaners No commercial oven cleaner or oven liner protective coating of any kind should be used in or around any part of the oven 3 Clean Only Parts List...

Страница 7: ...R 3 7 2 5 A G W Brand A Amana C Magic Chef G Graffer Sattler H Hardwick J Jenn Air M Maytag N Norge U Universal Y Crosley Product Type A Accessory Cartridge C Cooktop Updraft Countertop D Downdraft C...

Страница 8: ...st be connected to a grounded metallic permanent wiring system or an equipment grounding conductor should be run with the circuit conductors and connected to the equipment grounding terminal or lead o...

Страница 9: ...Range Description Light Switch Clock Infinite Switches Surface Elements Surface Indicator Lights Serial Plate Oven Door Door Handle Oven Racks Broil Element Bake Element Service Drawer Door Hinges In...

Страница 10: ...Clock and timer not working Power outage Verify power is present at unit Verify that the circuit breaker is not tripped Replace household fuse but do not fuse capacity Refer to Use and Care Manual Ope...

Страница 11: ...le Cause Correction Surface element does not heat Open element Loose wire connection or broken wire Failed infinite switch Check element for continuity replace if failed Verify all connections are cle...

Страница 12: ...rminals 220 240 VAC see wiring diagram for terminal identification If voltage is not present at bake element check wiring Approximately 21 7 Broil element Measure voltage at broil element Disconnect w...

Страница 13: ...Press Up or Down Arrow pads to change This mode enables the user to indicate F or C on the display NSC Controlled Sabbath Mode Hold Clock pad for 3 to 5 seconds to activate Sabbath mode Hold Clock pad...

Страница 14: ...he response Press the keypad a second time to deactivate the response Display will indicate the following Keypad Operation Bake Bake relay activated Broil Broil relay activated Timer DLB relay activat...

Страница 15: ...s Diagnostic Code Handling Code Measurable What is Displayed Action Taken By Control 1c1c Keypress Nothing Disables affected key Disables audible for affected key depression 1c31 Cancel key input A D...

Страница 16: ...the oven forward out of the cabinet opening 3 Disconnect or unplug the power cord leading from unit to fuse box or junction box depending on unit 4 Replace the oven using the installation instructions...

Страница 17: ...t and the frame of the range Remove the two track mounting screws and remove the track If the track support is being replaced remove the mounting screw securing it to the side frame and remove the sup...

Страница 18: ...e socket 8 Reverse procedure to reassemble NOTE Reposition fiberglass insulation around oven light socket to eliminate possibility of heat related problems Lamp 40 watts Lamp Socket Retaining Clip Ret...

Страница 19: ...2006 Maytag Services 16026839 A 1 Appendix A...

Страница 20: ...or or other locations where it may be subject to strong drafts Any opening in the wall behind the range and in the floor under the range should be sealed Make sure the flow of cooling ventilation air...

Страница 21: ...1 4 inch 6 4 mm thick flame retardant millboard covered with not less than No 28 MSG sheet steel 0 015 inch 0 381 mm thick stainless steel 0 024 inch 0 610 mm thick aluminum or 0 020 inch 0 508 mm th...

Страница 22: ...er of each hole as shown in figure 4 A nail or awl may be used if a drill is not available Secure the ANTI TIP bracket to the wall with the two screws provided as shown in figure 4 Proceed to STEP 3 B...

Страница 23: ...on the rear of the range Others will permit the termination of the range circuit at a plug in outlet placed at a convenient point near the back of the range The range is then connected to this outlet...

Страница 24: ...CE CORD OR CONDUIT INSTALLATION Pull the service cord through See figure 9 The protective earth wire must connect to the protective earth screw See figure 10 Connect the remaining wires See figure 11...

Страница 25: ...14 Connect the remaining wires See figure 15 Bare Wire Torque Specifications Lug Attached to Terminal Block 20 inch pounds American Wire Gage Torque 10 14 20 inch pounds 8 25 inch pounds 4 6 35 inch p...

Страница 26: ...orized service agency Please give the complete model and serial numbers of the range which is located on the range model number plate CONNECTING THE RANGE CONTINUED STRAIN RELIEF INSTALLATION Position...

Страница 27: ...2006 Maytag Services 16026839 B 1 Appendix B...

Страница 28: ...B 2 16026839 2006 Maytag Services Use and Care Instructions USER S GUIDE USER S GUIDE Electric Smoothtop Range CER3725AGW...

Страница 29: ...The time of day will return to the display Adjusting the Oven Temperature Oven temperatures are carefully tested for accuracy at the factory It is normal to notice some baking or browning differences...

Страница 30: ...ake broil or timing operation 2 Set the correct time of day using the or pads If the or pad is not pressed within 30 seconds the program will cancel Press the CLOCK pad and begin again Setting the Tim...

Страница 31: ...ill reappear in the display 4 Preheat broil element for three minutes Broil with the oven door open to the first stop position about 4 inches 5 After broiling press CANCEL to turn the oven off and rem...

Страница 32: ...replaced Cooktop Never use oven cleaners chlorine bleach ammonia or glass cleaners with ammonia Glass Ceramic Important Call an authorized servicer if the glass ceramic top should crack break or if m...

Страница 33: ...foods as soon as possible with soap and water If the spill is not wiped up it may discolor the porcelain To make cleaning easier remove the oven door if desired See Maintenance section on page 6 Oven...

Отзывы: