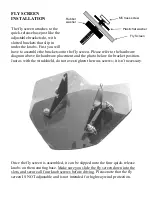
STEP 2:
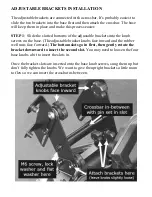
Once both adjustable
brackets are in, put the crossbar
between them at the crossbar hole in
the center of the upright brackets. You
will note that there is a hole with a
slot, and that the crossbar has a pin
sticking out of one end. That pin goes
into one of the slots to keep it from
rotating. It doesn’t matter which side
the pin is on, just set the crossbar at
the middle screw holes with the pin in
one of the slots, then insert the M6
button-head screws with a lock washer and a flat washer and tighten.
Before you install the windshield, make sure all four base knobs are fully
tightened. You will be able to reach these later without removing the shield.
REMOVING THE ADJUSTABLE BRACKETS
The entire adjustable brackets-and-windshield assembly can be removed as one
unit quickly and easily.
STEP 1 - If your windshield is in the full-down position, make sure it is tilted
back about half-way toward the rider. This will give you access to the base knobs
from under the front of the shield, and will give you clearance to rotate the
assembly off of the base.
STEP 2 – Loosen the four base knobs about 3 turns each.
STEP 3 - Grab the crossbar from behind the shield and rotate the entire
assembly slightly forward to first clear the rear base knobs, then up to lift off of
the front base knobs. If you try to just lift straight up it will not come off; it has
been designed to require some forward rotation first.
See the photo on the next page for how to hold this system as you lift it forward
and off the base.


