Hydra LAN User Guide
1.3 Detailed View
1.3.1 Front View
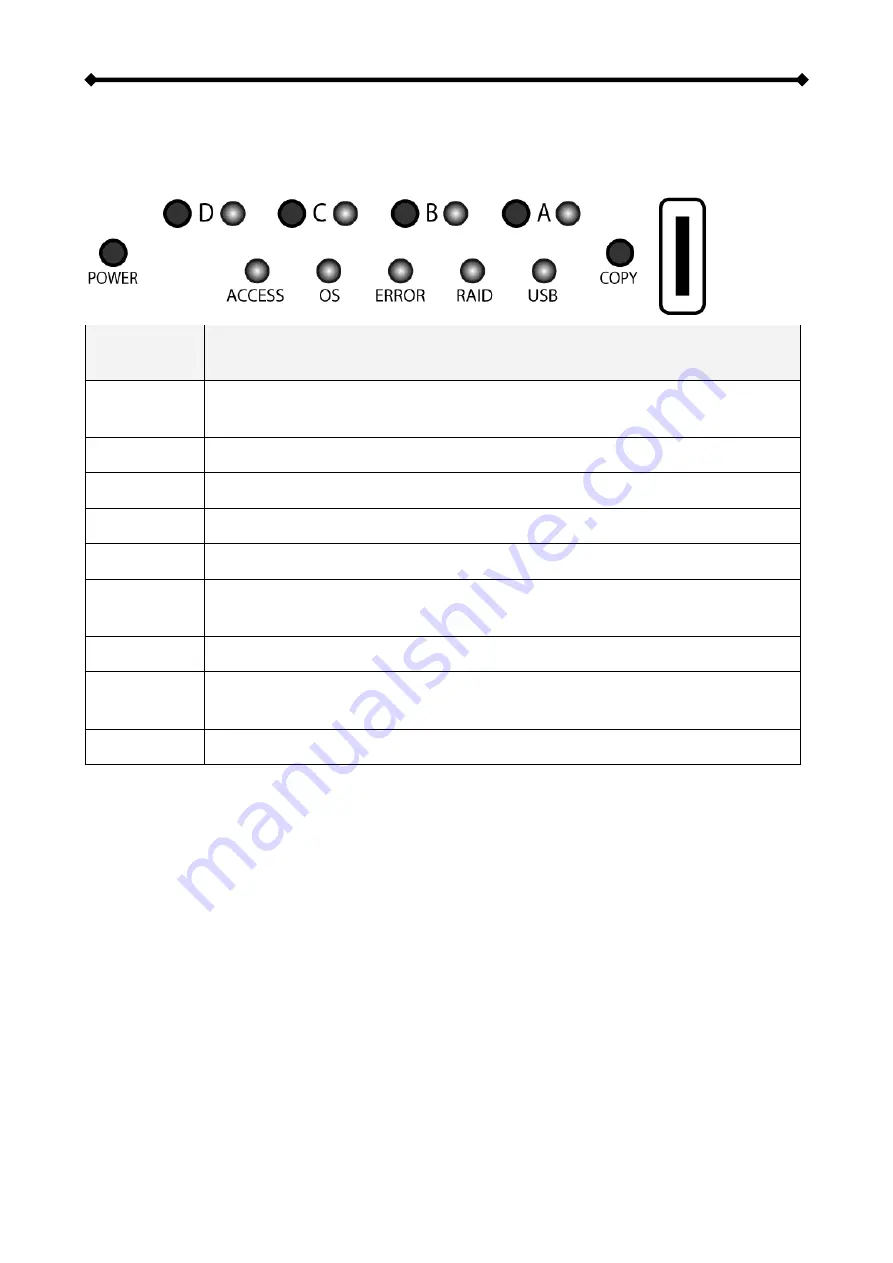
LED indication and buttons as seen beneath the front panel of the Hydra LAN.
LED or
Button
Status or Function
LED
D, C, B, A
•
OFF = Drive status normal
•
Blinking red = Error
Buttons D-A
•
HDD eject button (press to eject drive and rebuild data (RAID 1/5 only)
POWER
•
Power on/off switch (press and hold for 3 seconds to turn off)
COPY
•
USB copy button (press for 4 seconds to copy files from USB drive)
ACCESS
•
Blinking blue = Data access
OS
•
Blinking green = System starting or shutting down
•
Solid green = System ready
ERROR
•
Red = RAID error (one ore more drives have to be replaced)
RAID
•
Solid green = Data on RAID array is accessible
•
Blinking green = Rebuilding RAID array
USB
•
Solid yellow = Copying files from external USB drive
1.3.2 Power ON/OFF Procedure
Connect the power cord to your device and plug it into the wall socket. To turn on the
power, first turn on the power switch for the power supply at the back of your device and
then press the power switch on the front to start up the system. The blue backlight LED will
turn on and the OS LED will blink during the start up. It will take about two minutes for the
device to go online and when the OS LED is a solid green, the system is ready.
To turn off the Hydra LAN, login via browser, stop all current downloads, go to the “Turn Off
Server” section in the “System” area and turn the server off or use the ON/OFF switch on
the front of the device (press and hold ~3 seconds until the OS LED starts blinking). The
OS LED will be blinking rapidly for about 5 seconds and then the system will shut down
about 20 seconds later. If the device is not in use for a longer period of time, we
recommend turning off the power supply with the ON/OFF switch at the back of the device
and removing the power cord from the wall socket.
Note: If you prefer the system to start up again by itself after a power outage, set the A/M
switch at the back of the device to A.
Page 2 / Chapter 1 - Introduction


